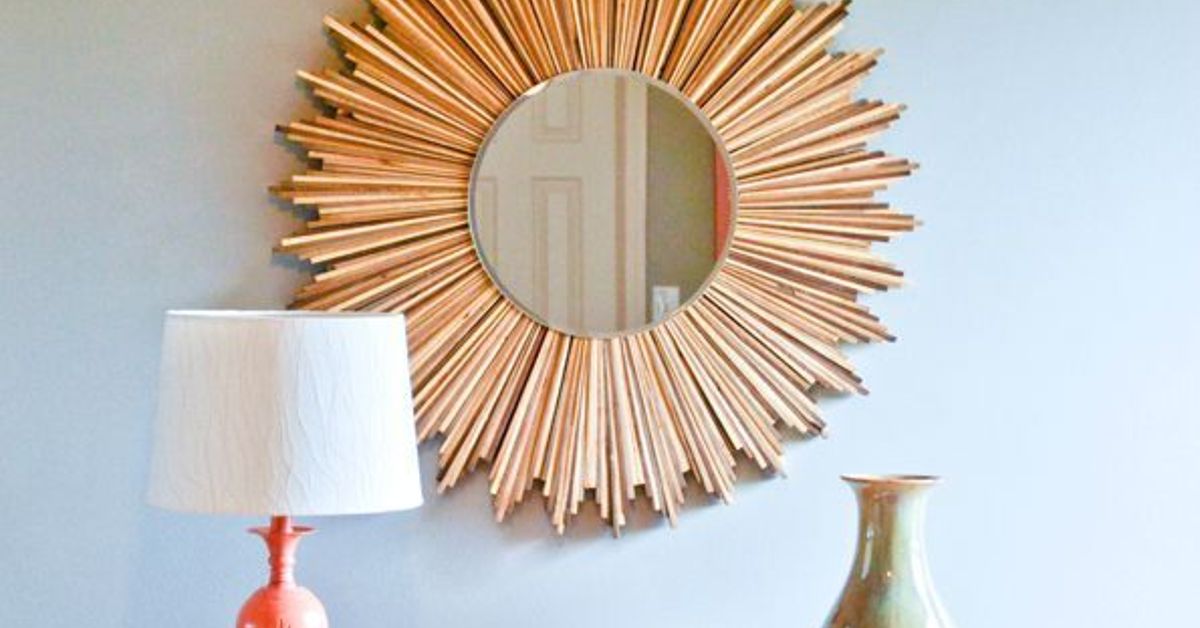
If your wall is begging for something dramatic, but your budget is whispering, “Please be serious,” a DIY stained wood shim starburst mirror might be your perfect compromise. It has that mid-century-meets-handmade charm, it looks far more expensive than it has any right to, and it turns a humble pile of wood shims into décor with main-character energy.
The beauty of this project is that it lives in the sweet spot between affordable and impressive. Wood shims are inexpensive, lightweight, easy to cut or layer, and already tapered, which makes them oddly ideal for creating the radiating shape that gives a starburst mirror its signature look. Add a few warm wood stain tones, a round mirror, a solid backing, and a little patience, and suddenly you’ve made something that looks like it wandered out of a boutique home store with a three-digit price tag.
In this guide, you’ll learn how to make a stained wood shim starburst mirror from scratch, how to avoid the usual DIY headaches, and how to end up with a finished piece that looks intentional instead of “adorably homemade.” We’ll cover supplies, layout ideas, staining tips, assembly steps, hanging advice, and a few lessons that can save you from muttering at your glue gun.
Why a Wood Shim Starburst Mirror Works So Well
A starburst mirror has been a favorite in American interiors for years because it does two jobs at once: it acts like wall art and it reflects light like a mirror should. That means it can make an entryway feel bigger, brighten up a dim corner, or become a focal point above a console table, dresser, or mantel.
Wood shims happen to be a surprisingly smart material for this kind of DIY mirror frame. They’re lightweight, tapered, easy to layer, and affordable enough that you can experiment without feeling like you’ve taken out a small loan in the lumber aisle. Because many shims are kiln-dried softwood, they also take stain nicely when prepped correctly. The catch is that softwoods can stain unevenly, which is why good prep matters so much here.
That’s also why a stained wood shim mirror has a richer look than a painted one. Paint can be gorgeous, but stain lets the grain show through, which gives the finished starburst more warmth, texture, and variation. Instead of looking flat, it looks collected. A little polished. Like you know what “wood tone balance” means at dinner parties.
What You’ll Need
Materials
For a typical DIY stained wood shim starburst mirror, gather the following:
Wood shims, a round mirror, a sturdy backing board such as thin plywood, luan, MDF, or another flat craft board, wood glue or strong construction adhesive for the wood pieces, mirror-safe adhesive if you are gluing the mirror to the backing, wood stain in one or more shades, optional pre-stain wood conditioner, fine-grit sandpaper, painter’s tape, hanging hardware, and a clear topcoat if you want added protection.
Tools
You’ll also want a measuring tape, pencil, scissors or a utility knife for templates, a jigsaw if you need to cut a round backing, clamps or heavy books for pressing pieces while glue cures, clean rags or foam brushes for stain, and a level for hanging.
Nice-to-Have Extras
A tack cloth or shop vacuum helps remove sanding dust before staining. A stud finder makes hanging much easier. Self-drilling anchors or toggle-style anchors are smart backup if a stud doesn’t line up where you want the mirror to live.
Choosing the Right Mirror and Layout
The easiest route is to start with a simple round mirror, often between 12 and 24 inches wide depending on your wall space. Smaller mirrors work well in clustered gallery arrangements or narrow entryways, while larger mirrors hold their own above a console or fireplace.
Before you glue a single shim, decide on the look you want. A tight, symmetrical starburst feels polished and modern. A looser, mixed-length arrangement feels a bit more organic and handmade. Neither is wrong. One just says, “I measured everything twice,” while the other says, “I trust the vibe.”
Many DIYers use one, two, or even three layers of shims to create more depth. A single layer is simpler and lighter. Multiple layers create that fuller, more dramatic sunburst effect that makes people ask where you bought it. Varying the direction slightly or alternating lengths can also make the mirror feel more custom.
How to Prep Wood Shims for a Better Finish
This is the step that separates “wow” from “why does it look blotchy?” Because wood shims are usually softwood, they can absorb stain unevenly. If you’ve ever stained pine and ended up with tiger stripes, you already know the mood.
Start by sorting through your shims. Set aside warped, cracked, or especially rough pieces. Minor variation is fine and even adds character, but badly split pieces can throw off the pattern and make gluing harder.
Next, sand the shims lightly. Focus on rough edges, splinters, and any fuzzy grain. You do not need to sand them into tiny furniture-grade masterpieces; you just want a smooth-enough surface that feels intentional and won’t snag your hand or absorb stain unpredictably. Wipe away the dust thoroughly with a tack cloth or vacuum and a dry rag.
If you’re using an oil-based stain on softwood, a pre-stain wood conditioner is worth considering. It can help reduce streaking and blotching, especially when you want a more even, refined look. If your goal is a deliberately varied finish with rustic character, you can skip it on a few pieces and test the effect first. Always do a small sample before staining the whole batch unless you enjoy chaos as a design strategy.
Best Stain Looks for a Wood Shim Mirror
The magic of a stained wood shim starburst mirror is the way it can lean either modern or rustic depending on your finish. A single dark walnut stain creates a bold, sophisticated look. Honey, golden oak, or provincial tones feel warmer and more relaxed. Mixing two to four stain shades can create a layered, dimensional effect that really shows off the rays of the starburst.
If you want a designer-style result, try grouping tones instead of going fully random. For example, blend a light natural stain, a medium brown, and one deeper accent tone. That creates movement without making the frame look busy. Wipe stain on with a rag, let it penetrate according to the product directions, then wipe off the excess. Light coats are usually easier to control than one dramatic swampy coat.
Let the stained shims dry completely before assembly. Truly completely. Not “probably fine.” Not “close enough.” Glue and damp stain are not an iconic duo.
Step-by-Step: How to Make a DIY Stained Wood Shim Starburst Mirror
Step 1: Create Your Design Layout
Lay your mirror in the center of a large work surface. Arrange shims around it until you find a pattern you like. This dry-fit stage is important because it lets you test spacing, color distribution, and overall diameter before glue enters the chat.
Some people prefer evenly spaced rays all the way around. Others overlap the shims in small bundles for a fuller burst. If you are doing multiple layers, start with the longest or widest visual ring first, then fill in shorter pieces between them.
Step 2: Cut or Prepare the Backing
Your backing board gives the mirror frame structure. It does not need to match the outer shape of the starburst, but it should be large enough to support the inner ends of the shims and the mirror itself. A circular backing often creates the cleanest result, though a hidden polygon or square can work as long as it stays tucked behind the mirror and rays.
Step 3: Glue the Shims in Place
Once your layout is set, begin attaching the shims to the backing. Work in sections so the pattern stays consistent. Wood glue is often enough for shim-to-backing attachment if you allow proper curing time. For more grab, some DIYers use a construction adhesive suitable for wood. Press each shim firmly and keep the inner edges aligned so the mirror will sit neatly on top.
If you’re making a thicker layered design, glue the first layer down, let it set, then add the second layer. This keeps the piece from shifting and saves you from building a starburst puzzle in midair.
Step 4: Attach the Mirror
If the mirror is being glued directly to the backing, use a mirror-safe adhesive. This matters because standard adhesives can damage the reflective backing on some mirrors. Apply the adhesive according to the product directions and place the mirror carefully in the center. Use light, even pressure, then allow the full cure time before moving the piece.
If your mirror already has a frame, lip, or mounting method, adjust the design so the wood shim starburst surrounds it instead of relying only on glue.
Step 5: Finish and Protect
At this point, inspect the piece for stray glue, uneven spacing, or stain touch-ups. If you want a more finished surface, add a clear protective topcoat once the stain is fully dry. This is optional, but helpful if the mirror will live in a high-traffic entryway or a room with humidity changes.
How to Hang the Mirror Safely
Even a lightweight wood shim mirror deserves proper hanging hardware. The safest option is to anchor the hardware into a wall stud whenever possible. If the ideal location doesn’t line up with a stud, use anchors rated for the weight of the finished mirror and appropriate for your wall type.
Before hanging, weigh the completed mirror or estimate the final load based on materials. Do not guess wildly and hope for the best. Choose hardware with a rating above that number, not right at it. Two secure points often keep a wide mirror more stable than one center hanger, especially if the frame is broad and decorative.
Use a painter’s tape trick to mark hanger positions on the back, transfer that spacing to the wall, and level it before drilling. Then step back, adjust if needed, and only then commit. A mirror should make the room sparkle, not stage a surprise dive at 2:13 a.m.
Styling Ideas for a Starburst Mirror
A DIY stained wood shim starburst mirror works beautifully in several spaces. In an entryway, it adds a welcoming focal point while bouncing light around a usually narrow area. Above a dresser, it brings texture without taking up tabletop space. Over a console, it pairs especially well with ceramic lamps, stacked books, and a low vase of branches or greenery.
If you love mid-century modern décor, keep the surrounding accessories simple and let the starburst shape do the talking. If your style leans rustic or collected, layer it with woven baskets, vintage wood tones, and a slightly imperfect finish that looks intentionally handmade.
You can also customize the design for your room. Use darker stain for a moodier, more masculine look. Go light and natural for Scandinavian warmth. Mix stains for contrast. Add metallic paint just at the inner tips if you want a little glam without losing the wood grain.
Common Mistakes to Avoid
Skipping the layout test
If you glue first and design second, you may end up with awkward gaps, uneven rays, or a starburst that looks more “shy sea urchin” than statement piece.
Using the wrong adhesive on the mirror
This is a big one. If you’re bonding a mirror to a backing, use a product made for mirror applications.
Rushing stain dry time
Stain that feels dry on the surface may still be tacky enough to interfere with glue or finish coats. Let it cure.
Ignoring wall support
A beautiful mirror is still a wall-mounted object with gravity-related opinions. Always choose hardware based on real weight and wall conditions.
Overcomplicating the color palette
Too many stain colors can make the design look accidental instead of curated. Two to four tones are usually plenty.
Conclusion
A DIY stained wood shim starburst mirror is one of those rare home projects that delivers serious visual impact without demanding a cabinetmaker’s resume. It’s affordable, customizable, and stylish enough to hold its own against store-bought décor. With the right prep, stain, adhesive, and hanging hardware, you can create a mirror that feels warm, sculptural, and surprisingly high-end.
More importantly, it’s a project with personality. Each shim adds a little variation, each stain tone adds depth, and the final piece reflects both your room and your effort. That’s a pretty satisfying combination for something that started in the hardware aisle next to the door-installation supplies.
Extra Notes From Real DIY Experience
The first time I worked on a wood shim mirror project, I underestimated how much the little decisions would affect the final look. On paper, it seemed easy: buy shims, stain shims, glue shims, admire genius. In reality, the difference between “custom décor moment” and “craft table confusion” came down to slowing down during the prep stage. Sorting the shims alone made a huge difference. The pieces that looked almost identical in the bundle behaved very differently once stain hit them. Some took color evenly, some turned darker at the tips, and a few wanted to be dramatic for no reason at all.
I also learned that stain samples are not optional if you care about the result. What looked like a warm medium brown on the can turned much darker on the actual shim, especially on the thinner ends. After testing a few combinations, I found that using a blend of light and medium tones created a richer starburst than using one dark color on everything. The mixed finish looked more dimensional and gave the mirror that collected, layered style that makes people assume you found it in a cool vintage shop and then casually say, “Oh this? It’s one of a kind.”
Assembly was another lesson in patience. Laying the shims out before gluing felt fussy at first, but once I started moving pieces around, I realized how easy it was for the pattern to drift off-center. One row would look perfect, and the next would suddenly make the whole thing lean visually to one side. Dry-fitting the design let me correct those little issues before any glue locked them in forever. I took a quick phone photo of the layout before attaching anything, and that turned out to be weirdly helpful when I had to rebuild the pattern section by section.
The biggest surprise was how much cleaner the finished project looked when I treated it like real furniture instead of a quick craft. That meant wiping away sanding dust, keeping glue squeeze-out under control, and letting each stage dry properly. It also meant choosing the hanging hardware before the mirror ever went on the wall. Once the piece was finished, it looked far too polished to risk hanging it with random leftovers from a junk drawer. Good anchors, careful measuring, and a level made the installation feel just as finished as the mirror itself.
And honestly, that’s the real joy of a DIY stained wood shim starburst mirror. It starts as a low-cost, slightly quirky idea, but with a little care, it ends up looking thoughtful and stylish. It’s the kind of project that reminds you DIY doesn’t have to mean rough around the edges. Sometimes it just means you got exactly what you wanted, in the exact stain tone you wanted, for a fraction of the price. That’s not just decorating. That’s a minor household victory.