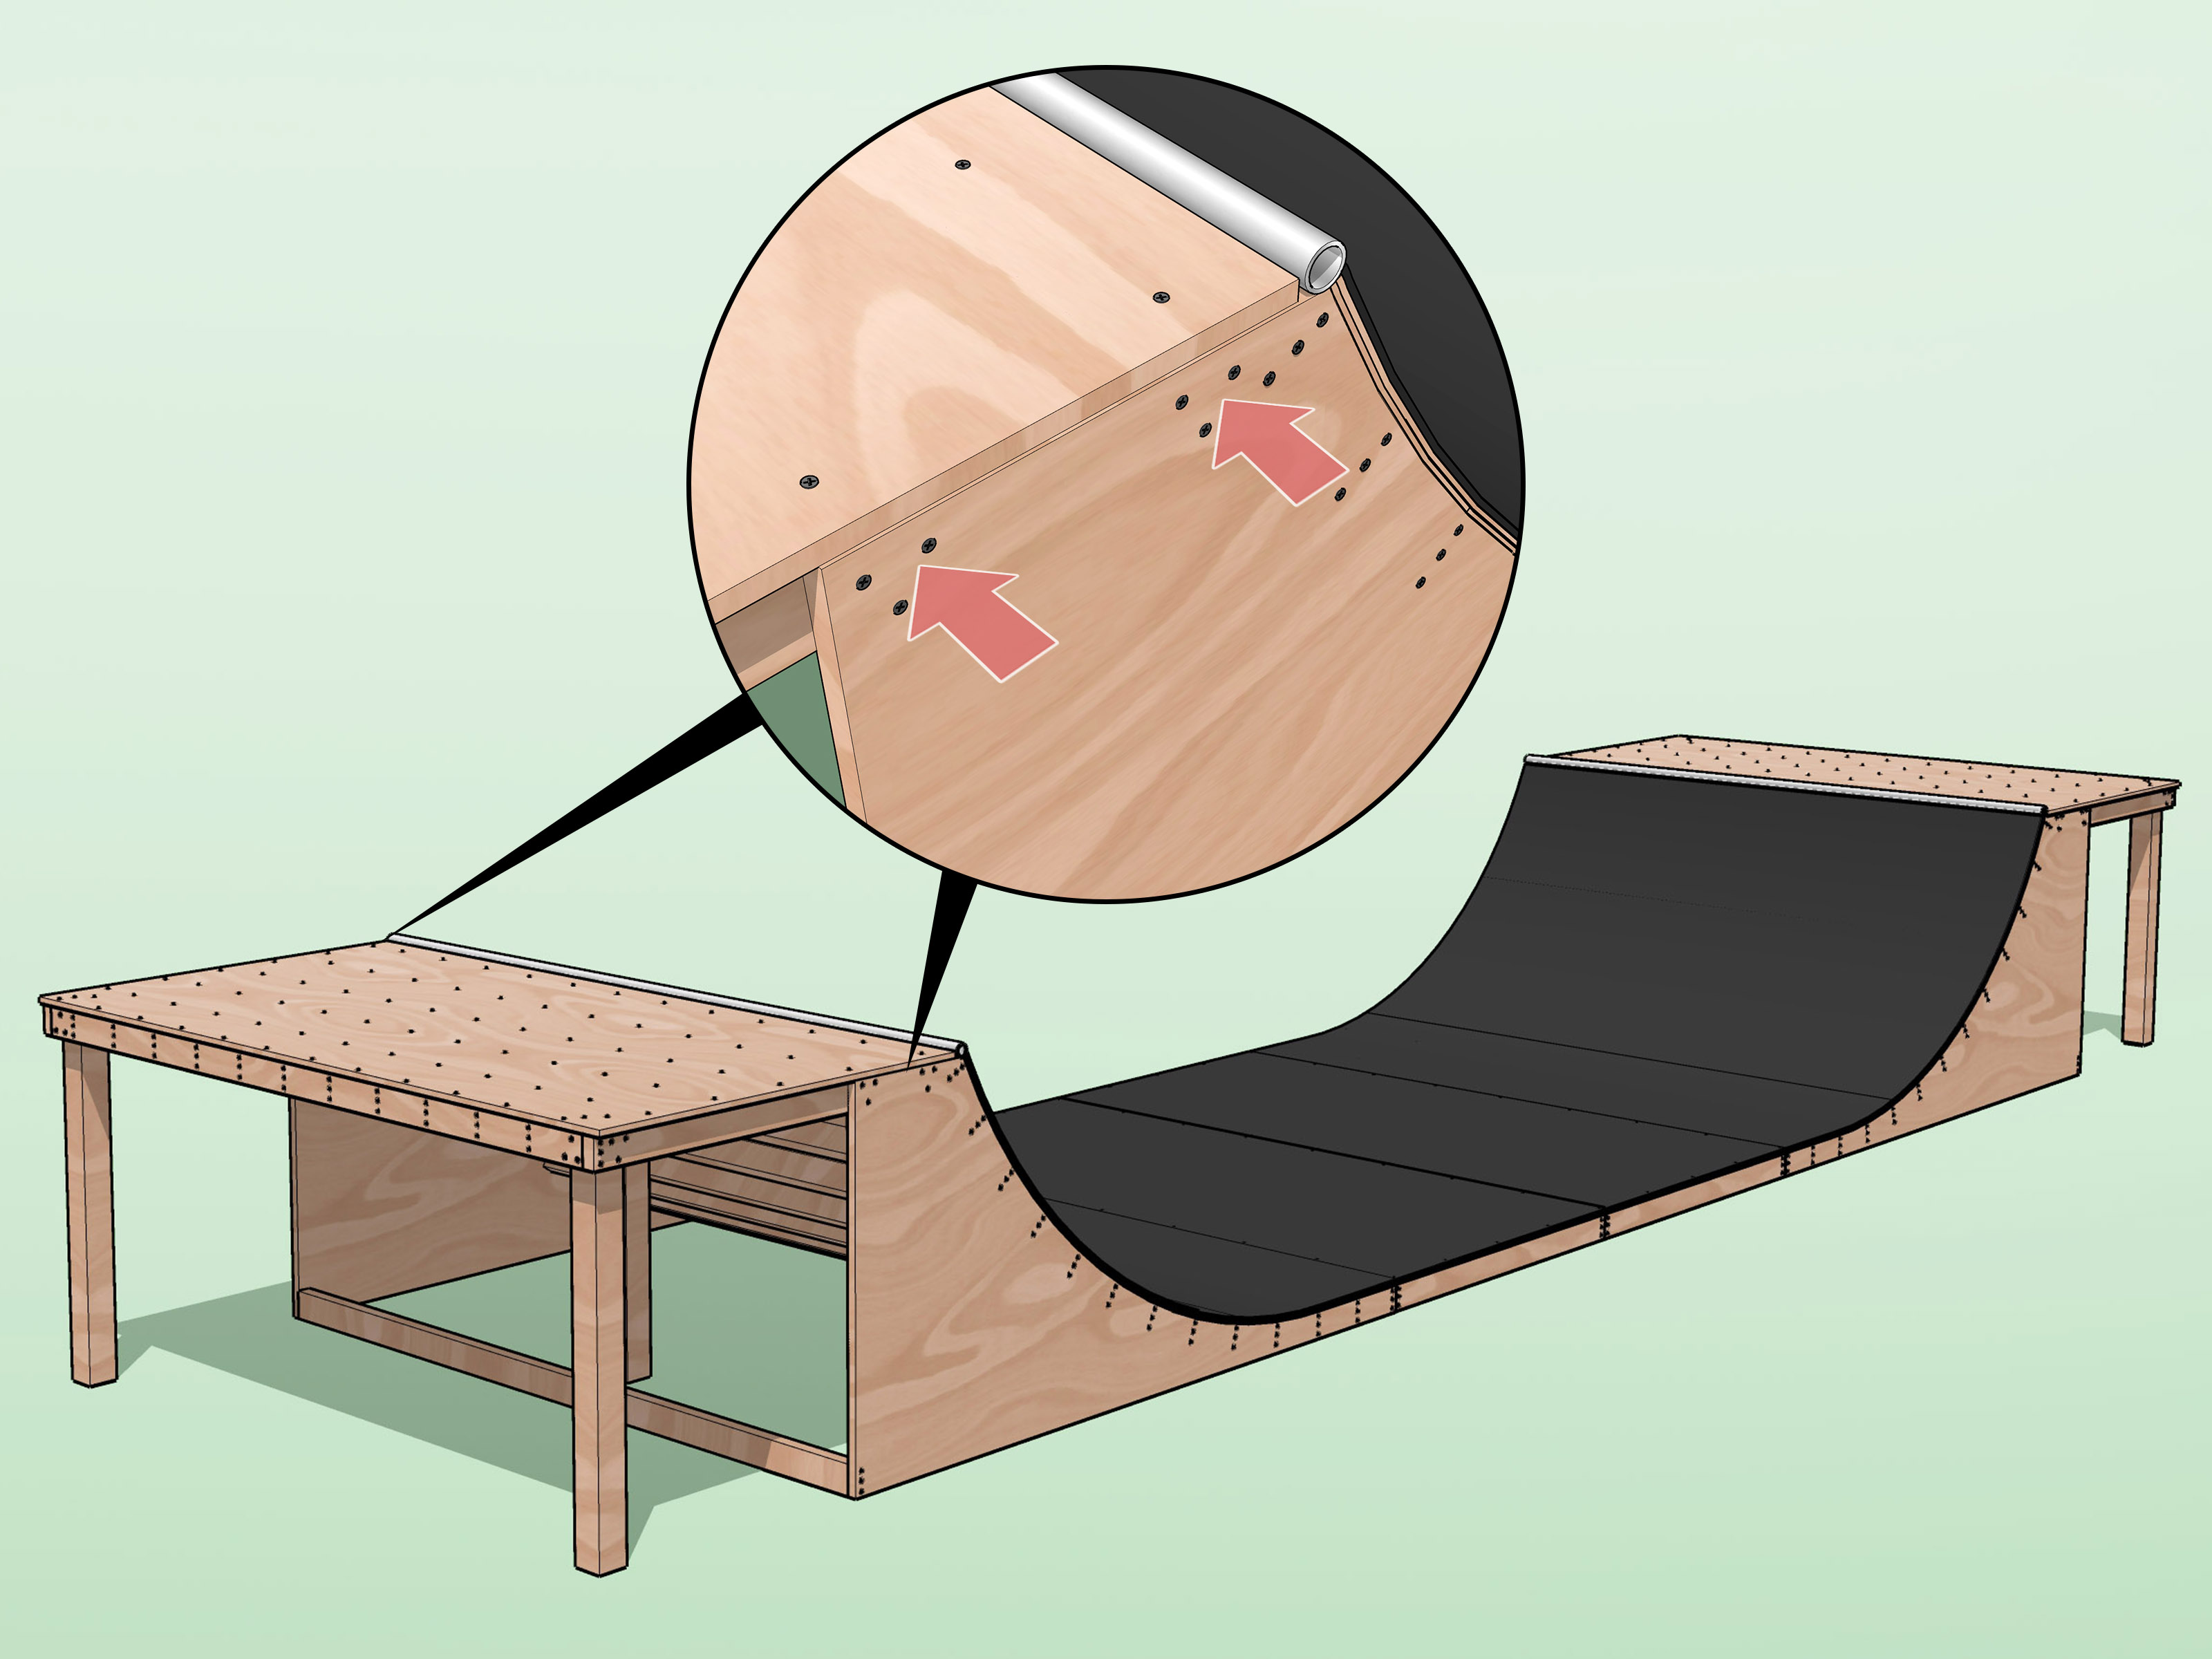
Building a halfpipe or skateboard ramp is one of those projects that sounds wildly ambitious until you break it down into lumber, curves, screws, patience, and one very important rule: do not eyeball the transition unless you enjoy creating a wooden catapult. A good ramp is smooth, sturdy, weather-resistant, and sized for the skaters who will actually use it. A bad ramp is noisy, wobbly, splintery, and possibly responsible for your neighbors learning new vocabulary.
This guide walks you through how to build a halfpipe or ramp for backyard skating, with a focus on a practical mini ramp rather than a massive vert ramp. A full-size vert halfpipe is a serious structural project that deserves professional design. A backyard mini ramp, quarter pipe, or small launch ramp, however, can be built by careful DIYers with basic carpentry skills, proper materials, and a healthy respect for safety.
Before you buy plywood, take a breath. The smartest ramp builders plan first, cut second, and only celebrate after the first smooth roll-in.
What Type of Ramp Should You Build?
The phrase “halfpipe” often gets used for several types of skate ramps, but each design has a different purpose. Choosing the right one will save money, space, and possibly a bruised tailbone.
Mini Ramp
A mini ramp is the most popular backyard halfpipe. It has two curved transitions facing each other, a flat bottom in the middle, and decks at the top. Most home mini ramps are about 2 to 4 feet tall. A 3-foot-tall mini ramp with an 8- to 12-foot width is a friendly size for beginners and intermediate skaters.
Quarter Pipe
A quarter pipe is one curved ramp with a deck and coping at the top. It is a great option if you have less space or want to practice pumping, kickturns, stalls, and basic lip tricks. Two matching quarter pipes can later become a mini ramp if you add a flat bottom between them.
Launch Ramp or Kicker
A launch ramp, also called a kicker, is smaller and easier to build. It is useful for driveway tricks, but it does not offer the same flow as a halfpipe. If this is your first woodworking project, a small kicker is a good warm-up before attempting a mini ramp.
Planning Your Backyard Halfpipe
A ramp is not just a pile of wood. It is a riding surface, outdoor structure, sound machine, neighborhood conversation starter, and long-term maintenance commitment. Good planning is what keeps it fun instead of becoming an expensive backyard sculpture.
Check Local Rules First
Before construction, check local building codes, zoning rules, HOA regulations, setback requirements, and noise ordinances. Some cities allow small backyard ramps without permits, while others regulate height, location, hours of use, or permanent structures. If the ramp is tall, anchored, roofed, or close to a property line, rules may be stricter.
Also consider your neighbors. A well-built ramp is quieter than a rattly one, but skating still makes noise. Placing the ramp away from fences, avoiding early-morning sessions, and using solid construction can prevent drama. Nobody wants their kickturns discussed at a zoning meeting.
Choose the Right Location
Pick a flat, well-drained area with enough clearance on every side. Avoid low spots where water pools. Do not build directly on bare grass or soft soil unless you enjoy watching your ramp slowly become a wooden boat. A gravel base, concrete pad, pavers, or compacted crushed stone gives the structure better support and helps reduce rot.
Make sure there is room to walk around the ramp, inspect it, repair it, and safely fall. Yes, falling gets its own space allowance. That is not pessimism; that is skateboarding.
Recommended Halfpipe Dimensions
For most backyard builders, a beginner-friendly mini ramp is the sweet spot. Here is a common starting design:
- Height: 3 feet
- Width: 8 to 12 feet
- Transition radius: about 6 to 7 feet
- Flat bottom: 6 to 8 feet
- Deck depth: 2 to 4 feet
- Total length: roughly 20 to 24 feet, depending on decks and flat bottom
The transition radius controls how the ramp feels. A tight radius feels steep and snappy. A larger radius feels smoother and more forgiving. For a 3-foot mini ramp, a 6- or 7-foot radius is a comfortable choice for many skaters. For young beginners, mellow is better. You can always get braver later; you cannot easily un-steepen a ramp after it is built.
Tools and Materials You Will Need
Your exact material list depends on size, but the following supplies are common for a backyard mini ramp or quarter pipe.
Tools
- Tape measure
- Carpenter’s square
- Chalk line
- Circular saw
- Jigsaw
- Drill and impact driver
- Countersink bit
- Level
- Clamps
- String, pencil, or a long 2×4 for drawing the transition
- Safety glasses, hearing protection, gloves, and dust mask
Materials
- Pressure-treated 2×4 or 2×6 lumber for framing
- 3/4-inch plywood for side templates and structural panels
- 3/8-inch plywood for curved ramp layers
- Ramp surface material such as Skatelite, Ramp Armor, sealed plywood, or hardboard for indoor/covered use
- Galvanized or coated exterior deck screws
- Steel pipe for coping, commonly around 2 inches in diameter
- Exterior wood sealer, marine-style varnish, or ramp paint
- Construction adhesive, optional but useful for reducing squeaks
- Tarp or ramp cover for weather protection
For outdoor ramps, pressure-treated lumber is usually worth the extra cost. Untreated wood can work indoors or under a roof, but outside it will eventually fight rain, sun, humidity, and insects. Spoiler alert: untreated wood often loses.
Step-by-Step: How to Build a Halfpipe or Mini Ramp
Step 1: Draw the Transition
The transition is the curved side profile of the ramp. This is the most important cut in the whole project. Lay a 3/4-inch plywood sheet flat. Decide your ramp height and radius. For example, a 3-foot-tall ramp with a 6-foot radius is a classic backyard mini ramp setup.
To draw the curve, use a long 2×4, a string compass, or a homemade pivot arm. Mark the pivot point based on your chosen radius, attach a pencil at the correct distance, and swing the pencil across the plywood to create a clean arc. Take your time. This curve determines whether the ramp feels smooth or strange.
Cut the first transition with a jigsaw. Sand the edge lightly, then use that piece as a template for the remaining sides. Matching sides are essential. If one side is slightly different, the ramp may twist, and twisted ramps ride like shopping carts with one bad wheel.
Step 2: Cut and Duplicate the Side Panels
For a halfpipe, you will need multiple side panels for each transition section. A wider ramp requires more support. Use the first clean side profile as a template, trace it onto other plywood sheets, and cut each side carefully. Clamp matching pieces together and sand high spots so they line up.
If you are building a modular ramp, create sections that can be moved or repaired separately. Modular construction makes sense for homeowners who may relocate the ramp, adjust the flat bottom, or rescue the yard from future landscaping ambitions.
Step 3: Frame the Transitions
Set the transition side panels upright and connect them with 2×4 or 2×6 cross supports. Many builders place supports 8 to 12 inches on center, especially under the curved riding surface where impact is highest. Closer spacing creates a stronger, smoother ramp and reduces flex.
Use a square and level as you frame. A ramp that is slightly out of square may still stand, but the riding surface can develop awkward gaps and uneven seams. Screw the framing together with exterior-rated deck screws. Pre-drilling helps prevent splitting, especially near board ends.
Step 4: Build the Flat Bottom
The flat bottom connects the two transitions and gives the skater time to pump, balance, and set up the next wall. For a 3-foot mini ramp, 6 to 8 feet of flat bottom is usually comfortable. Too little flat makes the ramp feel rushed. Too much flat makes it feel slow.
Frame the flat bottom like a small platform, using straight lumber and sturdy cross supports. The top of the flat bottom must align smoothly with the bottom of each transition. Any bump here will be felt every single run. It may look tiny from standing height, but under wheels it can feel like a speed bump built by a villain.
Step 5: Add the Decks
The decks are the standing platforms at the top of each transition. A deck depth of 2 feet is minimal; 3 to 4 feet is more comfortable. If kids, beginners, BMX riders, or multiple skaters will use the ramp, larger decks are safer and less cramped.
Frame each deck securely and brace it well. Add guardrails if the ramp height, local rules, or user needs call for them. Even a 3-foot drop can hurt if someone steps backward while celebrating a trick. Pride goes up; gravity remains undefeated.
Step 6: Install the Coping
Coping is the round metal pipe at the top edge of the transition. It protects the lip of the ramp and allows stalls, grinds, and smoother re-entries. Steel pipe is commonly used because it is durable and slides well.
The coping should sit slightly proud of the riding surface and deck, meaning it sticks out just enough to lock onto for tricks without becoming a dangerous obstacle. Many builders drill holes through the pipe and fasten it into blocking below. Others use brackets or J-hooks. Whatever method you choose, the coping must be secure. Loose coping is not “street style.” It is a repair waiting to become an injury.
Step 7: Lay the First Plywood Layer
Install the first layer of 3/8-inch plywood over the curved transitions. Start at the bottom and work upward, fastening into the framing supports. A chalk line helps you hit the studs instead of randomly decorating the plywood with screws.
Bending plywood over the transition is easier with help. If the plywood resists, do not force it so aggressively that it cracks. Some builders lightly dampen plywood or let it flex gradually before fastening. Use plenty of screws, keep screw heads flush, and avoid gaps between sheets.
Step 8: Add a Second Plywood Layer
A second 3/8-inch plywood layer strengthens the ramp and smooths the curve. Stagger the seams so they do not line up with the first layer. Seam staggering helps prevent weak lines and makes the riding surface feel more continuous.
Use exterior screws long enough to bite into the framing where needed, but not so long that they poke through dangerously. Countersink the heads slightly. A raised screw head can stop a skateboard wheel fast enough to introduce your body to physics in an unfriendly way.
Step 9: Install the Final Riding Surface
The top surface is where budget and weather exposure matter most. Premium ramp surfaces like Skatelite or Ramp Armor are designed for skating, weather resistance, and durability. They cost more upfront but can save maintenance headaches. Sealed plywood is cheaper but requires more upkeep. Masonite or hardboard is smooth and affordable, but it is best for indoor or well-covered ramps because moisture can ruin it quickly.
Pre-drill and countersink top-surface screws. Keep seams tight and smooth. Do not place seams in awkward high-impact areas if you can avoid it. Fasten the surface into framing, not just into the plywood below. Screws that only bite into thin layers can back out over time.
Step 10: Seal, Paint, and Weatherproof
Outdoor ramps need protection. Seal exposed plywood edges, screw holes, and deck boards. Apply a ramp-specific coating, exterior paint, or marine-style varnish according to the product instructions. Pay special attention to end grain, seams, and spots where water can sit.
Cover the ramp when not in use, but avoid trapping moisture under a tarp for long periods. Good airflow matters. After rain, remove standing water and let the surface dry before skating. A wet ramp is slippery, and a slippery ramp is basically a comedy sketch until someone gets hurt.
How to Build a Simple Quarter Pipe
If a full mini ramp feels too large, build a quarter pipe first. The process is similar but simpler: draw one transition, cut matching sides, frame the curve, add a deck, install coping, lay plywood layers, and finish with a smooth surface. A 2- to 3-foot quarter pipe with a mellow radius is a useful backyard feature and a great learning project.
A quarter pipe also lets you test materials and construction techniques before committing to a halfpipe. You will learn how plywood bends, how coping fits, how the ramp sounds, and how much maintenance your climate demands.
Common Ramp-Building Mistakes to Avoid
Using Too Little Support
Weak framing leads to flex, noise, loose screws, and a shorter ramp life. Closer joist spacing costs more in lumber but makes the ramp feel solid.
Choosing the Wrong Surface for Weather
Hardboard may feel great at first, but in wet climates it can swell, bubble, or fall apart. Outdoor ramps need weather-resistant materials and regular sealing.
Skipping Drainage
Water is the enemy. Build on a dry base, keep the ramp slightly elevated, and prevent puddles beneath the frame.
Leaving Screw Heads High
Every screw head should be flush or slightly countersunk. Inspect the ramp often because screws can rise as wood expands and contracts.
Making the Ramp Too Steep
A mellow ramp gets used. An intimidating ramp becomes expensive yard art. Build for the skater’s current ability, not their future fantasy highlight reel.
Safety Tips Before the First Session
Before anyone drops in, inspect the entire ramp. Check for loose boards, sharp edges, raised screws, unstable decks, slippery spots, and coping movement. Push on the structure from different angles. If it wobbles, fix it before skating.
Skaters should wear a helmet, knee pads, elbow pads, wrist guards, and flat-soled skate shoes. Beginners should learn to pump, kickturn, stop, and fall safely before trying tricks. Keep the first session low-pressure. The ramp does not need to be conquered on day one. It will still be there tomorrow, silently judging your impatience.
Maintenance: How to Keep Your Ramp Rolling
A halfpipe is not a “build it and forget it” project. Inspect it weekly during heavy use and after storms. Tighten loose screws. Replace damaged panels. Reseal exposed wood. Sweep dirt and leaves off the surface. Keep the area under and around the ramp clear so air can circulate.
In winter or long wet seasons, consider covering the ramp or removing top-surface panels if your design allows it. The longer water sits, the faster materials break down. Sun can also dry and warp wood, so maintenance is not only a rainy-state problem. Arizona and Florida may disagree on weather, but both can bully a backyard ramp.
Cost Expectations
The cost to build a halfpipe or ramp varies widely based on size, lumber prices, surface material, and whether you already own tools. A small quarter pipe may cost a few hundred dollars. A backyard mini ramp can range from several hundred dollars to several thousand, especially if you use premium ramp surfacing.
Do not save money by buying weak screws, thin framing, or poor surface materials. Save money by building a sensible size, shopping carefully, borrowing tools, and designing the ramp so parts can be replaced. Cheap construction usually becomes expensive repair.
Real-World Experience: Lessons From Building and Using a Backyard Ramp
The biggest surprise in building a halfpipe or ramp is how much the small details matter. On paper, a mini ramp looks like a simple wooden U-shape. In real life, every eighth of an inch seems to have an opinion. A slightly uneven seam can be felt under wheels. A screw head that looked flush at noon can rise after a week of rain and sun. A deck that seemed wide enough during construction suddenly feels tiny when two people are standing on it with boards in hand.
One useful experience is to build the ramp in stages instead of rushing through a weekend marathon. Cutting the transitions on day one, framing on day two, surfacing on day three, and sealing afterward gives you time to catch mistakes. When builders rush, they often skip checking square, forget to stagger seams, or place screws where wheels repeatedly hit. A ramp rewards patience. It punishes “good enough” with rattles.
Another practical lesson is that the first ride is not the true test. The real test comes after two weeks of skating, a heavy rain, and a few hot afternoons. That is when wood movement, drainage problems, and loose hardware start introducing themselves. Keep a drill, extra screws, sandpaper, and sealer nearby during the first month. Maintenance is not failure. It is part of owning a wooden ramp.
Surface choice also matters more than many beginners expect. A budget plywood surface can work, especially for a covered ramp, but it needs sealing and care. A premium ramp surface feels faster, smoother, and more durable outdoors. The trade-off is cost. If the ramp will be used often, exposed to weather, or shared by several skaters, investing in a better top layer can be worth it. If the ramp is a first experiment for younger kids, a smaller build with replaceable plywood may be more realistic.
Noise is another real-world issue. A hollow, loosely framed ramp can sound like a drum kit falling down stairs. Solid framing, tight screws, construction adhesive between layers, and good support under the flat bottom help reduce noise. Placement helps too. A ramp near a fence or wall can bounce sound toward neighbors. Moving it even a few feet or adding landscaping can make sessions less annoying for everyone nearby.
Finally, the best backyard ramps are built for progression, not intimidation. A 3-foot mini ramp with a mellow transition may not impress someone scrolling extreme sports clips, but it will get skated constantly. Kids can learn balance. Adults can regain confidence. Friends can practice without driving to a skatepark. The ramp becomes part of daily life: sweep it, skate it, tweak it, seal it, repeat. That is the real win. A good ramp does not need to be huge. It needs to be smooth, strong, safe, and inviting enough that people actually use it.
Conclusion
Learning how to build a halfpipe or ramp starts with smart planning and ends with consistent maintenance. Choose a realistic design, check local rules, build on a dry and level base, use strong framing, draw a smooth transition, install secure coping, and protect every surface from weather. A backyard mini ramp can deliver years of skating if it is built carefully and inspected often.
The goal is not to create the scariest ramp on the block. The goal is to build something smooth, durable, and fun enough that everyone wants one more run. That is the magic of a good ramp: it turns plywood and pipe into progress, laughter, and the occasional dramatic fall that everyone pretends not to replay in their head.
Note: This guide is for general educational purposes. Always check local building codes, HOA rules, property setbacks, and safety requirements before construction. For large ramps, elevated decks, public use, or heavy BMX use, consult a qualified builder or structural professional.