A DIY barn door can solve a surprisingly modern problem: how do you close off a room without donating several square feet to a swinging door? Mounted on an exposed rolling track, a barn-style door slides across the wall instead of opening into the room. That makes it especially useful for pantries, closets, laundry areas, offices, hallways, and other spaces where every inch seems to have already filed for permanent residency.
Better yet, today’s barn doors have escaped the farmhouse. Yes, reclaimed planks and black iron hardware still look fantastic, but contemporary slab doors, glass panels, painted Shaker designs, mirrored doors, and nearly invisible track systems can feel equally at home in modern interiors. Current installation guidance from major U.S. home-improvement sources consistently emphasizes three fundamentals: properly sized doors, structural support for the track, and hardware designed for the door’s thickness and weight.
Before You Build: Make the Barn Door Work, Not Just Look Good
Start by measuring the opening, surrounding trim, and available wall space. A sliding barn door generally needs to overlap the opening rather than fit inside it. Depending on the trim and hardware system, roughly 1 to 2 inches of coverage on the sides can help reduce visible gaps. You also need enough clear wall beside the doorway for the panel to slide completely out of the opening.
Next, inspect the wall. Barn doors can be heavy, and drywall alone is not an acceptable support system for a loaded track. Many installations use a solid wood mounting or header board secured into wall studs, while some hardware can mount directly to adequately positioned structural framing. Follow the specific hardware manufacturer’s fastening instructions rather than improvising with whichever screws happen to be closest to your drill.
Finally, think about clearance. Light switches, thermostats, outlets, artwork, baseboard details, vents, and even thick door casing can interfere with the sliding path. A floor or wall-mounted guide is also important because it keeps the bottom of the door aligned instead of allowing the panel to swing outward. Track stops and anti-jump components provide additional control.
25 DIY Barn Door Design Ideas
1. Classic Z-Brace Barn Door
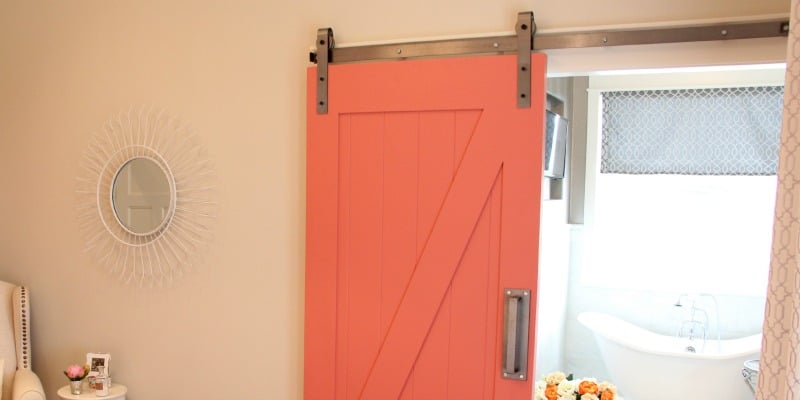
The Z-brace is the barn door everyone recognizes from across the room. Build the main panel with vertical boards, add horizontal rails at the top and bottom, and connect them with a diagonal brace. Stain it medium brown for traditional farmhouse character or paint everything white for a cleaner interpretation.
2. Double-X Barn Door
Give a wide door more visual muscle with two diagonal braces forming an X. The geometry looks especially good on oversized pantry entrances, bonus rooms, and workshops. Keep the boards chunky for rustic style or use narrow trim for a lighter contemporary version.
3. Chevron Plank Door
Chevron boards turn an ordinary rectangular door into wall art. Cut matching diagonal pieces and work outward from a centerline so the pattern remains symmetrical. Light natural lumber paired with matte-black rolling hardware delivers a crisp modern-farmhouse look without requiring decorative accessories.
4. Herringbone Barn Door
Want more movement than a chevron? Try herringbone. The staggered layout adds texture and works beautifully when applied as a decorative face over a stable plywood core. This method also reduces the need to build the entire structural panel from dozens of individually joined boards.
5. Simple Vertical-Plank Door
Sometimes the least complicated project ages the best. Join or attach vertical boards to a stable backing, keep ornamentation minimal, and let the grain provide the decoration. This design pairs naturally with exposed strap hangers and traditional rolling barn door hardware.
6. Horizontal-Plank Modern Door
Rotate the visual direction and install horizontal boards instead. The long lines can make a narrow panel appear wider and give the door a contemporary architectural rhythm. Apartment Therapy has featured similar horizontal treatments as an effective way to make sliding doors feel integrated with modern rooms.
7. Shaker-Style Sliding Door
A broad frame surrounding one or more recessed-looking panels creates a barn door that feels more tailored than rustic. Paint it white, cream, charcoal, or muted blue and pair it with understated hardware. It works particularly well in transitional homes where distressed lumber would feel like a cowboy wandered into the wrong movie.
8. Minimalist Flat-Slab Barn Door
Use smooth plywood, MDF suitable for the application, or a purpose-built slab to create a completely flat face. Add a long vertical pull and streamlined rollers. With a monochromatic finish, the result feels closer to custom European millwork than a livestock accessory.
9. Reclaimed-Wood Barn Door
Salvaged lumber supplies dents, nail marks, faded color, and authentic texture that would take years to fake naturally. Carefully inspect reclaimed material for excessive twisting, loose fasteners, contamination, or damage before incorporating it into an interior door. Repurposing older doors and materials can also introduce one-of-a-kind character.
10. Whitewashed Farmhouse Door
A diluted white finish softens strong wood grain without hiding it completely. It is an easy match for coastal farmhouse, cottage, and casual interiors. Pair the pale surface with dark hardware for contrast or brushed metal hardware for a quieter appearance.
11. Matte-Black Statement Door
A black door creates instant contrast against white or warm neutral walls. Add simple trim instead of elaborate bracing and the design becomes surprisingly sophisticated. Black hardware can disappear into the door, allowing the entire installation to read as one strong graphic element.
12. Bold Painted Barn Door
Deep green, navy, burgundy, ochre, and muted terracotta can transform a sliding door into a focal point. This is especially useful in otherwise neutral rooms. HGTV and other design sources showcase painted barn doors in styles extending well beyond the traditional brown farmhouse palette.
13. Two-Tone Barn Door
Paint the frame one color and leave the center panel natural, or reverse the combination. Two-tone treatment emphasizes the construction and lets you connect the door to existing cabinetry, flooring, furniture, or trim without trying to match every finish exactly.
14. Chalkboard Pantry Barn Door
Coat all or part of a smooth pantry door with chalkboard paint. Suddenly the door becomes a grocery list, dinner menu, reminder board, and place for your family’s questionable artistic masterpieces. It is functional decoration that earns its wall space twice.
15. Frosted-Glass Sliding Door
A wood or metal frame surrounding frosted glass lets light travel between spaces while obscuring direct views. Consider it for a home office, pantry, dressing area, or laundry room. Make sure the glass and frame are designed specifically for door use and compatible with your chosen hardware.
16. Clear-Glass Industrial Barn Door
Divide a home office from a living space without visually shrinking either room. A black-framed glazed panel gives the familiar sliding mechanism an industrial loft personality. The tradeoff is obvious: clear glass provides division, not visual privacy.
17. Mirrored Closet Barn Door
A securely constructed mirrored panel is particularly useful in bedrooms and dressing rooms. It hides the closet while doubling as a full-length mirror. Because glass adds weight, hardware capacity becomes especially important; never assume a lightweight interior-door kit can support a heavy mirrored assembly.
18. Cane or Rattan Accent Door
Use woven cane as an inset decorative panel within a structurally sound wooden frame. The texture works beautifully in coastal, bohemian, and warm contemporary interiors. Keep in mind that open-weave material is decorative rather than acoustic or privacy-focused.
19. Corrugated-Metal Accent Door
Frame lightweight corrugated metal with stained lumber for a workshop-inspired look. The contrast between warm wood and cool metal adds texture without requiring complicated joinery. This style is particularly convincing in garages, mudrooms, basements, and industrial-themed spaces.
20. Plywood Scandinavian-Style Door
Furniture-grade plywood with neatly finished edges can become a surprisingly elegant door. Use a clear protective finish, minimalist hardware, and a restrained handle. Rather than disguising plywood, treat its layered edges and continuous grain as deliberate design details.
21. Converted Vintage Door
An old paneled or architectural door can often be adapted to sliding hardware when its size, condition, construction, and hardware requirements are appropriate. The result preserves character while eliminating the swing radius of the original hinged installation. Vintage and salvaged pantry doors are frequently used this way in design projects.
22. Double Barn Doors
For a broad opening, mount two panels that meet in the middle. The symmetry creates architectural drama and reduces the amount of uninterrupted wall required on either side compared with sliding one enormous panel in a single direction.
23. Bypass Barn Doors
When there is insufficient wall space for multiple doors to spread out side by side, consider bypass hardware that allows panels to slide past each other on offset tracks. This approach works well for wide closets and storage walls. Specialized bypass guides help keep the panels aligned.
24. Mini Barn Doors for Cabinets
Shrink the concept and use sliding panels on a media console, kitchen island, bathroom cabinet, or storage unit. This is a low-risk project for practicing track alignment before attempting a full-size door. Mini barn-door hardware and guides require the same attention to smooth movement and periodic tightening.
25. Sliding Barn Door Room Divider
An oversized sliding panel can temporarily divide a gym, office, playroom, dining room, or multipurpose living area without permanently closing the floor plan. HGTV design examples demonstrate how large barn doors can function as architectural room dividers as well as decorative focal points.
10 Rolling Barn Door Hardware Ideas
26. Traditional Black Strap Hangers
Long steel straps extending down the face of the door are the classic choice. They emphasize height and look right at home with Z-brace, X-brace, reclaimed, and plank designs. Keep the bolt spacing symmetrical because exposed hardware is part engineering, part decoration.
27. Top-Mount Rollers
Top-mount hangers attach primarily to the upper edge rather than running far down the face. They reveal more of the door design and are useful when you want the rollers to feel less visually dominant. Confirm that the door construction provides sufficient material for the required fasteners.
28. Stainless-Steel Rolling Hardware
Replace farmhouse black with brushed stainless components for a cleaner contemporary look. Stainless finishes pair particularly well with glass, light wood, gray paint, and minimalist interiors. Select a system based on its engineering specifications, not simply because the rollers photograph nicely.
29. Soft-Close Barn Door Hardware
A compatible soft-close mechanism can catch the door near the end of travel and bring it to a more controlled stop. It is a worthwhile upgrade for frequently used doors, especially when enthusiastic household members believe every sliding door should be launched like an Olympic curling stone.
30. Hidden or Low-Profile Track Hardware
Not every sliding door needs an exposed industrial rail. Concealed and low-profile systems let the door become the star while the mechanism recedes visually. Architectural Digest has highlighted hidden-track concepts as a way to bring sliding functionality into calmer contemporary interiors.
31. Decorative Wheel Rollers
Standard round rollers are only the beginning. Depending on the manufacturer, wheel and hanger shapes range from minimalist circles to spoke-inspired and industrial designs. Choose decorative hardware after confirming door thickness, track compatibility, mounting requirements, and rated load.
32. Matching Track and Handle Set
Create a more polished result by coordinating the track, hangers, fasteners, and pull. Matte black is easy to match, but bronze, brass-toned, and brushed metal finishes can be equally effective. Consistency makes even an inexpensive DIY door appear intentional.
33. Recessed Finger Pull on the Back
A large handle on the room-facing side is easy. The wall-facing side is trickier because a protruding knob may strike the wall or prevent the door from opening completely. A recessed finger pull keeps the back surface relatively flush while giving you something to grab.
34. Adjustable Floor Guide
Do not treat the floor guide as an optional leftover part. It controls lateral movement at the bottom of the panel and helps the door travel predictably. Depending on the system, guides can engage a routed groove, straddle the door, or mount beside it.
35. Heavy-Duty Commercial-Style Track
For an unusually large or heavy custom door, investigate commercial-grade wall-mounted sliding hardware instead of automatically buying a decorative residential kit. Some professional systems support hundreds of pounds per panel, but capacities and compatible door thicknesses vary substantially by product.
Where DIY Barn Doors Work Best
Pantries are natural candidates because a swinging door can interfere with kitchen traffic. Laundry closets and utility rooms also benefit when the surrounding floor area is tight. In bedrooms, barn doors can cover closets without occupying the furniture-placement zone that conventional doors require. Sliding systems have repeatedly been recommended as space-efficient solutions for tight areas, provided adequate wall clearance exists.
Bathrooms require more thought. A surface-mounted barn door normally sits in front of the opening instead of sealing against a jamb like a conventional hinged door. Gaps can reduce both visual and acoustic privacy, and some installations lack straightforward locking hardware. For a guest bathroom directly beside a living or dining area, practicality may matter more than collecting compliments about your rollers.
Installation Details That Separate a Great Door From an Annoying One
The track must be level. Even a beautiful door becomes frustrating if gravity makes it roll open or closed by itself. Predrill where instructed, use the specified structural fasteners, install spacers correctly, and make sure the rollers and stops are positioned according to the hardware manual. This Old House and Fine Homebuilding both emphasize careful track positioning, structural attachment, roller alignment, and appropriate floor clearance.
Also check the door’s finished thickness before ordering hardware. Track systems have specific ranges for panel thickness and weight. Door guides can require grooves or particular bottom-edge configurations, and some kits have surprisingly narrow compatibility limits. Measure first; discovering that your handcrafted masterpiece is 1/4 inch too thick after the stain dries is the DIY equivalent of receiving a parking ticket at your own wedding.
of Practical Barn Door Experience: Lessons Worth Learning Before You Drill
The biggest lesson from building and installing sliding doors is that the glamorous part is the door, but the successful part is the planning. People naturally obsess over stain color, brace patterns, antique handles, and whether the roller wheels look sufficiently rugged. Yet most barn door problems begin several steps earlier, with a measurement or structural assumption that nobody double-checked.
One of the smartest habits is to mock up the finished door with painter’s tape before buying lumber. Mark the full width and height on the wall. Then mark where the panel will sit when closed and where its far edge will end when fully open. Immediately, you can see whether the door will cover the casing, collide with a thermostat, block an outlet, hit a light switch, or slide directly behind a bookcase you had forgotten was technically furniture.
Next comes weight. A solid-looking door does not need to be unnecessarily massive. Decorative planks can sometimes be applied over a stable engineered core, producing the visual depth of traditional construction without creating a wooden battleship. Whatever construction method you choose, estimate the finished weight including trim, glass, mirrors, metal accents, and handles, then select hardware with an appropriate rated capacity. Commercial hardware illustrates just how specifically sliding systems are engineered around panel weight and thickness.
Finishing before installation is another practical win. Sand and finish the front, back, and edges rather than coating only the visible face. Wood responds to humidity, and balanced finishing helps protect the material. For doors used near moisture, choose materials and finishes appropriate for that environment. Bathroom and laundry applications deserve particular attention because humidity can be harder on wood and hardware.
During installation, resist the temptation to use the track as your level reference merely because it looks straight. Use an actual level. Install the header or mounting board carefully, locate structural framing, and confirm every fastener position before drilling. A tiny error at one end of a long track can become surprisingly obvious once a large rectangular panel begins rolling along it.
Do not skip the floor guide. A door hanging only from top rollers can swing toward and away from the wall when pushed, bumped, or operated quickly. The guide keeps the bottom controlled and makes the entire installation feel substantially more solid. Stops are equally important because they define the safe limits of travel and prevent rollers from simply continuing beyond where they belong.
Handle placement deserves a dry run too. Temporarily tape the handle where you think it should go and operate the door several times. Make sure your fingers remain clear of trim and that the handle does not strike adjacent objects. On the reverse side, a flush or recessed pull is often more practical because there may be very little space between the door and wall.
Finally, test the finished installation gently before treating the door like a theme-park attraction. Roll it slowly through its entire path. Look for binding, rubbing, unwanted gaps, loose fasteners, contact with baseboards, and uneven floor-guide engagement. Recheck hardware after the door has been used for a while and periodically inspect fasteners, rollers, guides, and stops. Sliding cabinet-door guidance similarly recommends checking hardware and tightening loose components as part of routine maintenance.
The best DIY barn doors are not necessarily the most expensive, rustic, or complicated. They are the ones that fit the opening properly, roll smoothly, stop safely, complement the room, and continue doing all four after the novelty wears off. Build the mechanism as thoughtfully as the decorative panel, and your barn door will feel like an architectural upgrade rather than an oversized piece of wall decor with wheels.
Conclusion
DIY barn doors offer an unusual combination of woodworking project, decorating opportunity, and practical space management. From reclaimed Z-brace doors to smooth Scandinavian-style plywood panels, mirrored closet doors, glass office dividers, double doors, bypass systems, and hidden tracks, there is no requirement that a barn door actually look as though it recently left a barn.
Choose the design around the room, but choose the rolling door hardware around engineering realities: panel dimensions, finished weight, door thickness, structural wall support, clearances, guides, stops, and manufacturer specifications. Get those fundamentals right and even a relatively simple DIY door can become one of the most memorableand usefulfeatures in the house.
Note: Hardware dimensions, track positioning, fastener requirements, clearances, door thickness limits, and weight capacities vary by manufacturer. Always follow the instructions supplied with your specific sliding-door hardware and verify that the wall structure can safely support the complete installation. This article synthesizes practical and design guidance from U.S. resources including The Home Depot, Lowe’s, This Old House, Family Handyman, HGTV, Bob Vila, Better Homes & Gardens, Popular Mechanics, Johnson Hardware, Fine Homebuilding, Architectural Digest, and Apartment Therapy.