Note: This original article is written for web publishing and synthesized from real U.S. DIY, home decor, craft, budget decorating, wreath-making, and patriotic decorating guidance. Source links are not included, as requested.
A Budget-Friendly Patriotic Wreath That Looks Like You Tried Very Hard
A red white and blue patriotic wreath has a magical way of making a front door look instantly ready for summer. It says, “Welcome, neighbors!” It says, “Yes, we remembered the holiday!” It also says, “Please admire this door before noticing the weeds near the porch.” The best part? You do not need a designer budget, a craft room the size of a garage, or a mysterious drawer full of expensive ribbon to make one.
This project is built around one simple promise: a patriotic wreath for under $5. That means smart materials, a little recycling, and a willingness to look at basic dollar-store supplies like they are high-end decor waiting for their big break. With a wire hanger, cardboard circle, pool noodle scrap, or a cheap wreath form, plus red, white, and blue accents, you can create a Fourth of July wreath that feels cheerful, handmade, and proudly American without making your wallet quietly pack a suitcase.
This red white and blue wreath works for Memorial Day, Flag Day, Independence Day, Veterans Day, Labor Day weekend, summer cookouts, parade parties, and any Tuesday when your front door looks bored. It is simple enough for beginners, flexible enough for creative crafters, and forgiving enough for people who measure ribbon with their heart instead of a ruler.
Why Make a Patriotic Wreath Yourself?
Store-bought patriotic wreaths can be beautiful, but many cost far more than $5. Once you add shipping, oversized bows, faux florals, glittery stars, and that one “premium farmhouse Americana” label, the price can jump faster than a sparkler on the Fourth of July. A DIY patriotic wreath gives you control over the look, size, materials, and budget.
Making your own wreath also lets you match your home’s style. Want rustic farmhouse? Use burlap, twine, and muted navy. Prefer bold party energy? Add shiny tinsel garland and big paper stars. Love classic Americana? Keep the design clean with stripes, a blue section, and white star accents. This project can be cute, elegant, playful, vintage, or “my kids helped and now it has personality.” All are valid.
Supplies for a Red White and Blue Patriotic Wreath Under $5
The exact price depends on local store pricing, sales, tax, and what you already have at home. To keep the project under $5, reuse at least one base item and buy only the decorations you truly need. Here is a practical budget supply list:
Basic Supply List
- 1 wire hanger, cardboard ring, foam plate ring, or recycled wreath base: free
- 1 red, white, and blue patriotic tinsel garland or star garland: about $1.25–$1.50
- 1 roll red crepe paper, ribbon, or fabric strip: about $1.25–$1.50
- 1 roll blue crepe paper, ribbon, or fabric strip: about $1.25–$1.50
- White paper, tissue paper, coffee filters, napkins, or scrap fabric: free to about $1
- Tape, twist ties, floral wire, string, or hot glue: use what you already have
- Scissors and a pencil: already in the house, hopefully not hiding forever
If you already own glue, scissors, and some scrap paper, your total can land comfortably below $5 before tax. The real secret is choosing one “wow” item, such as shiny patriotic garland, and letting it do most of the visual heavy lifting. Basically, the garland becomes the drama queen of the wreath, and we support its journey.
Best Cheap Bases for a DIY Patriotic Wreath
A wreath base does not have to be fancy. It only needs to be round-ish, sturdy enough to hold decorations, and light enough to hang on a door. If it resembles a circle after a little convincing, it is a candidate.
Option 1: Wire Hanger Wreath Base
A wire hanger is one of the cheapest wreath bases because it is often free. Bend the hanger into a circle and keep the hook at the top for easy hanging. It will not look perfect at first. That is fine. Once the garland, ribbon, and paper stars go on, no one will know the base started life in a closet holding a lonely jacket.
Option 2: Cardboard Ring
Cut a large circle from a delivery box, then cut a smaller circle from the center. This creates a flat wreath form that works especially well with paper, ribbon, and lightweight garland. Cardboard is easy to decorate, easy to cut, and free if you have shipping boxes around. It is best for covered porches or indoor use because rain and cardboard are not exactly best friends.
Option 3: Pool Noodle Segment
If you have an old pool noodle, cut a length, bend it into a circle, and tape the ends together securely. This creates a lightweight foam wreath form. It is chunkier than a hanger and gives the wreath a fuller look. Wrap it with ribbon, fabric, or crepe paper before adding patriotic details.
Option 4: Dollar-Store Wreath Form
If you find a low-cost foam, wire, or grapevine wreath form, it may still fit the under-$5 budget if your decorations are minimal. However, the easiest way to stay under $5 is to make the base free and spend the budget on color.
Step-by-Step: How to Make a Red White and Blue Patriotic Wreath
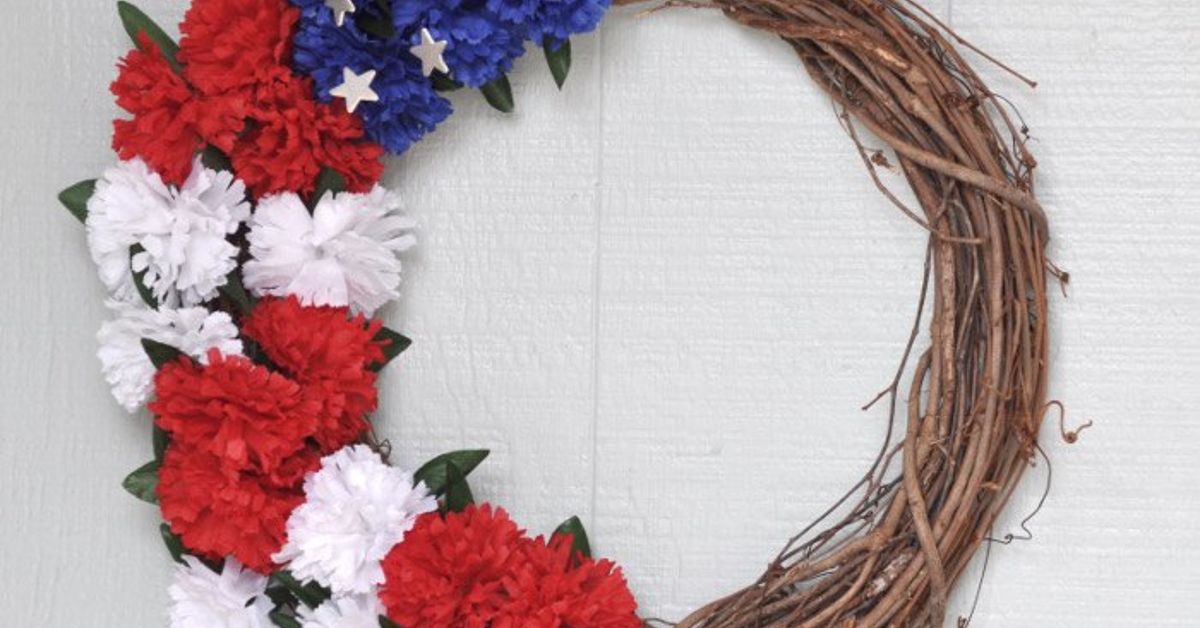
This tutorial creates a classic patriotic wreath with red and white stripes around most of the circle and a blue accent section with white stars. It gives a subtle nod to the American flag without using an actual flag as craft material. That keeps the design festive, respectful, and easy to customize.
Step 1: Shape or Cut Your Wreath Base
Start by preparing your wreath form. If using a wire hanger, bend it into a circle. If using cardboard, trace a large plate or bowl for the outer circle and a smaller bowl for the center. Cut carefully. If using a pool noodle, form it into a ring and secure the ends with strong tape.
Do not worry if the shape is not mathematically perfect. Homemade wreaths are allowed to have character. In fact, “slightly imperfect but charming” is basically the official mascot of budget crafting.
Step 2: Wrap the Base
Wrap the wreath base with white paper strips, fabric strips, ribbon, or crepe paper. This hides the base and creates a clean background. Use tape or small dots of hot glue to secure the ends. If you are using hot glue, work carefully and protect your fingers. A low-temperature glue gun is helpful, especially for family craft time.
Wrapping the base also makes the final wreath look fuller. Even if your decorations shift slightly, the base underneath still looks intentional instead of “cardboard from last week’s package delivery.”
Step 3: Create Red and White Stripes
Take red crepe paper, ribbon, yarn, or fabric strips and wrap them around about two-thirds of the wreath. Leave space between the red bands so the white base shows through. This creates a striped effect without needing extra white ribbon.
For a cleaner look, keep the spacing even. For a playful look, vary the stripe width. If the stripes look a little wild, call it “handcrafted movement.” That phrase makes almost anything sound expensive.
Step 4: Add the Blue Section
Cover the remaining one-third of the wreath with blue crepe paper, blue ribbon, blue fabric, or blue tissue paper. This section becomes the visual anchor. It balances the red stripes and gives the wreath a classic patriotic color story.
If you have blue star garland, this is the perfect place to use it. If not, plain blue paper works beautifully. Budget crafting is not about buying every supply. It is about making three things look like seven things through confidence and strategic fluffing.
Step 5: Make White Stars
Cut small stars from white paper, cardstock, napkins, felt scraps, or foam sheets. You do not need perfect stars. In fact, slightly uneven stars can look whimsical and handmade. Attach them to the blue section with glue, tape, or tiny loops of rolled tape.
Five to nine stars usually look balanced on a small wreath. Too many stars can make the wreath look crowded, like the sky had a glitter emergency. Keep some breathing room so each detail stands out.
Step 6: Add Patriotic Garland
Wrap a red, white, and blue tinsel garland around the wreath or tuck small pieces into different sections. This is the fastest way to add sparkle, fullness, and holiday energy. If the wreath looks too plain, garland fixes it. If the wreath looks too flat, garland fixes it. If your confidence is slipping, garland also fixes that, emotionally speaking.
Secure the garland at the back with twist ties, string, tape, or glue. Make sure loose ends are tucked in so the wreath looks neat from the front.
Step 7: Add a Bow or Hanging Loop
Use leftover ribbon, twine, yarn, or fabric to create a simple bow. Attach it at the top, bottom, or side of the wreath. A bow at the bottom gives a traditional look, while a side bow feels a bit more modern and casual.
If your base does not already have a hook, add a hanging loop using string, ribbon, or a twist tie. Keep the loop strong but hidden. The goal is for people to notice the wreath, not the engineering department behind it.
Design Ideas to Make Your Patriotic Wreath Look More Expensive
Even with a tiny budget, a few design tricks can make your DIY patriotic wreath look polished. The first trick is repetition. Repeat the same red, white, and blue materials around the wreath so it feels planned. The second trick is balance. If one side has a big bow, give the opposite side a few stars or a little garland so the wreath does not look like it is leaning into a strong breeze.
Texture also matters. Combine shiny tinsel with matte paper, soft fabric with crisp cardstock, or burlap with bright ribbon. A mix of textures makes a simple wreath feel layered and interesting. You can also add mini paper pinwheels, small clothespins, faux flowers, bandana strips, cupcake liners, or painted wooden stars if you already have them in your craft stash.
For a farmhouse patriotic wreath, use muted red, cream, navy, twine, and burlap. For a bold Fourth of July wreath, use bright red, pure white, royal blue, glitter stars, and metallic garland. For a kid-friendly wreath, let children cut stars, twist paper strips, or choose the bow placement. The bow may end up slightly sideways. That is not a flaw. That is childhood.
Where to Display Your Patriotic Wreath
The front door is the classic spot, but it is not the only option. Hang your red white and blue patriotic wreath on an interior door, above a mantel, on a kitchen wall, over a mirror, on a porch window, or near a party table. It can also become a backdrop for a summer dessert station, lemonade table, or backyard barbecue setup.
If you hang the wreath outside, consider the weather. Paper and cardboard versions do best under a covered porch. Tinsel and plastic decorations handle humidity better, but strong wind can still turn your wreath into a neighborhood traveler. Secure it well, especially if your front door gets direct sun, rain, or gusty weather.
How to Hang the Wreath Without Damaging Your Door
For renters, freshly painted doors, or anyone who has ever feared the wrath of a security deposit, damage-free hanging matters. An over-the-door wreath hook is simple if you already own one. Adhesive hooks can work for lightweight wreaths, but check the package weight limit and follow the instructions carefully.
You can also loop ribbon over the top of the door and secure it on the inside with tape, a removable hook, or a small command-style strip. Another method is tying fishing line or clear string around the wreath and attaching it to an indoor hook. The best method depends on your door surface, weather exposure, and wreath weight.
Because this under-$5 wreath is lightweight, it is usually easier to hang than a heavy floral wreath. That is another budget win: less money, less weight, fewer dramatic door-related incidents.
Patriotic Decorating Tips for a Respectful Look
Red, white, and blue decorations are a fun way to celebrate patriotic holidays, but it is smart to be thoughtful with actual American flags. This wreath design uses flag-inspired colors and stars rather than cutting, gluing, or altering a real flag. That keeps the project festive while avoiding awkward flag-etiquette questions.
If you want to include small flag picks, place them respectfully and avoid letting them drag, tear, or become dirty. For a simple DIY wreath, star shapes, stripes, ribbon, and color blocking are usually enough to create a patriotic look without using an actual flag as a craft supply.
Common Mistakes to Avoid
Using Too Many Decorations
It is tempting to add every star, bow, streamer, and shiny object you own. Resist the urge. A wreath should look festive, not like a craft store sneezed on it. Choose a focal point, such as a bow or blue star section, and let the rest support it.
Forgetting the Back
The back does not need to be beautiful, but it should be neat enough that decorations stay attached. Tape down loose ends, trim extra string, and make sure nothing scratchy is pressed against the door.
Making It Too Heavy
A budget wreath should stay light. Heavy ornaments, thick wooden pieces, and oversized signs may look nice, but they can pull down a cardboard or hanger base. Use lightweight paper, fabric, garland, and foam accents instead.
Skipping Weather Protection
If your wreath will hang outside, avoid placing paper decorations where rain can reach them. A covered porch is best. You can also bring the wreath indoors during storms. Patriotic spirit is strong, but crepe paper in a thunderstorm is not.
How to Store Your Wreath After the Holiday
When the season ends, store the wreath in a box, bag, or clean plastic container. If it has paper stars or crepe paper, avoid crushing it under heavier decorations. A pizza box can work surprisingly well for flat wreaths, as long as the box is clean. Nobody wants a wreath that smells faintly like pepperoni next Memorial Day.
Label the box “patriotic wreath” so you can find it quickly next year. If any parts get wrinkled, replace only those pieces instead of remaking the whole wreath. That keeps the project budget-friendly over multiple summers.
of Real-Life Experience: What This Wreath Teaches You
Making a red white and blue patriotic wreath for under $5 is not just about saving money. It is about discovering how much style can come from ordinary things. The first time you bend a wire hanger into a wreath shape, it may feel ridiculous. It may look like a lopsided potato with ambition. But once you start wrapping it with paper, ribbon, or garland, the project changes. Suddenly, the weird little circle becomes a door decoration with potential.
One of the biggest lessons from this kind of DIY project is that limitations can actually make the design better. When the budget is tiny, you cannot buy every decoration you see. That forces you to choose. You think harder about color placement, texture, balance, and what really matters. Instead of covering the wreath with random supplies, you create a cleaner design because you only have a few materials. In a funny way, the under-$5 limit becomes your creative coach. A very strict coach, but still.
This project is also a great reminder that handmade decor feels warmer than perfect decor. A store-bought wreath might be symmetrical and polished, but a homemade patriotic wreath has a story. Maybe your child cut the stars. Maybe you used cardboard from a package that arrived that morning. Maybe the bow took three tries and one tiny argument with gravity. Those little details make the wreath feel personal. Guests may not know the full behind-the-scenes saga, but they will feel the charm.
Another practical experience: lightweight wreaths are underrated. Heavy wreaths can be annoying to hang, hard to store, and risky on delicate doors. A simple paper-and-garland wreath is easy to move, easy to adjust, and easy to repair. If a star falls off, you glue it back. If a strip wrinkles, you replace it. If the whole thing gets tired after a few seasons, you can reuse the hanger or base and start again. There is freedom in decor that does not require a financial commitment ceremony.
This wreath also works well as a family activity. Younger kids can help choose colors, hand over stars, or fluff garland. Older kids can cut shapes, wrap the base, or design the blue section. Adults can handle hot glue, scissors, and final hanging. The finished wreath becomes more than a decoration; it becomes proof that everyone contributed something. Even if one star is upside down, it still counts. Honestly, that star may become the best part.
Finally, the biggest experience-based tip is this: hang the wreath, step back, and adjust it after looking from a distance. Up close, you may notice every wrinkle and uneven stripe. From the sidewalk, the wreath reads as festive, colorful, and welcoming. Most guests are not inspecting glue dots. They are noticing the cheerful red, white, and blue greeting on your door. And if they ask where you bought it, you get the joy of saying, “I made it for under five dollars.” That sentence is basically fireworks for a crafter.
Conclusion
A red white and blue patriotic wreath for under $5 proves that great seasonal decor does not need a big budget. With a recycled base, a few colorful supplies, and a little creative confidence, you can make a cheerful Fourth of July wreath that brightens your front door and welcomes summer guests in style. The project is beginner-friendly, family-friendly, and flexible enough to match farmhouse, classic, rustic, or bold patriotic decor.
Whether you make it from a wire hanger, cardboard ring, pool noodle, tinsel garland, ribbon scraps, or paper stars, the result is a decoration with personality. It is affordable, festive, and funthe crafting trifecta. Best of all, it lets you celebrate Memorial Day, Independence Day, and summer gatherings without spending more than the cost of a fancy coffee. Your door gets a patriotic glow-up, your budget stays calm, and your craft supplies finally get their moment in the sun.