A roof leak has a special talent for appearing at the least convenient moment. It rarely announces itself on a sunny Tuesday afternoon when the hardware store is empty. Instead, it arrives during a midnight thunderstorm, directly above something expensive.
That is why a reliable roof sealant matters. Liquid Rubber Waterproof Sealant stood out in documented hands-on testing because it combined strong adhesion, excellent moisture protection, impressive flexibility, and relatively simple application. It is thick, sticky, and not particularly glamorous, but roof repair is one field where looking like warm fudge is not automatically a disadvantage.
This Liquid Rubber review examines how the coating performs, where it works best, what its limitations are, and what homeowners should expect during a real-world DIY roof repair.
Liquid Rubber Review: The Quick Verdict
Liquid Rubber Waterproof Sealant is one of the strongest choices for repairing small leaks, sealing vulnerable seams, and creating a flexible waterproof membrane over compatible roof surfaces. Its heavy consistency helps it fill minor cracks and cling to wood, concrete, metal, modified bitumen, and other roofing materials.
Its greatest strengths are adhesion and waterproofing. Its biggest drawbacks are slow curing in cool or humid weather, high material consumption when coating an entire flat roof, and a tacky black finish that is neither walkable nor especially attractive.
| Category | Assessment |
|---|---|
| Waterproofing | Excellent when applied at the recommended thickness |
| Adhesion | Very strong on properly prepared surfaces |
| Flexibility | Excellent; designed to expand and contract |
| Application | Easy with a brush or roller, more demanding with a sprayer |
| Cure time | Typically 24 to 48 hours, depending heavily on weather |
| Best use | Localized repairs, seams, flashing details, and compatible low-slope roofs |
| Main limitation | Not a reflective finish or walking surface |
What Is Liquid Rubber Waterproof Sealant?
Liquid Rubber Waterproof Sealant is a single-component, water-based coating made from bitumen and flexible polymers. Once cured, it forms a seamless elastomeric membrane rather than a hard, brittle shell.
That flexibility is important because roofs are not motionless slabs. Metal expands in summer heat. Wood responds to moisture. Seams shift, fasteners move, and temperature changes repeatedly ask roofing materials to perform tiny gymnastics. A rigid patch may crack under that movement, while an elastomeric roof coating can stretch with the surface.
The product is available in quart, 1-gallon, and 5-gallon containers. It can be applied with a brush, roller, or sufficiently powerful airless sprayer. For most homeowners completing a modest DIY roof repair, a disposable brush and a 3/8-inch nap roller are the least complicated options.
Not All Liquid Rubber Products Are the Same
The standard Waterproof Sealant discussed here is a thick black coating focused on waterproofing and puncture resistance. Liquid Rubber also offers colored roof sealants and silicone roof coatings.
That distinction matters. A black waterproof coating is not the same thing as a white solar-reflective roof coating. Homeowners whose roofs receive intense, continuous sunlight may prefer a compatible colored or silicone product designed for reflectivity and prolonged exterior exposure.
How the Roof Sealant Was Tested
In independent hands-on testing, Liquid Rubber was applied to plywood alongside several competing roof-sealing products. The coated material remained outdoors for approximately two weeks and encountered rain, damp weather, and early-season snow.
After exposure, the plywood was cut open and inspected for moisture. The coated surface remained dry, while the membrane adhered so firmly that peeling it away was extremely difficult. That combination of water resistance and tenacious adhesion helped Liquid Rubber earn the top position among the tested sealants.
Application Performance
The product’s texture is noticeably thicker than ordinary exterior paint. That makes it slower to spread, but it also helps the material remain in cracks, depressions, and irregular areas instead of immediately running downhill like a panicked pancake syrup.
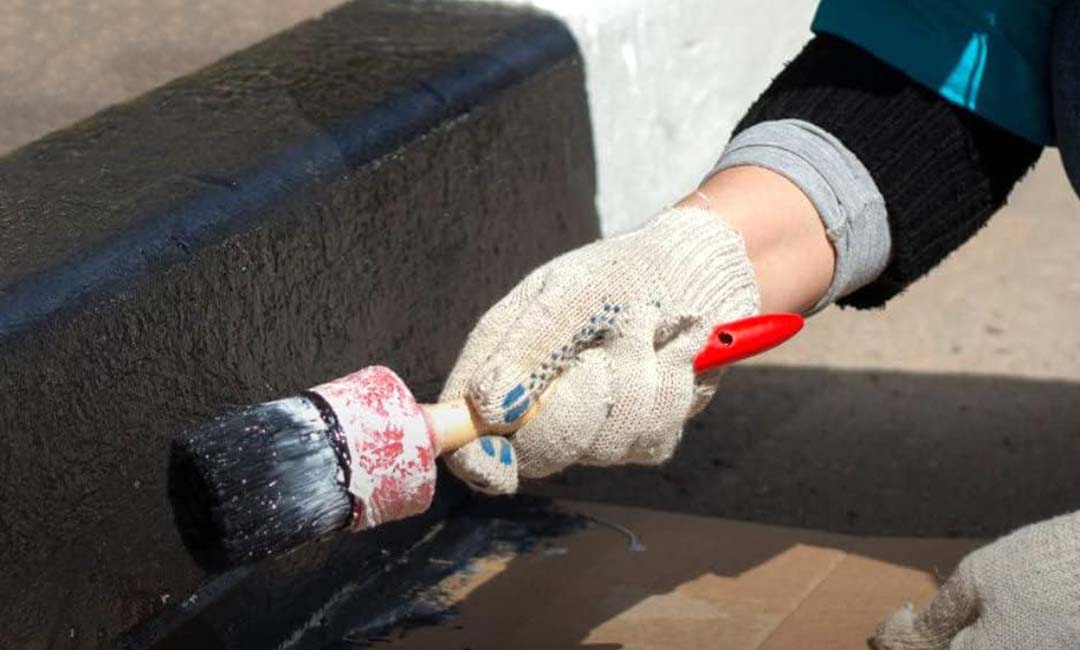
A brush works well around flashing, fasteners, roof edges, and penetrations. A roller is more efficient across larger open sections. Spraying is possible, but the manufacturer specifies heavy-duty equipment capable of handling elastomeric coatings. A small consumer paint sprayer may struggle or clog.
Weather Exposure
The test demonstrated excellent short-term waterproofing during wet and cold conditions. However, application temperature affected drying. At roughly 40 degrees Fahrenheit, the coating cured more slowly than it would under the manufacturer’s preferred conditions.
Liquid Rubber recommends applying the product when temperatures are above 50 degrees Fahrenheit, including overnight temperatures. The surface should be dry, humidity should remain below the recommended limit, and rain, fog, or dew should not be expected during the critical early curing period.
What Makes Liquid Rubber One of the Best Roof Sealants?
1. Strong Adhesion
Waterproof coatings fail when they lose contact with the material beneath them. Liquid Rubber bonds aggressively to clean, sound substrates, creating a fully adhered membrane rather than a loose skin floating over the roof.
That does not eliminate the need for preparation. Dust, oils, silicone residue, loose paint, rust flakes, coal tar, and trapped moisture can interfere with the bond. The coating is only as dependable as the surface holding it.
2. Excellent Flexibility
The manufacturer reports elongation exceeding 950 percent under its test conditions. Homeowners do not need to memorize that number, but the practical meaning is simple: the cured membrane can stretch significantly without immediately cracking.
This quality makes Liquid Rubber useful around seams, flashing transitions, plywood joints, metal components, and other areas where minor movement is expected.
3. A Seamless Waterproof Barrier
Roll roofing, sheet membranes, and roof panels all contain joints. Every joint is another opportunity for water to become an uninvited tenant. A liquid-applied sealant can create a continuous membrane across irregular shapes and complicated details.
For joints and penetrations, reinforcement is often advisable. Liquid Rubber recommends embedding seam tape or geotextile fabric between layers of wet coating. This three-course approach adds strength around the areas most likely to leak.
4. DIY-Friendly Application
There is no mixing of two chemical components, no open flame, and no specialized heating equipment. Open the container, mix the material thoroughly, and apply it with common painting tools.
The work is messy, but it is conceptually simple. For a homeowner comfortable with careful surface preparation and basic roller technique, Liquid Rubber is more approachable than many commercial roofing systems.
5. Low Odor and No Added Solvents
The water-based formula is nonflammable and contains no solvents or listed volatile organic compounds in the manufacturer’s technical information. It has far less aggressive odor than many traditional asphalt or solvent-based roof products.
Gloves, protective clothing, eye protection, and sensible ventilation are still appropriate. “Low odor” should not be interpreted as permission to wear your best white shirt.
Where Can Liquid Rubber Be Used?
Compatible applications may include roof maintenance, modified-bitumen repairs, existing metal roofing, built-up roof details, gutters, foundations, concrete, plywood, retaining walls, flashing, and selected low-slope surfaces.
Metal Roofs
Liquid Rubber can work well on prepared metal, particularly around fasteners, laps, seams, and small areas of surface deterioration. Remove loose rust, repair damaged panels, secure fasteners, and confirm whether the particular metal or existing finish requires primer.
Flat and Low-Slope Roofs
The product can form a heavy waterproof membrane on low-slope roofs, but covering a large surface requires substantial material. Manufacturer guidance calls for approximately 1 gallon per 15 square feet on flat or ponding surfaces to achieve the recommended dry-film thickness. That can translate into four or five heavy coats.
A 300-square-foot roof could therefore require roughly 20 gallons, depending on texture, waste, detailing, and substrate absorption. Measure first. Roof-coating math has a way of transforming a “small weekend project” into a stack of buckets.
Plywood and Concrete
Plywood and concrete can be coated, but these surfaces may require a compatible primer. Joints and cracks should be repaired and reinforced before the field coating is applied. Concrete must be sound and free of contaminants, while plywood panels should be firmly secured with stable joints.
Gutters and Flashing Details
The coating’s thickness makes it useful around gutter seams, roof-to-wall transitions, penetrations, and flashing repairs. Nevertheless, it should not replace corroded metal, missing flashing, or failed structural components.
Liquid Rubber Drawbacks and Limitations
It Can Remain Tacky
The manufacturer notes that the waterproof sealant may remain tacky after curing. It is not intended for decks, patios, floors, or frequently walked roof areas. Anyone expecting a hard, paint-like finish may be surprised.
Cold Weather Slows the Cure
Under favorable conditions of about 77 degrees Fahrenheit and 50 percent relative humidity, full curing generally takes 24 to 48 hours. Lower temperatures, higher humidity, thick coats, or poor airflow extend that schedule.
Do not rush additional coats onto material that is dry only on top. The previous layer should be uniformly dry, without wet material trapped beneath the surface.
The Black Finish Absorbs Heat
Standard Liquid Rubber Waterproof Sealant dries brown-black to black and is not a cool-roof finish. White or reflective coatings can reduce solar heat absorption, especially in warm climates. For a roof exposed to strong sunlight, compare the standard product with a compatible colored or silicone roof coating.
Large Projects Get Expensive
A gallon may be sufficient for localized repairs, but complete flat-roof coverage requires far more material than ordinary paint. Calculate the manufacturer’s required coverage rate rather than relying on how far the first thin coat appears to spread.
Applying too little product can create an attractive black roof that is still inadequately waterproofedessentially giving the roof a new outfit without fixing its problem.
It Does Not Repair Structural Damage
Liquid Rubber can seal a sound roof surface. It cannot restore rotted decking, saturated insulation, failing framing, major corrosion, widespread membrane separation, or drainage defects. Those conditions require removal, replacement, or professional evaluation.
How to Apply Liquid Rubber Roof Sealant Correctly
Step 1: Inspect the Roof
Find the actual source of the leak before opening the bucket. Water can travel along rafters, insulation, decking, or seams and appear indoors far from the entry point. Check penetrations, flashing, fasteners, seams, drains, and transitions.
Step 2: Repair the Substrate
Replace rotten wood, damaged flashing, loose fasteners, and badly deteriorated roofing. Correct drainage issues and remove trapped moisture. A coating should protect a functional roof assembly, not conceal a failing one.
Step 3: Clean and Dry the Surface
Remove dirt, chalk, loose coatings, grease, debris, rust flakes, silicone, and other contaminants. Pressure washing may be appropriate on some roofs, but the assembly must dry completely before coating.
Step 4: Perform a Test Patch
Apply a small amount in an inconspicuous location and allow it to cure. Check adhesion before committing to the full project. This simple step can reveal incompatibility with an existing coating or unusual roof material.
Step 5: Detail Seams and Penetrations
Fill larger cracks with a compatible sealant. Reinforce joints, seams, skylights, vents, and transitions with seam tape or geotextile embedded between layers of coating.
Step 6: Apply Multiple Heavy Coats
Begin at the farthest point and work toward the exit. Apply each coat in alternating directions to improve uniformity. Maintain a wet edge between sections and inspect for pinholes, blisters, voids, and thin spots.
Step 7: Respect the Cure Window
Allow each layer to dry thoroughly. Protect the roof from rain, dew, freezing temperatures, debris, and foot traffic until the membrane has cured. Apply the final coat in the direction of the roof slope to encourage positive drainage.
Liquid Rubber vs. Other Roof Sealants
Liquid Rubber vs. Silicone Coating
Silicone roof coatings are often chosen for broad low-slope roofs, strong UV exposure, and locations with recurring ponding water. Many high-solids silicone products can achieve the required thickness in one or two coats. They are usually more reflective when supplied in white, but they can be slippery, attract dirt, and complicate future recoating.
Liquid Rubber Waterproof Sealant is a strong choice when flexibility, adhesion, puncture resistance, and detailed waterproofing are the main priorities.
Liquid Rubber vs. Acrylic Elastomeric Coating
Acrylic coatings are typically easier to clean up and are widely available in reflective white finishes. They perform well on properly drained roofs but may be less tolerant of persistent standing water than suitable silicone or heavy waterproof membranes.
Liquid Rubber vs. Roof Cement
Roof cement is convenient for isolated cracks, flashing, and emergency patches. Liquid Rubber is better suited to creating a continuous membrane over a larger repaired section. For some projects, the best system uses compatible crack filler or flashing cement beneath a reinforced liquid coating.
Liquid Rubber vs. Sealant Tape
Waterproof tape provides fast reinforcement over seams and small punctures. However, tape alone does not conform to every irregular surface or create a broad seamless barrier. Combining reinforcement tape with a compatible coating can provide a more complete repair.
Is Liquid Rubber Worth the Money?
For localized roof leak repair, Liquid Rubber offers excellent value. One container can cost considerably less than a professional service call and may prevent damage to insulation, drywall, flooring, furniture, and electrical components.
For whole-roof restoration, value depends on roof size and condition. A small shed, porch roof, or utility structure may be a reasonable DIY project. A large residential low-slope roof can require many gallons, extensive preparation, reinforcement fabric, primer, and several days of suitable weather.
Before buying multiple pails, compare the total system cost with a professional coating installation or roof replacement. The least expensive bucket is not always the least expensive roof.
Who Should Buy Liquid Rubber Waterproof Sealant?
This roof sealant is best for homeowners who need to waterproof a sound, compatible surface and are willing to perform thorough preparation. It is especially appealing for small roof sections, metal seams, flashing details, gutters, plywood structures, sheds, and low-slope repair areas.
It is less suitable for people seeking a decorative finish, a walkable coating, an instant cure, or a highly reflective white roof. It is also not appropriate when the roof contains structural damage, saturated insulation, serious mold, extensive rot, or a leak that cannot be located.
Steep, high, fragile, or slippery roofs should be inspected by a qualified roofing professional. Saving money is admirable. Testing gravity from a ladder is not.
Final Verdict
Liquid Rubber Waterproof Sealant earns its strong reputation through dependable moisture protection, unusually tenacious adhesion, and enough flexibility to accommodate ordinary roof movement. In documented outdoor testing, it protected plywood through rain and snow while remaining firmly bonded to the surface.
The product is not perfect. It is thick, weather-sensitive during application, potentially tacky after curing, and material-hungry when used across a complete flat roof. The standard black formula is also a waterproof membrane rather than a reflective cool-roof coating.
For properly prepared localized repairs and compatible low-slope surfaces, however, it is one of the best roof sealant options available to DIYers. Apply it at the specified thickness, reinforce vulnerable details, wait for suitable weather, and resist the temptation to treat preparation as an optional appetizer.
Real-World Liquid Rubber Application Experience: What to Expect
The practical experience begins before the lid comes off. Most of the work is inspection, cleaning, drying, and deciding whether the roof is healthy enough to coat. A suspicious soft spot beneath your boot is not asking for another layer of sealant; it is requesting carpentry.
Once the surface is sound, gather more disposable supplies than expected. Gloves, old clothing, brushes, roller covers, mixing paddles, rags, painter’s tape, reinforcement fabric, and a protective tarp make the job much less chaotic. The black product has a remarkable ability to migrate from the roof to tools, gloves, bucket handles, ladder rails, and somehow your elbow.
After opening and mixing the container, the first surprise is the consistency. Liquid Rubber does not behave like thin house paint. It feels substantial and slightly stringy, particularly in cooler weather. A brush loads heavily and works well for pressing material into uneven seams. A roller covers open plywood or metal more quickly, although it takes steady pressure to distribute the coating without leaving thick ridges.
The first coat may look disappointingly thin in places, especially on porous wood or rough roofing. This is normal and demonstrates why multiple coats are necessary. Trying to create the entire membrane in one heroic pass can cause sagging, prolonged curing, trapped moisture, and a top surface that appears dry while the material underneath remains soft.
Working in small sections is far more manageable. Detail a vent, seam, or corner, embed reinforcement while the coating is wet, smooth the fabric, and cover it with another layer. Properly embedded fabric should disappear into the membrane without wrinkles, raised edges, or open pockets.
Weather becomes the project manager. A cloudy but dry day within the recommended temperature range is ideal. Intense sun can make the roof uncomfortably hot and accelerate surface drying, while cool evenings, heavy humidity, and dew slow the process. Checking the hourly forecast is not enough; overnight conditions matter because the coating remains vulnerable while curing.
Between coats, the surface may feel tacky even when it is ready for another application. Look for uniform color and confirm that no wet material remains underneath. Alternating roller direction helps expose missed spots. The second coat fills small voids, while later coats build the membrane thickness that provides dependable waterproofing.
The final inspection is surprisingly satisfying. Pinholes appear as tiny interruptions in the otherwise continuous finish. Thin areas may show texture or color differences. Check seams, terminations, fasteners, penetrations, and places where tools were lifted from the surface. Touch up defects before declaring victory.
After curing, water should bead or run across the membrane without penetrating it. The finished surface remains flexible and may retain some tack, so avoid unnecessary foot traffic. Keep drains clear and inspect the repair after the first heavy storm, then periodically afterward.
The overall experience is less like painting a wall and more like building a waterproof layer one careful coat at a time. The application is accessible to a patient DIYer, but patience is the essential tool. Preparation, proper thickness, compatible materials, and adequate curing time determine whether the finished repair becomes a durable barrier or merely a very enthusiastic black stain.
Editorial note: Product formulations, prices, packaging, warranties, coverage requirements, and application instructions may change. Review the current container label, technical data sheet, roof warranty, and local building-code requirements before beginning work.