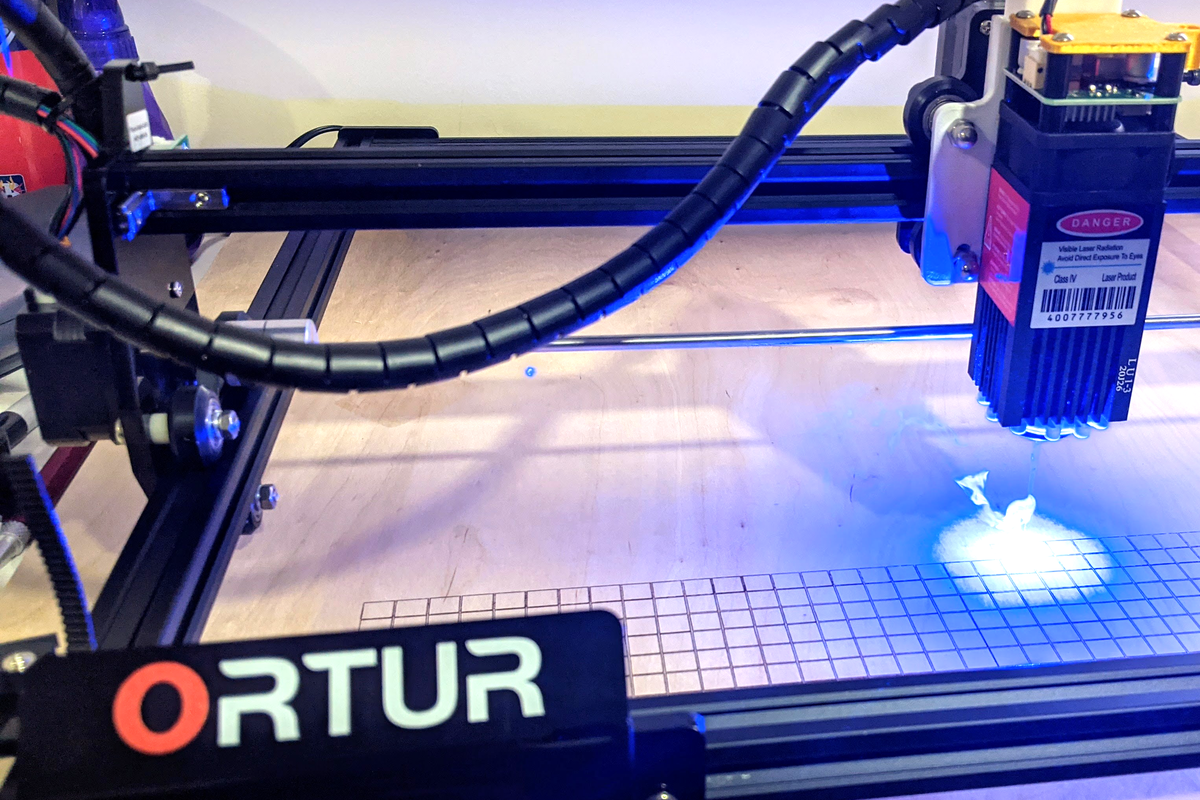
Laser cutters look like magic until you learn the trick: the “point” is not just the red dot dancing across the bed. The real point is focus, control, material behavior, and the tiny place where concentrated light becomes a tool instead of a very expensive flashlight. A laser cutter can turn plywood into a lampshade, acrylic into signage, cardboard into prototypes, and leather into custom patches. It can also turn a poorly planned project into smoke, scorch marks, and a small lecture from the shop manager. Ask me how I know. Actually, don’t. Let’s preserve everyone’s dignity.
So, where’s the point? It is partly the optical focal point, partly the purpose of the machine, and partly the human judgment behind every file, setting, material, and safety check. A laser cutter is not a “print” button with dramatic lighting. It is a precision machine that rewards preparation and punishes assumptions. In this guide, we will unpack how laser cutters work, why focus matters so much, what kerf does to your design, which materials behave nicely, and why ventilation is not a decorative suggestion.
What Is a Laser Cutter, Really?
A laser cutter is a computer-controlled machine that uses a focused beam of light to cut, score, or engrave material. Instead of pushing a blade through a sheet, it concentrates energy into a small spot and removes material by heating, melting, vaporizing, or burning it away. That sounds dramatic because it is. The machine may look calm on the outside, but inside, physics is wearing safety glasses and working overtime.
Most desktop and makerspace laser cutters use CO2 laser technology, which is especially useful for materials such as wood, acrylic, paper, cardboard, fabric, leather, rubber, and some coated metals. Fiber lasers are often used for metals and industrial marking. Diode lasers are common in smaller hobby machines and can engrave many organic materials, though their cutting ability depends heavily on wattage, wavelength, optics, and material thickness.
The common jobs are simple to name but very different in practice. Cutting goes all the way through the material. Scoring makes a shallow line. Engraving removes surface material to create an image, texture, label, or pattern. The same machine can do all three, but the settings are not interchangeable. Using engraving settings to cut is like trying to slice bread with a warm compliment. Nice energy, wrong execution.
Where’s the Point? The Focal Point Explained
The most important “point” in laser cutting is the focal point: the place where the laser beam is narrowed into its smallest, most intense spot. A lens focuses the beam in much the same way a magnifying glass can focus sunlight, except the laser is controlled, amplified, and far more precise. At the focal point, the beam has its highest energy density, which usually means cleaner cuts, sharper engraving, and less wasted heat.
Focus affects edge quality, cutting speed, engraving detail, and consistency. If the laser is focused too high or too low, the beam spreads out before it reaches the ideal cutting zone. The result can be wider lines, incomplete cuts, more charring, fuzzy engraving, melted edges, or designs that look like they were traced by a nervous raccoon.
Focal Length, Spot Size, and Depth of Focus
Focal length is the distance from the lens to the point where the beam is focused. A shorter focal length generally creates a smaller spot and finer detail, but it may have a shallower usable focus range. A longer focal length may be more forgiving on thicker materials because it offers more depth of focus, though it may not produce the same tiny detail. This is why many laser users keep different lenses for different jobs: one for crisp engraving, another for thicker cutting, and maybe a third for those days when optimism is stronger than plywood.
Depth of focus is the vertical zone where the beam remains effective enough to cut or engrave well. Thin paper does not ask much from depth of focus. Thick acrylic or plywood asks a lot more. If the beam narrows at the top surface but widens before reaching the bottom, the cut can taper or fail before it finishes. That is one reason thick material often needs slower speeds, more power, multiple passes, or a different lens.
Why Autofocus Is Helpful but Not a Substitute for Thinking
Modern laser cutters may include autofocus systems that measure material height and position the bed or laser head accordingly. Autofocus is convenient, especially in schools, studios, and production environments where many users share one machine. But autofocus depends on calibration, clean sensors, proper setup, and relatively flat material. Warped plywood, bowed acrylic, thick leather, or an uneven jig can still cause focus problems.
Experienced users often verify focus manually, run a focus test, or use a ramp test when precision matters. A ramp test places material at a slight angle and fires a line across it; the narrowest, cleanest part of the line reveals the best focus distance. It is simple, visual, and delightfully humbling. Nothing says “precision manufacturing” like discovering your perfect focus was two millimeters away from where you confidently assumed it was.
Kerf: The Tiny Gap That Can Ruin a Big Idea
Kerf is the width of material removed by the laser beam as it cuts. It may be tiny, but it matters. If you design a box with tabs and slots, the kerf determines whether the pieces fit snugly, wobble like a cheap folding chair, or refuse to assemble unless threatened with a mallet. Laser cutting is precise, but it is not dimensionless. The beam has width, and that width becomes part of your design.
For decorative signs, kerf may not matter much. For press-fit furniture, architectural models, gears, inlays, or layered assemblies, kerf compensation is essential. Designers often test a small section before cutting the final project. A simple row of slots with slightly different widths can reveal the best fit for a specific material and thickness. The key phrase is “specific material.” Three-millimeter plywood from one supplier may behave differently from three-millimeter plywood from another. Wood is natural. Natural materials have opinions.
Inside Cuts, Outside Cuts, and Practical Tolerances
When cutting a hole, the laser removes material along the cut path, making the opening slightly larger. When cutting an outside shape, the final part may be slightly smaller. Good design software and laser workflows allow you to offset paths or adjust dimensions to account for kerf. This is especially important for interlocking parts, living hinges, snap-fit details, and any project that must assemble without glue.
A smart workflow is to cut a miniature test joint before committing to a full sheet. The test uses a small amount of material and saves a large amount of regret. If the test joint fits, proceed. If it does not, adjust the design. This is not failure. This is prototyping, which is what adults call messing up efficiently.
Power, Speed, Frequency, and Passes
Laser settings are usually built around power, speed, frequency or pulse rate, and the number of passes. Power controls how much laser energy is applied. Speed controls how long the beam interacts with the material. Frequency affects how pulses overlap, which can influence cutting and edge quality depending on the machine. Passes determine how many times the laser repeats the path.
High power and slow speed deliver more heat. That can help cut thicker material, but it can also increase charring, melting, flame risk, and edge discoloration. Lower power and faster speed may produce cleaner engraving but fail to cut through. The trick is not simply “more power.” The trick is enough energy in the right place for the right amount of time. A laser cutter is not impressed by brute force. It prefers manners.
Why Test Grids Are Worth the Time
A material test grid is one of the most useful habits in laser cutting. It engraves or cuts small squares at different combinations of power and speed, letting you compare results directly. The best setting is rarely the one that looks strongest on paper. It is the one that gives the desired result with the least damage, smoke, residue, or wasted time.
Test grids are especially useful for plywood, acrylic, leather, paper, cardboard, coated metals, anodized aluminum, and unfamiliar plastics. Keep notes. Label samples. Build your own material library. Future you will be grateful, and future you is already tired.
Materials: What Cuts Beautifully and What Should Stay Far Away
Laser cutters are popular because they can work with so many materials, but “can” and “should” are not twins. Wood, acrylic, paper, mat board, cardboard, cork, leather, fabric, and certain engraving plastics are common choices. Acrylic can produce polished edges with a CO2 laser, making it excellent for signs, awards, displays, and decorative parts. Plywood is versatile and affordable, though glue layers can affect cutting consistency. Paper and cardboard cut quickly but demand careful monitoring because they can ignite easily.
Some materials should not be laser cut unless the machine, ventilation, and material data are specifically approved. PVC and vinyl are classic “do not cut” materials because they can release corrosive and toxic fumes that are dangerous to people and damaging to equipment. Unknown plastics are risky because you may not know what gases they release when heated. Fiberglass, carbon fiber, coated composites, and mystery bargain-bin panels should be treated with suspicion. When in doubt, do not cut it until you identify it.
Wood
Wood is friendly, warm, and occasionally dramatic. Solid woods engrave beautifully, but density, resin, grain direction, moisture content, and finish can change the result. Plywood is popular for models and boxes, but interior glue layers may resist cutting or create uneven edges. Baltic birch, basswood, maple, cherry, walnut, and MDF each have different personalities. MDF cuts evenly but produces a lot of smoke and residue, so ventilation and cleanup matter.
Acrylic
Acrylic is one of the laser cutter’s show-off materials. Cast acrylic engraves with a frosted look and cuts with smooth edges. Extruded acrylic may cut cleanly but often engraves differently. Clear acrylic usually works well with CO2 lasers because the wavelength is absorbed by the material. Diode lasers may struggle with clear acrylic unless the setup and wavelength are appropriate.
Metal
Most standard CO2 desktop lasers cannot cut bare metal. They can often mark coated metals, anodized aluminum, or metal treated with marking compounds. Fiber lasers are the usual choice for engraving and cutting many metals. Industrial metal cutting also involves assist gases, higher power, rigid motion systems, and far more engineering than a hobby machine in a garage. In other words, do not ask a small desktop CO2 laser to behave like a factory floor. It has boundaries.
Air Assist, Ventilation, and Fire Safety
Air assist blows air at the cutting point. This helps clear smoke and debris, reduces flare-ups, improves edge quality, and keeps the lens cleaner. It is one of those features that sounds minor until you turn it off and your project begins auditioning for a barbecue commercial. Air assist does not replace ventilation; it supports the cut at the point of action.
Ventilation removes smoke, fumes, and particles from the laser enclosure and work area. Cutting and engraving can release irritating or hazardous emissions depending on the material. A proper exhaust system, filtration where appropriate, and a clear approved-materials policy are not optional extras. They are part of using the machine responsibly.
Fire safety is equally important. Laser cutters use heat. Heat plus combustible material equals a situation that deserves respect. Users should never leave an active laser cutter unattended. Even a small flame can grow quickly, especially in paper, cardboard, thin wood, or dusty machines. Clean the bed, remove scrap, know the emergency stop, and understand the shop’s fire response procedure before starting a job.
Designing for Laser Cutting
Good laser-cut design begins before the machine is turned on. Vector files are used for cutting and scoring, while raster images are often used for engraving. Clean paths, closed shapes, correct line weights, proper units, and organized layers prevent many common problems. A file that looks fine on screen may contain duplicate lines, open paths, overlapping shapes, or hidden geometry that causes the laser to cut the same line twice. The machine will not question your choices. It will simply obey them with terrifying loyalty.
Common Design Mistakes
The first mistake is forgetting kerf. The second is ignoring material thickness. The third is using designs that are too delicate for the material. Thin acrylic details can snap. Tiny plywood tabs can burn. Paper can curl. Leather can shrink slightly. A successful laser project balances visual design with physical reality.
Another common mistake is placing parts too close together. Tight nesting saves material, but it can increase heat buildup, cause small parts to shift, or leave fragile edges between cuts. For expensive materials, careful nesting is smart. For flammable materials, too much cleverness can become spicy.
Living Hinges and Bending Flat Materials
One of the most charming laser cutter tricks is the living hinge: a pattern of closely spaced cuts that lets flat material bend. Living hinges are common in plywood, acrylic, and cardboard prototypes. The pattern, spacing, material grain, thickness, and bend radius all affect performance. A living hinge that works beautifully in thin plywood may fail in brittle acrylic or thick hardwood. Again, test first. The laser cutter is a wonderful teacher, but it charges tuition in material scraps.
So, What Is the Real Point of Laser Cutters?
The point of laser cutters is not merely speed, although they are fast. It is not merely precision, although they are precise. The real point is fast iteration. A laser cutter lets designers move from idea to object quickly. A student can prototype a bridge model in an afternoon. A small business can produce custom packaging, signage, ornaments, templates, jewelry, or branded displays. An engineer can test bracket shapes before machining metal. An artist can combine digital patterns with physical textures.
Laser cutters are especially powerful because they sit between imagination and manufacturing. They make digital design tangible. They also expose design flaws quickly. If a slot is too small, the laser tells you. If your material choice is wrong, the laser tells you. If your file has duplicate lines, the laser tells you twice, usually by burning the edge for emphasis.
Experiences from the Laser Bed: Lessons Learned the Smoky Way
My first memorable lesson with a laser cutter was not about advanced optics. It was about humility. I had designed a small press-fit box that looked perfect on screen. The tabs aligned. The dimensions were clean. The preview looked like something a responsible person would make. Then I cut it. The pieces came out beautifully, right up until assembly, when every slot was just loose enough to make the box wobble like a nervous table at a diner. That was the day I learned that kerf is not a footnote. Kerf is a character in the story, and it wants speaking lines.
The second lesson was about focus. I once assumed that because the material was labeled as three millimeters thick, it was actually three millimeters thick. How adorable. The sheet had a slight bow, and the focus was fine near the center but weak at the edges. The result was a project that cut through in some places and clung together in others by tiny wooden hairs. I spent more time freeing the parts with a utility knife than the laser spent cutting them. Since then, I check flatness, pin down warped sheets when allowed, and run small tests near problem areas. The laser may be precise, but it cannot flatten reality.
The third lesson was about materials that look similar but behave differently. Two sheets of plywood can have the same thickness and wildly different cutting behavior. One cuts like butter. Another has glue pockets that laugh at your settings. Acrylic also has its own little drama club: cast acrylic engraves beautifully, while some extruded acrylic can give a different finish. Leather varies by tanning method, thickness, oils, and finish. Paper can be calm one minute and crispy the next. The best habit is to treat every new material like a new recipe. Start with a small test, observe the result, adjust, and only then commit the full sheet.
The fourth lesson was about ventilation and smell. Laser cutting has a scent vocabulary: campfire plywood, sharp acrylic, toasted cardboard, mysterious leather, and the unmistakable aroma of “please stop and check what that material is.” Good ventilation changes the entire experience. It protects people, improves visibility, reduces residue, and keeps the machine cleaner. When ventilation is poor, everything suffers: the cut, the room, the optics, and everyone’s mood.
The fifth lesson was that laser cutters are better when treated like collaborators, not vending machines. The machine can repeat a perfect path, but the user must choose the right design, material, focus, settings, and safety practices. A successful laser project often comes from small boring steps: measuring material, cleaning the lens, checking the bed, setting focus, testing a corner, confirming units, and staying with the job. None of that sounds glamorous, but it is exactly what separates clean results from expensive confetti.
Perhaps the best experience is the moment a project works. The lid fits. The engraving is crisp. The acrylic edge catches the light. The living hinge bends smoothly. The prototype clicks together without glue. That moment feels like wizardry, but it is really the result of controlled light, careful design, and a few lessons learned from previous disasters. The point of laser cutting is not just the beam. The point is learning how ideas behave when they become objects.
Conclusion
Laser cutters are brilliant tools, but their brilliance depends on focus in every sense of the word. The optical focal point determines how cleanly the beam cuts or engraves. The design focus determines whether the final object fits, bends, folds, or falls apart. The safety focus determines whether the process remains controlled and responsible. And the creative focus determines whether the machine becomes a toy, a tool, or a small manufacturing superpower.
So, where’s the point? It is at the meeting place of light, material, and intention. Find that point, and a laser cutter becomes more than a machine. It becomes a fast, precise, occasionally smoky bridge between “I have an idea” and “I made this.” Just remember: measure first, test small, ventilate properly, stay nearby, and never trust mystery plastic. Mystery plastic is how villains introduce themselves.
Note: This article was written from synthesized, real-world laser cutting principles, including machine operation, optics, material behavior, kerf compensation, ventilation, and safety practices used by manufacturers, makerspaces, universities, and occupational safety resources.