There are craft projects that politely sit on the table, behave themselves, and produce exactly what the packaging promised. Then there is indigo shibori: the glorious, blue-fingered adventure where plain white fabric walks into a dye vat and comes out looking like it has been vacationing in a Japanese textile museum. An indigo dye kit for a shibori wrapper is one of the most satisfying entry points into textile design because it combines color chemistry, handwork, surprise, and just enough suspense to make rinsing fabric feel like opening a birthday present.
At its simplest, shibori is a resist-dyeing method. You fold, bind, clamp, twist, stitch, or wrap fabric so some areas resist the dye while others absorb it. Indigo, famous for its deep blue color and centuries of textile history, gives those patterns their signature contrast: crisp whites, watery blues, stormy navy patches, and edges that look beautifully human rather than factory-perfect. When the project is a wrapper, the result is not just decorative fabric. It becomes a reusable gift wrap, scarf, table accent, wall hanging, picnic cloth, book wrap, or that mysterious “nice textile” you keep moving from room to room because it looks good everywhere.
The magic of an indigo shibori wrapper is that it feels both ancient and modern. It nods to traditional Japanese techniques while fitting neatly into today’s love of sustainable wrapping, slow craft, and personalized home goods. It is handmade without looking homemade in the unfortunate “my glue gun betrayed me” sense. Done well, it looks intentional, elegant, and slightly expensivewhich is always a wonderful outcome when the main tools are a bucket, string, and patience.
What Is an Indigo Dye Kit?
An indigo dye kit is a packaged set of materials designed to help beginners create indigo-dyed textiles at home. Most kits include indigo dye or pre-reduced indigo, a reducing agent, soda ash or another alkaline ingredient, gloves, rubber bands, twine, wooden blocks or plastic shapes, and instructions. Some modern kits use all-purpose dye in an indigo shade rather than a traditional indigo vat. Both types can create attractive blue-and-white shibori designs, though the process and final character may differ.
Traditional indigo dyeing works differently from ordinary fabric dye. Indigo is not naturally water-soluble in the way many synthetic dyes are. In a dye vat, the pigment is chemically reduced so it can attach to fabric. When the fabric comes out of the vat, it may look yellow-green at first. Then oxygen does its dramatic little performance, and the cloth slowly turns blue. This oxidation stage is one reason people fall in love with indigo. It is not just dyeing. It is a tiny science show with better wardrobe options.
For beginners, kits are useful because they remove much of the guesswork. Instead of buying separate ingredients, measuring from scattered online notes, and wondering whether the bucket has become a portal to textile chaos, you get a controlled starting point. A good kit explains the vat setup, fabric preparation, tying methods, dipping time, oxidation, rinsing, washing, and cleanup. That structure matters, especially for first-timers who want beautiful results without accidentally dyeing the patio, the dog, and one sock from 2017.
What Makes Shibori Different from Regular Tie-Dye?
Shibori is sometimes described as Japanese tie-dye, but that explanation is a bit like calling sushi “rice with accessories.” It is not wrong in the broadest sense, but it misses the artistry. Tie-dye often relies on spirals, bursts, and bright color combinations. Shibori tends to focus on controlled resist patterns, repeated geometry, organic movement, and the dramatic contrast between blue dye and undyed fabric.
Shibori includes several techniques. Itajime shibori uses folded fabric clamped between blocks to create geometric shapes. Arashi shibori involves wrapping fabric around a pole, compressing it, and dyeing it to create diagonal, rain-like lines. Kanoko shibori uses binding and pinching, similar to tie-dye but often more deliberate. Nui shibori uses stitching to gather the cloth before dyeing, producing delicate linear patterns. Each method affects how the dye enters the textile and how the white areas remain protected.
For a shibori wrapper, these techniques are especially valuable because the finished cloth is meant to be seen from multiple angles. A wrapper may be tied around a gift, folded over a basket, draped on a table, or hung on a wall. Large patterns read beautifully from a distance, while smaller irregular details reward close inspection. The best shibori wrappers feel alive: not messy, not rigid, but full of movement.
Why Make a Shibori Wrapper?
A shibori wrapper is one of the most practical projects you can make with an indigo dye kit. Unlike a T-shirt, it does not need to fit. Unlike curtains, it does not require twelve yards of courage. Unlike a pillow cover, it does not demand a relationship with zippers. A square or rectangular piece of cotton fabric is enough to create something useful, attractive, and endlessly reusable.
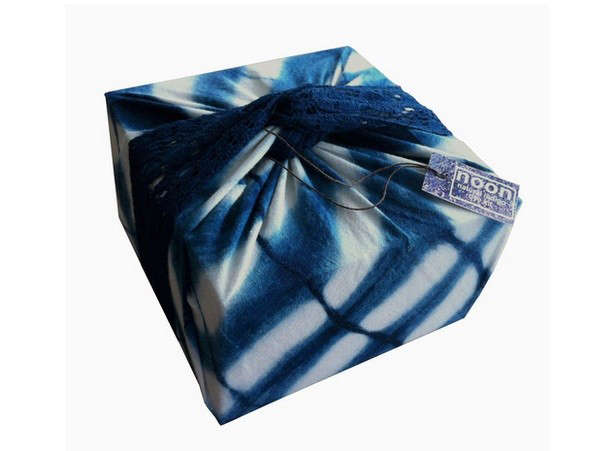
The wrapper concept is inspired by cloth wrapping traditions, including Japanese furoshiki, where fabric is used to wrap gifts, carry items, or bundle everyday objects. A hand-dyed indigo wrapper turns even a simple present into something memorable. Wrap a cookbook in a shibori cloth, tie the corners neatly, and suddenly the gift says, “I am thoughtful, stylish, and possibly own linen napkins.”
Beyond gifting, shibori wrappers can serve as table runners, tea towels, drawer liners, bandanas, plant-pot covers, wall art, or photography backdrops. They are beginner-friendly but not boring. Because every fold and bind creates a different result, no two wrappers are identical. That uniqueness is the point. In shibori, small imperfections are not failures; they are the evidence that a human hand was involved.
Choosing the Right Fabric for Indigo Shibori
The fabric you choose has a major effect on the final result. Natural fibers work best for indigo dyeing. Cotton is the most beginner-friendly choice because it absorbs dye well, handles folding and binding easily, and is widely available. Linen produces a slightly more textured, sophisticated look. Hemp and ramie can also take indigo beautifully. Silk can be stunning, but it requires gentler handling and may not be ideal for a first experiment.
For wrappers, medium-weight cotton is a strong choice. It should be light enough to fold and tie but sturdy enough to hold up to repeated use. A cotton bandana, flour sack towel, cotton lawn, muslin, or quilting cotton can all work. If the wrapper will be used for gifts, choose a square size such as 20 by 20 inches for small items, 28 by 28 inches for medium gifts, or 36 by 36 inches for larger bundles.
Pre-washing is not optional unless you enjoy disappointment as a hobby. New fabric may contain sizing, oils, finishes, or residues that interfere with dye absorption. Wash the fabric with a mild detergent before folding or binding it. Avoid fabric softener. It can leave a coating that makes dye penetration uneven in the wrong way. Shibori already creates intentional unevenness; it does not need sabotage from laundry products.
What Usually Comes Inside an Indigo Shibori Kit?
Most beginner indigo dye kits are designed to cover the essentials. The exact contents vary, but a typical kit may include dye, gloves, rubber bands, twine, binding materials, instructions, and sometimes a dye fixative. Traditional-style kits may include pre-reduced indigo, soda ash, and a reducing agent. Some kits also provide wood blocks for clamp-resist patterns, which are excellent for shibori wrappers because they create strong graphic designs.
You will still need a few household items. A five-gallon bucket is often useful for the dye vat. You may also need a stirring stick, measuring cup, plastic table covering, apron, drying rack, clean water for rinsing, and a place where blue splashes will not cause emotional damage. Outdoor spaces are ideal, but a protected laundry area can also work. Indigo is beautiful on fabric and less charming on rental countertops.
Read the kit instructions before opening the dye. This sounds obvious, yet many craft disasters begin with the sentence, “How hard can it be?” Indigo dyeing rewards preparation. Set up your workspace, pre-wet the fabric, arrange your folded bundles, and plan where each piece will oxidize after dipping. The process becomes far more relaxing when you are not sprinting across the room holding dripping blue cloth like a textile-themed emergency.
Popular Shibori Techniques for Wrappers
Itajime: The Geometric Classic
Itajime is one of the best techniques for a shibori wrapper. Fold the fabric accordion-style, then fold it again into a square or triangle. Place blocks, tiles, or sturdy shapes on both sides and secure them with rubber bands or clamps. The blocked areas resist the dye, leaving repeating shapes when unfolded. The result can look like windows, stars, diamonds, or abstract architecture.
Arashi: The Rainstorm Effect
Arashi means storm, and the pattern often resembles slanting rain. Wrap the fabric diagonally around a pole or cylinder, bind it tightly with string, then compress it before dyeing. This method creates long, energetic lines. For wrappers, arashi patterns are especially elegant because the diagonal movement looks beautiful when the cloth is tied around a package.
Kanoko: The Organic Dot Pattern
Kanoko involves pinching small sections of fabric and binding them with thread or rubber bands. The tied areas remain lighter, creating spots, rings, or clustered shapes. This method is perfect if you want a softer, more playful wrapper. The pattern can look like bubbles, pebbles, flowers, or tiny moons depending on how tightly and frequently you bind the fabric.
Nui: The Stitched Resist
Nui shibori uses running stitches to gather the fabric before dyeing. After stitching, you pull the thread tight, knot it, and dip the gathered cloth. Once dyed and rinsed, the stitches are removed to reveal lines or shapes. This is slower than rubber-band methods but gives a refined, handmade look. It is ideal for makers who enjoy the meditative side of craft and do not consider “watching dye oxidize” their only personality trait.
How the Indigo Dyeing Process Works
The process begins with fabric preparation. Wash and dry the textile, then fold, bind, clamp, or stitch it according to your chosen shibori method. Before dyeing, soak the bound fabric in clean water and gently squeeze out the excess. Damp fabric accepts dye more evenly and reduces the chance of trapped air interfering with the vat.
Next, prepare the indigo vat according to the kit directions. Traditional vats usually need gentle stirring and a rest period. Avoid vigorous splashing because oxygen can affect the reduced dye bath. Once the vat is ready, lower the fabric slowly beneath the surface. Massage it gently under the liquid so the dye reaches the exposed areas. After a short dip, remove the bundle carefully and let it oxidize in the air.
The fabric may emerge greenish or yellowish before turning blue. That color shift is normal and frankly delightful. For deeper color, dip the fabric again after it has oxidized. Multiple dips create richer blues than one long soak. This is an important indigo principle: depth comes from repetition. It is also a useful life lesson, though admittedly most life lessons do not involve rubber gloves.
Rinsing, Washing, and Caring for Indigo Wrappers
After dyeing and oxidizing, rinse the fabric until the water begins to run clearer. Remove bindings carefully, then rinse again. Some dye release is normal, especially with indigo. Wash the finished wrapper separately the first few times, using mild detergent. Avoid washing it with white towels unless you are trying to invent “surprise blue towels” as a lifestyle brand.
Indigo can be prone to crocking, which means color may rub off through friction. This is familiar to anyone who has worn dark jeans and accidentally tinted a pale sofa. For wrappers, this means you should test the cloth before wrapping light-colored or delicate items. A simple colorfastness check involves rubbing the dry fabric with a white cloth and seeing whether blue transfers. If it does, wash and rinse again before use.
To preserve the color, wash indigo wrappers in cool or warm water with similar colors. Line drying is a good option. Over time, indigo may soften and fade slightly, which is part of its charm. The wrapper becomes less like a static product and more like a textile with a memory.
Design Ideas for a Shibori Wrapper
A single indigo dye kit can produce a surprising range of wrappers if you vary the folds and bindings. For a bold modern look, use itajime with square blocks and strong folds. For a coastal or relaxed style, try looser arashi wrapping. For a romantic handmade effect, use small kanoko bindings in clusters. For an heirloom look, stitch simple lines or circles before dyeing.
You can also design wrappers by purpose. A cookbook gift looks wonderful in a large square wrapper with a geometric pattern. A small jewelry box pairs nicely with a delicate dotted design. A housewarming gift can be wrapped in a tea towel-style shibori cloth, making the wrapping part of the present. This is sustainable, attractive, and much less likely to be immediately thrown away than glossy paper covered in glitter. Glitter, as we all know, is not decoration. It is a long-term roommate.
If you plan to make several wrappers, label your folded bundles before dyeing or take photos of each folding method. Once everything is blue and wet, memory becomes unreliable. Documentation helps you repeat favorite designs later. It also prevents you from pretending you created a pattern intentionally when, in reality, the rubber band slipped and the universe took over.
Common Mistakes and How to Avoid Them
The first common mistake is using the wrong fabric. Polyester and many synthetic blends do not respond to indigo the same way natural fibers do. Choose cotton or linen for reliable results. The second mistake is skipping the pre-wash. Fabric finishes can block dye absorption, leaving dull or patchy areas that do not match the intended resist pattern.
Another issue is tying too loosely. Loose bindings allow dye to seep into areas that were supposed to stay white. This can still look beautiful, but if you want crisp contrast, bind firmly. On the other hand, tying so tightly that the fabric becomes impossible to unfold may lead to frustration and muttering. Aim for secure, not heroic.
Agitating the vat too much is also a problem in traditional indigo dyeing. Stir gently and lower fabric slowly. Finally, do not judge the color too early. Indigo deepens as it oxidizes. A piece that looks underwhelming at first may become gorgeous after several dips and enough air exposure.
Safety and Cleanup Tips
Even beginner-friendly dye kits deserve careful handling. Wear gloves, protect your workspace, and avoid using dye tools for food afterward. Work in a ventilated area and follow the kit’s safety directions. Keep dye materials away from children and pets, and dispose of leftover vat liquid according to the instructions provided with the kit.
Use dedicated buckets, spoons, and measuring tools. Dyeing is not the moment to borrow the family pasta pot. Cover surfaces before you begin, and keep paper towels or rags nearby. Indigo splashes are sneaky. They appear on elbows, floors, and occasionally places that make no scientific sense.
Cleanup is easier when you plan for it. Rinse tools promptly, wipe spills before they dry, and store leftover supplies in clearly labeled containers. If your kit includes chemicals, keep them sealed and out of reach. The goal is creative joy, not a mystery powder collection under the sink.
Is an Indigo Dye Kit Worth It?
For most beginners, yes. An indigo dye kit is worth it because it lowers the barrier to entry. You do not need to become a dye chemist before making your first wrapper. Kits provide structure, measured materials, and technique guidance. They are especially helpful for small projects like napkins, scarves, bandanas, and reusable wrapping cloths.
More experienced makers may eventually prefer buying ingredients separately, building larger vats, experimenting with natural fermentation vats, or exploring regional textile traditions in greater depth. But for a first shibori wrapper project, a kit is practical and satisfying. It gives you enough control to succeed and enough unpredictability to stay interesting.
The best part is that the finished wrapper is useful. It is not just a craft sample destined for a drawer. It can wrap gifts, decorate a table, hold bread, cover a basket, or become a personal accessory. Every time it is used, it tells a small story: folded here, tied there, dipped once, dipped again, opened with suspense, admired with slightly excessive pride. That is exactly what handmade objects are supposed to do.
Personal Experiences and Practical Lessons from Making Indigo Shibori Wrappers
The first time you make an indigo shibori wrapper, the project may feel more like cooking, gardening, and laundry all decided to form a band. You prepare the fabric, mix the vat, fold the cloth, tie it tightly, dip it carefully, wait for oxidation, rinse it repeatedly, and somehow end up emotionally attached to a square of cotton. This is normal. Indigo has that effect on people.
One practical lesson becomes obvious quickly: simple folds often produce the strongest designs. Beginners sometimes try to combine five techniques in one small cloth because enthusiasm is a powerful and dangerous fuel. But a clean accordion fold with two blocks can create a wrapper that looks polished and modern. A single arashi wrap can produce movement across the whole fabric. A few well-placed bindings can look more elegant than dozens of random rubber bands.
Another lesson is that contrast matters. If the entire cloth is exposed to dye, the wrapper may become a lovely blue square but lose the dramatic shibori effect. The resist areas need protection. Firm folding, tight binding, and thoughtful clamping create those bright white spaces that make the pattern sing. The white is not empty; it is part of the design. Think of it as the pause in the music, or the quiet person at dinner who suddenly says the funniest thing all night.
Timing also shapes the experience. Indigo dyeing is not a craft to begin ten minutes before guests arrive unless your guests enjoy watching you panic in gloves. The vat needs setup time, the fabric needs oxidation time, and the rinsing stage always takes longer than expected. A calm afternoon is perfect. Put on music, wear clothes that can survive a blue dot or two, and accept that your hands may look suspiciously artistic even through gloves.
One of the nicest discoveries is how versatile the finished wrappers become. A medium cotton shibori square can wrap a candle, a handmade soap set, a jar of jam, or a small book. A larger one can wrap a sweater or serve as a table centerpiece. Around the holidays, a stack of indigo wrappers makes gift wrapping feel intentional instead of frantic. There is also a quiet pleasure in watching someone admire the wrapping before they even open the present. Paper rarely gets that kind of respect.
There are also small surprises. The outside of a folded bundle may turn dark navy while the inner layers stay pale blue. A clamp may shift and create a strange little comet shape. A rubber band may leave a ring that looks like a moon. These accidents are often the best parts. Shibori rewards curiosity more than perfection. You can guide the process, but you cannot command every molecule of dye. Honestly, that is probably healthy for all of us.
After making several wrappers, many crafters start thinking in patterns everywhere. Napkins look like future shibori. Old pillowcases look suspiciously dyeable. Plain tote bags begin sending silent invitations. This is how a simple indigo dye kit becomes a gateway craft. One day you are making a reusable wrapper; the next day you are explaining oxidation at brunch. There are worse hobbies.
The biggest experience-based tip is to make more than one wrapper in a session. Once the vat is prepared, it makes sense to dye multiple pieces. Try one geometric itajime wrapper, one arashi wrapper, one loosely bound organic design, and one experimental piece where you let chaos have a supervised playdate. By the end, you will understand how fabric, pressure, folding, and dipping time work together. You will also have a small collection of handmade textiles that look cohesive because they share the same indigo palette.
Most importantly, enjoy the reveal. Unwrapping the bindings is the reward for all the folding and waiting. No screen preview can match that moment when the pattern opens for the first time. A shibori wrapper is beautiful because it carries the marks of process: pressure, patience, chance, and touch. In a world full of disposable packaging, that feels refreshingly personal. Also, it is blue. Deeply, wonderfully, dramatically blue. Sometimes that is reason enough.
Conclusion
An indigo dye kit for shibori wrappers is a smart, creative, and surprisingly practical project for anyone interested in textile craft. It offers the beauty of traditional resist dyeing without requiring a professional studio. With cotton fabric, careful folding, firm binding, a prepared dye vat, and a little patience, you can create reusable wrappers that are elegant, sustainable, and completely one of a kind.
The appeal of shibori is not perfection. It is the balance between control and surprise. You choose the fold, the pressure, the technique, and the number of dips, but the final pattern always keeps a little mystery for itself. That is why indigo shibori wrappers make such memorable gifts and home accents. They are useful objects with personality, proof that a humble square of fabric can become something worth keeping.