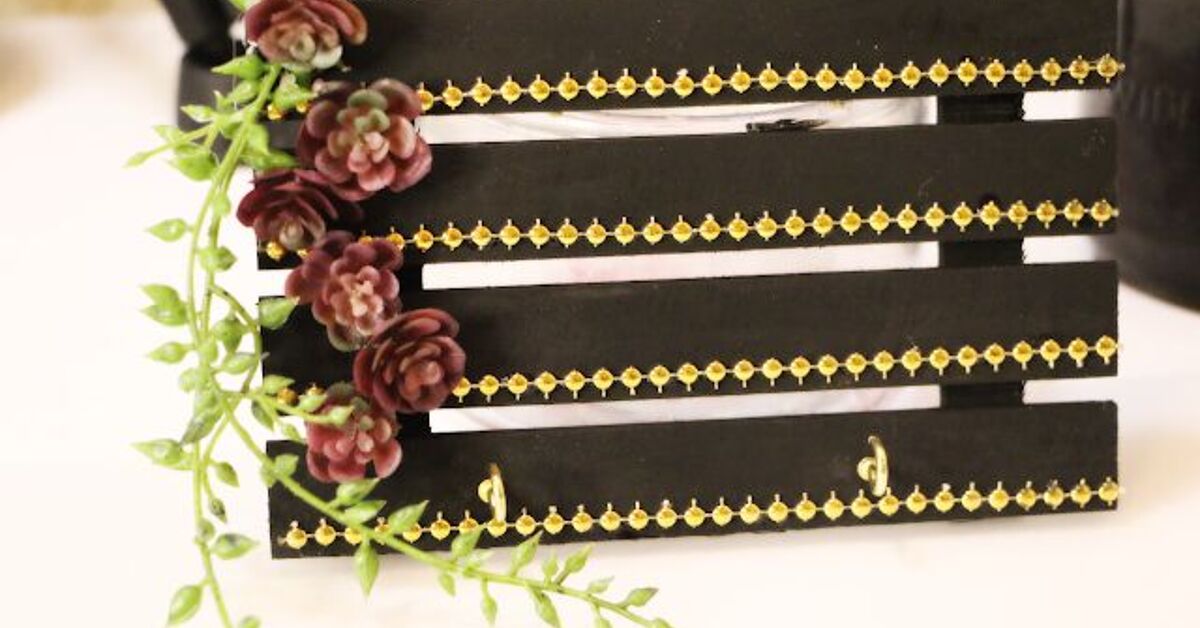
If your entryway currently has a “drop everything and hope for the best” system, this project is about to rescue your keys, your walls, and possibly your sanity. Learning how to upcycle Dollar Tree wood into a rustic succulent key holder is one of those budget-friendly DIY ideas that looks surprisingly boutique once it is finished. We are talking farmhouse charm, tiny greenery, practical hooks, and the smug satisfaction of saying, “Oh, I made that,” while pretending it did not cost less than a fancy coffee.
This rustic succulent key holder combines simple craft wood, a small planter-style accent, decorative hooks, and faux or live succulents into one useful wall organizer. It is perfect for keys, lightweight lanyards, pet leashes, sunglasses, or that one mystery key nobody in the house recognizes but everyone is afraid to throw away.
The best part? You do not need a workshop, a truck full of lumber, or the emotional courage required to use a table saw. With basic Dollar Tree craft wood, stain or paint, glue, hooks, and a few finishing touches, you can create a handmade entryway organizer that feels warm, rustic, and custom.
Why This Dollar Tree Wood Craft Works So Well
Dollar Tree’s craft section often carries lightweight wood and MDF pieces in useful sizes, including plank-style boards, hanging decor, crates, plaques, and small wood craft shapes. These pieces are ideal for small home decor projects because they are easy to paint, stain, distress, glue, and hang. For this DIY key holder, the wood becomes the backing board, while a mini succulent container adds texture and life.
A rustic succulent key holder is especially smart because it solves two decorating problems at once. First, it gives your entryway a defined landing zone for keys. Second, it adds greenery without requiring a full plant shelf, grow lights, or a dramatic conversation with a dying fiddle-leaf fig. Faux succulents are the easiest option, but small live succulents can work if you use a removable pot with drainage and avoid soaking the wood.
Materials You Will Need
Before you begin, gather everything in one place. This prevents the classic DIY shuffle, where you spend 20 minutes looking for a paintbrush that is somehow in the refrigerator. No judgment. Crafting gets weird.
Basic Supplies
- Dollar Tree wood plank, MDF board, plaque, or small crate panel
- Small Dollar Tree wood box, mini crate, metal tin, or shallow container for the succulent accent
- Faux succulents or one small live succulent in a removable nursery pot
- Three to five small screw-in hooks or cup hooks
- Wood glue, strong craft adhesive, or E6000-style adhesive
- Acrylic paint, chalk paint, wood stain, or brown craft paint
- Sandpaper or sanding block
- Paintbrush, foam brush, or lint-free cloth
- Twine, jute rope, raffia, or ribbon for rustic detail
- Picture-hanging hardware, sawtooth hanger, D-rings, or wall anchors
- Pencil, ruler, drill, or small awl for pilot holes
- Optional: clear matte sealer, wood beads, label holder, mini sign, or stencil
Choosing the Right Dollar Tree Wood
For the backing board, look for a piece that is wide enough for hooks and tall enough to support a small decorative planter. A board around 11 inches by 5.5 inches works well for a compact version, while a longer plank gives you room for more hooks and a fuller succulent arrangement. If you find a pre-hung wood sign with a design you do not love, flip it over. The back is often a blank canvas waiting for redemption.
MDF boards are smooth and easy to paint, but they do not absorb stain the same way solid wood does. If you want a stained wood look on MDF, use brown acrylic paint diluted with a little water, then wipe it back with a cloth. For real craft wood, a traditional stain or watered-down paint wash can create a warm, weathered finish.
Step-by-Step Tutorial: Rustic Succulent Key Holder
Step 1: Plan the Layout
Lay your wood board flat and place the hooks, planter container, and succulents on top without attaching anything yet. This dry layout helps you decide where everything should go. A balanced arrangement usually places the succulent container near the top or on one side, with hooks along the bottom.
Leave enough space between hooks so keys do not overlap like a metal wind chime during a thunderstorm. A good rule is to space hooks about 1.5 to 2 inches apart, depending on the size of the board.
Step 2: Sand the Wood
Lightly sand the board to smooth rough edges and help paint or stain adhere better. Sand with the grain when working with real wood, and use gentle pressure if the material is MDF or thin craft wood. Wipe away dust with a dry cloth before painting.
This step may seem small, but it makes the finished project look less “I hot-glued this during a snack break” and more “artisan entryway decor.” Tiny difference, big impact.
Step 3: Create a Rustic Finish
There are several easy ways to create a rustic finish. For a farmhouse wood look, brush on brown stain or watered-down brown paint, then wipe off the excess. Let it dry, then dry-brush white, cream, or gray paint over the surface. Use a nearly dry brush so the color catches only the raised areas and edges.
For a distressed painted look, apply a dark base coat, let it dry, then paint over it with white, sage green, charcoal, or warm beige. Once dry, sand the edges and corners to reveal the darker layer underneath. Focus distressing where natural wear would happen: corners, edges, around hooks, and near the top. Rustic style should look aged, not attacked by a raccoon.
Step 4: Seal the Surface
If this key holder will hang near a door, where it may be touched often, add a clear matte sealer. This helps protect the painted finish from fingerprints, scuffs, and the daily chaos of keys being tossed around by people who swear they are “very organized.”
Let the sealer dry fully according to the product label before adding hardware. Rushing this step can lead to smudges, peeling, or hooks that twist into soft paint.
Step 5: Attach the Succulent Container
Now attach the mini container that will hold your succulent. A small wood box, mini crate, metal tin, or tiny decorative bucket works well. Place it near the top of the board or slightly off-center for a more relaxed, handmade look.
If the container is wood-to-wood, wood glue is a clean option. Many wood glues require clamping and a full cure time, so do not hang the project immediately. If you are attaching metal, plastic, or mixed materials to wood, a strong craft adhesive may work better. Apply adhesive sparingly, press the container into place, and allow it to cure fully before adding weight.
For faux succulents, add floral foam, scrap foam, moss, or crumpled paper inside the container, then insert the stems. Top with reindeer moss, pebbles, or small wood chips for a finished look. For live succulents, use a removable tiny pot with drainage instead of planting directly into the wood container. This protects the board from trapped moisture.
Step 6: Mark and Drill Pilot Holes for Hooks
Use a ruler and pencil to mark where each hook will go. Before twisting in screw hooks, create small pilot holes with a drill bit, awl, or tiny nail. Pilot holes help prevent thin craft wood from splitting and make the hooks easier to install.
If your hooks are decorative but flimsy, keep them for keys only. This is a key holder, not a weightlifting rack for backpacks, umbrellas, winter coats, and emotional baggage.
Step 7: Install the Hooks
Twist the hooks into the pilot holes by hand until snug. If they are difficult to turn, use pliers wrapped in a cloth to avoid scratching the finish. Make sure each hook faces forward and lines up neatly with the others.
For a more rustic look, choose black, bronze, brass, or antique-style hooks. If your hooks are shiny silver and you want them aged, dab on a little black or brown acrylic paint, then wipe most of it away. Instant vintage charm, no time machine required.
Step 8: Add Rustic Details
This is where the project gets personality. Wrap jute rope around the top edge, add a small label that says “keys,” stencil a family name, or glue wood beads along the bottom. You can also add a tiny chalkboard tag for a farmhouse touch.
Keep embellishments simple. The succulent detail already adds texture, so too many extras can make the piece look crowded. Rustic decor works best when it feels collected, cozy, and slightly imperfect.
Step 9: Add Hanging Hardware
Attach a sawtooth hanger, D-rings, or sturdy picture hanger to the back. If your key holder is lightweight and only holds keys, standard picture-hanging hardware may be enough. If you plan to hang it on drywall and use it every day, wall anchors can provide extra support.
Always choose hanging hardware based on the finished weight of the project and what you plan to hang from it. Keys are fine. A 12-pound purse full of receipts, lip balm, and ancient granola bars is not.
Faux Succulents vs. Live Succulents
Faux succulents are the most practical choice for this project because they require no watering, no sunlight, and no guilt. Modern faux succulents can look surprisingly realistic, especially when grouped with moss or pebbles.
Live succulents are beautiful, but they need proper care. Most indoor succulents prefer bright light, well-draining soil, and careful watering. A container without drainage can trap water and lead to root rot, so avoid planting directly into a sealed wooden box. Instead, place a small nursery pot inside the decorative holder and remove it for watering. Let the soil drain fully before returning it to the key holder.
Design Variations to Try
Farmhouse White Key Holder
Paint the board white, distress the edges, add black hooks, and use faux eucalyptus with pale green succulents. This style works well in bright entryways, kitchens, mudrooms, and laundry rooms.
Dark Rustic Cabin Style
Use a dark walnut stain or deep brown paint wash. Add bronze hooks, burlap trim, and succulents with dusty green or burgundy tones. This version looks great with lodge, industrial, or masculine decor.
Boho Succulent Wall Organizer
Paint the wood warm tan or terracotta, add macrame cord or wood beads, and use trailing faux succulents. This version feels relaxed, sunny, and slightly vacation-minded, even if your keys are mostly going to the grocery store.
Mini Family Command Center
Use a larger wood plank and add hooks labeled for each family member. Attach a tiny clothespin for notes, a mini chalkboard for reminders, or a small envelope for mail. This turns the succulent key holder into a compact entryway organizer.
Common Mistakes to Avoid
The first mistake is using too much glue. Thick glue takes longer to cure and can squeeze out around the container. Apply a moderate amount, press firmly, and wipe away excess before it dries.
The second mistake is skipping pilot holes. Thin wood can crack when hooks are forced in. A tiny starter hole makes the project cleaner and stronger.
The third mistake is making the succulent section too heavy. A large ceramic pot may look cute, but it can pull on the board and hardware. Choose lightweight containers and faux greenery whenever possible.
The fourth mistake is hanging the key holder with weak adhesive strips if it will be used daily. Adhesive strips can work for very light decor, but repeated pulling from keys can loosen them over time. A proper hanger or wall anchor is safer for a functional piece.
How to Style Your Finished Key Holder
Hang your rustic succulent key holder near the front door, garage entrance, mudroom, kitchen command center, or hallway. Pair it with a small mirror, a mail basket, or a narrow entry table for a polished look. If your home has warm wood tones, choose brown stain and bronze hooks. If your style is coastal or cottage, use whitewash, rope, and soft green succulents.
You can also make several versions as gifts. A personalized key holder with a family name, apartment number, or “home sweet home” stencil makes a thoughtful housewarming present. Add a tiny bow and suddenly you are the crafty friend everyone both admires and fears.
Experience Notes: What Actually Makes This Project Look Expensive
After making a few budget wood projects, one lesson becomes clear: the finish matters more than the price of the wood. Dollar Tree wood can look high-end when you treat it like real decor instead of rushing through it. The biggest upgrade is layering color. A flat brown board looks okay, but a brown base with white dry brushing, light sanding, and a matte topcoat looks intentionally rustic. The layers create depth, and depth is what tricks the eye into seeing “boutique farmhouse” instead of “craft aisle experiment.”
Another experience-based tip is to test your layout before committing. It is tempting to glue the planter right in the middle because symmetry feels safe. However, slightly off-center placement often looks more natural and designer-like. Try placing the succulent container on the upper left, then running hooks along the lower right. This creates movement and keeps the piece from looking stiff.
Hardware also changes everything. The hooks are small, but they decide the personality of the whole project. Black hooks feel modern farmhouse. Brass hooks feel vintage and warm. Bronze hooks feel rustic and slightly old-world. Cheap hooks can still look great if the finish matches the rest of the piece. If they look too shiny, dab on dark paint and wipe it back. This tiny aging trick takes about two minutes and makes new hardware look collected.
For succulents, faux is usually the better choice if the key holder will hang in a hallway or entryway without bright light. Live succulents are charming, but they are not magical. They still need light, air, drainage, and careful watering. A faux succulent arrangement lets the project stay clean and lightweight. To make faux plants look more realistic, hide the plastic base with moss, pebbles, or shredded craft paper. Do not leave bare foam showing unless your design theme is “forgotten school diorama.”
One practical lesson is to let glue cure longer than you think you need to. A project can feel dry on the surface but still be weak underneath. Waiting overnight before hanging the key holder can prevent the planter from popping off later. This is especially important if you are attaching metal to wood or using a container with any weight.
Finally, think about how people actually use keys. Hooks should be easy to reach, easy to see, and far enough apart that keychains do not tangle. If your household has multiple drivers, label the hooks or vary their height slightly. The finished piece should be pretty, but it should also work on a rushed Monday morning when someone is holding coffee, mail, and the emotional burden of being five minutes late.
Conclusion
Upcycling Dollar Tree wood into a rustic succulent key holder is the kind of DIY project that delivers more style than its budget suggests. With a simple board, a small planter accent, a few hooks, and a warm distressed finish, you can create an entryway organizer that is useful, personal, and full of handmade charm. Whether you use faux succulents for zero-maintenance greenery or a removable live succulent pot for a natural touch, the result is a practical decor piece that keeps keys in place and makes your wall look intentionally styled.
The secret is patience: sand the wood, build up the finish, space the hooks carefully, and let adhesives cure properly. Do that, and your humble Dollar Tree supplies can become a rustic key holder that looks like it came from a cute home boutique where everything smells faintly of cedar, vanilla, and financial danger.