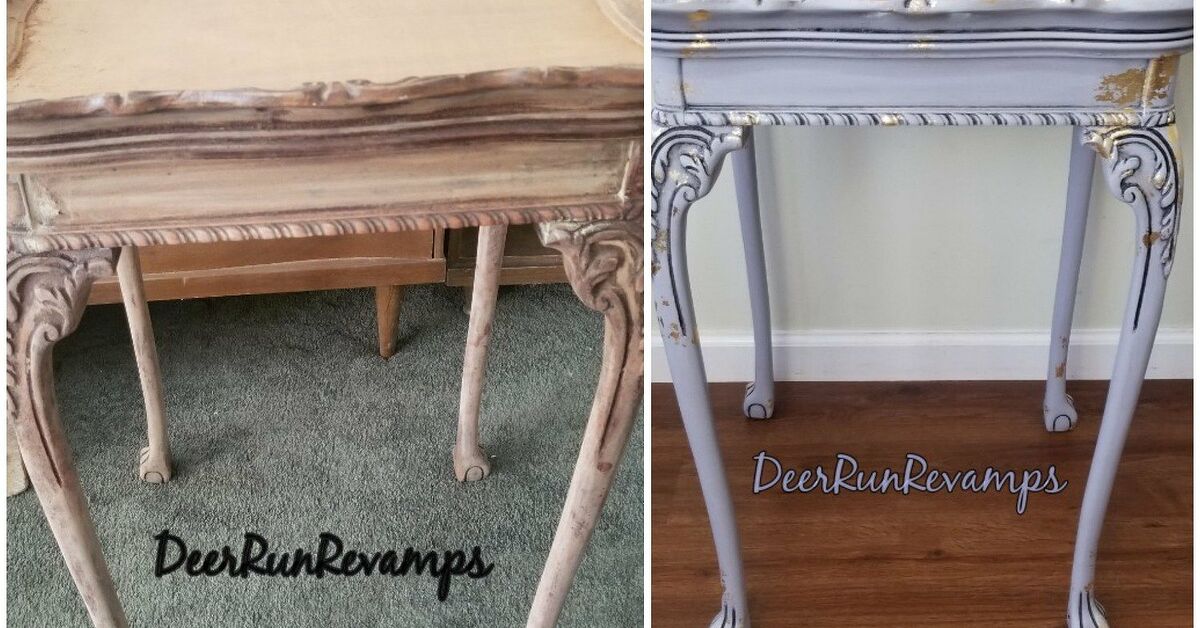
A thrift-store table can have the sturdy bones of an heirloom and the surface appearance of something that lost a bar fight in 1997. That is exactly why it makes such a satisfying makeover. With homemade chalky paint, a little gold leaf, and patient preparation, an inexpensive side table can become a custom accent piece that looks collected rather than rescued from beside a stack of VHS tapes.
This tutorial works for a small wood, veneer, laminate, or MDF table. The finished design combines a soft matte color with controlled flashes of gold on the feet, trim, drawer front, or tabletop edge. Depending on the color and placement, the result can look vintage, modern, French-inspired, glam, or delightfully eccentric.
Why This Thrift Store Table Makeover Works
Chalk-style paint has a thick body, hides minor visual flaws, and dries to a velvety, low-sheen finish. It also sands easily, making subtle distressing simple. A homemade version starts with ordinary flat latex paint and adds a fine mineral powder for extra texture and grip.
However, “minimal prep” does not mean “paint over mystery grease.” Thrifted furniture may carry polish, candle wax, cooking residue, hand oils, or the ghosts of several earlier DIY attempts. A clean, sound, lightly deglossed surface gives every layer a better chance of staying put.
Choose a Table With Good Bones
Wiggle the table before buying it. Check the joints, legs, drawers, veneer, and underside. A loose screw is easy. Swollen particleboard, severe water damage, mold, or widespread veneer failure can turn a cheerful weekend project into an unpaid furniture-restoration internship.
- Choose a stable piece with a shape you genuinely like.
- Prefer cosmetic ugliness over structural damage.
- Open drawers and doors to check alignment.
- Avoid strong odors, active insects, and crumbling materials.
- Identify whether the surface is solid wood, veneer, laminate, or MDF.
Solid wood and sound veneer are generally straightforward. Laminate and glossy factory coatings need extra deglossing and often a bonding primer. MDF can paint beautifully, but damaged edges must be sealed and smoothed. If old paint is flaking and its age is unknown, do not aggressively dry-sand it until you have considered lead-paint safety.
Materials and Tools
- Degreasing cleaner, clean cloths, and a vacuum
- 120-, 180-, and 220-grit sandpaper
- Wood filler, putty knife, and screwdriver
- Bonding or stain-blocking primer when needed
- Flat or matte water-based latex paint
- Pure calcium carbonate powder
- Measuring tools, mixing cup, and stir stick
- Synthetic brush and optional small foam roller
- Painter’s tape
- Metal-leaf adhesive, imitation gold leaf, and a soft dry brush
- Metal-leaf sealer and a compatible furniture topcoat
- Drop cloth, gloves, eye protection, and suitable dust protection
Homemade Chalky Paint Recipe
Calcium Carbonate Formula
- 1 cup flat or matte latex paint
- 4 tablespoons pure calcium carbonate powder
- 1 to 2 tablespoons warm water, added gradually
Mix the calcium carbonate with one tablespoon of warm water to create a smooth slurry. Stir in a small amount of paint, blend out every dry pocket, and then add the remaining paint. If the mixture resembles cake frosting, add more water one teaspoon at a time. It should brush smoothly without becoming runny.
Mix only what you expect to use because homemade chalky paint may thicken as it sits. Before painting the visible surfaces, brush a sample underneath the table. Let it dry and test its adhesion with a fingernail. This tiny experiment can expose contamination, weak bonding, or an overly gritty recipe before the whole table becomes involved.
How To Paint the Thrift Store Table
1. Disassemble, Clean, and Repair
Take “before” photos, remove knobs and drawers, and label the hardware. Vacuum dust from corners and wash the entire piece with a grease-cutting cleaner or mild dish soap. Wipe away cleaner residue and let the table dry fully.
Tighten joints, replace missing screws, and fill dents or unused hardware holes. Let filler dry, then sand it flush. Glue down small lifted areas of intact veneer. Badly shattered veneer may need to be removed and the transition leveled before painting.
2. Sand and Prime Strategically
You rarely need to strip the table to bare wood. Instead, dull glossy finishes with 180- to 220-grit sandpaper. Use a coarser grit only for rough repairs, then refine the area. Vacuum thoroughly and remove the final dust with a clean cloth.
Use primer on laminate, slick factory finishes, raw MDF, heavily patched areas, knotty wood, or stains that may bleed through a light color. A bonding primer improves grip, while a stain-blocking primer isolates discoloration. Let it dry according to the label and sand lightly if the surface feels rough.
3. Plan the Paint Color and Gold Placement
Gold leaf looks most intentional when it has a clear job. Use it to cap the feet, outline the top, frame a drawer, highlight carving, or cover one irregular corner. Avoid gilding every inch unless the theme is “minor European monarchy.”
Reliable combinations include charcoal and warm gold, deep navy and antique gold, dusty green and champagne gold, creamy white and distressed gold, or muted terracotta and bright gold.
4. Apply Two Thin Paint Coats
Stir the paint frequently because the mineral powder can settle. Apply a thin first coat with a synthetic brush. Follow the grain for a smooth finish or use loose crosshatch strokes for more rustic texture. Do not keep brushing areas that have started to dry; overworking chalky paint creates drag marks and rolled crumbs.
After the first coat dries, lightly sand with 220-grit paper if you want a smoother finish. Remove the dust and add a second thin coat. A foam roller can help on broad, flat areas, followed by a light brush pass to level the texture.
5. Distress Only Where Wear Would Happen
For a vintage look, gently sand corners, feet, edges, and areas near pulls. These places naturally wear over time. Random bare spots in the center of a drawer tend to look less like history and more like an argument with sandpaper. For a clean, modern result, skip distressing entirely.
How To Apply Gold Leaf
1. Mask the Design
Let the paint dry thoroughly before applying low-tack painter’s tape. For gilded feet, measure the same height on every leg. For a narrow rim, place two parallel tape lines and press the edges down carefully.
2. Brush on Leafing Adhesive
Apply a thin, even coat of metal-leaf adhesive, also called sizing. Avoid puddles, which can create ridges under the delicate leaf. Wait until the adhesive reaches the tacky stage specified on its label. Many water-based products change from milky to clear, but the manufacturer’s directions should control your timing.
3. Place and Burnish the Leaf
Lay imitation gold leaf over the tacky area. Transfer leaf is easiest for beginners because the backing supports the sheet. Press gently with the backing paper or a soft, dry brush, overlapping sheets slightly.
Brush away loose fragments and press leaf into carved details. Patch visible gaps with a little more adhesive and small scraps of leaf. Tiny cracks, seams, and overlaps are part of the hand-applied character, not evidence that the gold has filed a complaint.
4. Remove the Tape and Seal the Finish
Peel tape back slowly at a low angle. Sharpen imperfect lines with a small artist’s brush and the base color.
Unsealed chalky paint is vulnerable to moisture and abrasion. Decorative wax creates a soft, hand-rubbed look and suits low-use areas. A tabletop that will hold drinks, books, keys, or enthusiastic houseplants usually benefits from a more durable, compatible clear furniture topcoat.
Imitation gold leaf can tarnish, so protect it with a sealer made for metal leaf. After that layer cures, apply a compatible overall topcoat if required. Test the complete paint, leaf, sealer, and topcoat system on scrap material first because some finishes can change the gold color or alter the paint’s sheen.
Simple Gold Leaf Design Ideas
Gilded Feet
Cover the bottom two or three inches of each leg. The result is balanced, easy to mask, and forgiving for first-time leafing.
Gold Tabletop Rim
Add a slim metallic line around the top while leaving the broad surface matte. The contrast makes the silhouette look sharper.
Asymmetrical Gold Patch
Apply leaf to one corner in an irregular shape. This works especially well over charcoal, ink blue, or warm white and can disguise a repaired area.
Highlighted Carving
Apply gold only to selected raised details. Restraint allows the ornament to read clearly instead of turning the table into a trophy.
Common Mistakes To Avoid
- Skipping cleaning: Paint cannot bond reliably through wax, grease, or polish.
- Making paint too thick: Add water gradually until it brushes smoothly.
- Using heavy coats: Thick layers dry unevenly and dent more easily.
- Leafing over soft paint: Tape and adhesive may pull up an uncured base coat.
- Applying sizing unevenly: Puddles create lumps, while skipped areas create gaps.
- Sealing without testing: Clear products may change the sheen or metallic color.
- Using the table too soon: Dry layers still need time to cure and harden.
Frequently Asked Questions
Can I Make Chalky Paint With Baking Soda?
Yes, but baking soda creates a rougher, ceramic-like texture. Calcium carbonate generally produces a smoother furniture finish. Test either recipe before committing.
Do I Have To Sand?
Not always, but light sanding is sensible on glossy, damaged, or questionable surfaces. Cleaning is essential, and primer is recommended for laminate, exposed MDF, bleed-prone wood, and difficult factory coatings.
Should I Use Real or Imitation Gold Leaf?
Imitation leaf is affordable and ideal for furniture, but it should be sealed. Genuine high-karat gold resists tarnishing better, although it is unnecessary for most thrift-store projects.
How Long Before I Can Use the Table?
Follow the longest cure time listed among your paint, adhesive, leaf sealer, and topcoat. The piece may feel dry within hours while deeper layers are still soft. Use felt pads and avoid standing water or heavy objects during the early cure period.
Experience Notes: What This Project Teaches You
The first lesson is that the least photogenic work creates the best-looking result. Cleaning, repairing, and waiting rarely make exciting progress pictures, yet they determine whether the finished surface feels convincing. A tabletop may appear clean until a damp white cloth turns gray-brown. That cloth is proof that furniture stores memories in ways nobody requested.
The second lesson is to mix less paint than your confidence tells you to mix. One cup covers more small-table territory than expected when the coats are thin. Large batches thicken while you work and encourage waste. A smaller container is also easier to stir frequently, keeping the calcium carbonate suspended from the first leg to the last.
Brush choice changes the personality of the finish. A soft synthetic brush creates a calmer, more tailored surface. A rounded chalk-paint brush leaves visible movement and texture. Neither is automatically better. The mistake is deciding you want sleek, modern furniture after enthusiastic farmhouse brush strokes already cover the entire top.
Gold leaf teaches patience more dramatically. If the adhesive is too wet, the sheet slides, wrinkles, and clings everywhere except the intended spot. If it is too dry, the leaf behaves like expensive confetti. The useful moment is tacky rather than liquid. Work in small sections and follow the product timing instead of coating the entire table and racing it like a game-show challenge.
Imperfect leaf often looks richer than metallic paint. Tiny seams catch light differently, while cracks and overlaps reveal that the finish was applied by hand. Beginners commonly keep patching until the gold becomes heavy and flat. Step back every few minutes. What seems irregular from six inches away may read as beautiful texture across the room.
Masking deserves respect because matte paint can remain delicate before sealing. Let the base coat dry, use suitable low-tack tape, and remove it slowly. When a line is imperfect, a small artist’s brush usually repairs it faster than re-taping the entire design and reopening diplomatic negotiations with the table.
The most practical lesson concerns the topcoat. A guest-room table has different needs from a living-room table that hosts coffee, keys, remotes, and a cat who regards every flat surface as public infrastructure. Wax feels warm and traditional, but a durable, compatible clear coat is usually easier for a hard-working top. Designing for actual life does not make the project less artistic; it keeps the reveal attractive after the photograph.
Finally, restraint often looks more luxurious than abundance. One gold rim or four gilded feet can transform the entire piece. Let the matte color provide quiet space and allow the gold to appear where light naturally finds it. The table does not need to deny its thrift-store past. It only needs a better next chapterand perhaps a coaster.
Conclusion
Transforming a thrift-store table with homemade chalky paint and gold leaf is less about hiding an old object and more about editing it. Clean the surface, repair what matters, mix a reliable paint, build color with thin coats, place gold where it strengthens the design, and seal the finish for the way the table will actually be used.
The materials are accessible, the techniques are beginner-friendly, and the finished piece can look far more expensive than its price tag. Best of all, nobody else will own the same tableeven if its previous owner once used it to display a porcelain goose.