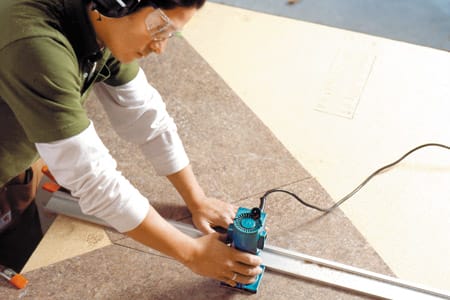
If you have ever stared at an L-shaped kitchen corner and thought, “How hard can one little angle be?”welcome to the club. Mitering corners in a laminate countertop looks simple from across the room and dramatically less simple once you are holding clamps, sealant, a wrench, and your pride. The good news is that it is absolutely doable when you understand the sequence. The bad news is that rushing it can leave you with a seam that looks like it lost an argument.
This guide walks through how to miter corners in a laminate countertop the smart way: measuring accurately, dry-fitting carefully, sealing against moisture, tightening the joint in the right order, and making the seam look clean instead of “character-building.” Whether you are installing a preformed top or working with a custom mitered section, this article will help you get a tighter fit, fewer headaches, and a much better-looking finish.
What a Mitered Laminate Countertop Corner Actually Is
A mitered countertop corner is where two countertop sections meet at an angled joint, usually to form an inside corner in an L-shaped kitchen. In many laminate countertop systems, the two pieces are factory-cut to meet at a 45-degree angle, then pulled together from underneath using miter bolts. Sealant or adhesive is applied at the seam to help block water infiltration and improve the finished look.
This kind of joint matters because laminate countertops are especially vulnerable to moisture damage at seams. If water sneaks into an unsealed joint, the substrate underneath can swell, lift the laminate, and turn your countertop into a cautionary tale. So yes, the seam is a cosmetic detailbut it is also a structural and moisture-control detail.
Tools and Materials You Will Likely Need
Essential tools
- Tape measure
- Straightedge
- Clamps
- Drill and bits
- Jigsaw or circular saw with laminate-friendly blade if trimming is needed
- Router if you must cut bolt recesses or fine-tune edges
- Rubber mallet
- Miter bolt wrench or installation wrench
- Caulk gun
- File or sanding block for minor edge tuning
Materials
- Miter bolt kit
- Wood biscuits if your system uses them
- Color-matched seam sealant, waterproof adhesive, or manufacturer-recommended joint compound
- Painter’s tape
- Screws for securing countertop to cabinets
- Build-up strips or support brackets if needed
- Laminate end cap kit if you have exposed ends
Some laminate countertop kits come with pre-cut miters, bolt channels, and even branded installation kits. If yours does, treat the manufacturer instructions like sacred text, not optional literature. Improvisation is great for jazz, not countertop seams.
Before You Start: Know Whether Your Miter Is Factory-Cut or Site-Cut
There are two very different projects people lump together under the phrase “miter corners in a laminate countertop.” The first is joining two preformed laminate countertop sections that already have factory-cut mitered ends. The second is cutting laminate sheets or countertop material yourself to create the miter.
For most DIY homeowners, the common job is the first one: joining preformed sections. That is also the safer path. Factory-cut miters are usually more accurate, cleaner, and less likely to chip. If you are trying to create a 45-degree countertop cut from scratch with no proper jig, no router confidence, and no backup plan, maybe pause and respect the corner a little more.
Step 1: Make Sure the Cabinets Are Level and Secure
Before the countertop pieces ever meet, the cabinets underneath must be level, plumb, and firmly fastened together. This step is not glamorous, which is exactly why people try to skip it. Do not. A miter seam will not sit flat if one cabinet is slightly high, twisted, or drifting off into another dimension.
Use a level across cabinet runs from front to back and side to side. Shim low spots where needed. Tighten cabinet connections so the bases act like one unit. A countertop seam installed over an uneven base will often separate, bind, or create a lip that catches crumbs forever.
Step 2: Dry-Fit the Countertop Pieces
Place the countertop sections on the cabinets without adhesive or sealant first. This dry fit lets you confirm three things: the walls are close enough to square, the mitered front edges align properly, and the backsplash sections meet without a visible jump.
During the dry fit, check the seam from above and from the front edge. The most important visual line is usually the front profile because that is where everyone’s eyes go first. If the front edge looks off, the whole installation looks off, even if the rest is technically acceptable.
If the wall is not perfectly squareand surprise, many are notyou may need light scribing along the backsplash or a slight adjustment at the rear. The goal is not perfection in a mathematical sense. The goal is a seam that looks tight and a top that sits naturally against the wall without forcing the joint apart.
Step 3: Prepare the Miter Joint Hardware
Most preformed laminate countertop corners use miter bolts installed underneath the seam. Some systems also use biscuits to help align the two sections. If the bolt recesses are factory-made, fantastic. If not, routing them accurately becomes part of the job, and that demands patience and the right jig.
Lay the countertop pieces upside down or tilt them safely for access if needed. Test-fit the bolts and any alignment pieces before applying sealant. This is not the moment to discover that your wrench does not fit or that a bolt slot is packed with debris.
If your kit uses biscuits, insert them dry first so you know they seat properly. They help keep the two pieces aligned as you pull the seam together, which can prevent that annoying mismatch where one section sits slightly higher than the other.
Step 4: Apply Sealant or Adhesive to the Mitered Edges
This is the point where things get real. Run a continuous bead of the manufacturer-recommended sealant or waterproof adhesive along the full mitered edge. The purpose is to seal the seam from moisture, not create a sticky swamp. Use enough to coat the joint thoroughly, but not so much that it becomes a dramatic overflow event.
Make sure the bead reaches the full depth of the seam, especially near the backsplash and front edge. Those are the zones where water likes to camp out. A complete seal is one of the biggest differences between a seam that lasts and a seam that starts failing after a few enthusiastic dishwashing sessions.
Step 5: Pull the Miter Together in the Right Order
Bring the two countertop sections together carefully. Install the miter bolts loosely at first so the joint is held but still adjustable. Align the front edges first. That is your visual priority. Once the front profile is flush, check the backsplash alignment and the top surface height.
Now tighten gradually, not like you are trying to win a strongman contest. Alternate between bolts so the pressure draws the joint together evenly. If you crank one side down too quickly, the seam can twist, shift, or create a high spot. Tighten, check, adjust, repeat.
If one section sits slightly proud, use a wood block and a rubber mallet to tap it gently into alignment. The wood protects the laminate surface from impact damage. Do not hammer directly on the countertop unless your remodeling plan includes learning how to buy a replacement piece.
Step 6: Clean the Seam Immediately
Once the miter joint is tight and aligned, wipe away the squeeze-out right away using the product recommended cleanup method. Some sealants skin over quickly, and once they harden, cleanup becomes a tiny, irritating side quest.
The finished seam should look narrow, sealed, and reasonably even. Laminate seams are rarely invisible, so do not chase fantasy. What you want is clean, tight, and intentional-looking. Think “professional finish,” not “mystically vanished joint.”
Step 7: Secure the Countertop to the Cabinets
After the seam is assembled, fasten the countertop to the cabinets from below. Use screws of the correct length so they do not punch through the laminate top. That would be memorable in the wrong way.
Many installations use corner brackets, build-up strips, or inside cabinet rails to receive screws. Secure the top without overdriving fasteners. You want it held firmly, not stressed into submission. If the countertop includes an overhang, confirm whether extra supports or brackets are required.
Step 8: Seal the Wall Joint and Finish Exposed Ends
Once the top is secured, apply caulk where the backsplash meets the wall. This helps block splashes and gives the installation a more finished appearance. If the countertop has a cut end, install the matching end cap or edging according to the system’s instructions.
These details are easy to overlook because by this point you feel like a hero who has conquered geometry. Finish them anyway. Small trim details are what make the project look complete instead of “mostly done and emotionally complicated.”
Common Mistakes When Mitering Laminate Countertop Corners
1. Ignoring cabinet level
If the base is uneven, the seam will fight you from the beginning. Many ugly joints are really cabinet problems wearing countertop costumes.
2. Tightening one bolt all the way first
This can twist the seam or create a lip. Tighten gradually and evenly.
3. Using too little sealant
A dry spot in the seam becomes a moisture entry point. Water is patient, and particleboard is not.
4. Focusing only on the backsplash
The front edge is the most visible alignment point. Get that flush first, then fine-tune the rest.
5. Forcing a bad wall fit
If the wall is out of square, forcing the countertop into place can open the seam. Scribing the backsplash is often the better move.
6. Over-tightening
Too much force can damage the joint, distort alignment, or stress the laminate.
How To Get a Better-Looking Seam
If your main concern is appearance, here are the practical rules that matter most:
- Start with clean, undamaged mitered edges.
- Dry-fit before adding adhesive.
- Align the front edge first.
- Tighten bolts progressively and evenly.
- Tap high spots gently with a mallet and wood block.
- Clean squeeze-out before it cures.
- Use color-matched seam materials when possible.
A good laminate seam does not scream for attention. It quietly does its job, resists water, and lets the rest of the kitchen have the spotlight.
When You Should Call a Pro
Sometimes the smartest DIY move is recognizing when the project has wandered into professional territory. Consider hiring a countertop installer if the corner angle is unusual, the wall is significantly out of square, the miter must be cut on site, or the laminate profile is complex. A custom 45-degree or odd-angle cut on a finished countertop is not the best project for “I watched two videos and now I believe in myself.”
You should also bring in help if the countertop seam sits near a sink cutout, where moisture protection is even more important. One bad seam near a wet zone can shorten the life of the entire top.
Final Thoughts
Learning how to miter corners in a laminate countertop is really about mastering sequence and restraint. You measure carefully, level the base, dry-fit the pieces, apply the right sealant, pull the joint together evenly, and clean up before the mess becomes permanent. That is the whole magic trick.
Done well, a mitered laminate corner looks neat, functions reliably, and survives daily kitchen life without drama. Done poorly, it becomes a tiny monument to impatience. So take your time, protect the seam from moisture, and remember: corners are not evilthey just demand respect.
Experience and Practical Lessons From Real-World Laminate Countertop Miter Jobs
One of the most common experiences people have with laminate countertop miters is assuming the seam problem is at the seam itself, when the real problem starts several feet below in the cabinets. Installers often discover that the first dry fit looks “wrong” because one cabinet is slightly twisted or a corner base sits a hair low. That tiny difference can make the front edge of the miter look uneven even when the factory cut is perfectly fine. In real projects, the best results usually come from slowing down at the cabinet-prep stage, using shims carefully, and checking the run from multiple directions before the countertop pieces ever touch.
Another common lesson is that dry-fitting saves enormous frustration. People who skip it tend to meet every surprise at the worst possible momentafter the adhesive is on, after the bolts are inserted, and after the pressure level in the room has reached “nobody speak to me.” In contrast, people who dry-fit first can test wall contact, front-edge alignment, backsplash position, and overhang consistency while everything is still easy to change. It is one of those boring steps that feels optional until you need it, which is almost always.
There is also a practical difference between a seam that is technically closed and a seam that looks professionally finished. Real-world experience shows that the front profile matters more than almost anything else visually. A homeowner may never notice a tiny irregularity near the wall once the backsplash caulk is in place and the coffee maker moves in. But they will notice a front edge that steps up, dips down, or refuses to line up. Experienced installers usually treat that front edge like the star of the show and let everything else take supporting roles.
Many DIYers also learn that tightening miter bolts is not a one-shot move. It is a gradual balancing act. In actual countertop installs, the seam often comes together best when the bolts are brought up in stages, with frequent checks from above. Tighten a little, check the front edge, tap lightly if needed, tighten again, inspect the backsplash line, then finish snugging the hardware. People who rush this part often end up loosening everything and starting over. That is not failure; that is just a countertop teaching patience in a very specific dialect.
Moisture protection is another area where experience tends to make believers out of skeptics. A laminate countertop can look perfectly fine on day one even if the seam sealing was sloppy. The trouble shows up later, when water works its way into the substrate and the joint begins to swell, separate, or discolor. Installers who have seen old failed seams almost always become evangelists for proper sealing. They know the seam is not just a line; it is a vulnerable boundary between daily kitchen life and expensive regret.
There is also the emotional side of the project, which no instruction sheet fully captures. A countertop miter job often begins with optimism, moves into mild confusion, visits several neighborhoods of self-doubt, and then either ends in triumph or a very long trip to the home center. The best project experiences usually belong to the people who set up the workspace well, gather every tool ahead of time, protect the laminate surface, and refuse to rush the last 10 percent. In home improvement, the last 10 percent is often where the visible quality lives.
Finally, experienced remodelers learn that success with laminate countertop corners is rarely about flashy skill. It is about careful preparation, clean technique, and knowing where not to improvise. You do not need superhero strength or mystical carpentry powers. You need a level cabinet run, accurate alignment, proper sealant, even bolt tightening, and enough humility to test before committing. In other words, mitering laminate countertop corners is less about brute force and more about disciplined detail. Not exciting dinner-party conversation, perhapsbut very exciting when your seam still looks great months later.
{ “@context”: “https://schema.org”, “@type”: “Article”, “headline”: “How To Miter Corners in a Laminate Countertop Y”, “description”: “A practical guide to measuring, joining, sealing, and finishing mitered corners in a laminate countertop for a clean, durable seam.”, “author”: { “@type”: “Person”, “name”: “ChatGPT” }, “mainEntityOfPage”: { “@type”: “WebPage” }, “about”: [ “laminate countertop”, “miter corners”, “countertop installation”, “DIY kitchen remodel”, “miter joint” ] }