Note: Clean body-only HTML, ready for web publishing and easy copying.
If drawing a cube feels manageable but drawing a four-dimensional cube sounds like geometry showing off, welcome to the club. A tesseract is the 4D cousin of the regular cube, and while nobody is casually sketching true four-dimensional space on a coffee napkin, you can draw a convincing 2D representation of it. That is exactly what this guide is about.
This article breaks the process into seven simple steps, using clear perspective logic instead of mysterious math wizardry. By the end, you will understand not only how to draw a tesseract, but also why the classic “cube inside a cube” image works so well. If you are a student, artist, doodler, or curious human who has ever wondered what a hypercube looks like on paper, you are in the right dimension.
What Is a Tesseract, Exactly?
A tesseract, also called a hypercube or 4D cube, is the four-dimensional version of a cube. Just as a square extends into a cube when you move it through a new dimension, a cube extends into a tesseract when you imagine it moving through a fourth spatial direction. Since our eyes and paper are stubbornly limited to three dimensions and two dimensions, what we draw is not the object itself, but a projection of it.
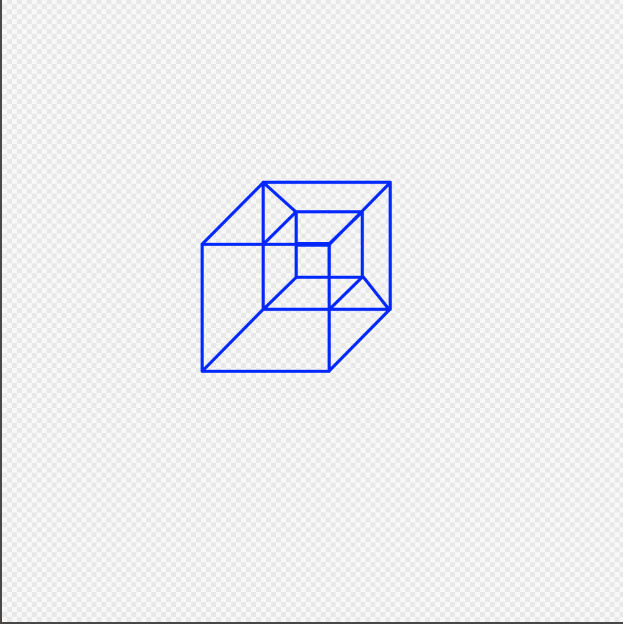
That projection is usually shown as one cube nested inside another cube, with matching corners connected. Think of it like a shadow of higher-dimensional geometry. The result looks futuristic, mathematical, and slightly like a cube that has unlocked premium features.
Why This Drawing Method Works
The easiest way to understand a tesseract drawing is to look at the pattern across dimensions. A point becomes a line when extended. A line becomes a square. A square becomes a cube. A cube becomes a tesseract. In drawings, each step often looks like a copy of the previous shape offset from the first one and connected at corresponding corners.
That means a square can be drawn as a square connected to another square. A cube can be drawn as a square connected to another square in perspective. And a tesseract can be drawn as a cube connected to another cube. Once you see that pattern, the shape becomes far less intimidating and far more fun to sketch.
What You Need Before You Start
You do not need advanced drafting tools or a PhD in topology. A pencil, eraser, ruler, and plain paper are enough. A fine-tip pen is useful if you want to trace the final lines cleanly. Colored pencils or markers can also help if you want to separate front edges, back edges, or different cubic sections of the form.
If you are a beginner, use a ruler. This is not cheating. This is geometry. Geometry practically invented the ruler fan club.
How to Draw a Tesseract in 7 Steps
Step 1: Draw the First Cube
Start by drawing a neat cube or box in simple perspective. You can use isometric style if that feels easier, or use light perspective lines for a more realistic effect. The important part is that your first cube looks balanced. Keep the vertical edges straight, and make sure the top and side edges feel consistent.
If your cube is crooked, your tesseract will also be crooked, just with extra ambition. So take a moment here. Build a solid base shape before moving on.
Step 2: Draw a Second, Smaller Cube Offset from the First
Inside the first cube, draw a second cube that is slightly smaller and shifted inward. Most people place it a little higher and to the right, or centered with a gentle offset. This inner cube represents the same cube displaced along the fourth dimension in projection.
Do not make the inner cube too tiny. If it is too small, the connecting edges will look messy. Leave enough space between the outer cube and inner cube so the structure can breathe. Good tesseract drawings usually look organized, not like a box of spilled toothpicks.
Step 3: Connect the Matching Corners
Now connect each corner of the outer cube to the corresponding corner of the inner cube. This is the step where the drawing officially graduates from “nice cube” to “hello, fourth dimension.”
Work methodically. Start at one corner and move around the shape in order. Each outer vertex should link to the equivalent inner vertex. If you rush here, lines may cross incorrectly, and the figure can start looking more like modern panic than modern geometry.
Step 4: Check the Structure for Symmetry and Clean Alignment
Pause and inspect the form. The outer cube should still read clearly as one cube, the inner cube should still read clearly as another, and the connecting segments should feel consistent. If one connection is much longer or steeper than the others, fix it now.
This is also the time to erase construction mistakes. A good tesseract drawing depends less on artistic flair and more on clean relationships between edges. Precision matters. Even a playful drawing needs a backbone.
Step 5: Decide Which Edges Are Visible
To make the shape easier to read, choose which edges should appear in front and which should recede. Darken the most visible outer edges first. Then reinforce selected edges of the inner cube. Some artists leave all lines visible for a transparent “wireframe” look, while others lighten or dash hidden edges to reduce visual clutter.
Both approaches work. A full wireframe feels mathematical and technical. A simplified version feels cleaner and more design-friendly. If your goal is clarity, reducing a few hidden lines can help the eye follow the shape faster.
Step 6: Add Depth with Line Weight, Shading, or Color
Once the structure is correct, add depth. Use heavier line weight on the front edges and lighter lines on the back. You can also shade one or two faces of the outer cube and a couple of faces of the inner cube to separate the layers visually.
Color can make a big difference here. For example, use one color family for the outer cube, another for the inner cube, and a third for the connecting edges. This makes the hypercube easier to understand at a glance, especially in classroom notes, posters, or visual math projects.
Step 7: Refine the Drawing So It Reads as a Tesseract
The final step is refinement. Straighten wobbly edges, erase leftover guide marks, and decide whether you want a clean geometric diagram or a more dramatic illustration. You can label vertices, highlight corresponding corners, or annotate the drawing as a “4D cube projection” if the audience is new to the concept.
If you want to level up, try drawing several versions: one in isometric style, one in one-point perspective, and one with heavy shading. This helps you understand that the tesseract is not one single picture, but a family of projections of the same idea.
Common Mistakes When Drawing a Tesseract
The most common mistake is drawing the inner cube without preserving the same general angle structure as the outer cube. If the two cubes do not feel related, the illusion breaks. Another frequent problem is connecting the wrong corners. This happens a lot when people start at random points instead of moving systematically around the figure.
Some beginners also over-shade too early. Get the geometry right first, then add style. A beautifully shaded incorrect tesseract is still just a very confident mistake.
Another issue is crowding the center. When the inner cube is too close to the edges, the connecting lines pile up and the drawing becomes hard to read. Give the shape space. White space is not laziness. It is visual oxygen.
Tips to Make Your Tesseract Drawing Look Better
Use a ruler for the first few attempts. Once your brain understands the structure, you can freehand it more confidently. Keep your offsets consistent so the inner cube feels like a translated version of the outer one. If you are using perspective, lightly sketch guide lines first so the cube itself looks stable before you build the tesseract on top of it.
It also helps to study ordinary cube drawings. Since a tesseract projection is built from cube logic, better cube drawing usually leads to better tesseract drawing. In other words, the road to the fourth dimension still starts with getting your regular boxes under control.
How Artists, Students, and Designers Use Tesseract Drawings
Tesseract drawings show up in math classrooms, science fiction art, logo concepts, tattoo ideas, puzzle design, and abstract illustration. Some people use them because they love geometry. Others use them because the shape instantly feels intelligent, mysterious, and slightly sci-fi without being impossible to draw.
For students, it is a useful exercise in dimensional thinking. For artists, it is a clean way to mix order and weirdness. For designers, it is a powerful symbol of complexity, structure, and hidden depth. It says, “Yes, this is a cube, but it has secrets.”
Conclusion
Learning how to draw a tesseract is really about learning how to see structure. Once you understand that the drawing is a projection of a 4D cube, the mystery starts to shrink. You are not drawing magic. You are drawing relationships: cube to cube, corner to corner, line to line.
The seven-step method makes the process approachable. First build a strong cube. Then add a smaller offset cube. Connect matching corners. Clean the geometry. Emphasize depth. Refine the final look. That is the heart of it. After a few attempts, the shape starts to feel less like an impossible object and more like a familiar visual puzzle you know how to solve.
And honestly, that is part of the charm. A tesseract still looks mind-bending even after you learn to draw one. It is one of those rare subjects that lets math and art share the same desk without fighting over the pencil.
Experiences People Often Have While Learning to Draw a Tesseract
One of the most common experiences beginners report is that the first attempt feels strangely easy at the start and strangely impossible about halfway through. Drawing the first cube is familiar. Drawing the second cube seems harmless. Then the connecting edges arrive, and suddenly the page becomes a test of patience, spatial reasoning, and whether you truly meant it when you said you liked geometry.
Another common experience is the “I know what this is supposed to be, but why does mine look like a collapsing bookshelf?” moment. That happens because the eye notices tiny proportional problems very quickly. If one edge slants too much, or one corner connects to the wrong partner, the whole form loses its rhythm. This can be frustrating, but it is also useful. Tesseract drawing trains precision in a way ordinary doodling usually does not.
Many students also discover that the drawing becomes easier the moment they stop thinking of it as a mysterious 4D object and start thinking of it as a pattern. First shape. Second shape. Match the corners. That mental shift is huge. Once the tesseract becomes a sequence instead of a monster, confidence rises fast.
Artists often describe a different experience: the shape starts as a math exercise and then becomes visually addictive. After drawing one clean wireframe version, they want to try thicker outlines, transparent faces, neon color palettes, surreal backgrounds, or floating geometric compositions. The tesseract has that effect. It begins in the notebook and somehow ends up on posters, album art, or sketchbook covers looking like it always belonged there.
There is also the very real experience of drawing three or four versions before one finally clicks. That is normal. In fact, it is practically part of the assignment. The first version teaches the structure. The second teaches proportion. The third teaches clarity. By the fourth, you are not just copying a shape. You are making decisions about line weight, depth, balance, and style.
Teachers and self-learners alike often notice that the tesseract sparks great conversations. Someone asks whether it is a real object. Someone else asks if time counts as the fourth dimension. Another person swears it looks like a portal, a puzzle, or the world’s most overachieving cube. Those reactions are part of what makes the subject memorable. The shape invites curiosity.
Perhaps the best experience, though, is the final one: the small shock of recognition when you look at your finished drawing and realize that it actually works. The lines make sense. The structure feels stable. The impossible thing looks possible enough to study. That moment is satisfying because it combines logic and imagination in a single image. And for many people, that is exactly why learning how to draw a tesseract is worth it.