If you’ve ever tried to sing along to your favorite acoustic song and felt
like the vocalist lives on a completely different planet (and in a much
higher key), it’s time to befriend one of the simplest gadgets in the guitar
world: the capo. This tiny clamp lets you change keys without learning new
chord shapes or turning your fingers into pretzels.
In this guide, you’ll learn exactly how to capo a fret on an acoustic
guitar, step by step. We’ll walk through 12 clear steps (with picture ideas),
explain what a capo actually does, show you how to avoid buzzing and tuning
nightmares, and share real-world experiences that make the technique feel
natural instead of mysterious.
What a Capo Actually Does (and Why It’s So Useful)
A capo is basically a movable nut. When you clamp it on a fret, it shortens
the vibrating length of the strings, which raises the pitch of all six
strings at once. Each fret you move up equals one half-step (semitone) of
transposition. Put the capo on the 2nd fret and you’ve just raised the pitch
of the guitar by a whole step.
The magic is that your chord shapes stay the same. A simple open C
shape becomes a brighter D-sounding chord with a capo on the 2nd fret. G
shapes suddenly live their best life as A, Bb, or beyond. You get:
- Easier ways to play in “singer-friendly” keys like Bb or Eb.
- Warm or bright tonal flavors depending on how far up the neck you go.
- Access to “barre-chord” keys without grinding through full barres.
Before You Start: Gear and Setup
You don’t need fancy equipment, but a good setup makes capoing a fret
smoother and better sounding.
- Capo type: Trigger, screw, strap, and partial capos all work. For beginners, a spring-loaded trigger capo is usually the easiest to move quickly.
- Guitar setup: If your acoustic’s action is very high or the intonation is off, a capo will exaggerate those issues. A basic setup from a tech can make a big difference.
- Fresh-ish strings: Old, crusty strings don’t respond well to extra pressure and go out of tune faster.
- Tuner: Keep a clip-on or app handy. Capos love to expose small tuning problems.
12-Step Guide: How to Capo a Fret on an Acoustic Guitar
Below are 12 simple steps to using a capo like a pro. For each step, there’s
a suggested “picture idea” you (or your photographer friend) can create for
your article or tutorial.
Step 1: Decide Why You’re Using a Capo
Start with the goal. Are you:
- Changing the key to match your voice?
- Copying the sound from a tutorial or chord chart that mentions a capo?
- Looking for a brighter, more “sparkly” tone higher up the neck?
Knowing the “why” helps you decide the “where” for capo placement.

Step 2: Pick the Target Fret
Every fret you move the capo up raises the pitch one half-step. For example:
- No capo: G chord sounds as G.
- Capo 2nd fret: G-shape chord now sounds as A.
- Capo 4th fret: G-shape chord now sounds as B.
Use a basic capo chart or the rule “up one fret = up one semitone” to find
the fret that puts the song in a singable range. If you’re unsure, start on
the 2nd or 3rd fret and experiment.

Step 3: Open the Capo and Hold It Correctly
If you’re using a trigger capo, squeeze the handle to open the clamp. If
it’s a screw or strap capo, loosen the tension first. Hold it so that the
rubber bar faces the fretboard and the hinge or handle is on the back of the
neck.

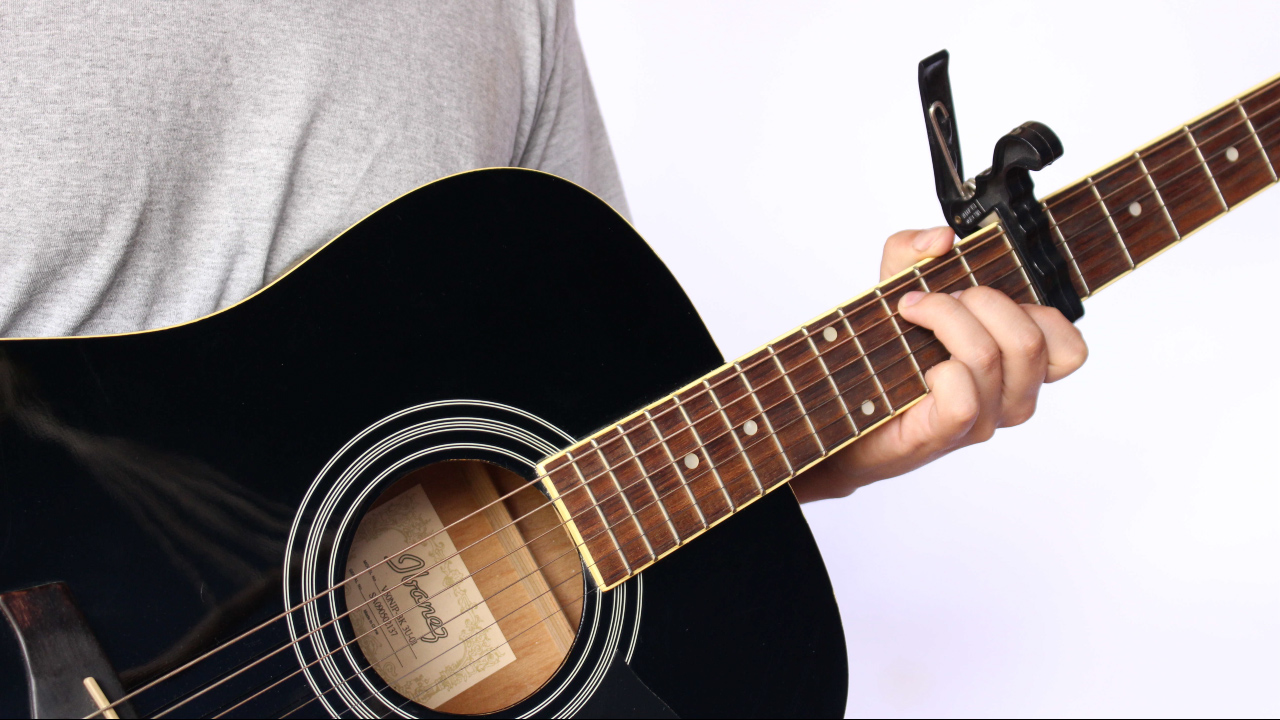
Step 4: Place the Capo Just Behind the Fret
This is the detail that makes or breaks your tone. Position the rubber bar
just behind the metal fret wireclose enough that it almost touches, but not
sitting on top of it. Avoid placing the capo in the middle of the fret or
too far back, which can cause buzzing and tuning issues.

Step 5: Make Sure the Capo Is Straight Across
Look down the neck from above. The capo should be perfectly parallel to the
fret, not angled. If one side is further forward than the other, some
strings will be pressed harder than others and may sound sharp or muted.

Step 6: Adjust the Tension
With a screw or strap capo, tighten just enough that all strings ring cleanly
when played open. Too loose and you’ll get buzzing; too tight and the
strings will go sharp and feel stiff. Trigger capos are fixed-tension, but
you can still experiment by placing them slightly closer or further from the
fret to reduce pressure.

Step 7: Check Every String for a Clean Note
Strum each string one at a time. You’re listening for:
- No buzzing or rattling.
- No dead strings (muted sound).
- Notes that don’t sound obviously sharp.
If something sounds off, move the capo slightly closer to the fret, straighten it, or lighten the tension if possible.

Step 8: Re-Tune After Placing the Capo
Even with perfect technique, many guitars go a little sharp when capoed,
especially if the action is high. Use a tuner to fine-tune each string
with the capo on. This is a pro move many beginners skip.

Step 9: Play Familiar Chords and Listen
Now try a few of your go-to chord shapesG, C, D, Em, Am. They’ll sound
brighter and higher, but they should still feel and ring like the chords you
know. This is the “aha!” moment where everything clicks.

Step 10: Experiment with Different Frets and Keys
Slide the capo up and down the neck and try the same chord progression. You
’ll hear how the mood changes:
- Capo low (1st–2nd fret): similar to open chords with a slight lift.
- Capo mid (3rd–5th fret): brighter, “singer-songwriter” territory.
- Capo high (7th+ fret): chiming, mandolin-like textures.

Step 11: Remove the Capo Safely
To take the capo off, reverse the process gently. Squeeze the trigger or
loosen the screw and lift it straight off the strings rather than dragging
it along the neck. Dragging can pull strings sideways, knock your tuning out,
or leave marks on the neck over time.

Step 12: Store the Capo Where You’ll Actually Use It
The most advanced capo technique of all: not losing it. Clip it on the
headstock, keep it in your case, or designate a “capo pocket” in your gig
bag. If it’s visible and reachable, you’re more likely to experiment with it
instead of avoiding songs that use one.

How Capo Placement Changes Chords and Keys
Think of the capo as a movable “zero fret.” When you put the capo on the 3rd
fret, that fret becomes your new open position. Your usual open chord
shapes now sound three semitones higher:
- Open G shape with capo 3: sounds as Bb.
- Open C shape with capo 2: sounds as D.
- Open D shape with capo 5: sounds as G.
A quick practical example: suppose a song is written in D major but uses
chords like D, G, and A, which are okay but feel a bit “stiff” for your
strumming. Put a capo on the 2nd fret and play C, F, and G shapes instead.
The song still sounds in D, but the chord voicings are warmer and friendlier
for open-string strumming.
Common Capo Mistakes (and How to Fix Them)
Mistake 1: Capo in the Middle of the Fret
If you smack the capo right in the center of the fret space, you’ll often
get buzzing or notes that sound dull. Always nudge it close to the fret wire
without going directly on top of it.
Mistake 2: Over-Clamping the Strings
Too much pressure pulls strings sharp. If your acoustic already has heavy
strings and higher action, a very strong trigger capo can make every chord
sound slightly out of tune. Switch to a screw-style capo with adjustable
tension or experiment with slightly backing off the pressure where possible.
Mistake 3: Slanted Capo
A crooked capo = uneven pressure. If your top strings are ringing clearly
but the low E is buzzing, or vice versa, check that the capo is perfectly
parallel to the fret and centered over the fretboard.
Mistake 4: Never Tuning After Capoing
The fastest way to sound amateur is to slap a capo on and start playing
without checking tuning. Get in the habit of a quick tune-check every time
you move the capo, especially before recording or performing.
Mistake 5: Ignoring the Guitar’s Setup
If you’re constantly fighting sharp chords and weird intonation with any
capo on any fret, the problem might be your guitar, not your technique.
High nut slots, uneven frets, or a poorly compensated saddle can all cause
pitch issues that are magnified by a capo. A professional setup can make
your capo behave much better.
Choosing the Right Capo for Your Acoustic Guitar
You don’t need a drawer full of different capos, but understanding the
options helps you avoid frustration:
-
Trigger (spring) capo: Quick, one-handed, ideal for live use and beginners.
Downside: fixed tension that might squeeze too hard on some guitars. - Screw or clamp capo: Slower to move, but you can dial in just the right pressure for clean notes without going sharp.
- Strap or toggle capo: Lightweight and cheap, but a bit fiddly and often less precise.
- Partial capo: Covers only some strings for creative alternate voicings. Fun for later experiments.
For a beginner on a steel-string acoustic, a mid-quality trigger or
adjustable screw capo from a reputable brand is usually the sweet spot:
reliable, gentle on the neck, and easy to use.
Extra : Real-World Experiences with Capos
Learning how to capo a fret on an acoustic guitar isn’t just a technical
skill; it changes how you think about songs, keys, and even your own voice.
Here are some real-world scenarios and “lessons learned” that will help you
get comfortable using a capo in everyday playing.
When the Singer Can’t Hit the High Notes
Picture this: you’re at a small open mic, about to play a classic tune in
the key of G. During soundcheck, the singer quietly admits, “Those high
notes are killing me.” Instead of rewriting the whole song, you can keep your
familiar G, C, D shapes and simply move the capo.
For example, drop your shapes down to E, A, B7 and place the capo on the 2nd
fret. The audience still hears the song in F# or G-like territory (depending
on the original arrangement), but the vocalist gets a slightly lower,
more comfortable range. To everyone else, you look like a wizard who fixed
the problem in ten seconds.
Using a Capo to Avoid Barre-Chord Burnout
Many beginner-friendly chord charts are written in keys like F or B minor,
which love to throw full barre chords at your not-quite-ready index finger.
One of the best capo “aha” moments happens when you realize you can move the
song into friendlier open shapes.
Let’s say the song uses F, Bb, and C. That can be rough if you’re still
working on clean barre chords. Instead, put the capo on the 3rd fret and use
open D, G, and A shapes. Rhythmically, you can relax; tonally, the sound is
chimier; and your left hand will thank you the next morning.
Creating Different Textures with Multiple Guitars
If you ever jam with another guitarist, the capo becomes a secret weapon for
avoiding the “muddy wall of sound” problem. When both guitars strum the same
chords in the same register, they can blend in a way that’s more mush than
music.
Try this: Guitarist A plays open chords in the original key. Guitarist B
puts a capo on the 5th fret and uses shapes that produce the same harmony
higher up the neck. Suddenly you have a two-guitar arrangement with a built-in
shimmer and clarity. This trick works beautifully for folk, pop, country,
and worship music.
Getting Comfortable Moving the Capo Mid-Song
Some arrangements use different capo positions between songs in a setor
even between sections of the same song. At first, this feels like juggling,
but with a bit of preparation, it becomes second nature.
Practice a “capo change drill”: start with capo on the 2nd fret, strum a
chord progression, then quickly release and move the capo to the 4th fret,
re-tune if needed, and continue. Focus on smooth, deliberate hand movements.
The goal isn’t speed at first; it’s accuracy and consistency. Over time,
you’ll be able to reposition the capo between songs without breaking the
flow of the set.
Learning the Fretboard Through Capo Use
Ironically, using a capo can actually help you learn the neck
better. When you know that a G shape at capo 2 sounds as A, or that a C
shape at capo 4 sounds as E, you start connecting chord shapes to actual
note names and intervals.
Try a simple exercise: pick one shape, like C. Move the capo up the neck and
say out loud what that C shape is sounding as at each fretC#, D, Eb, E, F,
and so on. You’ll reinforce your understanding of musical alphabet steps
while building confidence with the capo.
Accepting That “Perfect” Intonation Is a Myth
Finally, a small dose of realism: most acoustic guitars are never perfectly
in tune across the entire neck, even without a capo. When you clamp one on,
you’re adding a new variable. It’s normal to have a chord or two that feels
a hair sharp or flat compared with the open strings.
The goal isn’t mathematical perfection; it’s musical
believability. If it sounds good to your ear, stays reasonably in
tune across common chords, and doesn’t distract you or your listeners, you’re
winning. With a good setup, careful capo placement, and a quick tuning check,
your acoustic guitar will sound great in real-world situations.
The more you experiment, the more natural it will feel to grab the capo any
time you pick up the guitar. Eventually, “How do I capo a fret?” turns into
“Which fret do I feel like today?”
Conclusion
Using a capo on an acoustic guitar isn’t complicated, but doing it
well takes a little intention. By choosing the right fret,
positioning the capo just behind it, adjusting the tension, and checking
your tuning, you’ll avoid the buzzing, sharp notes, and frustration that
many beginners run into.
From transposing songs to match your voice to creating layered textures with
other guitarists, the capo is one of the most powerful tools in your case.
Follow these 12 steps, keep experimenting, and soon sliding a capo up and
down the fretboard will feel as natural as strumming your favorite chord.