A wood range hood cover is one of those kitchen upgrades that makes people suddenly say things like, “Wow, did you remodel?” when all you really did was hide a boring metal vent under a handsome wooden jacket. It is the kitchen equivalent of putting a tailored blazer over a plain T-shirt: same basic function, much better entrance.
The good news is that building a DIY wood range hood cover is absolutely doable for a patient homeowner with basic carpentry skills. The important part is remembering that the wood cover is decorative, while the actual range hood insert or vent does the hard work of removing steam, smoke, grease, heat, and cooking smells. In other words, the wood is the tuxedo; the ventilation system is the bouncer at the door.
This guide walks you through planning, measuring, framing, covering, trimming, finishing, and installing a custom wood range hood cover. It also explains how to avoid common mistakes, such as building too close to heat, blocking access to filters, forgetting about ductwork, or creating a beautiful wooden sculpture that your range hood insert cannot actually fit into. We are aiming for custom-kitchen charm, not an expensive lesson in “measure twice, sigh loudly once.”
What Is a Wood Range Hood Cover?
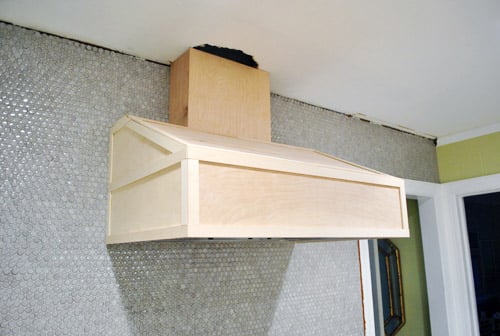
A wood range hood cover is a decorative enclosure built around a working range hood insert, under-cabinet hood, or liner. It can be simple and boxy, sloped like a farmhouse hood, wrapped in shiplap, painted to match cabinets, stained to show off natural grain, or trimmed with molding for a more traditional look.
The cover should never replace the mechanical hood itself. A safe setup includes a properly rated range hood or insert, correct clearance above the cooking surface, accessible filters, and ducting or recirculation according to the manufacturer’s instructions. The cover simply gives the appliance a built-in look.
Before You Build: Plan the Ventilation First
Choose the Range Hood Insert Before Cutting Wood
The biggest beginner mistake is designing the wooden cover first and shopping for the insert later. That is like buying shoes and then hoping your feet will adapt. Start with the range hood insert or vent unit. Read the manual carefully and note the required opening size, mounting method, duct size, control location, electrical requirements, and minimum clearance from the cooktop.
Most custom wood range hood covers are built around a range hood insert. Inserts are made to sit inside a cabinet, liner, or custom enclosure. They usually have lights, fan controls, removable filters, and a metal body. Your wooden frame must support the insert securely while leaving room for air movement, duct connection, and future cleaning.
Think About CFM and Cooking Style
Range hood power is measured in CFM, or cubic feet per minute. For many standard cooking surfaces, a common rule of thumb is about 100 CFM per linear foot of cooking surface. For high-output gas ranges, many guides recommend matching airflow more closely to burner output. Heavy frying, wok cooking, and frequent high-heat searing generally need stronger ventilation than occasional pasta boiling.
Do not choose the fan based only on what fits your mood board. A pretty hood that cannot clear smoke is just kitchen jewelry with a plug. Consider your range width, cooking habits, duct path, and whether your home may require makeup air for higher-CFM systems.
Ducted or Ductless?
A ducted range hood sends air outdoors through metal ductwork. This is usually the most effective option for removing heat, moisture, grease, and odors. A ductless or recirculating hood filters air and returns it to the kitchen, which can work in some spaces but requires regular filter replacement and does not remove moisture as effectively.
If you are adding new ductwork, this may become a job for a professional, especially if exterior wall cutting, roof penetration, electrical changes, or code questions are involved. DIY confidence is wonderful; guessing around wiring and fire safety is not.
Tools and Materials You May Need
Common Tools
- Tape measure
- Level
- Stud finder
- Miter saw or circular saw
- Jigsaw or oscillating tool
- Drill and driver bits
- Brad nailer or finish nailer
- Clamps
- Caulk gun
- Sander
- Safety glasses, hearing protection, and dust mask
Common Materials
- Range hood insert or under-cabinet range hood
- 1×2, 1×3, or 2×4 boards for framing
- Quarter-inch or half-inch plywood for panels
- Finish trim, lattice, cove molding, crown molding, or base cap molding
- Wood glue
- Wood screws
- Brad nails or finish nails
- Wood filler
- Paintable caulk
- Primer
- Cabinet-grade paint, stain, or clear topcoat
- Metal ducting if the hood is ducted
Use materials appropriate for a kitchen environment. Paint-grade plywood is great for a smooth painted hood. Oak, maple, poplar, or pine trim can add character. If you want a stained wood range hood cover, choose attractive boards with matching grain and avoid warped lumber unless you enjoy arguing with rectangles.
Step 1: Measure the Space Carefully
Measure the width of your range or cooktop, the distance between surrounding cabinets, the ceiling height, and the available wall space. A hood is often the same width as the range or slightly wider. Some installation guidance suggests the hood should extend beyond the cooking surface when possible, which helps capture rising steam and smoke more effectively.
Next, decide the bottom height of the hood. Many inserts are installed roughly 30 to 36 inches above the cooking surface, but your exact number must come from the appliance manual, the range manual, and local code. Gas ranges, high-output burners, and combustible materials require special attention. When in doubt, choose safety over a dramatic low-profile look.
Write down three critical measurements: the outside width of the cover, the total height, and the depth from the wall. Then write down the insert opening dimensions. Tape these measurements to the wall if needed. There is no shame in labeling your kitchen like a detective board if it prevents a bad cut.
Step 2: Mark Studs and Plan Support
A wood range hood cover can become surprisingly heavy after framing, plywood, trim, paint, and the insert are added. Do not rely on drywall anchors alone. Locate wall studs and plan where the frame will be screwed into solid structure. If your cover sits between cabinets, you may also be able to fasten support cleats to cabinet sides, but the wall should still carry the main load whenever possible.
Install a horizontal ledger board or cleat into the studs at the height where the hood frame needs support. Use a level so the hood does not end up leaning like it heard bad news. If there are no convenient studs in the right places, add blocking inside the wall or consult a contractor.
Step 3: Build the Basic Frame
The simplest wood range hood cover starts with a rectangular frame. Build a bottom frame sized to fit the range hood insert, leaving the opening required by the manufacturer. Then add vertical or angled side supports depending on the shape you want.
For a box-style cover, use straight vertical pieces and a flat front. For a farmhouse-style hood, angle the sides inward as they rise. For a chimney-style hood, build a wider lower section and a narrower upper chase that runs toward the ceiling. Dry-fit every part before fastening. Your goal is a frame that is square, level, sturdy, and roomy enough for the insert, duct, wiring access, and filter removal.
Pocket holes, wood screws, and glue can create a strong frame. Brad nails are useful for trim and panels, but they should not be the only thing holding the structure to the wall. Think of brad nails as helpful little assistants, not the entire construction crew.
Step 4: Test Fit the Insert
Before attaching decorative panels, slide or hold the insert into position. Make sure it fits into the opening, aligns with the duct path, and can be fastened the way the manual requires. Confirm that controls are reachable and filters can be removed without dismantling your masterpiece.
This is also the moment to check duct clearance and airflow. Smooth metal ducting is commonly recommended over flexible duct because it creates less resistance and is easier to keep clean. Minimize elbows where possible, because every turn makes the fan work harder. If the duct needs to turn immediately above the hood, check the insert manual for minimum vertical rise recommendations.
Step 5: Add Plywood Panels
Once the frame is solid and the insert has passed its audition, cover the frame with plywood. Quarter-inch plywood works well for many decorative skins because it is lightweight and easy to cut. Half-inch plywood can provide more stiffness for larger hoods, but it adds weight.
Measure each panel separately. Kitchens are famous for not being perfectly square, and walls sometimes have the straightness of a cooked noodle. Cut the front panel, side panels, and any chimney panels. Dry-fit them, then attach with wood glue and brad nails or finish nails. Keep the underside opening clean and accurate so the insert or liner sits properly.
Step 6: Add Trim and Personality
Trim is where a plain plywood box becomes a custom hood. Add a bottom apron using a 1×4 or 1×6 board. Add lattice strips for a shaker look, cove molding for softness, crown molding at the top, or vertical battens for a board-and-batten style.
For a modern kitchen, keep the lines simple and paint the cover the same color as the cabinets. For a farmhouse kitchen, consider a stained wood band at the bottom, painted panels, or a slightly tapered shape. For a traditional kitchen, layered molding can make the hood look like built-in cabinetry. For a rustic kitchen, reclaimed wood can look beautiful, but make sure it is clean, stable, sealed, and appropriate for the heat and grease environment.
Step 7: Fill, Sand, Caulk, and Finish
Fill nail holes with wood filler and let it dry. Sand the entire cover smooth, paying special attention to seams and trim transitions. Caulk small gaps where trim meets panels, especially if you are painting. A neat caulk line can make an amateur build look far more polished. It is basically Photoshop in a tube.
Prime the wood before painting, especially raw plywood and trim. Use a durable cabinet-grade paint in a satin or semi-gloss finish so the surface can be wiped clean. If staining, test the stain on scrap wood first because different species absorb color differently. Seal stained wood with a protective clear coat suitable for kitchen use.
Avoid rough, porous finishes near the cooktop. Grease loves texture. Give it grooves, and it will move in, hang curtains, and refuse to leave.
Step 8: Install the Cover and Insert
With help from another person, lift the cover onto the ledger or into position between cabinets. Check level, then fasten securely into studs and any planned side supports. Install the range hood insert according to its manual. Connect ductwork if applicable, secure electrical connections properly, and test the fan and lights.
If electrical wiring must be added or moved, hire a licensed electrician. If ductwork must pass through a wall, ceiling, attic, or roof, consider hiring a professional installer. The visible woodwork is a great DIY project; hidden systems deserve respect.
Design Ideas for a Custom Wood Range Hood Cover
Painted Cabinet-Match Hood
Paint the cover the same color as the surrounding cabinets for a built-in look. This works especially well in white, cream, sage, navy, charcoal, or warm greige kitchens.
Stained Wood Accent Hood
Use stained oak, walnut, maple, or pine for the bottom band or entire hood. Repeat the wood tone in open shelving, island trim, floating shelves, or bar stools so the hood feels intentional.
Modern Slab Hood
Skip heavy molding and use clean flat panels with crisp edges. This style pairs well with quartz counters, slab cabinet doors, and minimalist hardware.
Farmhouse Tapered Hood
A tapered hood with a wide lower apron and narrower upper chimney creates a classic farmhouse focal point. Add simple trim rather than overly ornate details if you want it to feel fresh instead of fussy.
Common Mistakes to Avoid
Building Too Low
A hood mounted too low can create heat and safety problems, block sightlines, and make tall cooks feel personally attacked. Follow the range hood and cooking appliance manuals for clearance.
Ignoring Filter Access
You will need to remove and clean filters. Do not trap them behind trim or make access so awkward that cleaning becomes a twice-a-decade archaeological event.
Using Weak Support
Fasten the structure to studs or proper blocking. A range hood cover should not wobble, sag, or rely on drywall anchors.
Forgetting Grease Maintenance
Even a beautiful custom hood gets exposed to airborne grease. Wipe the exterior regularly and clean metal filters according to the hood manufacturer’s instructions. A clean hood performs better and looks better.
Real-World Experience: What Building a Wood Range Hood Cover Teaches You
The first thing you learn when building a wood range hood cover is that kitchens are not as square as they appear in real estate photos. Cabinets may be slightly uneven, walls may bow, ceilings may dip, and your tape measure may suddenly become the most dramatic tool in the room. This is why dry-fitting is not optional. Every panel should be tested before glue or nails come out. A quarter-inch gap may not sound like much until it is staring at you above the stove every morning while you make coffee.
The second lesson is that the insert controls the entire project. Many homeowners start with inspiration photos and imagine the perfect shape, only to discover that the insert needs a larger opening, a different mounting lip, or more clearance. The smartest approach is to place the insert on the workbench, measure it from every angle, read the manual, and then build the wooden cover around that reality. Dream kitchens are lovely, but appliance manuals are the adult supervision.
Another practical experience: trim hides a lot, but it does not fix everything. If the frame is badly out of level, trim will simply decorate the problem. Spend extra time getting the ledger board level, the frame square, and the side panels symmetrical. This hidden work is not glamorous, but it is what makes the finished hood look expensive instead of “weekend project with emotional damage.”
Painting also takes longer than expected. Raw plywood edges soak up primer. Nail holes appear out of nowhere like tiny craters. Caulk lines need time to cure. If you rush the finish, the hood may look good from across the room but messy up close. A smooth painted wood range hood cover usually requires filling, sanding, priming, light sanding again, and at least two coats of durable paint. The reward is a surface that looks like custom cabinetry rather than a plywood science fair project.
One of the best design lessons is repetition. A wood hood looks most natural when it repeats something already in the kitchen. If the lower cabinets are painted navy, consider a navy hood. If the island has white oak accents, add a white oak band. If the cabinets have shaker doors, echo that with simple rectangular trim. The hood should be a focal point, but not a stranger who wandered in from another kitchen.
Finally, maintenance should be part of the design. A hood cover lives above steam, oil, tomato sauce bubbles, and the occasional ambitious stir-fry. Choose a finish that wipes clean. Keep the insert filters accessible. Avoid unnecessary ledges where grease can collect. A beautiful hood that is easy to clean will stay beautiful; a fussy one will slowly become a dust-and-grease museum.
Conclusion
Building a wood range hood cover is one of the most satisfying kitchen DIY projects because it combines function, design, and just enough carpentry to make you feel powerful with a nail gun. The key is to plan the ventilation first, choose the insert before building, respect clearance and ducting requirements, secure the frame properly, and finish the wood with a durable kitchen-friendly coating.
A custom wood hood can make a basic kitchen look thoughtfully designed. Whether you prefer a clean modern box, a warm stained wood feature, or a classic farmhouse-style cover, the process is the same: measure carefully, build safely, dry-fit constantly, and let trim do its tasteful little magic act.
Note: This guide is for building a decorative wood range hood cover around a properly rated range hood or insert. Always follow the appliance manufacturer’s instructions, local building codes, and professional guidance for electrical work, ductwork, gas appliances, and fire safety.