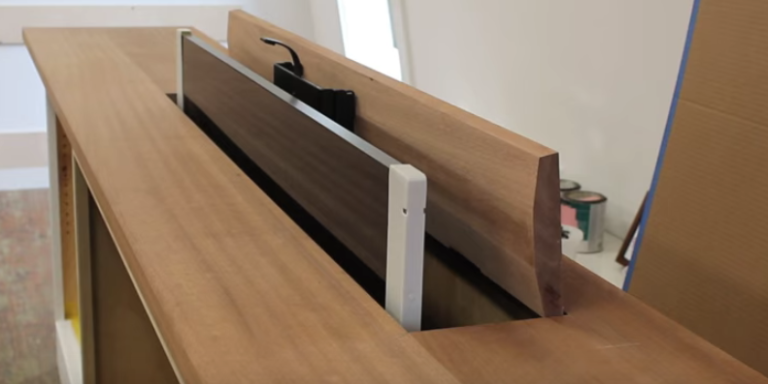
A hidden TV lift cabinet is one of those home projects that feels suspiciously fancy until you realize the core idea is simple: build a strong cabinet, install a motorized lift, mount the television securely, and make the top open cleanly when the screen rises. The magic is not wizardry. It is careful measuring, sturdy construction, and refusing to say, “That should fit,” until you have measured everything twice and muttered at your tape measure at least once.
Whether you want a pop-up TV cabinet at the foot of a bed, a living room console that hides the screen when guests arrive, or a media cabinet that keeps the “big black rectangle” from dominating your decor, this guide walks through the planning, materials, building process, and real-world lessons that make the project smoother. A DIY TV lift cabinet can look custom, protect your television, reduce visual clutter, and make your room feel calmer when the TV is not in use.
What Is a Hidden TV Lift Cabinet?
A hidden TV lift cabinet is a piece of furniture designed to conceal a flat-screen TV inside a cabinet until you are ready to watch it. A motorized TV lift mechanism raises the screen through an opening in the top, usually by remote control or a wired switch. When the TV lowers, the cabinet top closes or rests back in place, leaving the room looking like it contains a stylish console, credenza, bedroom bench, or storage cabinet rather than a media center.
The best builds blend three things: furniture design, mechanical planning, and cable management. If one is ignored, the whole project becomes annoying. A beautiful cabinet that is too shallow will not fit the lift. A strong lift mounted to a flimsy back panel will wobble. A perfect mechanism with no cable slack may yank an HDMI cord every time the TV rises. In other words, the cabinet and the lift need to be designed as one system.
Before You Build: Plan the Cabinet Around the TV Lift
The most common mistake in a pop-up TV cabinet project is designing the cabinet first and shopping for the lift later. Do it the other way around. Choose the television, choose the lift, read the lift specifications, then design the cabinet around those numbers.
Measure the TV
Measure the TV width, height, and depth without the factory stand attached. Most TV lift cabinets use the VESA mounting holes on the back of the screen, so the tabletop stand usually comes off. Also check the TV weight. Your lift must be rated for more than the actual weight of the TV, not “close enough.” Close enough is great for soup seasoning, not for a motorized mechanism holding an expensive screen.
Check Lift Stroke and Internal Height
The lift stroke is how far the lift travels upward. Your TV needs to rise high enough for the entire screen to clear the cabinet top. Internal cabinet height must also allow for the lowered TV, the lift carriage, cable bend radius, lid clearance, and sometimes a mounting board. A practical rule is to add extra breathing room beyond the TV height and lift hardware. A cabinet that works on paper but leaves only a fraction of an inch of clearance can become frustrating during installation.
Plan Cabinet Depth Carefully
Depth matters more than many first-time builders expect. The cabinet must fit the TV depth, the lift column, the mounting hardware, rear supports, cables, and a little space for airflow. If the cabinet is too shallow, the TV may scrape the lid opening or the back panel. For a sleek look, you can still build a narrow cabinet, but you need to pick a lift mechanism designed for tight spaces and use careful cable routing.
Tools and Materials
Your exact list will depend on the size and style of the cabinet, but most DIY TV lift cabinet builds use common woodworking tools and furniture materials.
Recommended Tools
- Table saw or circular saw with a straightedge guide
- Miter saw for trim and face frame cuts
- Drill and driver
- Pocket hole jig or doweling system
- Clamps
- Level
- Tape measure and square
- Sander
- Stud finder if anchoring near a wall
- Safety glasses and hearing protection
Common Materials
- 3/4-inch plywood for the main cabinet box
- 1/4-inch plywood or hardboard for a removable back or faux back
- Solid wood for trim, legs, rails, and face frames
- Motorized TV lift mechanism rated for your TV size and weight
- TV mounting hardware compatible with the lift and VESA pattern
- Hinges, lid supports, or a floating top panel system
- Vent covers, grommets, or cable pass-throughs
- Wood glue, screws, pocket hole screws, and finish nails
- Paint, stain, polyurethane, or another furniture finish
Step-by-Step: How to Build a Hidden TV Lift Cabinet
Step 1: Decide Where the Cabinet Will Go
Start with the room layout. A bedroom pop-up TV cabinet often sits at the foot of the bed, so the finished height should not block sight lines when the TV is hidden. A living room version may look like a credenza behind a sofa or against a wall. Think about viewing distance, outlet location, traffic flow, and whether the TV needs to swivel. If you need the screen to face two seating areas, look for a lift system or mount that supports rotation.
Step 2: Create a Simple Dimension Plan
Draw the cabinet from the front, side, and top. Mark the internal height, width, and depth. Include the TV, the lift column, the lid opening, the back panel, and cable paths. Leave extra room on both sides of the TV so it does not rub the cabinet during movement. For many builds, a few inches of side clearance makes installation and future maintenance much easier.
Also decide whether the cabinet will include real storage. Many builders create a faux front or shallow shelves so the cabinet still looks functional. A removable rear panel is extremely helpful because it gives access to the lift, cables, and mounting bolts after the cabinet is assembled.
Step 3: Build a Strong Cabinet Box
Cut the sides, bottom, top rails, and internal supports from 3/4-inch plywood. A TV lift cabinet should be sturdy because the mechanism creates movement and leverage. Use pocket holes, dadoes, rabbets, or reinforced butt joints depending on your skill level and tools. The goal is a square, rigid box that does not flex when the lift starts or stops.
Do not rely on a thin back panel to hold the lift. Instead, install a strong internal mounting board or frame made from plywood or solid wood. This board should connect securely to the cabinet base and sides. If the cabinet is wide, add stretchers or braces to prevent racking. A pop-up TV cabinet is furniture, but it behaves a little like a small elevator. Build accordingly.
Step 4: Cut the Top Opening
The TV needs an opening in the top of the cabinet. The opening should be long enough and wide enough for the TV to pass through without scraping. Measure the TV width and depth at its thickest point, then add clearance. Keep the cut clean because this is one of the most visible parts of the project.
There are two common lid styles. The first is a hinged lid that flips open as the TV rises. The second is a floating lid attached to the lift or resting on the TV bracket so it rises with the screen. A hinged lid can look classic and simple, while a floating lid can create a cleaner disappearing effect. In either case, test the motion slowly before final finishing.
Step 5: Install the TV Lift Mechanism
Place the lift inside the cabinet and center it behind the lid opening. Use a level to make sure the lift column is perfectly vertical. If it leans, the TV may rise at an angle, bind against the top, or look crooked when extended. Mark the mounting holes, drill pilot holes, and fasten the lift using the hardware recommended by the manufacturer.
Mounting strength is critical. The lift should be secured to a solid internal structure, not just a decorative panel. After fastening it, run the lift up and down without the TV attached. Listen for rubbing, watch for wobble, and confirm that the lift reaches the correct height.
Step 6: Attach the TV
Remove the TV stand and attach the mounting brackets to the VESA holes on the back of the TV. With help from another person, lift the TV onto the mechanism. Do not do this part alone unless the TV is very small and the lift design makes it safe. Flat screens are awkward to hold, and dropping one is a quick way to turn a DIY win into a very expensive sound effect.
Once the TV is attached, check alignment. Raise the lift slowly and watch the clearance on every side. Adjust the mounting height if the TV does not fully disappear when lowered or does not rise high enough when extended.
Step 7: Manage Cables Properly
Cable management is where many TV lift cabinet builds either feel professional or become a nest of electronic spaghetti. Use flexible cable sleeves, hook-and-loop ties, grommets, and cable pass-throughs to keep wires organized. Leave enough slack for the full range of motion, but not so much that cables fall into the lift mechanism.
Power cords, HDMI cables, streaming device cables, soundbar connections, and antenna or Ethernet lines should move freely. Run the lift several times while watching the cables. If any cord tightens, twists, catches, or rubs, fix it before closing the cabinet.
For electrical safety, avoid improvised wiring. If the project requires a new outlet or in-wall power changes, hire a licensed electrician. Low-voltage signal cables and power cords are not the same thing, and they should not be treated the same way.
Step 8: Add Ventilation
Televisions and media devices create heat. A hidden cabinet traps that heat unless you design airflow into the build. Add ventilation slots, grilles, rear openings, or a ventilated false back. If you plan to keep a streaming box, game console, receiver, or power strip inside the cabinet, ventilation becomes even more important.
A neat trick is to place vents low on one side and higher on another side so warm air has a path to escape. You can also use decorative metal grilles or slatted wood details so the ventilation looks intentional rather than like an apology cut with a jigsaw.
Step 9: Finish the Cabinet
Once the lift works correctly, remove the TV and finish the cabinet. Sand the surfaces, fill nail holes, soften sharp edges, and apply paint or stain. A hidden TV lift cabinet often looks best when it matches the room’s existing furniture style. Mid-century legs, shaker doors, cane panels, fluted trim, or a simple painted finish can all work beautifully.
For a bedroom cabinet, consider a soft matte finish that does not glare in morning light. For a living room credenza, a stained wood top and painted body can make the piece feel more like custom furniture than a tech project. If the cabinet sits behind a sofa, finish the back nicely because it may be visible.
Design Ideas for a Pop-Up TV Cabinet
Modern Credenza Style
A modern credenza is one of the easiest styles to adapt for a TV lift. Use clean lines, slab doors, tapered legs, and a simple rectangular shape. The TV disappears into the body of the furniture, while the cabinet still looks useful when closed.
Bedroom Footboard Cabinet
A footboard TV lift cabinet is perfect for people who want a bedroom TV without staring at it all day. Keep the cabinet low enough to feel proportional with the bed. Add a finished back because the side facing the bed will be visible.
Behind-the-Sofa Console
If your sofa floats in the room, a narrow lift cabinet behind it can create a theater-like experience without mounting anything on the wall. This design works especially well in open-plan living rooms where wall space is limited.
Outdoor TV Lift Cabinet
An outdoor version requires weather-resistant materials, protective covers, stainless or coated hardware, and serious planning for moisture. Use exterior-rated plywood or composite materials, choose a TV designed for outdoor use, and make sure the lift mechanism is suitable for the environment. When in doubt, build for more protection than you think you need.
Common Mistakes to Avoid
Choosing a Lift That Barely Fits
A lift that technically fits may still be a headache. Give yourself room for adjustments, cables, brackets, and airflow. Tight tolerances look elegant only when they work. Otherwise, they look like sanding, swearing, and rebuilding.
Forgetting Future Access
At some point, you may need to change an HDMI cable, reset a streaming device, adjust the lift, or replace the TV. Build a removable back panel or access door. Future you will be deeply grateful and may even forgive present you for the sawdust in the garage.
Mounting the Lift to Weak Material
A TV lift should not be mounted to thin plywood alone. Use a reinforced internal frame. The cabinet must handle movement, weight, and vibration over time.
Ignoring the Lid Motion
The lid is not just decoration. It must open and close without binding, pinching cables, or pressing on the TV. Test it many times before final assembly.
Experience Notes: What Real Builds Teach You
After studying successful hidden TV lift cabinet builds and the problems DIYers commonly run into, one lesson stands above the rest: the cabinet is not difficult because it is complicated; it is difficult because every small measurement depends on another small measurement. The TV height affects the lift stroke. The lift depth affects cabinet depth. The lid thickness affects clearance. The cable path affects where the back panel can go. Once you see the project as a system, it becomes much easier to build.
A good experience-based approach is to create a cardboard or scrap-wood mockup of the internal space before cutting expensive plywood. You do not need to build the entire cabinet in cardboard, but you should mark the TV outline, lift column, and top opening. This quick test often reveals issues that drawings miss. For example, the TV may technically fit inside the box, but the HDMI ports may face sideways and need extra room. Or the power cord may stick straight out from the back and require a low-profile adapter.
Another practical lesson is to finish less early than you want to. It is tempting to paint or stain every panel before installing the lift because fresh wood looks like progress. However, TV lift projects often require small adjustments: trimming an opening, moving a support, drilling a larger cable hole, or shifting the lift slightly. Complete the mechanical test first. Run the lift with no TV, then with the TV, then with all cables attached. Only after the motion is smooth should you commit to the final finish.
Real-world builders also learn that quiet matters. A cabinet can look perfect, but if the lid rattles every time the TV moves, the project feels unfinished. Felt pads, rubber bumpers, snug hinges, and properly tightened hardware make a noticeable difference. The same goes for cable noise. A loose HDMI cable tapping the inside of the cabinet can sound surprisingly dramatic in a quiet bedroom.
Finally, do not underestimate style. The point of a hidden TV cabinet is not only to hide electronics; it is to make the room feel intentional. Match the cabinet to your home, not to a workshop fantasy. If your space is coastal, use light finishes and simple lines. If it is traditional, add framed doors and classic trim. If it is modern, keep the cabinet flat, low, and clean. The best pop-up TV cabinet is the one that looks like it belonged in the room before anyone knew it had a secret.
Final Thoughts
Building a hidden TV lift cabinet is one of the most satisfying DIY furniture projects because it combines practical storage, clever engineering, and a little theatrical reveal. When the TV rises smoothly from the cabinet, the effect feels custom and high-end. When it disappears again, your room gets its calm back.
The key is planning. Measure the TV, choose the right lift, build a rigid cabinet, leave space for cables and ventilation, and test the mechanism before finishing. A pop-up TV cabinet does not need to be overly complicated, but it does need patience. Build it carefully, and you will end up with a piece of furniture that hides your screen, upgrades your room, and gives you the tiny joy of pressing a button like you live in a secret-agent movie.