“`
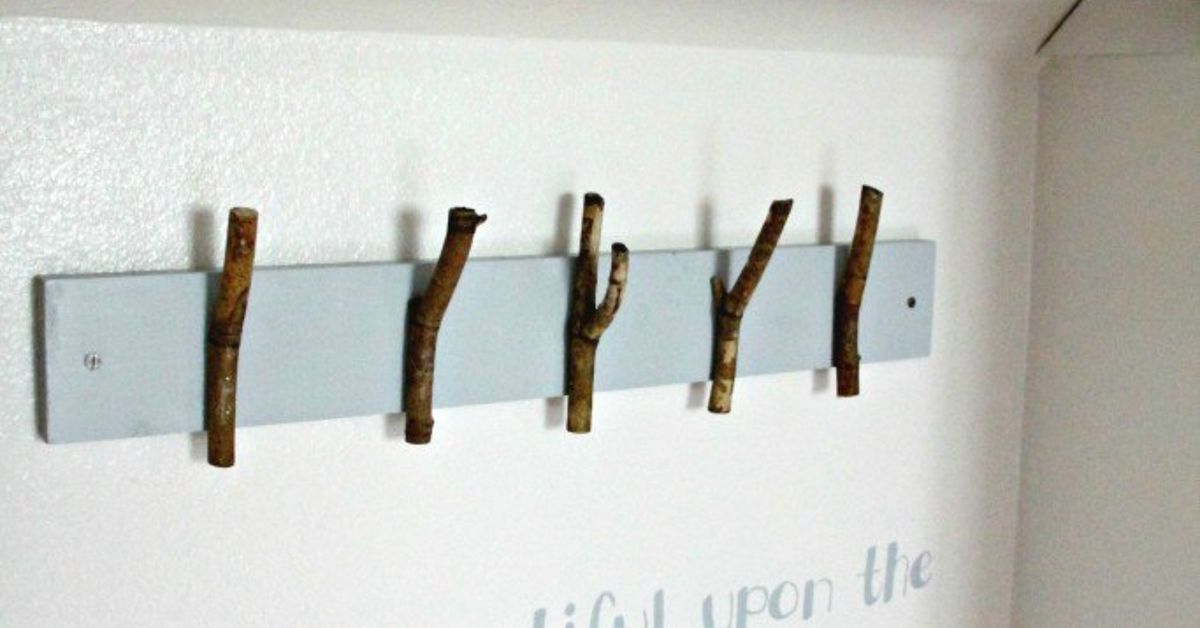
If your entryway currently looks like a small coat tornado passed through, congratulations: you are a normal person with jackets, bags, scarves, keys, and at least one mystery hoodie nobody in the house claims. The good news is that organization does not have to mean buying another boring rack that looks like it came from an office supply closet. With a sturdy branch, a backing board, a few screws, and a little patience, you can build DIY tree branch coat hooks that feel rustic, practical, and just fancy enough for guests to say, “Wait, did you make that?”
This project turns natural wood into a functional wall-mounted coat rack. Instead of metal hooks, short branch stubs become the hooks. The look can be farmhouse, cabin, woodland, modern rustic, cottagecore, or “I took a walk and returned with interior design.” Better still, it is budget-friendly, customizable, and a great weekend DIY project for beginners who can measure, sand, drill, and resist the urge to use the first suspiciously rotten stick they find.
Why Make Tree Branch Coat Hooks?
A tree branch coat rack is one of those rare home projects that solves clutter while adding character. Store-bought hooks can be perfectly fine, but branch hooks bring texture, warmth, and a handmade story. Each branch has its own shape, knots, grain, and little imperfections. That is the charm. Nature does not manufacture in bulk, which is why your final piece will not look like everyone else’s.
From a practical standpoint, wall-mounted branch hooks work beautifully in entryways, mudrooms, laundry rooms, cabins, craft rooms, kids’ rooms, and even bathrooms if the wood is sealed well. You can use them for coats, hats, tote bags, dog leashes, lightweight backpacks, aprons, scarves, and seasonal accessories. Just remember: rustic does not mean magical. The strength of your rack depends on the branch, the board, the screws, and how securely you mount it to the wall.
Choosing the Right Branch
The best branch for DIY coat hooks is dry, solid, and naturally shaped with strong side shoots. Look for hardwood branches such as oak, maple, birch, walnut, hickory, or cherry if available. These woods are typically stronger than soft, brittle, or punky branches. Avoid pieces that feel spongy, crumble at the ends, show active insect holes, smell musty, or have bark falling off in damp sheets. If the branch looks like it has already retired from being wood, let it enjoy retirement outdoors.
For a wall rack, choose a main branch or branch sections that are roughly 1 to 2 inches thick, with hook stubs about 3 to 5 inches long. The hook should angle upward slightly so coats and bags do not slide off. A branch crotch, where a smaller branch grows from a larger one, often makes the strongest natural hook shape. The main stem becomes the mounting surface, while the side branch becomes the hook.
Use Local Wood When Possible
If you collect branches outdoors, use local wood and avoid transporting branches or firewood long distances. Tree pests and diseases can hide in cut wood, and moving wood from one region to another can spread invasive insects. For a small home project, the safest approach is simple: collect locally, inspect carefully, and do not bring questionable wood indoors.
Tools and Materials
You do not need a professional workshop to make tree branch coat hooks. A basic tool kit is enough for most versions of this project.
Materials
- Dry hardwood branch sections with strong side shoots
- One backing board, such as pine, oak, cedar, or reclaimed wood
- Wood screws for attaching branches to the board
- Wall screws or lag screws for mounting into studs
- Drywall anchors or toggle bolts if studs are not available
- Wood glue, optional but helpful
- Wood stain, paint, or clear finish
- Polyurethane, tung oil, Danish oil, or water-based clear coat
Tools
- Hand saw, pruning saw, or miter saw
- Drill and drill bits
- Screwdriver or driver bit
- Sandpaper in medium and fine grits
- Clamps
- Stud finder
- Measuring tape
- Level
- Pencil
- Safety glasses
Step-by-Step Guide: How to Make DIY Tree Branch Coat Hooks
Step 1: Plan the Size and Layout
Before cutting anything, decide where the coat rack will go. Measure the available wall space and think about what you plan to hang. A small key-and-hat rack may only need three hooks. A family mudroom rack may need five to seven hooks spaced far enough apart for bulky jackets. As a general rule, give each hook enough breathing room so coats do not become one giant fabric lasagna.
A backing board between 24 and 36 inches wide works well for most entryways. If you want to mount into wall studs, remember that studs are often spaced 16 inches apart in many homes, though some walls differ. A longer board gives you more flexibility to hit at least two studs, which is ideal for strength.
Step 2: Clean and Inspect the Branches
Brush away dirt, loose bark, moss, and debris. If the bark is tight and attractive, you can keep it for a more natural look. However, peeled branches usually last better indoors because loose bark can flake, trap dust, or hide tiny insects. A putty knife, drawknife, or even a sturdy pocket scraper can help remove bark. Work slowly so you do not gouge the wood.
Inspect each branch section carefully. Press your fingernail into the wood. If it dents too easily or feels soft, skip it. Check the hook angle and thickness. A hook that is too thin may snap under weight. A hook that points downward is basically a slide for coats, and your jacket deserves better.
Step 3: Dry the Wood Properly
Freshly cut branches contain moisture. If you seal or install them too soon, they may shrink, crack, or loosen over time. Let branches dry in a warm, ventilated space. Small branches may dry in a few weeks, while thicker pieces may need longer. Do not seal damp wood inside a plastic bag; trapped moisture can encourage mold. Airflow is your friend. Mold is not.
Some cracking is normal as natural wood dries, especially at the ends. Small cracks can add rustic character. Large cracks through the hook area, however, can weaken the piece. If a branch splits deeply where it needs to hold weight, choose another one.
Step 4: Cut the Branch Hooks
Cut each branch section so the back side sits as flat as possible against the board. The hook portion should extend outward and upward. Aim for a hook length of about 3 to 5 inches. Too short, and it will not hold bulky items. Too long, and it may act like a lever that puts extra stress on the screws.
Make clean cuts and test each piece against the backing board. If the back of a branch is rounded, flatten a small mounting area with a saw, rasp, chisel, or sander. The more contact the branch has with the board, the more stable it will be.
Step 5: Sand Until Smooth
Sand the branch hooks thoroughly, especially the ends and any spots where coats may catch. Start with medium-grit sandpaper to remove roughness, then move to fine-grit paper for a smoother finish. You do not have to erase every bump and knot; those details make the piece beautiful. The goal is to remove splinters, sharp edges, and snag points.
Also sand the backing board. Round over the corners slightly if you want a softer handmade look. If you prefer a crisp modern-rustic style, keep the board edges straight but smooth them enough that nobody gets a splinter while grabbing a raincoat in a hurry.
Step 6: Arrange the Hooks on the Board
Lay the board flat and arrange the branch hooks until the spacing looks balanced. Mix taller and shorter hooks if you want an organic look, or line them up evenly for a cleaner design. Mark each location with a pencil. Stand back and look at the layout from a few feet away. This step matters because once you start drilling, “close enough” can become “why is that one hook trying to escape?”
For family use, consider adding a lower row for kids. Lower hooks encourage children to hang their own coats and backpacks, which is both practical and wildly optimistic. Still, it gives them a fighting chance.
Step 7: Pre-Drill the Holes
Pre-drilling helps prevent branches from splitting. Drill pilot holes through the backing board and into the branch base, or drill through the branch into the board depending on your design. For a cleaner front appearance, attach the hooks from the back of the board with screws that go forward into the branch. Make sure the screws are long enough to bite securely into the branch but not so long that they poke through the front like tiny metal surprises.
If the branch shape allows it, use two screws per hook to prevent twisting. A dab of wood glue between the branch and board can add extra stability, but screws should do the real structural work.
Step 8: Attach the Branch Hooks
Clamp each branch in position, then drive the screws carefully. Do not over-tighten. Natural branches are irregular, and too much force can split the wood or strip the hole. If a hook wiggles, remove it, add a better pilot hole, or choose a screw with stronger bite. This is the part where patience saves you from inventing new words in the garage.
After attaching all hooks, test each one by gently pulling downward and outward. Do not hang your entire winter wardrobe on it yet. First, check for movement, cracks, or weak spots.
Step 9: Stain, Paint, or Seal
Finishing protects the wood and makes the rack easier to clean. For a natural look, use a clear polyurethane, tung oil, Danish oil, or water-based finish. For a richer tone, apply wood stain before the protective topcoat. If you prefer a playful design, paint the backing board and leave the branch hooks natural. A matte black board with pale birch hooks looks modern. A whitewashed board with darker branches feels farmhouse. A walnut stain can make the whole piece look like it came from a boutique that charges extra for adjectives.
Apply finish in thin coats according to the product instructions. Let each coat dry fully. Lightly sand between coats if recommended. For bathrooms or damp entryways, use a durable clear coat and make sure the rack is not constantly exposed to water.
Step 10: Mount the Rack Securely
The strongest method is to screw the backing board directly into wall studs. Use a stud finder, mark the stud locations, hold the rack level, and drill pilot holes. Drive screws through the board into the studs. For a heavy-use coat rack, two studs are better than one.
If studs are not available where you need them, use heavy-duty drywall anchors or toggle bolts rated for more weight than you expect the rack to hold. Coats and bags create movement, not just static weight, so do not rely on tiny picture nails or lightweight adhesive hooks. A coat rack that falls off the wall is not rustic. It is just rude.
Design Ideas for Tree Branch Coat Hooks
Rustic Entryway Rack
Use a reclaimed board, leave the branch hooks slightly irregular, and finish everything with clear satin polyurethane. This style works well with farmhouse benches, woven baskets, and muddy boots that pretend they live neatly by the door.
Modern Woodland Rack
Paint the backing board matte black, charcoal, or warm white. Sand the branches smooth and seal them with a clear finish. The contrast makes the organic shapes feel intentional rather than random.
Kids’ Backpack Station
Use thicker branch hooks and mount the rack lower. Label each hook with a child’s name, initials, or small painted symbols. Keep spacing wide enough for backpacks, lunch bags, and the occasional art project covered in glitter.
Bathroom Towel Hooks
Choose smooth, sealed branches and mount them on a painted board. Use a moisture-resistant finish and keep the rack away from direct shower spray. This is great for hand towels, robes, and lightweight bath accessories.
Common Mistakes to Avoid
The first mistake is using weak or rotten wood. A pretty branch is not useful if it snaps the first time someone hangs a wool coat on it. Choose solid hardwood and inspect every hook before installation.
The second mistake is skipping the drying process. Fresh green wood may look fine at first, but it can shrink, crack, or loosen as it dries. Let the branch dry before sanding, finishing, and mounting.
The third mistake is poor wall mounting. Even a beautifully built rack can fail if it is attached only to drywall with weak hardware. Whenever possible, mount into studs. If you must use anchors, choose strong anchors appropriate for the wall type and expected load.
The fourth mistake is leaving rough edges. Coats, scarves, and bags can snag on splinters. Sand the hooks until they are comfortable to touch. Your guests should admire your DIY skills, not leave with a scratched jacket and a dramatic story.
How Much Weight Can Branch Coat Hooks Hold?
There is no universal number because every branch, screw, board, and wall is different. A thick hardwood branch mounted with two strong screws into a sturdy backing board can hold everyday coats and bags when the board is properly fastened to studs. Thin twigs, cracked pieces, or poorly mounted hooks should only hold lightweight items.
As a safe habit, use branch hooks for normal household storage rather than extreme loads. Hang one heavy coat per hook, not three backpacks, a bowling ball bag, and your emotional baggage from last winter. If you need serious load capacity, use commercial metal hooks or reinforced wooden pegs designed for heavy use.
Maintenance Tips
Dust the rack regularly with a soft cloth. If it gets dirty, wipe it with a lightly damp cloth and dry it right away. Avoid soaking natural wood. Once or twice a year, check the screws and wall mounting hardware. Tighten anything that has loosened. If a branch develops a major crack, replace it before it fails.
If the finish starts to look dull, lightly sand the surface and apply a fresh coat of clear finish. A well-made tree branch coat rack can last for years, and the small marks it gains over time usually add character.
Experience Notes: What You Learn When Making DIY Tree Branch Coat Hooks
The biggest lesson from making DIY tree branch coat hooks is that the branch chooses half the design for you. You may start with a perfect sketch, but natural wood has opinions. One hook leans left. Another has a knot exactly where you planned to drill. A third looks incredible from the front but sits on the board like a sleepy alligator. This is not failure; it is the personality of the project. The best results often come from adjusting your layout around the wood instead of forcing the wood to behave like factory hardware.
Another useful experience is learning that sanding takes longer than expected. At first, a branch may look smooth enough. Then you run a scarf over it and discover it has the texture of a tiny medieval weapon. Sanding the hook ends, undersides, and branch joints makes the rack feel finished. This is where a beginner project starts looking professional. You do not need to make the wood perfectly uniform, but every surface that touches fabric should feel friendly.
Mounting also teaches an important DIY truth: the wall matters as much as the project. A coat rack is handled every day. People pull coats off at an angle, kids tug backpacks down with the grace of raccoons opening a trash can, and guests may hang heavier items than expected. Mounting into studs gives the rack real strength. If you use anchors, choose quality hardware and install it carefully. A beautiful rack on weak anchors is basically a countdown timer.
Finishing is where the project becomes personal. Clear coat keeps the natural branch look. Stain makes different wood pieces feel more unified. Paint can turn a rustic rack into something modern, coastal, or playful. One of the best combinations is a simple painted board with natural branch hooks because the contrast highlights the branch shapes without making the whole piece look too busy. If the branches are already dramatic, keep the board simple. If the branches are plain, let the board color do some of the decorating work.
You also learn to appreciate imperfection. A branch coat rack should not look like plastic pretending to be wood. Small knots, bends, color changes, and tool marks are part of the appeal. The trick is to make the piece safe, smooth, and sturdy while leaving enough natural character to tell the truth about what it is. It came from a tree. It now holds your jacket. That is a respectable career change.
Finally, this project is surprisingly satisfying because it turns something ordinary into something useful. A fallen branch becomes storage. A plain wall becomes an entryway feature. A messy pile of coats becomes, if not perfect organization, at least a more attractive mess with ambition. And every time someone compliments it, you get to say, “Thanks, I made it,” which is one of the finest sentences in the DIY language.
Conclusion
DIY tree branch coat hooks are practical, affordable, and full of natural charm. The key is choosing solid dry wood, shaping and sanding it carefully, attaching it securely to a backing board, finishing it for protection, and mounting it properly to the wall. Whether you want a rustic mudroom rack, a whimsical kids’ hook station, or a modern woodland accent, this project gives you storage with personality.
It is also a reminder that good home design does not always require expensive materials. Sometimes it starts with a branch, a board, and the confidence to say, “Yes, this stick has potential.”