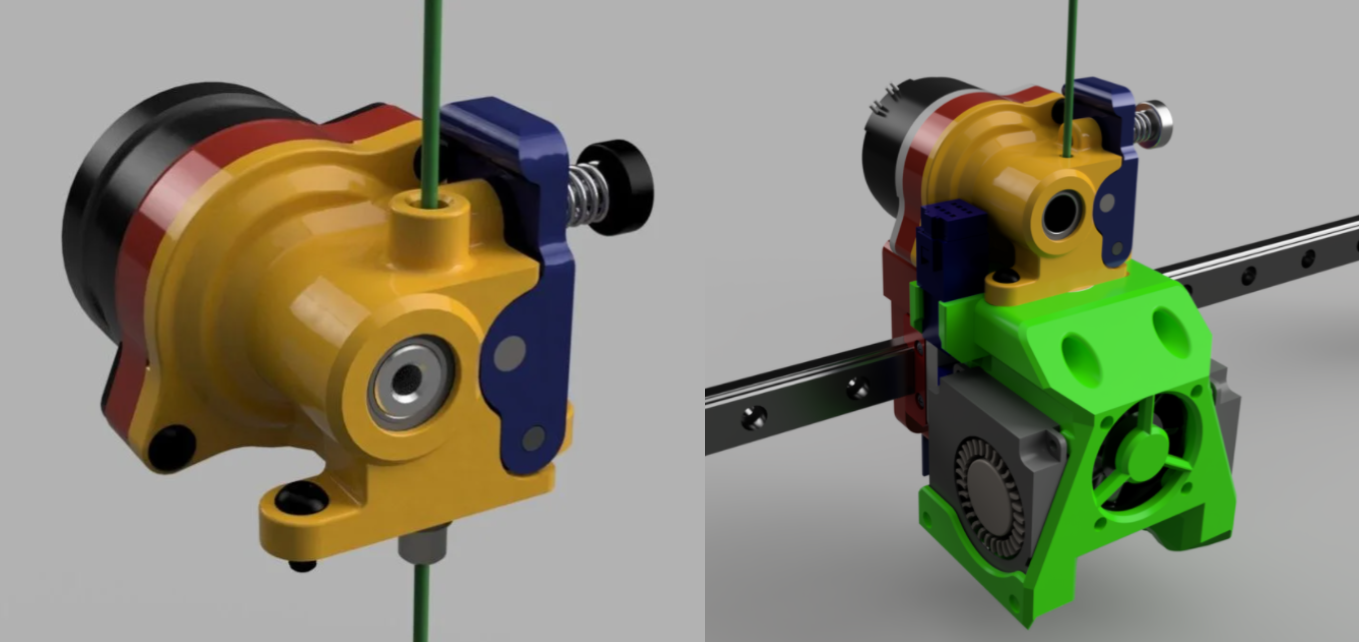
In desktop 3D printing, the humble extruder has a very demanding job. It must grip a round plastic noodle, push it through a hot nozzle, react instantly to every corner, and avoid turning flexible filament into a tiny spring-loaded bird’s nest. That is a lot of responsibility for a component often hidden behind a fan shroud.
For years, makers had to choose between two familiar compromises. A Bowden system kept the heavy motor off the moving printhead, which helped the printer move quickly. A direct drive setup placed the extruder close to the hotend, which improved control but often added enough weight to make the toolhead behave like it had eaten Thanksgiving dinner.
Then lightweight direct drive extruders changed the conversation. Instead of treating direct drive as a slow-but-flexible option, modern compact designs combine a small motor, intelligent gearing, dual-drive filament grip, and a short filament path. The result is a toolhead that can stay nimble while delivering precise extrusion control.
A featherweight direct drive extruder is not magic. It will not repair loose belts, cure a clogged nozzle, or convince a shaky printer frame to become a race car. But when the mechanics, cooling, firmware, and slicer settings work together, it can dramatically improve print quality, material compatibility, and real-world speed.
Why Lightweight Direct Drive Matters
Direct drive extrusion means the filament drive gears sit directly above or near the hotend. The filament travels only a short distance between the point where it is gripped and the point where it melts. That shorter path matters because plastic filament is not perfectly rigid. When an extruder pushes filament through a long Bowden tube, some of the force is absorbed by friction, bending, compression, and slight movement inside the tube.
That delay makes retraction and pressure control more difficult. The printer may stop pushing, but the pressurized molten plastic in the nozzle can keep oozing. Then the printer starts extruding again, but the response may arrive fashionably late. The result can be stringing, blobs, weak corners, and seams that look as though the printer sneezed mid-print.
A direct drive extruder shortens that mechanical delay. The motor can respond more quickly to changes in extrusion demand because there is less flexible filament path between the drive gears and nozzle. This is especially useful for detailed models, sharp corners, small text, thin walls, and materials that dislike being shoved through a long tube.
The catch is moving mass. Every gram on a printhead affects acceleration, deceleration, resonance, and ghosting. A heavy motor bolted above a hotend can turn a lightweight motion system into a tiny construction crane. At modest speeds, the problem may barely appear. At higher accelerations, however, the toolhead’s inertia can create ringing artifacts that echo after sharp corners.
That is why featherweight direct drive designs are so appealing. They aim to preserve the control advantages of direct drive without asking the printer’s motion system to haul around a brick with a nozzle attached.
The Orbiter Effect: Small Motor, Serious Ambition
The phrase “featherweight direct drive extruder” became especially popular around compact geared designs such as the original Orbiter extruder. That early design drew attention because it reportedly weighed about 140 grams while using a 7.5:1 reduction system and a compact NEMA 14 motor. Its purpose was simple but ambitious: deliver the grip and force associated with larger geared extruders without mounting a full-size NEMA 17 motor on the toolhead.
The clever part was not merely shrinking the motor. Small motors generally have less torque, and extrusion is a torque-hungry job. Filament may encounter resistance from the drive gears, heatbreak, melt zone, nozzle, spool holder, and even an overly enthusiastic filament sensor. A compact extruder needs mechanical advantage to push reliably.
That is where gearing enters the picture. A reduction gear system allows the motor to spin more revolutions while the filament drive gears turn with greater torque. In plain English, the motor trades some raw speed for leverage. It is the mechanical equivalent of using a ratchet instead of trying to loosen a stubborn bolt with your fingertips.
Well-designed lightweight extruders typically combine several traits:
- A compact motor with enough torque for the intended flow rate.
- A reduction gearbox that multiplies usable force.
- Dual-drive gears that grip both sides of the filament.
- A tightly constrained filament path to prevent buckling.
- An accessible idler system for loading, unloading, and maintenance.
- A mounting design that keeps the hotend, fan ducts, and sensor hardware compact.
None of those ideas is new by itself. The breakthrough comes from packaging them into a toolhead that does not resemble a small apartment building.
Direct Drive vs. Bowden: The Real Tradeoff
The direct drive versus Bowden debate often becomes unnecessarily dramatic. It is not a battle between good and evil. It is a design tradeoff.
A Bowden system places the extruder motor on the printer frame and feeds filament through a PTFE tube to the hotend. This reduces moving mass, which can help with acceleration and ringing. Bowden setups can produce excellent prints, especially when the tube is short, the filament path is well constrained, and the printer is carefully tuned.
However, the longer filament path can make flexible materials more difficult. TPU behaves less like a rigid rod and more like a stubborn rubber shoelace. Push it too aggressively through a loose or poorly supported path, and it may buckle before it reaches the hotend. That can lead to under-extrusion, jams, or the classic “why is the filament trying to escape sideways?” moment.
Direct drive makes flexible materials easier because the drive gears sit close to the hotend. The filament has less opportunity to bend, compress, or wander off on an unscheduled adventure. Retraction distances can also be much shorter because the extruder is acting closer to the nozzle.
A lightweight direct drive setup tries to combine the best parts of both approaches. It gives the printer a short, responsive filament path while minimizing the motion penalty of carrying the extruder on the toolhead.
Why Lower Moving Mass Improves Print Quality
Speed numbers alone do not tell the whole story. A printer can be commanded to travel at 300 mm/s, but that does not mean it reaches 300 mm/s during every small feature. Acceleration determines how quickly the machine reaches its requested speed, while moving mass determines how hard the motion system must work to get there.
When a heavy toolhead changes direction rapidly, the belts, frame, rails, and carriage must absorb that force. If the system flexes or vibrates, the nozzle can oscillate after a corner. This produces ghosting, ringing, or ripples around letters and sharp edges.
Reducing toolhead mass does not automatically eliminate resonance, but it gives the motion system a better chance. Lower mass can raise usable acceleration, reduce stress on belts and bearings, and make input shaping easier to tune. It is less about making a printer reckless and more about making it composed.
Think of it this way: a lightweight direct drive extruder helps the printer dance. A heavy direct drive extruder can still dance, but it may prefer ballroom music over speed metal.
The Engineering Details That Separate Great Extruders From Average Ones
Gear Reduction and Torque
A compact extruder needs enough force to push filament at the required volumetric flow rate. Gear reduction allows a smaller motor to generate more useful torque at the filament drive gears. However, excessive gearing can reduce top-end speed or make the motor work harder at high extrusion rates.
The sweet spot depends on the motor, gear ratio, filament type, nozzle size, hotend capacity, and target print speed. An extruder that performs beautifully with a 0.4 mm nozzle at moderate speeds may need a different balance for a high-flow 0.6 mm nozzle pushing thick ABS layers.
Dual-Drive Filament Grip
Dual-drive systems use two hobbed gears to grip the filament from both sides. Compared with a single-drive arrangement, this can reduce filament slipping and distribute force more evenly. It is especially useful when printing slippery, soft, or demanding filaments.
Still, more grip is not always better. Excessive idler tension can chew deep grooves into filament, create plastic dust, and make unloading difficult. The ideal tension is enough to prevent slipping without turning every spool into a snack.
A Tight Filament Path
A short filament path is helpful. A tightly constrained filament path is essential, particularly for TPU and other flexible materials. Good extruder designs leave very little open space between the drive gears and the heatbreak entrance. This reduces the chance that soft filament will buckle under compression.
For flexible printing, the filament path matters as much as the extruder label. A poorly designed direct drive can still struggle with TPU, while a well-constrained Bowden system can perform better than expected.
Accessible Maintenance
Even excellent extruders eventually need cleaning. Filament dust accumulates on drive gears. Tiny fragments can lodge near the idler. A worn gear may lose grip. A practical extruder makes these tasks manageable without forcing the user to remove half the printer and question every life decision that led to this moment.
Look for designs with easy filament release, visible drive gears, simple tension adjustment, and serviceable bearings. The best lightweight extruder is not just powerful; it is civilized.
Fast Printing Is About Flow, Not Just Motion
A lightweight direct drive extruder can help a printer accelerate more confidently, but it cannot force a hotend to melt plastic infinitely fast. This is one of the most common misunderstandings in high-speed FDM printing.
Your printer may be mechanically capable of very high travel speeds, yet the hotend may only melt a certain volume of filament per second. That limit is called volumetric flow. It depends on nozzle geometry, heater power, melt-zone length, filament type, temperature, and cooling conditions.
For example, increasing layer height and line width increases the volume of plastic needed per second. A slicer may request 250 mm/s, but the printer could be physically limited by the hotend’s maximum flow rate long before the motion system runs out of enthusiasm.
That is why a lightweight extruder should be paired with realistic volumetric flow limits. The fastest reliable printer is not the one with the largest speed number in a screenshot. It is the one that finishes the job without under-extrusion, skipped steps, or a filament jam at hour 14 of a 15-hour print.
How to Tune a Featherweight Direct Drive Extruder
Installing a compact direct drive extruder is only the beginning. The mechanical behavior of the printer changes when you swap a toolhead, motor, hotend, fan arrangement, or duct system. Treat the upgrade as a system change, not a decorative accessory.
1. Check the Mechanical Installation
Before editing firmware, verify the basics. Make sure the mount is rigid, the belts are aligned, the carriage moves smoothly, and the hotend fan is correctly positioned. Confirm that the filament enters the extruder without sharp bends from the spool holder or reverse Bowden tube.
Also inspect cable routing. A lightweight extruder can lose much of its benefit if a thick cable bundle tugs on the toolhead like a reluctant dog on a leash.
2. Calibrate Extruder Movement
Every geared extruder needs correct extrusion calibration. In Klipper, this is commonly handled through rotation distance and gear ratio settings. In Marlin-based systems, the equivalent setting is usually called E-steps.
The goal is simple: when the printer is told to move 100 mm of filament, it should move approximately 100 mm of filament. This calibration is separate from slicer flow tuning. First make the extruder mechanically honest. Then tune filament-specific flow settings afterward.
Run the test at a slow extrusion speed with the hotend at printing temperature. Measure carefully, repeat the test, and confirm consistency. A rushed calibration can create a printer that is technically “tuned” but only in the same sense that a crooked picture frame is technically hanging.
3. Start With Conservative Retraction
Direct drive systems generally need less retraction than Bowden setups because the drive gears sit close to the nozzle. A reasonable starting point for many direct drive printers is around 0.5 mm at a moderate retraction speed, then adjust based on actual stringing and seam behavior.
Do not assume that more retraction is always better. Excessive retraction can pull softened filament into the heatbreak, increase the risk of clogs, and create inconsistent extrusion after travel moves.
4. Tune Pressure Advance or Linear Advance
Pressure advance in Klipper and Linear Advance in Marlin help compensate for pressure changes inside the nozzle during acceleration and deceleration. Proper tuning can reduce blobs at corners, improve line consistency, and minimize oozing during travel moves.
Because a direct drive extruder has a shorter filament path, its ideal pressure advance values are often lower than those used by a long Bowden setup. Tune this setting separately for each filament family, nozzle, temperature range, and major hardware change. A profile that looks perfect with matte PLA may need adjustment for PETG, ABS, or flexible TPU.
5. Recheck Resonance and Input Shaping
Changing toolhead mass changes the printer’s vibration behavior. After installing a lighter extruder, rerun input shaping or resonance testing. You may discover that the printer can handle higher acceleration with fewer artifacts, or you may find a new resonance frequency that needs attention.
Do not skip this step. A lighter toolhead is an opportunity, not a permission slip to type unreasonable acceleration numbers into a configuration file while wearing sunglasses indoors.
When a Lightweight Direct Drive Extruder Is Worth It
| Printing Goal | Why Lightweight Direct Drive Helps | What Else Still Matters |
|---|---|---|
| Printing TPU | Short, controlled filament path reduces buckling risk. | Dry filament, sensible speed, and minimal retraction. |
| Cleaner corners | More responsive extrusion can improve pressure control. | Pressure advance or Linear Advance calibration. |
| Higher acceleration | Lower toolhead mass reduces inertia and ringing potential. | Rigid frame, good belts, and resonance tuning. |
| Compact CoreXY build | Smaller toolhead can preserve build volume and simplify mounts. | Cooling duct design and cable management. |
| High-flow printing | Strong geared grip helps feed filament consistently. | Hotend capacity and realistic volumetric flow limits. |
When Lightweight Is Not the Only Answer
A featherweight extruder is not automatically the best choice for every printer. Some large-format printers may prioritize torque, ruggedness, or compatibility with a specialized hotend. Some low-speed machines may gain little from shedding a few dozen grams. Some printers need frame reinforcement, better rails, better cooling, or a less ambitious slicer profile before they need a new extruder.
There is also the matter of installation complexity. A compact extruder may require printed mounts, custom cable routing, revised probe offsets, fan duct changes, firmware edits, and new calibration work. For a tinkerer, that is Saturday entertainment. For someone who simply wants to print replacement hooks before dinner, it may be less charming.
The best upgrade is the one that solves your actual bottleneck. If TPU is constantly jamming, direct drive may be a major improvement. If your printer rings like a dinner bell at 3,000 mm/s², reduced moving mass and input shaping may help. If your nozzle cannot melt plastic fast enough, the answer may be a better hotend rather than a more athletic extruder.
Conclusion: Tiny Toolhead, Big Difference
A featherweight direct drive extruder earns its reputation by solving two problems at once: it shortens the distance between filament control and the nozzle while keeping the toolhead light enough for fast, controlled motion. That combination is particularly valuable for flexible filaments, sharp corners, clean seams, and modern high-acceleration printers.
The strongest designs use smart gearing, reliable filament grip, a tightly constrained path, and practical maintenance features. But hardware alone is only half the story. Calibration is what turns a promising upgrade into a dependable printing system.
Install it carefully, tune extrusion honestly, keep retraction modest, verify pressure advance, and rerun resonance testing. Do that, and a lightweight direct drive extruder can make your printer feel less like a plastic spaghetti machine and more like a precision manufacturing tool.
Extended Maker Experiences: What a Featherweight Direct Drive Upgrade Feels Like
The first experience many makers notice after moving from a traditional Bowden setup to a featherweight direct drive extruder is not raw speed. It is control. The printer suddenly feels more predictable. A small retraction adjustment can visibly change stringing. Pressure advance tuning becomes easier to interpret. Corners look cleaner, seams become less dramatic, and the toolhead appears to respond more immediately when the slicer asks for a quick change in extrusion.
TPU is often the biggest emotional moment. On a loose Bowden system, flexible filament can feel like trying to push cooked spaghetti through a drinking straw using only optimism. The filament bends, compresses, slips, and occasionally decides that the easiest route to the nozzle is anywhere except the nozzle. With a compact direct drive extruder and a tight filament path, TPU usually becomes far less mysterious. It still benefits from slower speeds and careful retraction, but it stops feeling like a material designed specifically to embarrass hobbyists.
Another common experience is that the printer becomes quieter in a different way. The stepper motor may still make its familiar electronic hum, but the toolhead can move with less visible shake. On a well-built CoreXY printer, the difference can be noticeable during sharp travel moves and detailed outer walls. The carriage feels less like it is dragging a backpack full of bricks across the rails.
That said, the upgrade can expose problems that were already hiding in the machine. Once extrusion becomes more responsive, it becomes easier to spot poor cooling, a partially clogged nozzle, uneven belt tension, or a frame that flexes at higher acceleration. This is not necessarily bad news. It is like turning on brighter lights in a workshop: you may notice more dust, but at least you can finally clean it.
Makers also tend to discover that lightweight direct drive is not a “set it and forget it” upgrade. The hardware installation is only the opening act. Extruder calibration, flow tuning, pressure advance, retraction, maximum volumetric flow, and input shaping all deserve a second look. A printer that was previously tuned around a Bowden setup may need an entirely new personality after conversion.
The reward is a more capable machine. A good featherweight direct drive extruder can print PLA with crisp corners, PETG with fewer strings, ABS with more controlled seams, and TPU with far less drama. It can also support higher acceleration without punishing the motion system as severely as a bulky direct drive assembly.
The most satisfying part is not watching a speed test. It is seeing ordinary prints improve: a clean cable guide, a flexible phone case, a functional bracket, or a detailed figurine with fewer random blobs and less post-processing. The printer becomes easier to trust. And in 3D printing, trust is valuable, because nobody wants to spend six hours watching a machine manufacture a very expensive bowl of plastic noodles.
Note: Extruder specifications, motor current, retraction values, pressure advance settings, and acceleration limits vary by printer, hotend, filament, and firmware. Use the values in this article as starting concepts, not universal presets. Always confirm mechanical clearances, electrical requirements, and manufacturer documentation before modifying a printer.