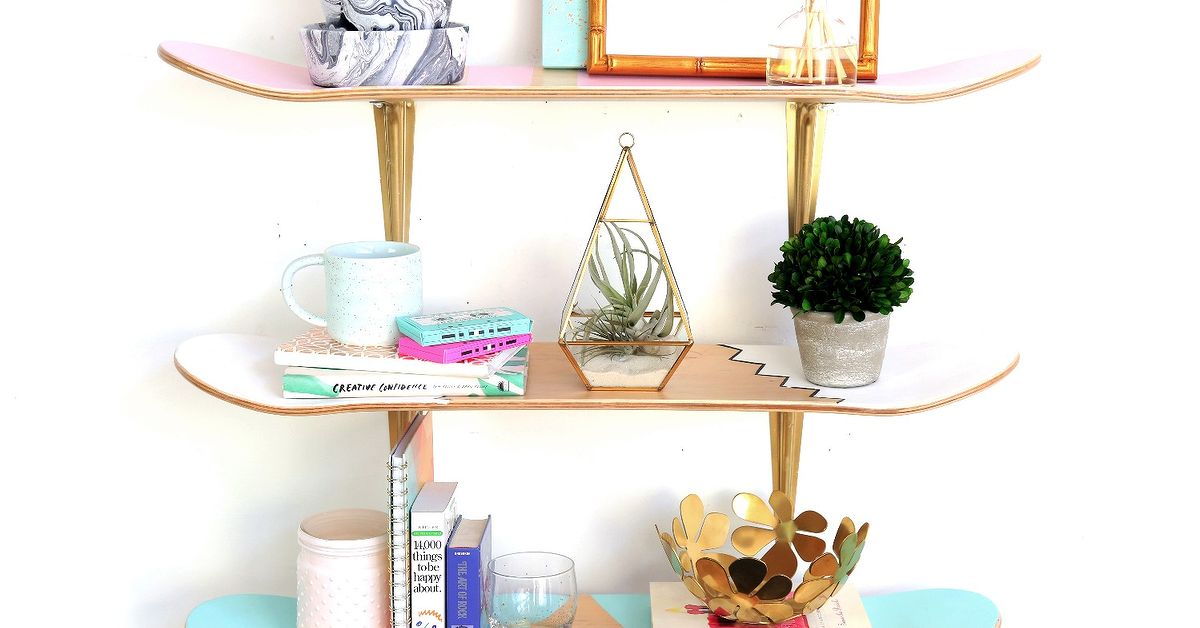
An old skateboard deck has already survived curb battles, questionable landings, surprise puddles, and at least one moment when someone said, “I totally meant to do that.” Instead of tossing that retired board into a closet or letting it become a dust collector with emotional baggage, turn it into a bold wall shelf.
A DIY skateboard deck shelf upcycle is one of those projects that looks far more expensive and complicated than it really is. The curved shape, colorful graphics, and worn-in personality make every shelf unique. Whether you are decorating a teen bedroom, skate-inspired office, garage hangout, apartment entryway, or creative studio, a skateboard shelf adds storage and instant character without pretending to be a fancy antique.
This project works best as a lightweight display shelf for small plants, framed photos, collectibles, headphones, sunglasses, candles, hats, or a carefully curated collection of things that make guests ask, “Where did you get that?” The answer, proudly, is: “It used to be under my feet.”
Why Upcycle a Skateboard Deck Into a Shelf?
Skateboard decks are made to handle impact, flex, and repeated abuse from concrete. Many traditional decks use layered maple construction, which gives them strength while keeping them relatively lightweight. Their distinctive nose, tail, and concave shape also make them more visually interesting than a plain piece of shelf lumber.
Upcycling an old deck is not just about saving money. It is about preserving a little history. Maybe the deck was your first serious board. Maybe it belonged to your teenager before they moved on to a new setup. Maybe you found it at a thrift store with graphics so wonderfully weird that it deserved a second life indoors.
A skateboard deck shelf is also an easy conversation piece. A regular floating shelf says, “I bought a shelf.” A skateboard shelf says, “I own a drill and have opinions about wall decor.”
What You Need for a DIY Skateboard Deck Shelf
You do not need a full woodworking shop, a beard made of sawdust, or a garage that looks like a renovation show. Most skateboard shelf projects can be completed with a few basic tools and some careful measuring.
Materials
- One old skateboard deck, preferably without major cracks or delamination
- Two sturdy wall shelf brackets
- Wood screws suitable for the bracket and deck thickness
- Wall screws appropriate for studs or heavy-duty wall anchors
- Washers and low-profile bolts, if using existing truck mounting holes
- Wood filler, optional
- Clear protective finish, optional
- Paint, stain, or decorative hardware, optional
Tools
- Drill and drill bits
- Stud finder
- Level
- Tape measure
- Pencil
- Screwdriver or drill driver
- Sandpaper in medium and fine grits
- Safety glasses
- Dust mask or suitable respirator for sanding
- Cleaning cloth
Choose the Right Skateboard Deck
Not every retired deck is ideal for a shelf. Before you begin, inspect the board carefully. A little curb rash is charming. A big crack through the middle is less charming and more of a warning from physics.
Look for a deck that is structurally solid, especially around the center and the truck mounting areas. Small chips along the edges are usually fine. Surface scratches, faded graphics, and worn grip tape can actually make the finished shelf look better because they add personality.
If you want the board to look clean and modern, choose a deck with minimal damage and a graphic you love. If you want a more rugged industrial look, embrace a deck with scuffs, scratched paint, and a few hard-earned battle scars.
Most standard skateboard decks are long enough to make an excellent narrow shelf. Wider shaped decks, cruiser decks, and old-school boards can create even more display space. A wider deck is especially useful for small potted plants, books, or decor that needs a little extra balance.
Decide Which Side of the Deck Will Face Up
This is the creative fork in the road. There is no single correct answer, but each option creates a different look.
Graphic Side Up
Displaying the graphic side on top creates a colorful shelf surface. This works beautifully when the artwork is the main attraction. The deck’s concave shape creates a subtle cradle, which can help keep lightweight decor from sliding around.
The downside is that bolts or mounting hardware may be more visible if you use the original truck holes. You can make this look intentional by using matching hardware, decorative washers, or black bolts that blend into the graphic.
Grip Tape Side Up
Keeping the grip tape on top gives the shelf a gritty skatepark feel. It also provides natural traction for lightweight items such as sunglasses, small frames, and tiny plant pots. However, grip tape can collect dust and may be too rough for delicate objects.
This option looks especially good in garages, game rooms, skate-themed bedrooms, and creative studios where polished perfection would feel suspicious.
Graphic Side Down
Mounting the deck with the graphic facing downward creates a cleaner shelf surface on top. You still get a flash of color and artwork from below, especially when the shelf is mounted at eye level or higher.
This orientation is practical for displaying books, candles, mini speakers, and small storage baskets. It is also a great choice when you want the deck to look like a floating art piece rather than a literal skateboard on the wall.
How to Prep an Old Skateboard Deck
Preparation is where a retired board transforms from “garage relic” into “intentional home decor.” Start by removing the trucks, wheels, bearings, and any leftover hardware. Save the hardware if it is still in good condition; it may be useful for a different skateboard project later.
Wipe the deck with a slightly damp cloth to remove loose dirt. Let it dry completely before sanding, sealing, or mounting. If the board has sticky residue from old stickers, use a gentle cleaner and test it first in a hidden spot. Strong chemicals can damage printed graphics, so avoid turning your deck into a science experiment.
Sand only where it is needed. Smooth rough chips, splinters, and sharp edges with medium-grit sandpaper, then follow with a finer grit for a cleaner feel. Keep sanding light if you want to preserve graphics. The goal is not to erase the board’s history; the goal is to prevent it from attacking anyone who reaches for a houseplant.
If the deck has small gouges or chipped layers, fill them with wood filler and sand them smooth after drying. You can leave minor dents alone if you like a lived-in look. For a more polished finish, apply a thin coat of clear water-based finish over exposed wood and graphics. Work in a well-ventilated space and allow the deck to dry fully before installation.
How to Mount a Skateboard Deck Shelf Safely
The wall mounting step matters more than the decorating step. A stylish shelf that falls off the wall is not “industrial chic.” It is just a loud lesson.
Option 1: Use Traditional Shelf Brackets
The simplest method is to use two metal shelf brackets mounted beneath the deck. Choose brackets with support arms that fit under the deck without sticking out too far. Position them roughly beneath the truck mounting areas, where the deck is typically strongest.
Mount the brackets into wall studs whenever possible. Use a stud finder, mark the stud locations, and confirm that the bracket placement is level. Stud-mounted screws provide the most dependable support for a wall shelf.
If you cannot mount directly into studs, use wall anchors that are appropriate for your wall type and the expected weight. Drywall, plaster, masonry, and concrete all need different fasteners. Read the anchor packaging carefully instead of trusting a random screw that has been rolling around in a drawer since 2014.
Once the brackets are installed, rest the skateboard deck on the support arms. Secure the deck with short screws driven from underneath, using pilot holes first to reduce the risk of splitting the wood. Make sure the screws are short enough that they will not poke through the top surface.
Option 2: Use the Existing Truck Holes
A more skateboard-specific approach is to attach brackets through the existing truck mounting holes. This lets you avoid drilling new holes into the deck and gives the project an authentic garage-built look.
Use bolts that fit the existing holes, along with washers and locking nuts. Position the brackets so the deck stays level and balanced. This method works well if you do not mind visible hardware. In fact, exposed bolts can make the shelf look even more intentional, especially in an industrial, skatepark, or street-art-inspired room.
Option 3: Create a Decorative Floating Effect
For a cleaner appearance, use hidden-style shelf hardware or a custom cleat system. This method requires more precision because skateboard decks are curved rather than perfectly flat. It is best for experienced DIYers who are comfortable measuring, drilling, and adapting the hardware to the deck’s shape.
If you want a floating skateboard shelf but do not want to spend an entire Saturday muttering at invisible brackets, start with standard shelf brackets. They are reliable, easy to install, and far less likely to make you question your relationship with power tools.
Best Places to Hang a Skateboard Deck Shelf
A skateboard shelf works almost anywhere, but placement changes its personality. In a bedroom, it can display books, sneakers, trophies, and small plants. In a home office, it can hold headphones, notebooks, and a small framed photo that reminds you to log off occasionally.
In an entryway, a skateboard shelf can become a landing zone for keys, sunglasses, and mail. Add a few hooks underneath for hats or lightweight bags. In a garage, it can hold gloves, spray bottles, or skate gear. In a game room, mount several decks in a row for a wall display that looks like a tiny indoor skate shop.
Try hanging multiple decks at different heights. A staggered set of three skateboard shelves can look more dynamic than one long shelf. Keep the boards in a similar color palette for a curated look, or mix completely different graphics for a more chaotic, skatepark-wall energy.
Skateboard Shelf Styling Ideas
Create a Mini Skate Gallery
Mount two or three decks vertically and use each one as a shelf. Keep the graphics visible and add a small object to each deck: a plant, a framed photo, a collectible, or a favorite pair of sunglasses. This turns a blank wall into a personal story wall.
Build a Sneaker Display Shelf
A wide deck can hold one or two pairs of sneakers, depending on the shoe size and deck shape. Use a graphic-side-down setup for a flatter surface. Pair it with framed skate photos, posters, or a small LED light strip for a streetwear-inspired display.
Make a Plant Shelf With Attitude
Small succulents, trailing pothos, and lightweight faux plants work well on skateboard shelves. Use pots with drainage trays so you do not create an accidental water feature on your wall. A green plant against a bright deck graphic is an easy way to make the shelf feel fresh rather than overly themed.
Turn It Into a Charging Station
Place a skateboard shelf near an outlet and use it as a charging station for phones, earbuds, smartwatches, and portable speakers. Add a cable clip underneath to keep cords from hanging down like confused spaghetti.
Common DIY Skateboard Shelf Mistakes to Avoid
The most common mistake is overloading the shelf. Skateboard decks are durable, but the wall mounting system is usually the limiting factor. Do not stack heavy books, large speakers, or a bowling ball collection on a narrow deck shelf.
Another mistake is skipping the level. Skateboard decks have dramatic curves, which can make a slightly crooked shelf look even more crooked. Check your bracket placement with a level before drilling. Your future self will appreciate not having every decorative object slowly drift toward one end.
Do not ignore damaged decks. If the board is deeply cracked, peeling apart, or soft from water damage, retire it from shelf duty. You can still use a damaged deck as wall art, cut it into smaller decorative pieces, or display it vertically.
Finally, avoid mounting a skateboard shelf above a bed, crib, sofa, or workspace where someone sits for long periods. Even lightweight decor deserves a secure location and a little common sense.
How to Maintain Your Upcycled Skateboard Shelf
Once installed, your skateboard shelf needs very little maintenance. Dust it occasionally with a dry microfiber cloth. Avoid soaking the deck with water, especially if the edges expose wood layers. If the finish starts looking dull, wipe it clean and apply a fresh protective coat according to the product instructions.
Every few months, check the brackets and mounting screws. Tighten anything that has loosened, especially if the shelf lives in a high-traffic area or holds objects that get moved often. A shelf inspection takes less than two minutes and is much more pleasant than picking broken pots off the floor.
DIY Skateboard Deck Shelf Upcycle: Real-World Lessons and Experiences
The best part of a skateboard deck shelf upcycle is that no two projects come out exactly the same. One person starts with a scratched deck from high school, another finds a beat-up board at a thrift store, and someone else rescues a deck from a garage where it has been hiding behind paint cans since the early 2000s. Each deck arrives with its own color, scuffs, stickers, and suspiciously mysterious stains.
A common first experience is realizing that skateboard graphics are often better than expected once the board is cleaned. A deck that looked exhausted in a dark corner can suddenly reveal bright colors, metallic details, or artwork hidden under dust. This is why it is smart to clean the board before deciding to paint over it. You may discover that the original graphic has more personality than any color you planned to add.
Another lesson is that mounting takes more thought than decorating. It is tempting to rush through the measuring stage because the fun part is imagining plants, sneakers, or collectibles on the finished shelf. But careful bracket placement makes the project look professional. When the board is level, centered, and firmly supported, even a heavily worn deck can look like intentional designer decor.
Many DIYers also discover that imperfections make the shelf better. A chipped edge can become part of the shelf’s character. A faded logo can make it feel vintage. A few scratches can keep the project from looking overly polished or mass-produced. In a world full of identical furniture, an old skateboard deck has the advantage of looking like it has actually lived a life.
The styling process is usually where the shelf becomes personal. A skateboard shelf in a teenager’s room might hold medals, headphones, and a small plant. The same shelf in a home office might display a camera, notebooks, and a framed concert ticket. In a garage or workshop, it may become a practical spot for gloves, keys, and tape measures. The deck is the same, but the story changes with the room.
A useful experience-based tip is to start light. Decorate the shelf with a few small items for the first week, then observe how the mounting system feels. If the shelf stays stable and level, add a little more. This approach is safer than loading it immediately with every object you own that happens to fit on an eight-inch-wide board.
Another practical discovery is that skateboard shelves look especially good in groups. One deck can be a fun accent, but two or three decks arranged vertically or in a staggered row create a stronger visual statement. Mix different graphic styles for a skate-shop vibe, or use boards in similar colors for a more coordinated room design.
Ultimately, a DIY skateboard deck shelf is not about building flawless furniture. It is about turning something worn, personal, and slightly rebellious into useful home decor. The finished shelf may have a few scratches, visible bolts, or a small dent near the tail. That is not a failure. That is proof that the board had a first life before it became part of your home.
Final Thoughts
A DIY skateboard deck shelf upcycle is a simple project with a big payoff. It gives an old board a new job, adds functional storage, and brings skate-inspired style to almost any room. With solid brackets, careful wall mounting, and a little creativity, you can turn a retired deck into a shelf that feels personal, practical, and far more interesting than something pulled from a flat-pack box.
Choose a deck with a story, mount it safely, keep the styling light, and let the graphics do the talking. Your old skateboard may be done kickflipping, but it is not done being useful.