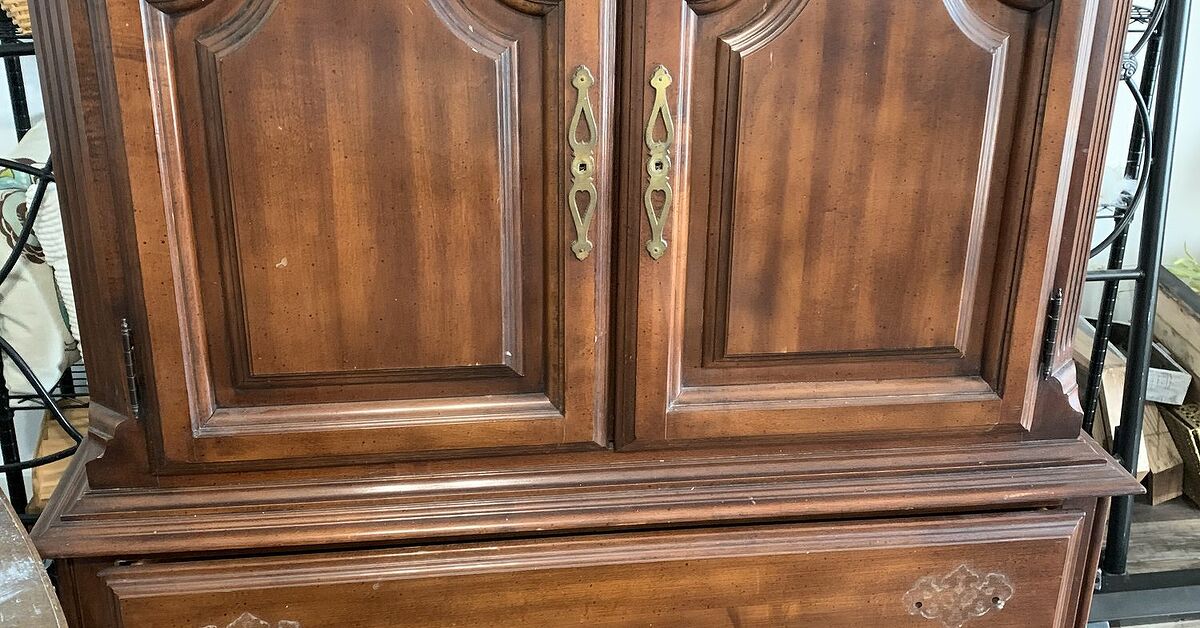
An old chest of drawers can look hopelessly dated one minute and charmingly farmhouse the next. The secret is not expensive equipment, mystical artistic talent, or owning a workshop large enough to park a tractor. It is patient preparation, the right paint system, and enough restraint to stop distressing before the dresser appears to have survived a cattle stampede.
This painted chest of drawers farmhouse makeover DIY guide explains how to inspect, repair, clean, sand, prime, paint, distress, protect, and style a tired dresser. The project works especially well with thrift-store furniture, family hand-me-downs, and sturdy pieces whose finish has seen better decades.
Why a Chest of Drawers Is Perfect for a Farmhouse Makeover
A chest of drawers has the ideal combination of broad painted surfaces, visible hardware, useful storage, and architectural details. A plain boxy dresser can become a clean modern-farmhouse piece, while a curvy vintage chest can lean toward cottage, rustic, or French-country style.
Paint also offers a budget-friendly way to update furniture without replacing a structurally sound piece. Designers frequently use color, contrasting drawer fronts, new hardware, decorative trim, and subtle aging techniques to transform ordinary dressers into statement furniture.
What Makes the Finish Look “Farmhouse”?
Farmhouse furniture usually feels warm, practical, collected, and slightly imperfect. Common characteristics include:
- Muted white, cream, gray, greige, sage, dusty blue, or charcoal paint
- A matte, eggshell, or satin sheen rather than a mirror-like gloss
- Natural wood accents on the top or drawer fronts
- Black iron, aged brass, bronze, or wooden hardware
- Light distressing around edges that would naturally receive wear
- A combination of old and new elements rather than a perfectly matched showroom appearance
Successful farmhouse interiors often layer vintage character with practical modern details, allowing furnishings to feel collected over time instead of purchased as a single coordinated set.
Before You Paint: Inspect the Chest Carefully
Do not let an attractive price tag distract you from a dresser that is one loose joint away from becoming decorative firewood. Open every drawer, inspect the back, check the legs, and gently rock the cabinet from side to side.
Look for Structural Problems
A good makeover candidate should have a solid frame. Minor scratches, ugly stain, missing knobs, and worn varnish are cosmetic problems. Severe water damage, active insect damage, crumbling particleboard, extensive veneer loss, or a badly twisted frame can require more work than the piece is worth.
Check that:
- The drawers open and close without excessive force.
- The drawer bottoms are not separating from their grooves.
- The frame does not wobble.
- The top is reasonably flat.
- The veneer is firmly attached.
- There is no strong mildew or smoke odor.
- The existing finish is not flaking uncontrollably.
Think Before Painting a Valuable Antique
Painting a mass-produced dresser with a damaged finish is very different from painting a rare antique with its original surface. If the chest has unusual joinery, maker’s marks, hand-cut dovetails, exceptional wood, or documented historical value, consider having it evaluated before permanently altering it. Efficient refinishing methods are appropriate for ordinary furniture, while valuable pieces may deserve a more conservative restoration approach.
Check for Lead Paint
Be cautious when working on an older painted chest, particularly one with an unknown history. Disturbing lead-based paint through dry sanding, scraping, or cutting can release hazardous dust. The Environmental Protection Agency recommends lead-safe practices and professional guidance when lead may be present. Do not aggressively sand a suspicious old finish until you have assessed the risk.
Tools and Materials
You do not need every refinishing gadget sold online. A sensible basic kit is enough:
- Screwdriver or drill
- Drop cloth or plastic sheeting
- Mild soap and water or a suitable degreasing cleaner
- Clean rags and microfiber cloths
- Wood glue, clamps, and wood filler
- 150-, 180-, and 220-grit sandpaper or sanding pads
- Dust mask or properly selected respirator
- Vacuum and tack cloth or lint-free wiping cloth
- Bonding or stain-blocking primer
- Furniture paint, cabinet enamel, acrylic paint, milk-style paint, or chalk-style paint
- Quality synthetic brush
- Four-inch foam or microfiber mini roller
- Paint tray
- Clear water-based topcoat or furniture wax, when appropriate
- Replacement drawer pulls or knobs
- Anti-tip furniture anchoring kit
Choose products designed to work together. A random primer, leftover wall paint, mystery wax, and incompatible clear coat can create peeling, discoloration, or a surface that remains sticky long after your enthusiasm has dried.
Step 1: Remove Drawers and Hardware
Take out every drawer and label its position with painter’s tape. Older furniture is not always perfectly square, and drawers that appear identical may fit only in their original openings.
Remove knobs, pulls, escutcheons, and decorative plates. Store screws in a labeled container rather than placing them “somewhere safe,” which is a well-known DIY term for “never to be seen again.” Photograph complicated hardware before disassembly so you know how it should be reinstalled.
If you plan to reuse the hardware, clean it according to its material. Mild soap may be enough for painted or sealed pieces. Solid brass may tolerate more intensive polishing, but aggressive cleaners can remove intentional patina or damage plated finishes.
Step 2: Clean Before Sanding
Cleaning is not optional. Furniture can hold furniture polish, cooking grease, skin oils, dust, wax, and cleaning-product residue. Sanding a dirty surface may grind those contaminants deeper into the finish.
Wash the dresser using a cleaner appropriate for the existing surface. Work in manageable sections and avoid soaking veneer, particleboard, joints, or drawer bottoms. Rinse away cleaner residue when the product instructions require it, then allow the chest to dry completely.
Major paint manufacturers consistently place cleaning near the beginning of their furniture-painting instructions because adhesion depends on a clean surface.
Step 3: Make Necessary Repairs
Painting highlights defects rather than magically swallowing them. Tighten loose screws, reglue weak joints, secure drawer bottoms, and repair lifting veneer before opening the paint can.
Fill unwanted hardware holes, deep scratches, and dents with wood filler. Let the filler dry fully, then sand it flush. If you are switching from two-hole pulls to single knobs, measure carefully so the new hardware sits at the same height on every drawer.
Small missing pieces of veneer can sometimes be patched or filled on a painted project. Large loose areas should be glued and clamped. Do not simply paint over a veneer bubble and hope it becomes emotionally stable.
Step 4: Sand for Adhesion and Smoothness
Most dressers do not need to be stripped to bare wood before painting. The goal is usually to remove loose finish, flatten imperfections, reduce gloss, and create a surface the primer can grip.
For a sound wood finish, begin with approximately 150- or 180-grit sandpaper and finish with 220 grit. A lightly scuffed surface is often sufficient. More aggressive sanding may be required for heavy damage, thick brush marks, or a failing coating. Sand in the direction of visible wood grain whenever possible.
Laminate and other slick manufactured surfaces require special attention. Light abrasion and a high-adhesion bonding primer can improve the chance of success. Sherwin-Williams and General Finishes both emphasize surface abrasion and bonding primers when coating difficult furniture surfaces.
Vacuum the chest, drawers, work area, and decorative grooves. Follow with a clean lint-free cloth. Paint will not conceal sanding dust; it will preserve it like tiny archaeological artifacts.
Step 5: Decide Whether You Need Primer
Primer creates a reliable bridge between the old finish and the new paint. It can improve adhesion, create an even base color, reduce the number of finish coats, and block stains or wood tannins.
Use Primer When:
- The existing finish is glossy or difficult to identify.
- The dresser is laminate, veneer, MDF, or previously painted.
- You are changing from a very dark color to a light farmhouse white.
- The wood contains knots or tannins that may bleed through.
- You have exposed bare wood or filler.
- The surface has smoke, water, or marker stains.
Apply primer with a brush in corners and detailed areas, then use a mini roller on broad surfaces. Thin, even application is better than a thick coat. Allow the primer to dry according to its label, lightly sand rough areas, and remove all dust before painting. Benjamin Moore, Sherwin-Williams, and This Old House recommend this brush-and-roller approach for controlled coverage on furniture.
Can Chalk-Style Paint Skip Primer?
Some chalk-style products are formulated to adhere to many surfaces with minimal preparation. However, “no primer required” does not mean “paint over grease, loose varnish, and mysterious furniture polish.” Cleaning remains essential, and problem woods or slick surfaces may still need a specialized primer. Always follow the instructions for the exact product you purchase.
Step 6: Choose a Farmhouse Paint Color
The safest choice is warm white, but it is not the only choice. Select a color that relates to the room, flooring, wall color, and hardware.
Classic Farmhouse White
Choose a soft white with cream, gray, or beige undertones. A stark blue-white can make an older dresser look cold and may exaggerate stains or surface imperfections.
Soft Greige or Putty
Greige is practical when white feels too bright. It works with natural wood, linen, black metal, warm brass, and woven baskets.
Sage Green
Muted sage adds color without turning the chest into the loudest object in the room. It pairs beautifully with wood tops and antique brass hardware.
Dusty Blue
A gray-blue finish creates a relaxed cottage farmhouse look. Use dark bronze pulls for warmth or black cup pulls for stronger contrast.
Charcoal or Soft Black
A dark chest can anchor a pale bedroom or entryway. Slightly distressed edges reveal the layer below and prevent the finish from feeling overly formal.
Step 7: Paint the Chest of Drawers
Stir the paint thoroughly without whipping air into it. Begin with a brush on corners, trim, routed details, and narrow edges. Immediately roll the large flat sections while the brushed paint is still workable.
Apply two or more thin coats rather than one heavy coat. Thick paint tends to sag around drawer openings, pool in corners, show roller texture, and remain soft longer. Work from the top downward and maintain a wet edge.
Allow each coat to dry for the full time stated by the manufacturer. Lightly sand between coats with fine sandpaper if the surface feels rough. Remove every trace of dust before continuing. Thin layers and light sanding between compatible coats help create a smoother, more durable finish.
Do Not Paint the Drawer Sides Automatically
Paint adds thickness. Coating tight-fitting drawer sides or wooden runners may cause drawers to bind. Paint only the visible drawer fronts unless you have enough clearance. For a surprise detail, use wallpaper or a contrasting color inside the drawers instead.
Step 8: Create a Natural Distressed Finish
Distressing should imitate believable wear. Focus on corners, drawer edges, feet, raised molding, and areas near handles. These are the places hands, shoes, and daily use would naturally affect.
Wait until the paint is dry enough to sand cleanly. Use fine sandpaper and remove color gradually. Step back frequently to compare the entire chest. Randomly attacking the middle of a drawer with coarse paper rarely looks historic; it looks like the dresser lost an argument with a belt sander.
For added depth, apply a second paint color beneath the final color and sand selectively to expose both layers. Two-color distressing is a recognized chalk-paint technique for creating an aged appearance.
Step 9: Protect the Painted Finish
Whether you need a topcoat depends on the paint, sheen, desired appearance, and expected use. A decorative guest-room dresser may need less protection than a child’s dresser, changing station, bathroom storage chest, or entryway cabinet.
Use a compatible clear water-based topcoat for stronger protection, especially on the top and drawer fronts. Apply thin, even coats and respect the manufacturer’s drying schedule. A matte or satin topcoat preserves the farmhouse appearance better than a high-gloss finish.
Furniture wax creates a soft, hand-rubbed look but may require maintenance and is not always ideal beneath items exposed to water, heat, or frequent cleaning. Some chalk-style paint systems offer dedicated protective coatings designed to improve durability.
Remember that dry paint is not necessarily cured paint. A finish may feel dry within hours but remain vulnerable to dents, scratches, and sticking for days or weeks. General Finishes advises treating newly finished furniture gently during its full curing period.
Step 10: Update the Hardware
Hardware can determine whether the finished chest looks authentically farmhouse or merely freshly painted. Black cup pulls create a practical country look. Aged brass adds warmth. Wooden knobs feel casual and can be stained to coordinate with a natural top.
Before drilling new holes, create a cardboard template. Mark the centerline and hardware spacing once, then reuse the template on every drawer. This avoids the charmingly handmadebut not actually charmingeffect of six handles installed at six different angles.
If the original hardware is well proportioned, clean it and reuse it. Original pulls often suit the scale and age of the furniture better than trendy replacements.
Step 11: Reassemble and Anchor the Dresser
Wait until the finish is sufficiently hardened before installing hardware and sliding drawers back into the cabinet. Place felt pads beneath lamps, baskets, and decorative objects. Avoid leaving rubber-backed items or heavy accessories on a newly finished top during the curing period.
Secure the completed chest to a wall using an appropriate anti-tip device. Dressers can tip when drawers are opened, climbed on, or loaded unevenly. The U.S. Consumer Product Safety Commission recommends anchoring furniture with drawers, doors, or shelves, especially in homes with children.
Farmhouse Styling Ideas for the Finished Chest
Let the makeover remain the star instead of burying it beneath a decorative yard sale. A few well-scaled objects are enough:
- A ceramic lamp with a linen shade
- A round or rectangular wood-framed mirror
- A stoneware vase with branches or seasonal greenery
- A shallow woven basket for keys or small accessories
- A short stack of books
- A framed black-and-white photograph
- A folded vintage textile
Balance height and empty space. One tall object, one medium object, and one low object often create a pleasing arrangement. Farmhouse style feels relaxed because it leaves room for everyday life.
Common Mistakes to Avoid
Skipping the Cleaning Step
Paint applied over wax, oil, polish, or grease may separate, develop craters, or peel when scratched.
Using Heavy Paint Coats
Thick coats extend drying time and create drips around moldings and drawer openings.
Distressing Every Edge Equally
Natural wear is irregular. Concentrate on exposed corners and frequently handled areas.
Reassembling Too Soon
Drawer fronts and cabinet openings can stick together when soft paint is pressed against soft paint.
Ignoring Product Compatibility
Oil-based, water-based, waxed, and specialty finishes do not always cooperate. Check the labels before combining products.
Painting Drawer Runners
Extra coating thickness may stop a previously smooth drawer from closing correctly.
Forgetting Safety
Use ventilation, appropriate respiratory protection, eye protection, and careful dust control. Follow every product’s safety instructions, particularly when sanding, spraying, stripping, or working with an unknown old coating.
Experience-Based Lessons From a Farmhouse Dresser Makeover
The most important lesson from projects like this is that preparation takes longer than painting. The glamorous part may be rolling on creamy white paint, but the difference between a convincing makeover and a peeling weekend experiment is usually made during cleaning, repairing, and sanding.
A common early surprise is how much damage becomes visible after the drawers and hardware are removed. A pull may hide a crescent-shaped dent. Decorative plates may conceal multiple abandoned screw holes. The top may look smooth under dark varnish but reveal water rings and scratches after sanding. It is wise to finish all repairs before priming instead of assuming the paint will cover them. Paint changes color; it does not perform carpentry.
Another useful lesson involves choosing the right white. Small paint samples can appear warm in the store but turn icy blue beside beige walls or yellow flooring. Testing the color on the back of a drawer or a piece of scrap wood gives a much better idea of how it will look in the actual room. Observe the sample during daylight and under artificial lighting before committing to the entire chest.
Thin coats require patience, yet they usually save time overall. A heavy coat may appear to provide instant coverage, but it creates runs along the lower edges of drawers and ridges around decorative trim. Fixing those flaws means waiting, sanding, cleaning, and repainting. Two or three controlled coats create a smoother result with less drama.
It is also easy to overdo distressing. The first sanded corner looks good, so the temptation is to distress another corner, then every edge, then the center of each drawer, and finally areas no human hand could realistically reach. A better method is to distress lightly, reinstall the drawers, and inspect the chest from several feet away. Additional wear can always be added. Reversing excessive distressing requires repainting.
Hardware selection deserves more attention than it usually receives. Tiny knobs can look lost on wide drawers, while oversized cup pulls can overpower a delicate chest. Temporarily attaching one pullor even taping a paper outline of it to the drawerhelps confirm the scale. Reusing the original holes also avoids additional filling and drilling.
Drying time creates another classic lesson. A finish that feels dry to a fingertip may still be soft underneath. Installing pulls too early can twist the paint around screw holes. Closing tight drawers can cause painted edges to stick together. Setting a lamp on the top can leave a permanent ring. Letting the chest sit undisturbed for several days, and treating it carefully throughout the cure period, protects all the work already invested.
Finally, the best farmhouse makeover is not necessarily the most distressed, decorated, or complicated one. A solid dresser painted in a warm neutral, fitted with well-scaled hardware, and finished with one restrained natural-wood detail can look more convincing than a piece loaded with stencils, glaze, artificial scratches, and decorative slogans. Farmhouse style succeeds when the furniture appears useful, comfortable, and capable of belonging in the room for years.
Conclusion
A painted chest of drawers farmhouse makeover is an approachable way to rescue useful furniture and create customized storage. Start with a structurally sound piece, clean it thoroughly, complete the repairs, sand for adhesion, and use a primer suited to the surface. Build the color with thin coats, distress only where wear makes sense, and protect the finish according to how the dresser will be used.
The transformation does not depend on perfection. Slight age, visible grain, and a few carefully preserved marks can give the finished chest more personality. The goal is not to make old furniture look factory-new. It is to make it look intentionally renewed.
Note: Product preparation, drying, recoating, ventilation, and curing requirements vary. Follow the instructions printed on the specific cleaner, primer, paint, wax, and topcoat you use. Assess unknown vintage coatings for lead hazards before sanding, and anchor the completed dresser securely to the wall.