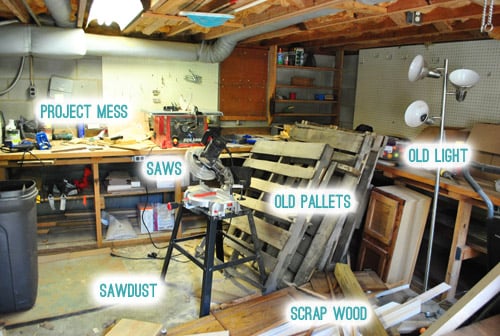
Our basement workshop has never appeared in a glossy home-improvement magazine. No photographer has asked to capture its elegant arrangement of coffee cans filled with mystery screws. Nobody has admired the tasteful layer of sawdust softening the concrete floor. The workbench is rarely empty, the extension cords reproduce when the lights go out, and at least one screwdriver is always hiding in a location that defies physics.
Yet this messy basement workshop is also one of the most useful rooms in the house. It is where wobbly chairs regain their dignity, broken lamps receive second chances, and innocent pieces of lumber become shelves, cabinets, garden boxes, or expensive firewood. The goal is not to transform it into a showroom. The goal is to make it safer, easier to use, and organized enough that every project does not begin with a 30-minute search for the tape measure.
Creating a functional basement workshop requires more than buying storage bins. Moisture, ventilation, dust, lighting, electrical capacity, fire safety, workflow, and tool access all matter. A beautiful pegboard cannot rescue a room with a leaking wall, overloaded outlet, or table saw buried under last winter’s unfinished projects.
Why Basement Workshops Become Messy So Quickly
A workshop is naturally a high-clutter environment because it stores objects in wildly different shapes and sizes. A socket set fits neatly in a drawer. An eight-foot board does not. Paint cans stack nicely until one leaks. Sandpaper looks organized until the grit markings disappear. Scrap wood is particularly dangerous because every small piece whispers, “You might need me someday.”
Basements add another complication: they are frequently expected to serve several purposes at once. The same room may contain a furnace, laundry appliances, holiday decorations, household storage, sports equipment, canned food, and the family’s growing collection of boxes labeled “miscellaneous.” The workshop does not merely compete with clutter; it shares a habitat with it.
Mess usually develops through three predictable habits:
- Tools are placed where a project ends rather than where the next project begins.
- Materials enter the workshop faster than unused items leave it.
- Temporary storage gradually becomes permanent archaeological evidence.
The solution is not perfection. A working shop will always become untidy during a project. The real objective is recoverability: after the cutting, drilling, gluing, and muttering are over, the room should be capable of returning to a usable condition without requiring an emergency cleanup crew.
Start With the Basement, Not the Toolboxes
Control Moisture Before Building Storage
Basement moisture can damage tools, swell lumber, rust hardware, ruin cardboard packaging, and encourage mold. Before installing cabinets or stacking expensive equipment against a foundation wall, look for plumbing leaks, condensation, water stains, damp corners, musty odors, and signs of rainwater entry.
The U.S. Environmental Protection Agency recommends keeping indoor relative humidity below 60 percent and ideally between 30 and 50 percent. It also advises addressing the source of condensation or water intrusion quickly rather than merely drying the visible surface. A basic hygrometer can help reveal whether the basement feels dry while secretly operating as a tropical resort for rust.
Use a dehumidifier when necessary, but do not treat it as a substitute for repairs. Improve exterior drainage, correct leaking pipes, seal appropriate cracks, and keep valuable materials off the floor. Metal shelving, plastic feet, or pressure-treated sleepers can provide separation between stored items and minor floor moisture.
Consider Radon When the Basement Becomes Occupied Space
A workshop may turn a previously ignored basement into a place where someone spends several hours each week. The EPA advises retesting for radon when household living patterns change and a lower level begins receiving regular use. Radon levels are often highest in the lowest occupied part of a building, and testing is the only reliable way to determine the concentration in a specific home.
A radon test is not an organization project, but it belongs near the top of any responsible basement workshop checklist. A perfectly labeled drill-bit cabinet is less impressive when the room itself has not been evaluated.
Protect Mechanical and Electrical Equipment
Do not build shelves that block access to the electrical panel, furnace, water heater, shutoff valves, sump pump, or HVAC equipment. These systems require inspection and maintenance, and technicians should not have to climb over a mountain of plywood to reach them.
Keep combustible storage away from heating equipment. The National Fire Protection Association notes that combustible materials should not be stored in mechanical, boiler, or electrical equipment rooms. Even when a basement is not formally divided into separate rooms, maintaining clear space around such equipment is a sensible workshop rule.
Create Workshop Zones Instead of One Giant Pile
Our most useful organizational improvement was not a cabinet, cart, or wall system. It was mentally dividing the basement into zones. Each zone supports a specific stage of work, which reduces the number of times tools and materials migrate across the room.
Material Storage Zone
Store lumber, sheet goods, metal stock, dowels, trim, and large scraps near the workshop entrance when possible. Heavy materials should travel the shortest practical distance. Vertical lumber storage can make individual boards easier to see and retrieve, while a properly supported horizontal rack may be better for long pieces that could bow.
Experienced workshop planners commonly use mobile tool bases, accessible wood storage, and layouts designed around material movement. These ideas are especially valuable in small shops where the same open floor area may need to support cutting, assembly, and finishing at different times.
Cutting and Machining Zone
Tools that create chips and dust should share a section of the workshop when practical. This makes cleanup easier and reduces the length of vacuum hoses or dust-collection connections. Leave enough infeed and outfeed room for the material, not merely enough space for the machine itself.
A compact table saw may occupy only a few square feet while parked, but ripping an eight-foot board requires a clear path on both sides. Before settling on a layout, carry a pretend board through each major operation. It feels ridiculous, but it is less ridiculous than discovering that the lumber must pass through the laundry area and over a basket of clean towels.
Assembly Zone
The main workbench should sit in a well-lit area with comfortable access from multiple sides. Frequently used measuring, marking, clamping, and fastening tools belong nearby. Large assembly surfaces can double as mobile worktables, outfeed supports, or temporary finishing stations when fitted with locking casters.
Finishing Zone
Paints, solvents, adhesives, stains, and oily products need deliberate storage and ventilation. Keep containers closed, follow their labels, and avoid using flammable liquids near flames, pilot lights, sparks, or other ignition sources. NFPA guidance identifies paints, solvents, lacquers, oils, and alcohols among the materials associated with Class B fires.
In many basements, the safest choice is to perform strong-smelling or highly flammable finishing work somewhere with better outdoor ventilation. A basement window cracked open two inches is not a magical portal through which every vapor politely exits.
Build the Workshop Around a Practical Workbench
The workbench is the heart of a basement workshop and, in our case, the primary nesting ground of clutter. A good bench should be stable, flat enough for the intended projects, resistant to ordinary abuse, and positioned where there is useful lighting.
A complicated cabinetmaker’s bench is not mandatory. A sturdy plywood or MDF-topped frame can serve general repairs, assembly, painting, electronics work, and light woodworking. A replaceable or sacrificial top is particularly helpful because it allows drilling, cutting, gluing, and accidental artistic experimentation without emotional distress.
Storage below the workbench should hold tools used at the bench rather than random objects that merely fit there. Full-extension drawers are useful for hand tools and small power tools, while an open shelf can accommodate jigs, cases, or a shop vacuum. Workshop guides from This Old House similarly emphasize stable work surfaces, nearby storage, good lighting, and enough electrical access to support the work being performed.
Most importantly, reserve part of the bench for actual work. Draw a boundary, install a shallow tool shelf, or create a rule that unfinished projects must live on dedicated trays. Otherwise, the available workspace will steadily shrink until all cutting occurs on a six-inch patch beside a jar of bent nails.
Use Walls Before Sacrificing More Floor Space
Floor space is usually the most limited resource in a small basement workshop. Walls, cabinet doors, ceiling joists, and the sides of shelving units can provide storage without narrowing the main walking and working paths.
Pegboard for Visible, Frequently Used Tools
Pegboard works well for tools that are used often and easy to identify by shape. Pliers, squares, small saws, levels, wrenches, and safety equipment can remain visible instead of disappearing into drawers. Use secure hooks and avoid loading lightweight hardware beyond its rating.
French Cleats for Adjustable Storage
A French-cleat wall supports movable holders, shelves, bins, and tool racks. It is a useful choice when the tool collection continues to change, which it will. Workshop storage that cannot adapt eventually becomes another obstacle requiring organization.
French-cleat systems are valued because individual bins and holders can be removed, carried to a project, and repositioned as storage needs evolve. The concept works particularly well for screws, sanding accessories, measuring tools, and cordless-tool holders.
Closed Cabinets for Dust-Sensitive Items
Not every tool benefits from being displayed. Precision instruments, electrical components, manuals, batteries, clean finishing supplies, and rarely used equipment stay cleaner in drawers or cabinets. Transparent boxes are useful when visibility matters, but clear containers do not eliminate the need for labels. A transparent box filled with 200 unidentified metal objects remains a transparent box filled with confusion.
Make Dust Control Part of Every Tool Setup
Wood dust does not remain politely beside the saw that produced it. Fine particles travel through the basement, settle on stored belongings, and may enter adjacent living areas. Sweeping after the project is helpful, but controlling dust close to the source is more effective.
OSHA identifies local exhaust ventilation as the primary method for controlling wood dust because it captures particles at or near the point where they are generated. Its woodworking guidance also warns against using compressed air to blow accumulated dust, since that practice creates an airborne dust cloud.
For a modest basement workshop, practical dust control may include:
- A shop vacuum connected directly to portable tools.
- A separator that captures larger chips before they reach the vacuum filter.
- A dedicated dust collector for higher-volume machines.
- Regular filter inspection and replacement.
- Vacuuming instead of aggressively sweeping fine dust.
- Closing or isolating pathways to finished living spaces while dusty work is underway.
Even a compact vacuum attached to a single machine can capture a surprising amount of material. Small-shop dust systems are often most successful when they are convenient enough to connect every time rather than impressive enough to admire occasionally.
Improve Lighting Before Buying Another Tool
A dim workshop makes layout lines difficult to see, hides defects, creates misleading shadows, and turns every dropped screw into a basement legend. Good lighting combines broad ambient illumination with focused task lighting above benches and machines.
Place fixtures so that your body does not cast a shadow directly over the cut line. Add under-cabinet or adjustable task lights above detailed work areas. Light-colored walls and ceilings can also make the room feel brighter by reflecting more light.
The U.S. Department of Energy recommends using task lighting to illuminate the work area directly rather than relying entirely on brighter whole-room lighting. DOE purchasing guidance similarly supports combining work-surface lighting with lower ambient illumination.
Lighting upgrades are not glamorous in the traditional tool-buying sense, but the ability to distinguish a pencil mark from a shadow is remarkably useful.
Treat Extension Cords as Temporary Equipment
A workshop should have enough properly installed receptacles to reduce dependence on extension cords and overloaded power strips. Electrical changes should comply with local codes and be completed by a qualified electrician when the work exceeds your skills or legal authority.
Inspect cords for damaged insulation, loose connections, missing grounding prongs, and unsuitable current ratings. The U.S. Consumer Product Safety Commission warns that defective or undersized extension cords can create shock and fire hazards. Its power-tool guidance recommends grounded, undamaged cords that are suitable for the intended electrical load.
Route cords away from cutting paths and walkways. Do not allow them to become permanent vines growing across the basement floor. A ceiling-mounted retractable cord reel may help in some layouts, but it still needs the correct rating and safe installation.
Protect Eyes, Ears, Lungs, and Fingers
Personal protective equipment should be visible and easy to reach. Safety glasses stored in an upstairs closet will not protect anyone during a “quick little cut.” Place eye protection, hearing protection, appropriate masks or respirators, and first-aid supplies near the workshop entrance or main work zone.
NIOSH recommends reducing noise through engineering or administrative controls before relying only on hearing protection. When noise cannot be reduced sufficiently, correctly selected and consistently worn earplugs or earmuffs can help. NIOSH uses 85 dBA as its recommended occupational exposure threshold, and powered woodworking equipment can sometimes exceed that level.
Machine guards should remain installed and functional. Tools should be unplugged or otherwise made safe before blade changes, adjustments, or maintenance. The workshop should also contain an appropriate fire extinguisher in a visible, accessible location near an exitnot behind the object that happens to be burning.
Organize According to Frequency of Use
The simplest storage rule is to give the best locations to the most frequently used tools.
- Daily-use tools: Keep them visible or within one easy reach.
- Regular-use tools: Store them in nearby drawers, cabinets, or labeled bins.
- Occasional tools: Place them on higher shelves or in secondary storage.
- Never-used tools: Sell, donate, recycle, or admit that they are decorative objects.
Group tools by task rather than by appearance. A drywall knife belongs with drywall supplies, not beside kitchen knives because both happen to be flat and sharp. Keep drill bits with drills, sanding discs with sanders, and measuring tools near the layout area.
Small hardware deserves especially strict control. Use divided boxes or labeled drawers for screws, nails, anchors, washers, nuts, bolts, electrical connectors, and picture-hanging hardware. Labels should describe both type and size. “Screws” is technically accurate but emotionally unhelpful.
Set Limits for Scrap Wood and Unfinished Projects
Scrap storage can consume an entire basement if every offcut is treated as a future heirloom. Create physical limits: one bin for short hardwood pieces, one rack for useful plywood scraps, and one container for material suitable only for testing finishes or supporting paint cans.
When a container is full, something must leave before something new enters. This rule converts an emotional decision into a spatial one. Keep pieces that are large, valuable, difficult to replace, or likely to match current work. Discard unsafe fragments, warped strips, damp material, and pieces too small for any realistic project.
Apply a similar rule to unfinished projects. Give each active project a tray, shelf, cart, or labeled box. Include its hardware, drawings, and special tools. Projects without a defined home tend to spread across every available surface and eventually merge into one enormous project called “the basement.”
A Simple Cleanup Routine That Actually Works
A workshop remains usable when cleanup is treated as the final stage of the project rather than a separate event performed during moments of personal transformation.
- Disconnect and safely store power tools.
- Return frequently used hand tools to their assigned locations.
- Vacuum machines, benches, and the floor.
- Empty dust containers before they become overfilled.
- Seal finishes, adhesives, and chemicals.
- Place project parts in their labeled tray or bin.
- Remove trash and unusable scraps.
- Leave one clear work surface for the next visit.
This routine may take ten minutes after a small job. Skipping it repeatedly can create several hours of future cleanup, usually scheduled for the exact day you urgently need the workshop.
What Our Messy Basement Workshop Taught Us
The following experience is an illustrative composite of the situations many DIY households encounter in a shared basement workshop.
For a long time, we believed the workshop’s primary problem was a lack of storage. Every frustrating search for a wrench seemed to confirm it. We bought plastic bins, inherited an old cabinet, installed two shelves, and proudly added a rolling cart. Within weeks, every new storage surface was full, but the workshop was no easier to use.
The real problem was that we had never decided what belonged in the room. The basement contained duplicate tools, empty product boxes, broken appliances waiting for imaginary repairs, leftover flooring, dried paint, unidentified lumber, and hardware from furniture that no longer existed. We did not have a storage shortage. We had an unwillingness-to-make-decisions surplus.
The turning point arrived during a simple shelf project. We needed a drill, a level, wall anchors, and a stud finder. The drill was on the bench beneath a drop cloth. The battery was in a cabinet. The charger was behind the miter saw. The anchors were divided among three jars, none correctly labeled. The stud finder was eventually discovered upstairs in a kitchen drawer, possibly attempting to start a new life.
Instead of building the shelf, we spent the afternoon emptying the workshop. We made broad categories: keep, relocate, donate, discard, and investigate. “Investigate” quickly became the most popular category because it postponed commitment, so we eliminated it. Anything we could not identify or justify received a deadline.
Once the floor was visible, we marked functional zones with painter’s tape. Lumber storage went near the stairs. Cutting tools moved closer together. The main bench became the assembly area. A smaller table near a window became the place for repairs and less dusty tasks. Finishing supplies were reduced, checked, and moved into more deliberate storage.
We also learned that tool storage had to match behavior. A beautiful drawer system was useless for the combination square we reached for every ten minutes. It belonged on the wall. The rarely used specialty wrench did not deserve premium pegboard territory. It went into a labeled drawer. Our most-used cordless tools received a simple charging station, which ended the traditional ritual of searching for whichever battery still had two blinking bars.
The scrap pile required the most courage. We had kept pieces so small that their only realistic purpose was reminding us of larger pieces we once owned. We established containers with fixed capacities and sorted material by genuine usefulness. The first purge felt wasteful. The newly available floor space felt better.
Not everything became perfect. During active projects, clamps still gather in strange corners. Sawdust still escapes. Tools occasionally remain on the bench overnight, apparently too exhausted to return home. The difference is that the room now has a reset point. Every important item has a logical location, the main paths remain clear, and cleanup no longer requires inventing new places to hide things.
The biggest lesson was that an organized workshop is not a static display. It is a system that supports movement: material enters, work progresses through several stages, finished objects leave, and waste is removed. When any stage stops moving, clutter begins accumulating around it.
We also stopped waiting for the workshop to become “finished.” A useful shop evolves with its projects. Tool holders move. Shelves change height. A machine that once seemed essential may become unnecessary. Another tool may deserve a mobile base because it is used only twice a month. Flexibility is more valuable than creating a layout so permanent that nobody dares improve it.
Most of all, we discovered that a little mess is not evidence of failure. A spotless workshop may simply be a workshop where nothing happens. Sawdust, clamps, sketches, and partly assembled projects are signs of activity. The goal is not to eliminate every trace of work. It is to prevent yesterday’s work from blocking tomorrow’s.
Conclusion: A Better Workshop, Not a Perfect One
Our messy basement workshop may never become a flawless gallery of matching cabinets and color-coordinated tools. That is fine. A successful home workshop is dry, reasonably clean, well lit, safely powered, and organized around the work its owner actually performs.
Begin with moisture and safety. Protect access to household equipment, improve lighting, control dust near its source, and reduce electrical hazards. Then create zones, use vertical storage, assign logical homes to frequently used tools, and establish firm limits for scraps and unfinished projects.
Do not attempt to redesign the entire basement in one heroic weekend. Clear one workbench, organize one tool category, install one shelf, or eliminate one box of useless leftovers. Small improvements begin producing benefits immediately. Eventually, the basement stops feeling like a storage crisis and starts behaving like a workshop again.