My front yard used to have two personalities. On sunny days, it looked like an ordinary lawn leaning politely toward the street. During heavy rain, it became a miniature watershed with muddy channels, drifting mulch, and one determined pebble that traveled farther than I did all weekend. Mowing was awkward, irrigation ran off too quickly, and every bare patch seemed eager to relocate downhill.
I finally stopped treating the slope like a defective flat lawn. My front yard slope project became a practical makeover built around four goals: slow runoff, protect the soil, create safer access, and improve curb appeal. The finished design used contour planting, two low terraces, a curved path, layered vegetation, and a shallow infiltration area near the bottom.
Why the Slope Needed a Real Plan
A sloped front yard creates connected problems. Water gains speed downhill, exposed soil erodes, and loose bark or stone migrates. Dense turf can protect a bank, but thin grass on compacted or shaded ground becomes a recurring repair job. Extension guidance repeatedly emphasizes keeping vulnerable soil covered with living plants, mulch, or temporary erosion-control materials while permanent roots develop.
My first impulse was to scatter more seed and hope. That strategy had the sophistication of fixing a roof leak with encouraging words. The slope also had compacted soil, uneven sunlight, a downspout near the upper corner, and a straight mowing route that doubled as a runoff channel. Before buying plants, I needed to understand the site.
The Problems I Wanted to Solve
- Erosion: Small rills formed below the downspout after storms.
- Unsafe maintenance: Sideways mowing felt like low-budget stunt work.
- Wasteful watering: Irrigation moved downhill before soaking in.
- Weak curb appeal: The slope looked accidental rather than designed.
Measuring the Grade and Following the Water
I drew a basic site map showing the house, driveway, sidewalk, utilities, trees, downspouts, sunny areas, and low spots. Then I watched the yard during rain. Water is an honest design critic; it identifies every shortcut and bad assumption within minutes.
Using stakes, level string, and a tape measure, I estimated the grade. Slope percentage equals vertical rise divided by horizontal run, multiplied by 100. A 2-foot drop over 20 feet is a 10 percent slope. This matters because slopes above roughly 10 percent become harder to walk and need dependable year-round cover to limit erosion.
Before digging, I checked local rules and requested utility marking. Drainage changes, grading, walls, and work near sidewalks or property lines may require review. The national 811 service exists because finding a buried line with a shovel is a terrible way to introduce yourself to the utility company.
My Three-Zone Slope Design
The design followed a simple principle: slow water near the top, spread it across the middle, and give it a safe place to soak in near the bottom. Rain gardens, contour beds, vegetated swales, and terraces all reduce concentrated flow instead of sending stormwater downhill as quickly as possible.
Zone 1: Upper Planting Band
Near the house, I redirected the downspout into a broad planted area while maintaining drainage away from the foundation. Compact shrubs and clumping grasses helped spread the flow instead of allowing one narrow stream to cut through the slope.
Zone 2: Low Contour Terraces
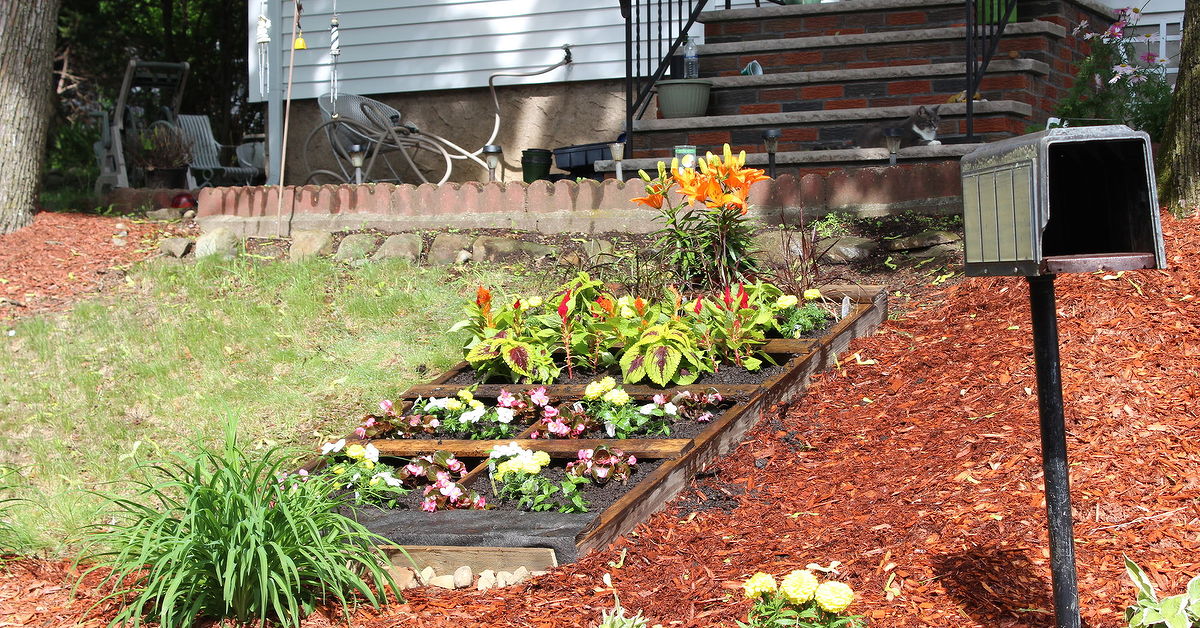
Two gently curved terrace lines crossed the middle of the hill. They shortened the effective slope, created level planting pockets, and kept soil from sliding. The walls were intentionally low; their job was to interrupt runoff, not restrain a small mountain. Taller or heavily loaded retaining walls need professional design, drainage planning, and local code review.
Zone 3: Lower Infiltration Area
At the bottom, I formed a shallow planted basin set away from the house and sidewalk. It was not a pond. It temporarily held runoff so water could slow and soak into suitable soil. EPA guidance describes a rain garden in much the same way: a planted depression that receives runoff from roofs, driveways, or streets and encourages infiltration.
Preparing the Hill Without Starting a Mudslide
I worked in sections instead of clearing the entire slope at once. Useful vegetation stayed until replacement areas were ready, and exposed soil was covered promptly. Where planting could not happen immediately, I used biodegradable erosion netting and a light layer of stable mulch.
Mulch choice matters on a grade. Fine bark may float or slide, while shredded mulch tends to knit together. Natural-fiber netting can hold the surface while groundcovers establish; both Clemson and Penn State extension resources recommend netting or similar temporary protection on vulnerable slopes.
I loosened individual planting pockets rather than spreading a deep blanket of fluffy topsoil over compacted subsoil. Soil health depends on structure, pore space, organic matter, and biological activitynot merely on adding something sold in a bag.
Building the Terraces and Path
The terrace curves were laid out with a garden hose. Straight walls would have emphasized the steepness; broad arcs made the yard look wider and echoed the front walk. The blocks sat on a compacted base with drainage material behind them. Water trapped behind a wall creates pressure, so the unseen base and drainage details mattered more than the decorative cap.
I added a curved stepping route that crossed the hill gradually. A straight path can concentrate runoff, whereas a switchback or S-shaped route reduces the effective grade and slows water movement. Flat stones were set securely and spaced for comfortable use. On steeper sites, properly built steps, landings, and handrails may be safer.
Choosing Plants for a Front Yard Slope
I did not search for one magical erosion-control plant. I built layers. Shrubs provide woody roots, grasses and sedges form dense fibrous roots, flowering perennials add seasonal interest, and groundcovers shield the surface from rain impact. Trees and shrubs can improve infiltration and stabilize soil, while low-growing plants fill the gaps where erosion and weeds would otherwise volunteer.
The planting plan repeated a limited palette instead of using one of everything. Repetition created order from the street, while changes in height and bloom time kept the design lively.
A Practical Planting Framework
- Structural shrubs: Compact native or adapted shrubs in staggered groups.
- Grasses and sedges: Dense-rooted clumps along contour lines.
- Flowering perennials: Repeated drifts for color and pollinators.
- Groundcovers: Low plants that fill gaps and protect soil.
- Moisture-tolerant plants: Species reserved for the lower basin.
For a sunny slope, regionally suitable options might include little bluestem, creeping phlox, aromatic aster, low juniper, or compact native shrubs. Shadier banks may support sedges, ferns, foamflower, wild ginger, or Christmas fern. These are examples, not a nationwide shopping list. Plants must match local climate, sun, soil moisture, mature size, and invasive-species guidance. A polite groundcover in one state can become a botanical supervillain in another.
Irrigation and First-Year Maintenance
New plants needed regular moisture, but overhead watering encouraged runoff. I installed drip tubing along the contours and applied water slowly. Plants with similar moisture needs were grouped together, so the dry upper bank did not receive the same schedule as the lower basin.
During the first year, I checked the slope after storms, removed weeds before they seeded, and repaired tiny channels immediately. A two-inch rill takes minutes to fix. Ignored long enough, it becomes a weekend project with fewer snacks and more questionable language.
Budgeting and Project Order
I divided the work into phases: site mapping and utility marking, drainage and grading, low walls and path construction, irrigation, planting, then mulch. This kept wheelbarrows from flattening new plants.
Hardscape materials, drainage components, soil delivery, and larger shrubs were the main costs. I saved by repeating a smaller plant palette, buying some young plants, and doing the planting myself. I did not try to save by skipping drainage behind retaining elements. Some corners are expensive to cut twice.
What Changed
The house finally looked connected to the yard. Curved planting bands made the lot appear wider, and the steepest section no longer needed mowing. More importantly, rainwater stopped racing down a single muddy chute. The terraces interrupted flow, roots protected the soil, and the lower basin handled short bursts of runoff.
The landscape was not maintenance-freethose mostly exist in real-estate listingsbut care became predictable: inspect emitters, remove occasional weeds, prune shrubs, and cut back perennials at the right time.
Experiences and Lessons From the Project
The first lesson was that drainage comes before decoration. I spent far too much time comparing flower colors and not enough time asking where roof runoff went. The yard answered during the next storm. Once the downspout was redirected and its flow spread through vegetation, several downstream problems became easier to solve.
The second lesson was to test the rough design in bad weather. During the first strong storm, I watched from the porch as water reached one terrace outlet. The opening was too narrow, and a small stream began cutting around its edge. I marked the spot, widened the protected outlet, and added stone to dissipate the flow. Fifteen minutes of observation prevented a permanent erosion channel.
Planting density also mattered more than expected. One-gallon plants seemed large while I carried them uphill, but after installation the spaces between them looked like vacant lots. Wide spacing saves money on day one but leaves soil exposed and gives weeds an invitation. I filled the larger gaps with plugs and smaller groundcovers, which improved coverage without purchasing more big containers.
The hill contained several microclimates. The top dried rapidly and received reflected heat from the house. The middle stayed moderately moist. The lower corner near the driveway remained cooler and collected extra runoff. Treating the whole slope as one bed would have guaranteed unhappy plants. Grouping them by exposure and moisture produced much better growth.
I also gave up my devotion to perfectly clean soil. Bare ground looks tidy for about ten minutes, but on a slope it invites weeds and erosion. Leaf litter beneath shrubs, living groundcover, and stable mulch now perform useful work. The landscape looks finished because plants overlap and repeat, not because every inch has been vacuumed.
Patience became part of the plan. The first month looked sparse. The first growing season looked promising. By the second season, roots had knitted the surface together, grasses softened the terrace edges, and flowers repeated across the hill. A slope planting should be judged after establishment, not immediately after the nursery pots disappear.
I would spend even more time planning maintenance access. My curved path works well, but one upper pocket is still difficult to reach without leaning across a grass clump. If rebuilding, I would add two discreet stepping stones before planting. They would be nearly invisible from the street and extremely visible while carrying pruners.
The most satisfying moment was not a neighbor’s compliment, although I accepted those with the humility of someone who had moved many wheelbarrows of material. It was watching the yard perform during heavy rain. Water slowed, spread, and soaked into planted soil instead of carrying that soil toward the curb.
Most of all, I learned that a front yard slope is not automatically a flaw. It offers layered views, elevation, natural drainage opportunities, and visual depth that a flat lawn cannot easily provide. The project improved when I stopped asking the hill to behave like a level rectangle and started designing with its shape.
Conclusion
My front yard slope project worked because it treated the site as a connected system. Water was directed away from the foundation, runoff was slowed along contours, bare soil was protected, plants were matched to microclimates, and access was included from the beginning.
For a similar makeover, start by observing rather than shopping. Measure the grade, watch a storm, test the soil, locate utilities, and determine where water can safely go. Then choose an appropriate mix of contour beds, terraces, paths, shrubs, grasses, groundcovers, and infiltration features. Gravity will always participate. Good landscape design simply gives it better instructions.
Note: Plant suitability, drainage rules, permit thresholds, and retaining-wall requirements vary by location. Consult local extension resources, the building department, and qualified landscape or engineering professionals when structural stability, utilities, foundations, sidewalks, or neighboring property may be affected.