There is something strangely therapeutic about staring at ocean waves. Maybe it is the color, maybe it is the foam, or maybe it is the fact that the ocean never sends a calendar invite. Fortunately, you do not need a beachfront condo or a dramatic seagull soundtrack to enjoy that peaceful coastal feeling. With a stainless-steel tumbler, a few pigments, and carefully mixed epoxy resin, you can create a calming ocean design that looks like a tiny rolling shoreline wrapped around your favorite drink.
An ocean resin tumbler is one of the most satisfying beginner-friendly resin projects because it combines simple color layering with a little controlled chaos. The goal is not to make every wave identical. Real waves are uneven, foamy, moody, and occasionally determined to ruin your sandcastle. Your tumbler should have that same natural movement.
This guide explains how to create a peaceful ocean-inspired tumbler with resin, including preparation, color placement, wave effects, curing tips, common mistakes, and practical safety reminders. The process reflects widely recommended techniques from resin manufacturers, craft educators, safety agencies, and product safety documentation used across the United States.
Why Ocean Resin Tumblers Are So Popular
Ocean resin tumblers combine function and art. Instead of using a plain cup that looks like it survived three office moves and a dishwasher argument, you can create a personalized piece with layered blues, sandy neutrals, white foam, shimmer, and translucent water effects.
The ocean design works especially well on tumblers because the curved surface creates natural movement. A dark navy band can resemble deep water, a turquoise section can suggest shallow waves, and a soft white line can become sea foam. When resin moves while the tumbler rotates, the colors stretch around the cup in a way that feels more organic than a flat painting.
Ocean designs also give beginners plenty of creative freedom. You can make a tropical turquoise shoreline, a stormy navy sea, a soft pastel beach scene, or a midnight ocean with silver mica shimmer. No two tumblers will look exactly alike, which is excellent news for anyone who dislikes measuring things with the emotional intensity of a chemistry lab.
Important Resin Safety Before You Begin
Resin crafting is creative, but it is still a chemical process. Liquid epoxy resin and hardener should be handled carefully. Safety guidance from OSHA, CDC/NIOSH, EPA resources, resin manufacturers, and product safety data sheets consistently emphasizes avoiding skin contact, protecting the eyes, and working with adequate ventilation.
Set up your project in a clean, well-ventilated workspace. Wear nitrile gloves, protective eyewear, and clothes you do not mind sacrificing to the craft gods. Do not work near food preparation areas, pets, or children. Keep resin bottles sealed when not in use, and always follow the exact instructions and safety data sheet provided by your specific resin brand.
Use resin only on the outside of a tumbler unless the product manufacturer specifically confirms that the fully cured product is appropriate for the intended use. Avoid coating drinking rims, straw openings, lids, threads, or interior surfaces. A beautiful tumbler should inspire hydration, not confusion about where your mouth is supposed to go.
Supplies You Need for an Ocean Resin Tumbler
Basic Materials
- Stainless-steel tumbler with a smooth exterior
- Tumbler turner or rotating cup spinner
- Two-part epoxy resin formulated for coating projects
- Nitrile gloves and safety glasses
- Disposable measuring cups and stir sticks
- Painter’s tape
- Fine-grit sandpaper, usually 180 to 220 grit
- Rubbing alcohol or a manufacturer-approved cleaning product
- Plastic sheet, silicone mat, wax paper, or kraft paper for workspace protection
Color and Design Materials
- White acrylic paint or white resin pigment
- Teal, aqua, turquoise, royal blue, and navy pigments
- Sand-colored pigment, tan glitter, or fine beach-toned mica powder
- White glitter or white mica powder for foam effects
- Optional iridescent glitter for a subtle sunlight-on-water look
- Optional heat gun for gentle bubble removal
Choose pigments designed for resin whenever possible. A tiny amount usually goes a long way. Too much pigment can affect the resin’s ability to cure properly, so think “whisper of color,” not “entire paint aisle fell into the cup.”
Step 1: Prepare the Tumbler Surface
Good resin art begins with surface preparation. If the tumbler has a glossy factory coating, lightly sand the outside so the surface becomes dull and slightly textured. You are not trying to remove the tumbler’s personality. You are simply creating enough tooth for the base paint and resin layers to grip.
After sanding, wipe away dust with rubbing alcohol or a cleaner approved for your tumbler material. Let the cup dry completely. Moisture, oil, fingerprints, and mystery crumbs from last Tuesday can interfere with adhesion.
Use painter’s tape to cover the rim, bottom edge, threads, logo area, or any section you do not want coated. Make the tape line neat because it will define the final edge of your design. A crooked tape line is not a creative wave. It is just a crooked tape line.
Step 2: Create a Beach and Water Base
Most calming ocean tumbler designs look best with a beach section near the bottom and darker water moving upward. Start by applying a base coat of paint. A pale sand color, creamy beige, soft gray, or warm pearl creates a natural shoreline foundation.
For a tropical look, use a light sandy base with aqua and turquoise water. For a moodier coastal tumbler, use a cool gray sand band with navy, slate blue, and muted teal. Let the paint dry completely before adding resin.
You can also add fine glitter to the beach area. Champagne glitter, pale gold mica, or soft beige shimmer can imitate sunlight reflecting on sand. Use it sparingly. The ocean is calming; a Vegas casino floor at midnight is a different aesthetic.
Step 3: Mix the Resin Correctly
Measure resin and hardener exactly according to the manufacturer’s ratio. Some products use a one-to-one volume ratio, while others require weight-based measuring. Never assume that all resin behaves the same way. Resin brands are less like identical twins and more like cousins who all insist their potato salad recipe is the only correct one.
Mix slowly and thoroughly, scraping the bottom and sides of the cup. Rapid stirring can introduce extra bubbles. Many resin makers recommend mixing in a deliberate, steady motion rather than whipping it like cake batter.
If you need several colors, first mix one clear batch completely. Then divide the resin into smaller cups and add pigments to each portion. Prepare a clear portion, a sandy portion, two or three shades of blue, and a white foam mixture.
Step 4: Build the Ocean Layers
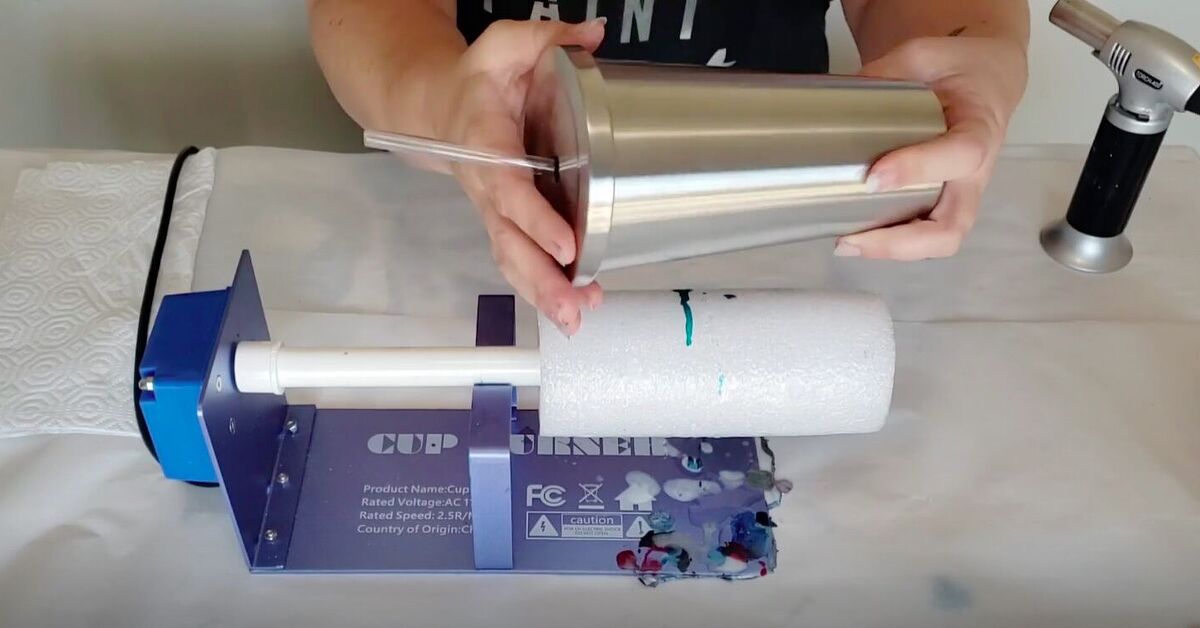
Place the tumbler on the turner and make sure it rotates smoothly. The turner keeps resin from sagging, pooling, or forming lopsided drips while it cures. If the cup stops spinning halfway through, gravity will immediately volunteer to become your art director.
Begin with the sand-colored resin near the bottom third of the tumbler. Use a gloved hand, silicone brush, or mixing stick to spread it gently around the cup. Blend slightly upward so the edge does not look like a strict horizontal stripe.
Next, apply the lightest blue above the sand. Add turquoise, aqua, and teal in uneven bands. Keep the colors loose and slightly overlapping. Then add darker blue or navy toward the upper area for depth. Real water does not change color in perfectly straight lines, so avoid creating a tumbler that resembles a beach-themed spreadsheet.
Let the tumbler rotate while you softly blend the boundary between the sand and shallow water. Leave a few translucent areas. Clear resin between colors creates depth and makes the water look more natural.
Step 5: Add White Sea Foam Waves
The sea foam is the moment when your tumbler begins to look like an ocean instead of a blue smoothie. Use white-tinted resin, white mica powder, or a mix of white pigment and very fine white glitter. Apply a narrow wavy line where the shallow water meets the sand.
Use a toothpick, gloved finger, silicone tool, or thin stick to pull tiny sections of the white resin outward. Drag some lines toward the sand and some back into the water. This creates branching, lacy patterns that resemble foam breaking along the shoreline.
For a more dramatic wave, create one thick white curve and feather its edges. For a calm beach style, use thinner, softer foam lines. The trick is irregularity. Foam should look like it arrived naturally, not like it was drawn by a ruler with trust issues.
How to Make the Foam Look More Realistic
- Use different thicknesses instead of one solid white stripe.
- Leave some clear gaps in the white resin.
- Pull tiny white tendrils toward the sand.
- Add a faint blue haze behind the foam for depth.
- Use a toothpick to create delicate branching details.
- Do not overwork the resin once the foam looks natural.
Overworking is one of the easiest ways to lose the ocean effect. Resin has a habit of rewarding confidence and punishing panic. Make a few deliberate movements, step back, and let the design breathe.
Step 6: Remove Bubbles Carefully
Small bubbles are common in resin projects. Letting mixed resin rest briefly can help some bubbles rise naturally. You may also use a heat gun very lightly and from a safe distance to encourage surface bubbles to pop.
Do not hold heat in one place too long. Excessive heat can scorch paint, move colors too aggressively, distort glitter, or create unwanted resin movement. A quick pass is usually enough. Think of it as warming a marshmallow from across the campfire, not trying to melt a glacier.
Never use open flame unless your resin manufacturer specifically allows it and you understand the safety instructions. Some resin products and workspaces are not suitable for flame use.
Step 7: Let the Tumbler Cure
Keep the tumbler rotating for the period recommended by your resin manufacturer. Then allow it to cure in a clean, protected space. Cover the area loosely if dust, pet hair, or airborne glitter from an unrelated craft project may drift onto the surface.
Cure time varies by product, temperature, humidity, coating thickness, and mixing accuracy. A tumbler may feel dry before it reaches full strength, so follow the full cure timeline listed on the resin instructions before using or washing it.
Once cured, carefully remove the painter’s tape. If the resin edge feels sharp, lightly sand it with fine-grit sandpaper. You can apply a final clear resin coat for extra shine and smoothness if needed.
Common Ocean Resin Tumbler Mistakes and How to Fix Them
The Colors Turn Muddy
This usually happens when blue, white, and sand colors are blended too aggressively. Keep each color area visible and use gentle overlap rather than nonstop swirling. A little movement looks like waves; too much movement looks like the ocean lost an argument with a blender.
The Resin Is Sticky After Curing
Sticky resin often points to incorrect measuring, incomplete mixing, cold conditions, or unsuitable humidity. Check the product directions, verify your measuring method, and make sure the workspace temperature falls within the manufacturer’s recommended range. Soft resin may need to be removed and redone if it does not cure properly.
The Tumbler Has Drips or Uneven Spots
Use a tumbler turner and make sure the cup is level. Apply thin, even coats rather than flooding the surface with too much resin. Check the tumbler during the early curing stage for drips near the bottom edge.
The Foam Looks Too Solid
Break up the white area with tiny clear spaces and thin branches. Add a little translucent blue around the foam line. Real sea foam is airy and uneven, not a strip of white frosting on a birthday cake.
Ocean Tumbler Design Ideas to Try
- Tropical Beach: Bright turquoise water, pale sand, white foam, and a hint of gold shimmer.
- Stormy Coast: Deep navy, smoky gray, silver mica, and dramatic white waves.
- Sunset Ocean: Peach, coral, soft lavender, dark blue water, and a glowing gold horizon.
- Midnight Sea: Black-blue resin, navy shimmer, silver glitter, and small white foam accents.
- Sea Glass Shoreline: Soft aqua, mint, frosted white, translucent resin, and pale sand.
- Minimal Coastal Tumbler: Cream base, one teal wave, one foam line, and no glitter at all.
How to Care for a Resin Tumbler
Hand-wash your tumbler gently and avoid prolonged soaking, harsh scrubbers, dishwashers, microwaves, and high heat unless the tumbler and resin manufacturer specifically state otherwise. Resin is durable when properly cured, but repeated heat and abrasion can dull the glossy finish over time.
Store the tumbler out of intense direct sunlight when possible. UV-resistant resin can help reduce yellowing, but no clear coating is completely invincible against years of bright sunlight. Treat your tumbler like a favorite pair of sunglasses: useful, stylish, and happier when not baked on a dashboard.
Maker Experiences: What Creating an Ocean Resin Tumbler Really Feels Like
Making an ocean resin tumbler is not just about finishing a cup. It is about slowing down long enough to watch color move. The first few minutes can feel intimidating because resin looks very different before it cures. The colors may seem too bright, the white foam may look too thick, and the beach section may appear suspiciously like pancake batter. Then the tumbler starts rotating, the layers settle, and the design begins to change.
One of the most memorable parts of creating an ocean tumbler is learning when to stop. Beginners often want to keep fixing every swirl, every bubble, every tiny uneven edge. But ocean art rewards restraint. A wave pattern becomes more realistic when it is allowed to stay imperfect. A small ripple in the resin may become the detail that gives the finished tumbler its most natural movement.
Many makers discover that the best tumblers are rarely created from a perfect plan. You may start with a tropical beach idea and end up with a moody coastline because the navy pigment spreads farther than expected. You may intend to make one thin foam line and suddenly create a beautiful wave crest that looks like it belongs on a postcard. Resin has a sense of humor, and sometimes it helps with the design.
The color process can also be surprisingly calming. Mixing teal, aqua, and blue resin feels almost like building a tiny ocean weather system. Lighter shades create the shallow-water effect, while darker blue creates depth. Adding white resin for foam can feel like drawing waves with clouds. Even without artistic training, you can see the scene develop as the colors travel around the tumbler.
There is also a practical lesson in patience. Resin does not care that you are excited. It cures at its own pace. The tumbler must keep rotating, bubbles need time to rise, and the final finish needs time to harden. Waiting can be difficult, especially when you want to hold the finished cup immediately and announce that you are now an ocean artist. Still, the pause is part of the craft.
Some makers enjoy turning the process into a small ritual. They prepare the workspace, cover the table, put on gloves, choose a playlist, and line up the pigments like paint on a palette. Others prefer to work quietly and focus on the movement of the resin. Either approach works. The project can be energetic and glittery or quiet and meditative.
An ocean tumbler also makes a meaningful handmade gift. A beach-inspired cup can remind someone of a favorite vacation, a hometown near the coast, a honeymoon, a family trip, or simply their dream of eventually escaping winter. You can personalize the design with a name decal, a meaningful date, a tiny shell charm placed away from the drinking area, or colors inspired by a specific beach.
The most useful experience, however, is realizing that mistakes are part of the learning curve. A streak that looked strange while wet may become a gorgeous wave when cured. A slightly uneven foam line may make the design look more realistic. Even a tumbler that does not turn out exactly as planned teaches you more than a dozen perfectly filtered social media videos.
After making one ocean resin tumbler, you may find yourself looking at every blue pigment, piece of glitter, and beach photograph differently. Suddenly, turquoise is not just turquoise. It is shallow water. Navy is not just navy. It is deep water before a storm. White mica is not just shimmer. It is sea foam waiting for a dramatic entrance.
That is the charm of resin tumblers: they turn a practical object into a tiny piece of atmosphere. Every time you reach for your drink, you get a little reminder to slow down, breathe, and perhaps avoid checking email until after the first sip.
Final Thoughts
Learning how to create a calming ocean design on a tumbler with resin is equal parts technique, patience, and playful experimentation. Prepare the surface carefully, measure and mix resin accurately, build color layers slowly, and use white resin sparingly for natural-looking sea foam. Most importantly, give yourself permission to let the waves be imperfect.
Your finished tumbler does not need to look identical to anyone else’s. The ocean itself never repeats a wave exactly, and that is what makes this design so satisfying. With a little practice, you can create a glossy, peaceful tumbler that carries a tiny shoreline wherever your day takes you.
Note: Always follow the exact safety instructions, curing guidance, ventilation requirements, and product-specific mixing ratios provided by the manufacturer of the resin you use.