There are two types of old medicine cabinets: the charming vintage kind that makes your bathroom feel like a 1930s hotel, and the sad, rusty, toothpaste-splattered kind that looks like it has been quietly judging your life choices since the Clinton administration. If yours belongs to the second group, good news: you do not have to rip out half the bathroom or spend a heroic amount of money to fix it.
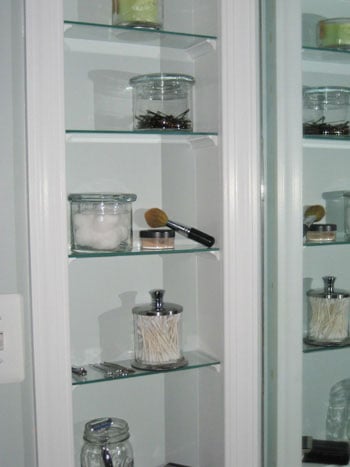
One of the smartest small bathroom upgrades is turning an old medicine cabinet into an open shelved accent nook. Instead of replacing a bulky mirror box with another bulky mirror box, you can use the recessed cavity already in the wall to create a stylish built-in shelf. It gives you storage, display space, architectural interest, and the smug satisfaction of saying, “Oh, that? I made it,” while pretending it did not involve three trips to the hardware store.
This DIY medicine cabinet makeover works especially well in powder rooms, guest baths, hallways, laundry rooms, and small bathrooms where every inch matters. With basic tools, moisture-resistant materials, and a little patience, an awkward wall hole can become a polished bathroom niche shelf for candles, rolled washcloths, perfume bottles, small plants, framed art, or the fancy hand soap you bought because the label looked expensive.
Why Turn a Medicine Cabinet Into an Open Shelved Nook?
Old recessed medicine cabinets are often shallow, dated, and hard to organize. The mirrored door may be chipped, the shelves may be stained, and the inside may have that mysterious bathroom-cabinet smell that no candle can fully defeat. Removing the cabinet gives you a built-in opening, usually already framed between wall studs, which is perfect for an open shelf nook.
An open shelved accent nook adds visual depth without taking up floor space. Unlike a surface-mounted cabinet, it sits inside the wall, so it does not crowd the sink area or make a narrow bathroom feel tighter. It also gives you a chance to add color, tile, wallpaper, beadboard, wood trim, or a contrasting paint finish. In other words, it turns a forgotten storage box into a design feature.
Best Places to Use This Project
This project is most useful when the old cabinet is not your only practical storage. Open shelves are beautiful, but they are honest. They will show your prettiest items and expose your chaos if you ask them to hold cough syrup, floss picks, and seven half-empty moisturizers. For daily clutter, keep a vanity drawer, basket, or closed cabinet nearby. Use the nook for curated storage and decorative essentials.
Good candidates include guest bathrooms, powder rooms, hallway niches, linen-adjacent spaces, or bathrooms where you already have a vanity with drawers. If your medicine cabinet is the only place you store medications, first plan a safer closed storage spot away from heat and humidity.
Tools and Materials You Will Need
You do not need a contractor-level workshop for this DIY recessed shelving project. Most homeowners can complete it with common tools and affordable materials. Your exact list depends on the size of the wall cavity and the finish you want.
Basic Tools
- Stud finder
- Utility knife
- Screwdriver or drill
- Level
- Tape measure
- Pry bar or putty knife
- Oscillating tool, handsaw, or small saw if trimming is needed
- Brad nailer or hammer and finish nails
- Caulk gun
- Paintbrush or small roller
- Safety glasses, gloves, and dust mask
Materials
- One-by lumber, plywood, PVC trim board, or moisture-resistant MDF
- Thin plywood, beadboard panel, tile, or wallpaper for the back panel
- Wood glue or construction adhesive
- Finish nails or trim screws
- Wood filler
- Paintable caulk
- Primer
- Bathroom-friendly paint in satin, semi-gloss, or enamel finish
- Optional: peel-and-stick tile, small trim molding, shelf pins, stain, polyurethane, or LED puck light
For bathrooms, choose materials that can handle humidity. Solid poplar, primed pine, PVC trim, sealed plywood, and properly painted MDF can all work. Raw wood in a steamy bathroom is like a cat near an open tuna can: technically fine for a moment, but trouble is coming.
Step 1: Empty and Inspect the Existing Cabinet
Start by removing everything from the medicine cabinet. Take out shelves, shelf clips, and loose hardware. If there is a built-in light, outlet, razor slot, or wiring nearby, turn off power at the breaker before you do anything else. Do not guess with electricity. Bathrooms already contain water; they do not need surprise sparks for ambiance.
Look around the inside edges of the cabinet. Most recessed medicine cabinets are held in place with screws driven through the sides into framing. Some may also have caulk around the outer frame. Score old caulk with a utility knife so the wall paint does not tear when you pull the cabinet out.
Step 2: Remove the Old Medicine Cabinet Carefully
Back out the mounting screws while supporting the cabinet. Older cabinets can be heavier than they look, especially metal ones with mirrored doors. If possible, remove the door first. Once the screws are out, gently wiggle the cabinet forward. Use a putty knife or slim pry bar if paint has sealed it to the wall.
Do not yank aggressively. Behind that cabinet may be framing, drywall edges, insulation, wiring, plumbing, or old shims. Pulling slowly lets you see what you are working with before you accidentally turn a weekend project into an interpretive plumbing disaster.
Step 3: Check the Wall Cavity
Once the cabinet is out, inspect the opening with a flashlight. A typical recessed medicine cabinet cavity is framed between studs, but every house has its own personality. Some personalities are delightful. Others hide pipes exactly where you wanted a shelf.
If you see electrical wires, plumbing lines, vent pipes, damaged framing, mold, or signs of leaks, pause the project. Small cosmetic updates are DIY-friendly; moving plumbing or electrical usually belongs to licensed professionals. If the wall is load-bearing or framing has been cut in a questionable way, get expert help before covering it up.
Important Safety Note for Older Homes
If your home was built before 1978, old paint may contain lead. Avoid sanding or disturbing painted surfaces until you know what you are dealing with. Use lead-safe practices or hire a certified professional if there is any risk. A cute shelf is not worth creating hazardous dust in your home.
Step 4: Measure the Opening Like You Mean It
Measure the height, width, and depth of the cavity in several places. Old walls are rarely perfectly square. Write down the smallest width and height so your new shelf box will actually fit. This is not the moment for optimism. Wood does not care about your hopeful measuring style.
Decide whether you want the nook flush with the wall, slightly proud with decorative trim, or set back for a shadow-box effect. A common approach is to build a simple wooden box that slides into the opening, then add face trim around the edges to hide gaps and create a finished built-in look.
Step 5: Choose Your Design Style
The beauty of an open shelf nook is that it can match almost any bathroom style. For a clean modern look, paint the inside the same color as the wall and use slim square trim. For a cottage look, add beadboard to the back panel and a small ledge trim. For a spa-inspired bathroom, use warm wood shelves with a white painted frame. For a bold powder room, line the back with wallpaper or peel-and-stick tile.
Think of the nook as a tiny stage. The back panel is the scenery, the shelves are the actors, and the cotton swabs are the extras who should probably stay off camera unless they are in a very attractive jar.
Step 6: Build the Shelf Box
Cut two side pieces, one top piece, one bottom piece, and any interior shelves. Dry-fit them before attaching anything. If your cavity is shallow, one center shelf may be enough. If it is taller, two shelves can create three useful compartments. Leave enough vertical clearance for the items you plan to display, such as skincare bottles, folded washcloths, a small vase, or candles.
Use wood glue and finish nails or trim screws to assemble the outer box. Check for square as you go. If your boards are slightly bowed, place the best-looking faces toward the inside because that is what people will see. The back of the box can be thin plywood, beadboard, tile backer, or another decorative panel attached with adhesive and small nails.
Floating Shelf Option
If you prefer a lighter look, you can finish the inside of the cavity with drywall or paneling, then install individual small floating shelves. This works best when the opening is sturdy and the shelves are not expected to hold heavy items. For a bathroom accent nook, lightweight display storage is usually enough.
Step 7: Prime, Paint, or Stain Before Installation
Painting before installation saves time and protects edges that may be hard to reach later. Prime raw wood, plywood, and MDF first. Bathrooms need finishes that resist moisture and wipe clean, so satin, semi-gloss, or cabinet-grade enamel paint is a smart choice. If you stain the shelves, seal them with a water-resistant clear coat.
Color can completely change the mood. A white nook blends in and feels crisp. A deep green, navy, charcoal, or terracotta interior turns the shelf into an accent feature. A natural wood shelf adds warmth, especially in bathrooms with lots of tile and chrome.
Step 8: Install the Box in the Wall
Slide the finished shelf box into the opening. Use a level to check the sides and shelves. If the wall cavity is uneven, use shims behind the box until everything sits straight. Secure the box to the side framing with trim screws or finish nails. Do not rely on caulk alone; caulk is a finisher, not a structural therapist.
Once the box is secure, add face trim around the opening. Small casing, lattice trim, square stock, or even a simple picture-frame style molding can make the project look intentional instead of “we removed a cabinet and hoped for the best.” Mitered corners look polished, but butt joints can also look clean if cut neatly and filled well.
Step 9: Caulk, Fill, Sand, and Touch Up
Fill nail holes with wood filler and let it dry. Sand smooth. Caulk the seams where trim meets the wall and where the shelf box meets the trim. Use paintable caulk, apply a thin bead, and smooth it with a damp finger or caulk tool. This step is small but powerful. Caulk is the makeup filter of DIY carpentry.
After caulk dries, touch up paint on the trim, inside corners, and any scuffed areas. Stand back and check the nook from several angles. Bathrooms have strong lighting, and strong lighting loves to expose sloppy edges like a friend who always tags unflattering photos.
Step 10: Style the Open Shelved Accent Nook
Now comes the fun part. Keep the styling practical, edited, and bathroom-friendly. A good rule is to combine one useful item, one decorative item, and one texture per shelf. For example, place rolled white washcloths beside a small amber jar and a tiny plant. Or use a shallow tray for perfume bottles, a framed mini print, and a candle.
What to Store in the Nook
- Rolled hand towels or washcloths
- Attractive jars for cotton balls or bath salts
- Perfume bottles or daily skincare in matching containers
- Small framed art
- A bud vase or faux greenery
- Guest soaps
- Decorative boxes for small essentials
What Not to Store There
Avoid storing prescription medications, sensitive skincare, razors, toothbrushes, or anything that should stay clean, dry, private, or child-safe. Bathrooms are humid, and open shelves collect dust faster than closed cabinets. Use the nook for attractive, low-risk items and keep the unglamorous necessities tucked elsewhere.
Moisture Protection Matters
Because bathrooms produce steam, your open shelf nook needs moisture protection. Run the bathroom fan during and after showers, fix leaks promptly, and do not leave damp towels stuffed into the shelves. If the nook is close to a shower, choose more water-resistant finishes such as PVC trim, tile, sealed wood, or high-quality enamel paint.
Keep indoor humidity controlled and encourage airflow. If your bathroom has no exhaust fan, open a window when possible or use a small dehumidifier. Mold prevention is mostly moisture management, not magic spray. The goal is to make the nook easy to wipe, quick to dry, and boringly resistant to bathroom drama.
Budget-Friendly Finish Ideas
This project can be inexpensive if you reuse materials. Old glass shelves from the medicine cabinet may fit the new nook. Scrap wood can become trim. Leftover paint from the vanity can tie the look together. Peel-and-stick wallpaper or tile can add pattern without the commitment of a full renovation.
For a high-end look on a small budget, paint the inside of the nook a contrasting color and use simple trim around the outside. Add two matching jars, a stack of towels, and one small piece of art. Suddenly your old medicine cabinet cavity looks like a designer detail instead of a bathroom afterthought.
Common Mistakes to Avoid
Skipping the Wall Inspection
Never assume the cavity is empty. Wires, pipes, and vent lines can hide behind old cabinets. Check before cutting, drilling, or nailing.
Using Unsealed Wood
Raw wood can absorb moisture and warp. Always prime, paint, stain, or seal exposed surfaces, especially inside a bathroom.
Overloading the Shelves
This nook is decorative storage, not a garage shelf. Heavy items need proper blocking and stronger supports.
Styling Too Much Stuff
Open shelves need breathing room. If every inch is filled, the nook becomes visual clutter with better lighting.
Real-World Experience: What This Project Teaches You
Turning an old medicine cabinet into an open shelved accent nook is one of those projects that looks simple on social media but teaches several practical DIY lessons in real life. The first lesson is that demolition is not destruction. The goal is not to attack the cabinet like it insulted your family. The goal is to remove it cleanly, preserve the wall around it, and learn what is hiding behind it. A slow, careful removal usually saves hours of patching later.
The second lesson is that walls are rarely perfect. Many homeowners expect the opening to be square because the old cabinet looked square from the outside. Then the cabinet comes out and the cavity looks like it was framed during an earthquake by someone holding a sandwich. This is normal. Shims, trim, caulk, and patience are the difference between “custom built-in” and “mysterious hole with shelves.” Measure multiple times, dry-fit everything, and accept that small adjustments are part of the job.
The third lesson is that finish choices matter more than fancy materials. A simple pine box can look expensive if it is sanded, primed, painted, and trimmed neatly. On the other hand, costly wood can look sloppy if the seams are rough and the paint is rushed. Spend extra time on sanding, caulking, and touch-ups. Those quiet finishing steps are what make guests ask where you bought the shelf.
The fourth lesson is that open storage changes your habits. A closed medicine cabinet forgives clutter. An open nook does not. After this makeover, you may find yourself decanting cotton balls into jars, folding towels like a boutique hotel employee, and quietly judging toothpaste tubes left on the sink. That is the strange power of visible storage: it encourages you to keep fewer, better-looking things in reach.
The fifth lesson is about scale. Small shelves should hold small collections. One candle, one folded towel stack, and one jar can look elegant. Twelve bottles, three plants, a shell from vacation, and a decorative sign that says “Relax” may create a tiny retail display having a panic attack. Edit until the nook feels useful and calm.
Finally, this project teaches confidence. It is not a full remodel, but it includes many core DIY skills: removing a fixture, inspecting a wall cavity, measuring, cutting, building a box, installing trim, caulking, painting, and styling. Once you finish, you may start looking at other awkward corners of your home and thinking, “Could that be a nook?” Be careful. That is how weekend projects multiply.
Conclusion
Learning how to turn an old medicine cabinet into an open shelved accent nook is a smart way to upgrade a bathroom without gutting the room or draining your wallet. The project uses space you already have, adds built-in character, and gives your bathroom a more intentional, polished look. With careful removal, a safe wall inspection, moisture-resistant materials, clean trim work, and thoughtful styling, an outdated medicine cabinet can become one of the most charming details in the room.
The secret is balance. Build it sturdy, finish it neatly, and style it lightly. Let the nook hold beautiful basics, not every bathroom item you own. When done well, this DIY bathroom niche shelf feels custom, saves space, and gives an old wall opening a new job. Not bad for a project that starts with removing the cabinet where expired cough drops went to retire.