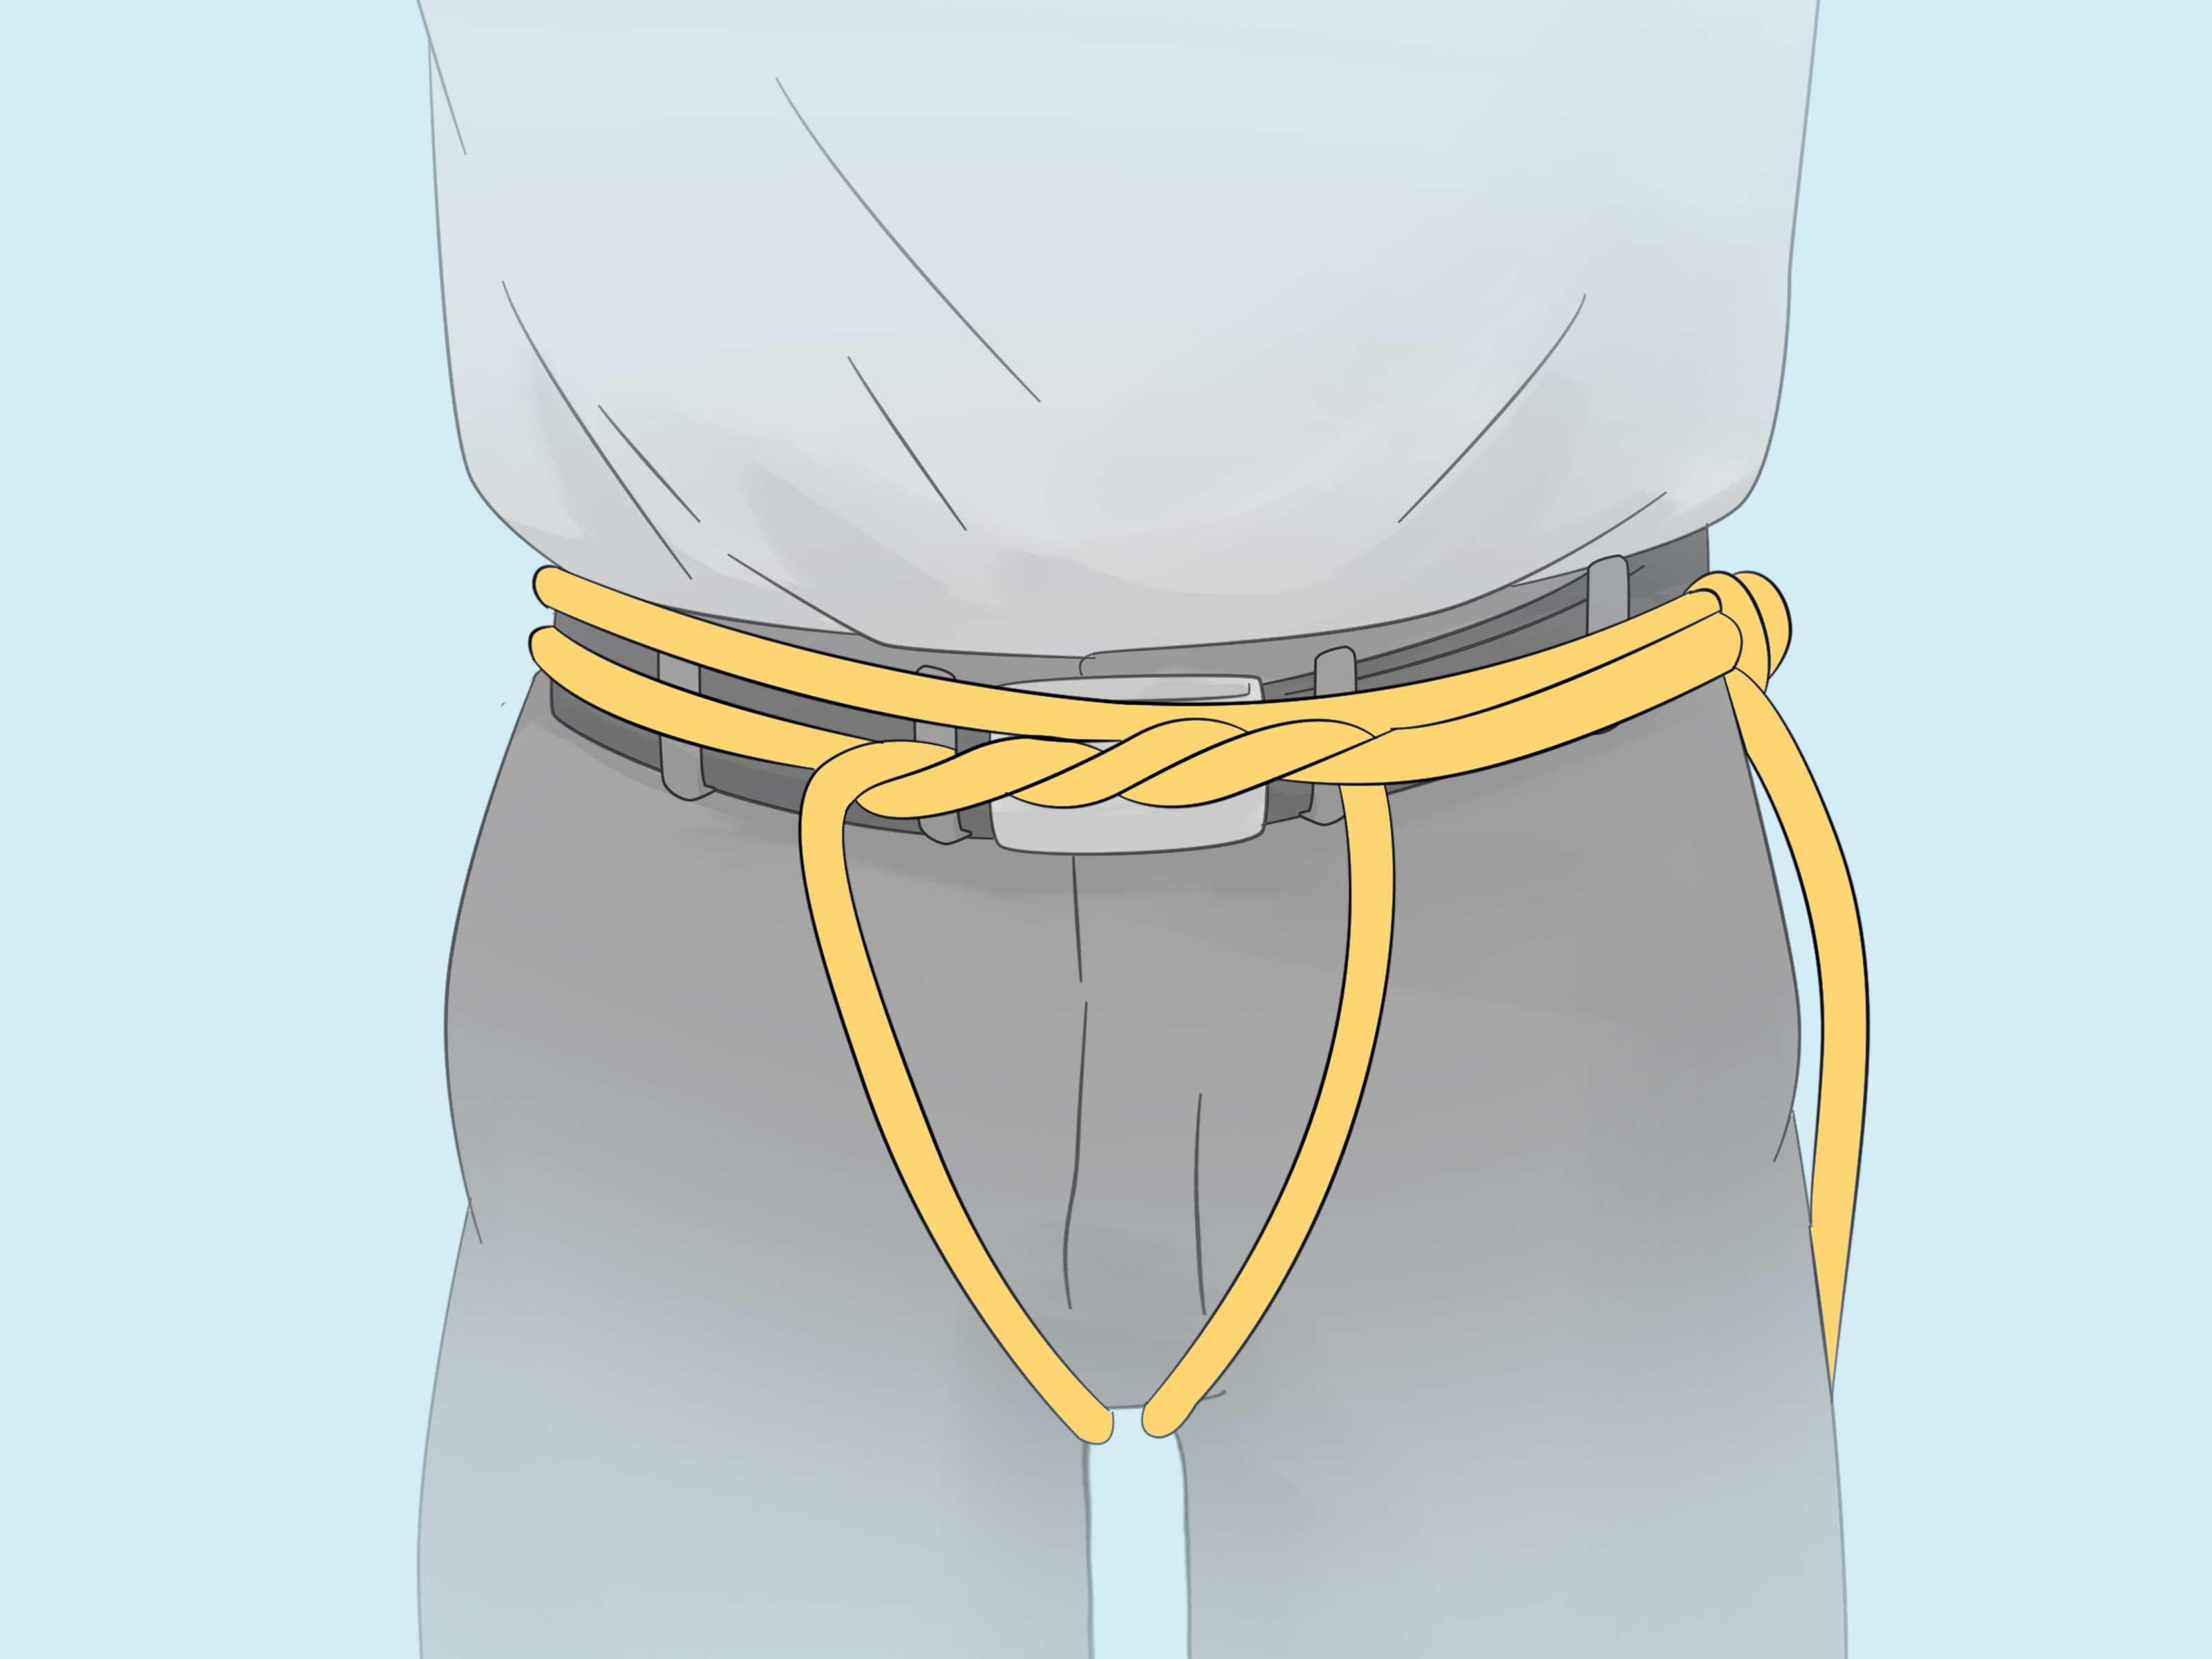
A Swiss seat rappel harness is the classic improvised answer to a very old outdoor problem: you need a harness, and you need one now. In climbing, rescue, military, and search-and-rescue training, it shows up as a practical emergency option when a proper sit harness is unavailable. It is also a reminder that “improvised” should never mean “casual.” Good rope skills, a solid partner check, and a calm setup matter more than swagger on the edge of the cliff. Reputable training sources from NOLS, the U.S. Forest Service, state and local rope-rescue programs, and military training materials all treat harness use, knot choice, and belay discipline as safety-critical, not decorative.
What a Swiss Seat Is
A Swiss seat is an improvised seat harness made from tubular webbing or rope. The basic idea is simple: wrap material around the waist and legs so the load sits on the hips and thighs, then secure it with a knot that will not slip under expected use. Training references from emergency and rope-rescue programs describe it as a temporary or improvised rappel seat, while knot references note that the square knot is commonly used to secure the ends of Swiss-seat webbing, with safety knots on each side. Outdoor instruction sources also pair Swiss-seat training with rappel practice, belay practice, and anchor awareness, which is exactly how it should be treated.
The Swiss seat is not a fashion statement, and it is not the first choice when a purpose-built climbing harness is available. A modern harness is more comfortable, easier to inspect, and generally a better option for regular climbing and rappelling. NOLS describes a climbing harness as the standard waist-and-leg-loop system that securely attaches the climber to the rope, and its rappelling guidance emphasizes proper device use and rope management. The Swiss seat belongs in the “emergency skills and training” category, not the “daily driver” category.
What You Need Before You Start
For a Swiss seat, the usual materials are tubular webbing or a suitable rope, a rappel rope, a rappel device, and locking carabiners as required by your system. You also need enough room to work cleanly, enough time to inspect every step, and a partner who will look for crossed webbing, loose tails, and bad judgment. Multiple training sources stress the value of knots, anchors, belay systems, stopper knots, and controlled rope handling. The U.S. Forest Service rappel guide also reminds users to keep rope ends managed, use knots that prevent the rope from running off the system, and avoid letting rope rub on harness webbing.
Before you tie anything, check the webbing for cuts, glazing, frays, or contamination. Check the rope for damage and make sure the rappel device is appropriate for the rope diameter you are using. Keep loose clothing, beards, and long hair secured away from the device. That advice may sound unglamorous, but it is the sort of unglamorous advice that keeps people from becoming cautionary tales.
How to Tie a Swiss Seat Rappel Harness
Step 1: Find the center of your webbing
Hold the webbing so you know where the midpoint is. The center helps you keep both sides even, which makes the harness sit symmetrically. Uneven webbing can create an awkward seat and a sloppy load path, and that is not the kind of asymmetry anyone wants when leaning back over open space. Training materials that teach improvised harnesses generally begin with clean, centered webbing and an intentional layout before any knot is tied.
Step 2: Wrap the webbing around your waist
Place the midpoint of the webbing against the front of your body and wrap it around your waist so the strap sits high on the hips, not low on the stomach. The harness should ride where the load can be supported by bone structure rather than soft tissue. Keep the webbing flat and untwisted as you go. A twist now becomes a pressure point later, and pressure points always seem to show up at the worst possible moment.
Step 3: Bring the ends down and around the legs
After the waist wrap, bring each end between your legs and around the tops of your thighs. The material should create two leg loops that help distribute your weight when you sit back in the rope. Keep the webbing flat, and make sure each leg loop is laid out cleanly without crossing over itself. When the webbing crosses in the wrong place, the harness may still “look okay” from a distance, which is precisely why partner checks exist.
Step 4: Bring the ends back to the front
Once each end has gone around a leg, bring both ends back to the front of your body. At this point, the structure should resemble a rough seat-and-leg arrangement with the webbing ready to be secured. The goal is to create a snug, stable harness that will hold your body in a seated rappel position without sliding excessively or pinching the wrong places. Multiple rope-safety references emphasize that improvised harnesses are for controlled rope work only, not for improvising comfort.
Step 5: Tie the webbing securely
Use a square knot to join the ends of the webbing, and back it up with safety knots on each side as required by your training system. The NCEM rope-and-knots reference specifically identifies the square knot as a way to secure the ends of a Swiss seat and notes the need for safety knots on both sides. Keep the knot dressed neatly so the strands lie flat and the knot can be inspected at a glance. A messy knot is not automatically unsafe, but it is often a sign that the rest of the system deserves a second look.
Step 6: Attach the rappel device correctly
Once the seat is tied and inspected, attach the rappel device according to the device manufacturer’s instructions and your course standards. The Forest Service rappel guide is very clear that the device should be attached to the rope system correctly and that the user should follow the directions for the safety harness and proper device use. NOLS likewise stresses that the belay device is what controls rope tension during rappelling, so correct attachment is not a side note; it is the whole plot.
Step 7: Add rope-end protection
If your system calls for it, tie stopper knots in the ends of the rappel rope so you do not rappel off the end. MSU Denver’s outdoor skills guidance explicitly notes that a stopper knot in the ends of the rappel rope prevents accidental rappelling off the rope’s end. That is the sort of knot that feels redundant until the exact second it becomes the most important thing in the universe.
Step 8: Perform a full partner check
Before committing weight, have a partner check the entire system: the harness tie, knot dressing, carabiner orientation, device setup, rope ends, and closure of any backups. Training sources from rescue and military programs repeatedly frame rappel work as a sequence of knots, anchors, belay procedures, and controlled descent. That is because a successful rappel is usually less about courage and more about not skipping steps.
Common Mistakes to Avoid
The biggest mistakes are usually the simplest ones: webbing twisted around the waist, leg loops crossed, knot tails too short, no safety knots where required, rope ends left unsecured, or a rappel device attached incorrectly. Another common error is letting the rope rub against the harness webbing, which the Forest Service warns can quickly damage synthetic webbing. A Swiss seat should be snug, flat, and easy to inspect. If it looks like a spaghetti accident, start over.
Another mistake is treating an improvised harness as a substitute for judgment. If the surface is wet, unstable, or unfamiliar, or if the rappel is long, awkward, or exposed, the better answer may be to pause, simplify the system, or use a proper harness if one is available. Good outdoor programs teach rappelling alongside anchor building, belay systems, and route assessment for a reason: the harness is only one piece of the safety chain.
When a Swiss Seat Makes Sense
A Swiss seat makes sense in emergency training, rescue training, military instruction, or any situation where a proper harness is unavailable and a qualified system is being used. U.S. Army and other training references show Swiss-seat use in rappel phases and ground training, while search-and-rescue materials include it among the basic rope-and-webbing skills taught to students. In other words, it is a legitimate toolbut one that belongs in trained hands and a carefully managed system.
The Swiss seat is also a useful confidence-builder. Once a student has tied one correctly, inspected it, and sat back on rope with a trained instructor nearby, the whole rappel system becomes less mysterious. That confidence matters, because panic and rope work are a terrible combination. NOLS’s climbing curriculum highlights rappelling, belaying, anchor building, and route assessment as interconnected skills, and that is exactly the mindset that makes improvised systems safer.
Why Clean Rope Work Matters
Clean rope work is the difference between a system that feels organized and one that feels like a dare. Keep the rope managed, the knots dressed, and the brake hand disciplined. The Forest Service and MSU Denver materials both reinforce the same theme: rope systems depend on deliberate handling, proper stopper knots, and careful attachment points. When people rush, the system gets clumsy. When the system gets clumsy, gravity gets opinionated.
Experience-Based Notes From Real Training Environments
In real training settings, the Swiss seat usually teaches two lessons at once. The first is technical: webbing must be flat, centered, and tied correctly. The second is psychological: people get nervous when they realize that a few inches of webbing and a few knots are doing an astonishing amount of work. That nervousness is healthy. It makes students slow down, listen, and ask for a partner check instead of pretending they are born with rope-based wisdom. U.S. military and university rope programs repeatedly place Swiss-seat instruction inside structured rappel training rather than as a casual side skill, which is exactly the right environment for learning it.
Another common experience is that the harness feels stranger than people expect on the first sit-back. A proper sit harness feels like a piece of gear. A Swiss seat feels like a temporary solution that is asking for your trust. That difference can make first-time users rush the setup or fidget with the webbing after it is already tied. Instructors tend to correct that by making students pause, breathe, and inspect the system methodically. That slower pace is not a delay; it is part of the training. NOLS, rescue programs, and Forest Service guidance all point toward the same habit: deliberate rope handling beats improvised confidence every time.
In a group setting, the biggest visible difference between experienced and inexperienced climbers is not strength. It is order. Experienced people tend to lay the webbing out flat, keep the ends clear, and talk through each step before loading the system. Newer climbers often try to tie the knot first and think later. The better habit is the opposite: understand the shape of the harness, confirm where the load will sit, then secure the knot and inspect the whole system. That simple discipline is echoed in multiple rescue and climbing references that connect harness use with belaying, anchors, and proper device handling.
A final training lesson is that comfort matters more than ego. The Swiss seat should not pinch, slide, or twist. If it does, something is wrong. People often assume that “good enough for one rappel” means the system is acceptable. In practice, comfort is a clue about load distribution, and load distribution is a clue about safety. A neatly tied, well-centered Swiss seat usually feels controlled when weighted. A bad one feels like a bad idea before you even leave the edge. That is why instructors insist on checking the harness before the rappel begins and again after the climber weights the rope in a controlled test sit.
People who practice this skill in military, search-and-rescue, or outdoor-education settings often remember the same moment: the first time they lean back and realize that the harness is not magic, just disciplined rope work. That realization is valuable. It turns rappelling from a dramatic stunt into a sequence of repeatable actionstie the seat, inspect the knot, check the device, protect the rope, and descend smoothly. The best experience is the boring one, because boring means the system is behaving exactly as planned.
Conclusion
A Swiss seat rappel harness is one of those skills that feels old-school because it is old-school, but it remains useful because the fundamentals never stopped mattering. Tie it neatly, back it up properly, check it with a partner, and treat the whole setup as an emergency skill that deserves respect. For regular climbing, use a proper harness whenever possible. For training and true backup situations, a correctly tied Swiss seat can be the difference between getting down and getting stuck thinking about the problem a little too long.