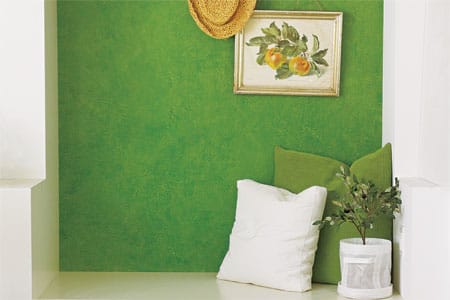
Some walls are perfectly happy being plain. Others stare back at you like they are waiting for a personality transplant. If your room feels a little too flat, too new, or too much like it came pre-installed with a rental agreement, rag rolling paint can add warmth, movement, and a wonderfully imperfect Old-World finish.
Rag rolling is a decorative painting technique that layers a tinted glaze over a dried base coat with a crumpled cloth. The result is a soft, mottled surface that can resemble aged plaster, faded stone, weathered stucco, or the kind of wall you might find in a tiny Italian villa where someone is always baking bread and arguing lovingly.
What Is Rag Rolling Paint?
Rag rolling is a faux finish technique that uses a rolled, twisted, or crumpled rag to apply or remove glaze. The rag creates irregular impressions, which is exactly the point. Nature does not create perfectly repeated wallpaper patterns, and neither should your painted wall.
The technique usually involves two colors: a base coat and a translucent glaze coat. Because glaze allows some of the base color to show through, the two shades visually mix on the wall. This is what gives the finish its depth instead of making it look like two unrelated cans of paint got into an argument.
For an Old-World look, choose colors that feel softened by time. Think warm cream under taupe, pale mushroom under dusty olive, soft terracotta under caramel, or faded gray-blue under antique white. The goal is not to make the wall look dirty. The goal is to make it look storied.
Why Rag Rolling Works So Well for Old-World Interiors
Flat paint reflects light evenly. Rag rolling breaks up that uniformity with subtle highs and lows. As light moves across the surface, the wall looks richer, more dimensional, and slightly different at different times of day.
This makes rag rolling especially useful in rooms that need a little atmosphere: dining rooms, powder rooms, bedrooms, reading nooks, hallways, fireplaces, and accent walls. It can also work on furniture, trim, cabinets, and decorative architectural details when the surface is properly prepared.
The finish is forgiving because it celebrates variation. A small imperfection often becomes part of the texture instead of announcing itself like a typo in a wedding invitation. Still, there is a difference between relaxed variation and accidental chaos, so technique matters.
Supplies You Need Before You Start
Gather everything before opening the glaze. Decorative painting moves quickly once the wet layer is on the wall, and searching for a clean rag while your glaze dries is not a thrilling way to spend a Saturday.
- Interior latex paint for the base coat
- Clear water-based acrylic or latex glaze
- Latex paint to tint the glaze
- Lint-free cotton rags, old T-shirts, cheesecloth, or soft cotton fabric
- Paint roller and roller cover
- Paint tray and liner
- Angled sash brush for cutting in edges
- Painter’s tape and drop cloths
- Rubber or nitrile gloves
- Stir sticks and a small bucket for mixing glaze
- Cardboard, drywall scrap, or poster board for a practice sample
A rag with a little texture works best. Thin cotton T-shirts create a soft, delicate pattern, while thicker fabric creates a bolder effect. Avoid fuzzy towels, heavily dyed fabric, or anything that sheds lint. Your wall deserves character, not random sweater fibers.
Choose Colors That Look Aged, Not Overdone
Use Low-Contrast Colors for a Soft Plaster Effect
For a subtle faux plaster finish, choose colors that sit close together on the color wheel. A creamy beige base with a slightly deeper tan glaze creates warmth without shouting. A muted gray base with a pale stone-gray glaze can feel elegant and European.
Use Medium Contrast for More Texture
For a stronger Old-World wall treatment, use a base coat that is one or two shades lighter or darker than the glaze. For example, a warm ivory base with a diluted antiquing-brown glaze can create the appearance of aged limestone.
Try These Old-World Color Pairings
- Warm ivory base with taupe glaze
- Soft sand base with muted terracotta glaze
- Pale sage base with dusty olive glaze
- Faded blue-gray base with antique white glaze
- Greige base with mushroom-gray glaze
- Light clay base with caramel glaze
Always test your combination first. Paint and glaze can look dramatically different once they dry, and the base coat changes the way the translucent top layer reads. Paint manufacturers recommend testing faux finishes on a sample board before committing to an entire wall.
Prepare the Wall Before Rag Rolling
A decorative finish cannot hide every problem. Rag rolling can soften minor visual flaws, but it will not magically repair loose drywall tape, giant nail holes, greasy fingerprints, cracked paint, or a mystery stain shaped like a small continent.
Start by removing wall décor, outlet covers, and switch plates. Lay drop cloths over floors and furniture. Clean the wall with a mild cleaner, then let it dry completely. Fill dents and holes with spackle, sand smooth, and wipe away dust.
If the existing wall is glossy, lightly sand it so the new paint can grip the surface. If you are painting over stains, dramatic color changes, patched drywall, or highly porous areas, use an appropriate primer before the base coat.
For homes built before 1978, be cautious about sanding, scraping, or disturbing old paint. Older paint may contain lead, and renovation work can create hazardous dust. Consider testing and using lead-safe work practices before preparing the surface.
Step-by-Step: How To Rag Roll Paint
Step 1: Paint the Base Coat
Apply your chosen base color using a roller. Cut in around ceilings, trim, doors, and corners with an angled brush. Let the base coat dry fully according to the paint label. If needed, apply a second coat for even coverage.
Do not rush this step. If the base coat is still soft or tacky, the glaze can pull it up, smear it, or create an uneven finish. Decorative paint rewards patience in much the same way bread dough does: ignore the timing, and it gets weird.
Step 2: Mix the Tinted Glaze
Mix clear glaze with your chosen paint color according to the glaze manufacturer’s instructions. The goal is a translucent mixture, not opaque paint. Stir slowly and thoroughly so the color is even throughout the bucket.
Water-based glazes are usually easier for beginners because they are easier to clean up and generally offer a workable open time. Use only compatible products and follow the instructions on the specific glaze you buy.
Step 3: Practice on a Sample Board
Paint a scrap board with the same base coat you used on the wall. Once dry, apply the glaze and test several rag motions. Try rolling vertically, diagonally, and in loose overlapping curves. Let the sample dry before deciding whether the color, contrast, and texture are right.
This tiny rehearsal can save you from turning your dining room into a very expensive art experiment. It also helps you decide whether you prefer a softer “rag off” look or a stronger “rag on” look.
Step 4: Work in Small Sections
Divide the wall into manageable areas, roughly three feet by three feet. Roll or brush a thin, even layer of glaze onto one section. Do not coat the entire wall at once unless you enjoy racing drying time with questionable odds.
Keeping a wet edge helps prevent lap marks and harsh seams. Manufacturers of decorative glazes also recommend working in smaller, irregular sections so the finish can stay blended rather than forming visible blocks.
Step 5: Create the Rag-Rolled Pattern
Take a clean, lint-free rag and loosely crumple or twist it into a soft tube. Gently roll it over the wet glaze in a loose vertical motion. Do not press too hard. Rotate the rag often so the same folds do not create repeated marks.
Use a relaxed, slightly wandering motion. Let the rag move in soft S-curves or loose vertical passes. Occasionally overlap the previous area to blend the pattern. The goal is a random, organic surface, not a row of identical cinnamon rolls.
When one part of the rag becomes saturated, switch to a clean area or grab a fresh rag. A loaded rag can smear glaze instead of lifting or redistributing it. Keep several clean rags nearby so you can work without interruption.
Step 6: Blend the Edges
Before moving to the next section, lightly overlap the fresh glaze into the edge of the previous section. Use a barely damp rag or a dry rag to soften any hard line. Step back every few minutes and view the wall from several feet away.
If one area looks too heavy, gently blot it with a clean rag while the glaze is still wet. If it looks too pale, add a little more glaze and roll again. Decorative painting is less about one perfect motion and more about making small corrections while the surface is workable.
Step 7: Let the Finish Dry Completely
Allow the glaze to dry according to the label before removing tape, rehanging artwork, or placing furniture against the wall. The surface may look softer as it dries, especially with low-contrast colors.
Do not judge the finish while it is wet. Wet glaze often looks darker and more dramatic than the final wall. Give it time. The wall may be having a temporary emotional moment.
Rag On vs. Rag Off: Which Method Should You Use?
Rag On
With the rag-on method, you dip the rag lightly into tinted glaze and roll it onto the dry base coat. This adds color and creates a more pronounced texture. Rag on is useful when you want a stronger pattern or need to add visual warmth to a bland wall.
Rag Off
With the rag-off method, you roll glaze onto the wall first, then use a clean rag to lift or redistribute part of it. This method usually creates a softer, more weathered appearance. For many Old-World interiors, rag off is the easier and more forgiving option.
Both methods work. The decision depends on how much contrast you want. If you are new to faux painting, start with rag off on a small accent wall, closet, powder room, or sample board.
Common Rag Rolling Mistakes and How To Fix Them
The Pattern Looks Too Repetitive
Rotate the rag more frequently. Change your hand pressure, angle, and direction. Avoid rolling in perfectly straight lines from ceiling to floor. A little irregularity is what makes the finish believable.
The Wall Looks Too Dark
Use less tinted paint in the glaze mixture, apply glaze more thinly, or blot more of the wet glaze away. You can also soften a dry section by glazing over it with a lighter tone.
The Effect Looks Too Busy
Busy walls usually happen when the contrast is too high or the rag marks are too sharp. Apply a thin, translucent glaze in a color closer to the base coat to calm things down. Old-World does not mean “every inch is auditioning for a role.”
You Have Visible Section Lines
Blend neighboring sections while both edges are still wet. Work smaller, keep the glaze layer thin, and avoid stopping halfway through a large wall without a natural break such as a corner, doorway, or window.
The Finish Feels Like Too Much Commitment
That is a fair concern. Decorative finishes are more labor-intensive to repair or remove than a standard painted wall. Textured wall treatments are generally best in lower-traffic areas where frequent touch-ups are less likely.
Where Rag Rolling Looks Best
Rag rolling is most successful when it supports the room instead of competing with everything in it. Use it behind a bed, around a fireplace, in a dining room, on a ceiling medallion wall, or in a small powder room where a little drama feels intentional.
It pairs beautifully with natural materials such as wood, linen, leather, limestone, terracotta, brass, woven baskets, and aged metal. If the room already has patterned wallpaper, bold art, bright furniture, and three competing rugs, a quieter wall may be the wiser choice.
How To Maintain a Rag-Rolled Wall
Once cured, treat the wall like any painted interior surface. Dust gently with a microfiber cloth or vacuum using a soft brush attachment. For small marks, use a lightly damp cloth and mild soap, then blot dry.
Keep leftover base paint and a small amount of glaze mixture labeled for future touch-ups. Test any repair in an inconspicuous spot first, because recreating a random faux finish is less like matching a paint color and more like trying to repeat a cloud.
Real-World Rag Rolling Experience: What the First Wall Teaches You
The first thing most DIY painters learn about rag rolling is that the wall looks alarming before it looks beautiful. During the first few minutes, the glaze may seem too dark, the marks may feel too obvious, and the entire project may appear one bad choice away from becoming a cautionary tale told at future dinner parties. Then the glaze begins to soften, the colors settle together, and the wall starts to develop depth. The lesson is simple: do not panic halfway through the process.
Another common discovery is that the rag matters more than expected. A thin cotton T-shirt creates a soft, refined pattern, while a thick terry cloth towel can leave a much bolder texture. Some people prefer cheesecloth because its loose weave produces delicate, broken marks. Others like soft cotton rags because they are easier to control. The best choice depends on the finish you want, but having several fabric options nearby gives you room to adjust without stopping the entire project.
Working with a second person can also change the experience completely. One person can apply glaze with a roller while the other follows behind with the rag. This keeps the glaze wet longer and makes blending easier, especially on large walls. It also prevents the awkward situation where you are holding a dripping roller in one hand, a rag in the other, and wondering why you thought painting would be a peaceful hobby. Even so, one person can absolutely complete the job by working in smaller sections.
Most successful rag-rolled walls are quieter than the painter originally planned. Beginners often choose too much contrast because the sample board looks subtle under bright workshop lighting. On a full wall, however, that same contrast can become intense. A softer glaze color usually creates a more elegant Old-World result. The wall should have movement when you stand back, not a pattern that demands attention from across the room.
Experience also teaches that perfection is not the goal. The charm of rag rolling comes from its irregularity. A faint darker area, a slightly lighter patch, or a soft overlap can make the finish feel more believable. The trick is to keep those variations gentle and spread across the wall rather than concentrating them in one spot. When in doubt, step back several feet. Close up, every decorative wall looks complicated. From across the room, the layers blend into warmth and texture.
Finally, the most satisfying part of rag rolling is how dramatically it changes a space without changing the structure of the room. A plain wall can become softer, richer, and more inviting with little more than paint, glaze, fabric, and patience. It is a budget-friendly way to make a room feel more collected and less factory-fresh. Once you learn the rhythm of the technique, you may start looking at every blank wall as a possible European villa. Proceed responsibly.
Conclusion
Rag rolling paint is one of the easiest ways to add age, warmth, and depth to an ordinary wall. Choose low-contrast colors, prepare the surface carefully, work in small sections, and keep the rag pattern relaxed. With a little practice, you can create a beautiful Old-World faux finish that feels layered, inviting, and intentionally imperfect.