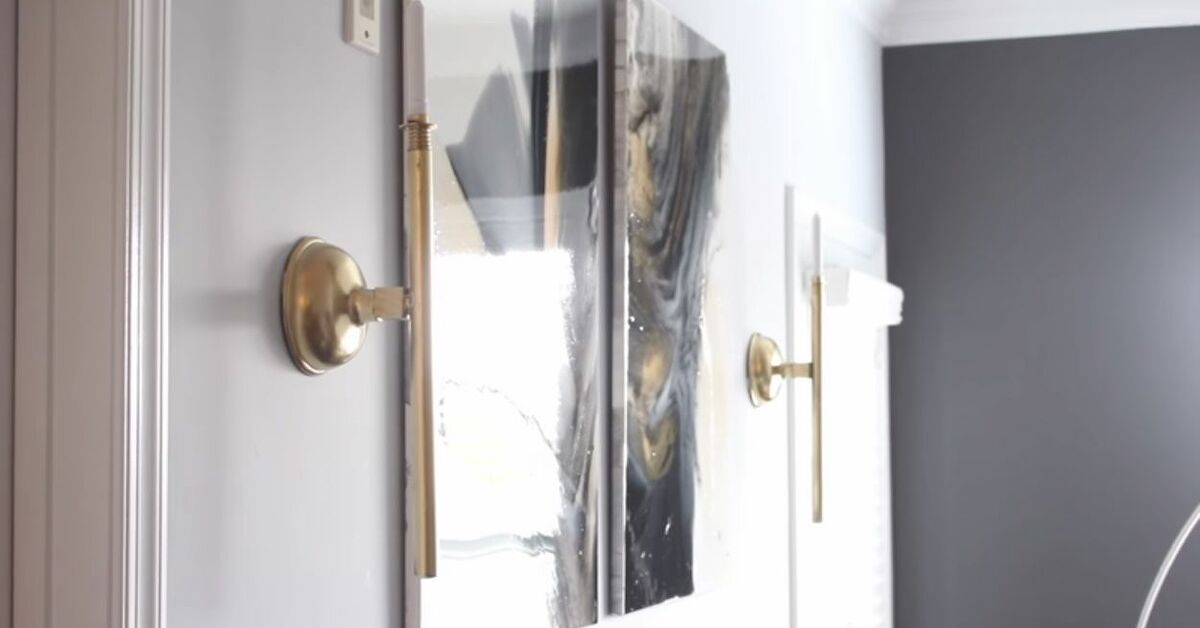
There are DIY projects that sound elegant from the first sentence, and then there are projects that begin with the word “plunger.” This one is both. With a brand-new bathroom plunger, a little paint, a wall plaque, and a flameless candle, you can create a surprisingly chic wall sconce that looks farmhouse, industrial, vintage, coastal, or spa-inspired depending on how you finish it. The best part? Nobody has to know your boutique-looking bathroom accent started life in the plumbing aisle.
Bathroom plunger candle wall sconces are a clever upcycled decor project for small bathrooms, powder rooms, laundry rooms, guest baths, and quirky hallway corners. They are budget-friendly, renter-adaptable, and wonderfully customizable. Done well, they do not look like a joke craft. They look like something you found at a charming antique market, right between the overpriced brass mirror and the basket labeled “French linen” even though it was clearly made last Tuesday.
What Is a Bathroom Plunger Candle Wall Sconce?
A bathroom plunger candle wall sconce is a decorative wall-mounted candle holder made using parts of a new, unused plunger. The rubber cup becomes the candle cradle, shade, or tulip-shaped holder. The wooden handle can become a support arm, stem, or rustic accent. A small wood plaque, metal plate, or decorative board acts as the backplate that mounts to the wall.
The finished piece is meant for ambience, not task lighting. Think soft glow near a mirror, cozy lighting above a towel basket, or a decorative pair flanking framed art. For bathroom use, flameless LED candles are strongly recommended. They create the warm candle effect without smoke, dripping wax, or the obvious problem of placing a real flame near wood, rubber, paint, towels, and hairspray. In other words, they give you atmosphere without turning your powder room into a dramatic local news segment.
Why This DIY Works So Well
The magic of this project is shape. A plunger cup already has a flared, sculptural form similar to a small shade or cup-style candle holder. When painted matte black, aged bronze, antique brass, creamy white, or stone gray, it stops looking like a utility item and starts looking intentional. The handle adds a natural wood detail, which is perfect for rustic bathroom decor, farmhouse wall sconces, and cottage-style interiors.
This project also works because bathrooms often need vertical decor. Countertops are usually crowded with toothbrushes, soap pumps, lotions, and that one mystery bottle nobody admits buying. Wall sconces add height and personality without stealing precious sink space. A pair of DIY candle wall sconces can frame a mirror, soften a blank wall, or make a small bathroom feel more designed.
Materials You Will Need
Basic Supplies
- 2 brand-new small bathroom plungers with wooden handles
- 2 small wood plaques, boards, or decorative backplates
- 2 flameless LED votive candles, tea lights, or small pillar candles
- Spray primer suitable for plastic, rubber, or mixed surfaces
- Spray paint in your chosen finish
- Clear protective sealer, preferably matte or satin
- Medium-grit and fine-grit sandpaper
- Wood stain, wax, or paint for the backplate
- Small screws, washers, and wall anchors
- Heavy-duty craft adhesive or construction adhesive
- Museum putty or removable adhesive dots for the LED candle
Helpful Tools
- Drill and drill bits
- Screwdriver
- Small hand saw or miter saw
- Measuring tape
- Level
- Pencil
- Utility knife or scissors for trimming rubber if needed
- Painter’s tape
- Drop cloth or cardboard spray-painting surface
Choose plungers with simple shapes. A basic wooden-handle plunger is easier to transform than a bulky plastic model with a branded handle or an oversized flange. The more classic the silhouette, the more high-end the final sconce will look.
Safety First: Use New Plungers and Flameless Candles
This project should only be made with brand-new, never-used plungers. That should not need to be said, but the internet is a wild campground and someone, somewhere, is already reaching toward the cleaning closet. Do not repurpose a used plunger for home decor. Buy new pieces and clean them before crafting to remove dust, manufacturing residue, and store-shelf grime.
For the candle itself, use flameless LED candles. Bathrooms can be humid, narrow, and full of flammable items such as towels, paper products, cotton rounds, decorative greenery, and hair products. A wall-mounted sconce made from wood, paint, adhesive, and rubber is not the right place for an open flame. LED candles with timers or remotes are ideal because you can switch them on without removing them from the holder.
If you decide to adapt this idea for a non-bathroom space and want to use real candles, redesign the holder with a nonflammable metal or glass cup, keep generous clearance from anything that can burn, and never leave a candle unattended. For this bathroom plunger sconce tutorial, flameless is the cleanest, safest, and most practical choice.
Step-by-Step Tutorial: How to Make Bathroom Plunger Candle Wall Sconces
Step 1: Plan the Shape Before Cutting Anything
Place your plunger on a table and imagine how it will sit on the wall. The simplest design uses a wood plaque as the backplate, a short section of the handle as the horizontal arm, and the rubber cup at the front as the candle holder. You can keep the handle attached to the cup and cut it to a shorter length, or you can remove the cup, cut the handle separately, and reattach the pieces with screws and washers.
For a bathroom wall, a finished sconce around 9 to 12 inches tall usually looks balanced. The candle cup should project far enough from the wall to feel dimensional but not so far that elbows, towels, or robe sleeves attack it during normal bathroom traffic.
Step 2: Clean and Prep Every Surface
Wash the rubber cups with mild dish soap and warm water, then dry them completely. Wipe the wooden handles and backplates to remove dust. Lightly scuff glossy rubber and plastic surfaces with sandpaper so primer has a better chance to grip. Sand the cut ends of wood handles until smooth.
Good prep is the difference between “custom handmade sconce” and “painted object that gave up emotionally.” Do not rush this part. Paint adheres better to clean, dry, nonglossy surfaces, especially when you are working with mixed materials like rubber and wood.
Step 3: Cut the Handle to Size
If your plunger has a long wooden handle, cut it down to create a short support arm. A 4- to 6-inch arm works well for most small sconces. Measure twice, mark once, and cut carefully. If you are making a pair, cut both handles to the same length so the sconces look like siblings, not distant cousins who met at a family reunion.
Sand the cut edge and test the fit against the backplate. The arm should sit straight and allow the rubber cup to face upward like a candle bowl. If the cup naturally angles forward, that can look beautiful, but make sure the LED candle sits securely.
Step 4: Reinforce the Candle Cup
Most rubber plunger cups are flexible. To make the cup sturdier, add a small wood disk, metal candle plate, plastic lid, or thick craft foam insert inside the cup. This creates a flat base for the flameless candle. Secure the insert with adhesive, but do not glue the LED candle permanently in place. You will need to change batteries eventually, and future you deserves kindness.
If the candle sits too low, add a riser inside the cup. If it wobbles, use museum putty or removable adhesive dots. If the cup is too deep, choose a taller LED votive or pillar. The goal is for the faux flame to peek above the rim naturally.
Step 5: Attach the Arm to the Backplate
Mark the center of your wood plaque. Pre-drill a hole through the backplate and into the end of the handle section. Add a little construction adhesive where the wood pieces meet, then drive a screw through the back of the plaque into the handle. This gives you both adhesive bond and mechanical support.
Do not rely on glue alone for a wall-mounted object, especially in a bathroom. Heat, humidity, and gravity have a long-running feud with weak adhesive. Screws and washers are your quiet little insurance policy.
Step 6: Attach the Rubber Cup
Depending on your plunger style, the rubber cup may already screw onto the handle. If so, reattach it tightly after cutting the handle. If not, use a washer and screw through the center of the cup into the end of the wood arm. Add adhesive for extra hold, but keep the visible finish neat.
Position the cup so it tilts slightly upward. This makes the candle look nestled instead of trapped. Check the balance from the front and side. A good DIY sconce should look intentional from every angle a guest might see while pretending not to snoop in your medicine cabinet.
Step 7: Prime and Paint
Work in a well-ventilated area and protect your surface with cardboard or a drop cloth. Apply primer in light coats, allowing each coat to dry according to the product directions. Follow with spray paint, again using several light coats instead of one heavy blast. Heavy coats can drip, wrinkle, or stay tacky, especially on flexible materials.
For a modern bathroom, try matte black. For vintage charm, use antique brass or oil-rubbed bronze. For coastal style, paint the rubber cup soft white and stain the wood backplate light oak. For a moody powder room, try charcoal, deep green, or aged copper. Once the paint is fully dry, add a clear sealer to help protect the finish from bathroom humidity.
Step 8: Finish the Backplate
Your backplate sets the style. Stained wood feels rustic and warm. Painted wood looks cleaner and more modern. A distressed finish works in farmhouse bathrooms, while a smooth satin finish feels more polished. You can also add trim, decorative molding, a small mirror tile, cane webbing, peel-and-stick wallpaper, or faux leather behind the plunger cup for a custom look.
If you want the sconce to look expensive, keep the palette simple. Two or three finishes are enough. For example, black cup, walnut backplate, ivory LED candle. Or brass cup, white backplate, cream candle. When in doubt, edit. Craft projects, like group texts, can go wrong when too many elements join the conversation.
Step 9: Mount the Sconces Securely
Hold the finished sconce against the wall and mark the mounting location. Use a level to keep pairs aligned. If you can screw into a wall stud, do it. If not, use drywall anchors rated for more than the actual weight of your sconce. Even a lightweight decorative object should be mounted securely, especially in a high-use room.
For renters, heavy-duty removable strips may work for very lightweight versions, but humidity can weaken adhesive over time. A small screw-and-anchor installation is usually more reliable. If you use adhesive strips, follow the manufacturer’s weight limits and surface instructions exactly.
Step 10: Add the Flameless Candle and Style the Space
Place the LED candle inside the cup and secure it with removable putty if needed. Turn it on, step back, and admire the fact that you have turned a plunger into mood lighting. This is the kind of personal growth home decor magazines do not talk about enough.
Style the sconces in pairs beside a mirror, above a towel hook, beside floating shelves, or on a narrow wall near the bathtub. Keep them away from direct shower spray and avoid placing them where people may bump them. Add small accents nearby, such as framed art, eucalyptus stems, amber glass bottles, or a woven basket, to make the sconces feel part of a designed vignette.
Design Variations for Every Bathroom Style
Modern Farmhouse
Use a stained wood backplate, matte black cup, and warm ivory flameless candle. Add black screws or decorative nail heads for a slightly industrial finish. This version pairs beautifully with black faucets, white subway tile, shiplap, and wood-framed mirrors.
Vintage Brass Powder Room
Paint the cup antique brass and use a dark walnut backplate. Lightly rub black or brown wax into creases to create an aged effect. Choose a warm white LED candle. The result looks like something rescued from an old inn, minus the dust and suspicious wallpaper.
Coastal Spa Bathroom
Paint the cup matte white or pale sand. Use a light wood backplate and a cream flameless candle. Add rope trim or a small rattan detail for texture. This version works well with soft blue towels, natural baskets, white tile, and greenery.
Moody Boutique Hotel
Go dramatic with a black backplate, black cup, and amber LED candle. Use two sconces beside an arched mirror or above dark green beadboard. The look feels elegant, mysterious, and just theatrical enough to make handwashing feel like an event.
Whimsical Guest Bath
Lean into the humor with a subtle wink. Paint the cup a fun color such as blush, teal, or mustard, then pair it with playful artwork. The trick is to keep the finish clean so the joke stays clever rather than chaotic.
Common Mistakes to Avoid
Using a Real Candle
This is the biggest mistake. A rubber-and-wood wall sconce is not a safe holder for a real flame. Use flameless LED candles for this project.
Skipping Primer
Rubber and plastic can be difficult to paint. Primer improves adhesion and helps the final color look smoother. Without it, paint may peel, chip, or remain tacky.
Mounting With Weak Adhesive
Bathrooms are humid, and humidity can reduce the reliability of some adhesives. Use screws, anchors, or proper hanging hardware whenever possible.
Choosing the Wrong Candle Size
A candle that is too small disappears inside the cup. A candle that is too large looks awkward and may not sit securely. Test sizes before gluing inserts or finalizing the design.
Overdecorating the Sconce
The plunger shape is already quirky. Too many ribbons, beads, decals, or faux flowers can push it from stylish to craft-table explosion. Keep the design focused.
How to Maintain Your DIY Bathroom Sconces
Dust the sconces regularly with a soft cloth. Avoid harsh cleaners, especially on painted rubber, because they may dull or damage the finish. If your bathroom gets steamy, run the exhaust fan during showers to reduce moisture buildup. Check the mounting hardware every few months to make sure everything remains snug.
Replace LED candle batteries as needed. If your candles have timers, use them. A timer keeps the bathroom glowing in the evening without requiring you to remember anything, which is helpful because most of us are already using our last available brain cell to find the clean hand towel.
Real-Life Experience: What This Project Feels Like to Make
The first time you make bathroom plunger candle wall sconces, you may question your own judgment somewhere around the moment you are sanding a plunger handle with serious artistic focus. That is normal. DIY confidence often arrives after the first coat of paint. Before that, everything looks like evidence.
One of the most useful lessons from this project is that dry fitting matters more than enthusiasm. When you hold the plunger cup against the backplate before cutting, you can immediately see whether the proportions feel elegant or cartoonish. A cup that looks too large can be balanced with a taller backplate. A handle that sticks out too far can be trimmed shorter. A candle that sinks into the cup can be raised with a hidden insert. Almost every design issue is easier to solve before paint enters the room.
Another experience worth mentioning is the importance of patience with spray paint. The first instinct is to cover the entire piece quickly because transformation is exciting. Resist. Light coats look better and dry harder. A matte black finish can make the rubber cup look like metal, but only if the paint goes on smoothly. If you spray too heavily, the finish may bubble or sag, and suddenly your high-end sconce has the texture of melted licorice.
Mounting is also where this project becomes real. On the worktable, the sconce is a cute object. On the wall, it becomes decor. Use a level, measure carefully, and step back before drilling. If you are hanging two sconces beside a mirror, measure from the mirror edge, the countertop, and the floor so the pair lines up visually. Bathrooms often have slightly uneven ceilings, tile lines, or trim, so trust the level more than your eyeballs after your third cup of coffee.
In a small bathroom, one sconce may be enough. In a powder room, two can make the whole space feel styled. A pair of matte black sconces beside a round mirror can echo black faucet hardware. Brass sconces can warm up white walls. Whitewashed sconces can blend into coastal decor. The same basic plunger can become surprisingly different depending on finish, candle size, and backplate shape.
The best part is the reaction. Most guests will not identify the material immediately. They may say, “Cute sconces!” and then you get to decide whether to reveal the secret. Telling them is half the fun. The reveal usually produces a pause, a laugh, and then the satisfying sentence every DIYer secretly wants to hear: “Wait, you made that?”
This project is also forgiving. If the finish chips, repaint it. If the candle cup feels too plain, add a metal rim or decorative washer. If the backplate looks boring, apply stain, paint, wallpaper, or trim. Unlike expensive store-bought lighting, this DIY gives you permission to experiment. It is low cost, low risk, and high personality.
Most importantly, it teaches a classic decorating truth: style is not always about buying the “right” thing. Sometimes it is about seeing a shape differently. A plunger cup can become a shade. A handle can become an arm. A bathroom wall can become a tiny gallery moment. And a humble hardware-store item can become the star of a room, provided it is brand new and has never had a previous career in plumbing emergencies.
Conclusion
Bathroom plunger candle wall sconces are proof that stylish DIY decor does not have to be expensive, complicated, or painfully serious. With new plungers, a simple backplate, secure mounting hardware, paint, and flameless LED candles, you can create wall sconces that add warmth, humor, and custom charm to your bathroom. The key is to treat the project like real decor: prep the surfaces, use light paint coats, choose a cohesive finish, mount everything securely, and style the sconces with intention.
Whether your bathroom leans modern farmhouse, vintage brass, coastal spa, or playful guest-bath chic, this project can be adapted to fit your space. It is budget-friendly, beginner-friendly, and memorable in the best possible way. After all, anyone can buy a candle sconce. It takes a special kind of creative genius to look at a plunger and think, “Yes, but make it elegant.”