Note: This article is written for web publishing in standard American English and synthesizes practical polymer clay techniques, flower-shaping methods, and real plumeria characteristics into an original tutorial.
Some flowers look polite. A plumeria walks into the room wearing sunglasses, smelling like vacation, and casually reminding everyone that tropical design does not need to shout to be stunning. With five soft petals, a sunny center, and that signature pinwheel shape, the plumeria flower is one of the prettiest subjects you can sculpt from polymer clay.
The good news? You do not need a greenhouse, a Hawaiian breeze, or a professional studio to make one. Polymer clay is friendly, forgiving, and wonderfully dramatic when shaped into petals. It stays workable until baked, which means you can fiddle with the curve of one petal for twenty minutes and the clay will not judge you. Your family might, but the clay will not.
In this guide, you will learn how to make a polymer clay plumeria flower from start to finish: choosing clay, mixing realistic colors, shaping five petals, adding gentle texture, assembling the bloom, baking it safely, and finishing it for jewelry, hair clips, magnets, mini decor, or handmade gifts. The final result is lightweight, durable, and charming enough to make your craft table feel like it needs sunscreen.
What Makes a Plumeria Flower Look Like a Plumeria?
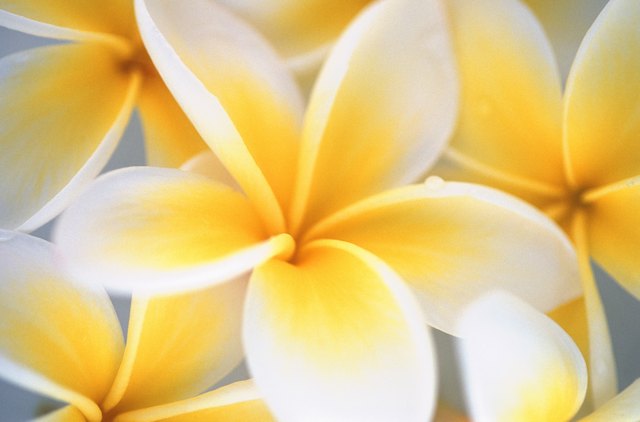
Before sculpting, it helps to understand the flower you are copying. A plumeria, also called frangipani, usually has five rounded petals arranged in a slight spiral or pinwheel. The petals overlap near the center and curve outward, creating a soft, waxy, almost porcelain-like appearance. Many classic plumerias are white with yellow centers, but they also appear in pink, coral, red, orange, and blended sunset tones.
For polymer clay, the most important features to capture are:
- Five petals: simple, balanced, and slightly overlapping.
- Teardrop shape: narrow near the center, wider and rounded at the tip.
- Soft curve: petals should not lie flat like sad pancakes.
- Warm center: yellow, peach, or orange shading makes the flower look alive.
- Smooth surface: plumeria petals look waxy, so avoid heavy veins.
The goal is not botanical perfection. The goal is “recognizable tropical beauty,” which is far less stressful and much more fun.
Supplies You Need
You can make a polymer clay plumeria flower with basic tools. Fancy cutters are helpful, but your fingers and a craft knife can do heroic work.
Clay and Color Materials
- White polymer clay
- Yellow polymer clay
- Pink, coral, or orange polymer clay, optional
- Translucent polymer clay, optional for a softer petal look
- Soft pastels or mica powder for shading, optional
- Liquid polymer clay, optional for bonding petals
Tools
- A smooth tile, glass board, or silicone work mat
- Acrylic roller or clay roller
- Craft blade or small teardrop cutter
- Ball stylus or rounded tool
- Needle tool or toothpick
- Small paintbrush for pastel shading
- Cornstarch or water for smoothing fingerprints
- Oven thermometer
- Baking parchment, ceramic tile, or cardstock for baking
- Aluminum foil for tenting
Choosing the Right Polymer Clay
For flowers, choose a clay that is flexible after baking and not too brittle. Thin petals need strength. Very soft clay can be easy to shape but may sag, while very firm clay may hold details better but requires more conditioning. Popular choices include Sculpey Premo, Sculpey Soufflé, FIMO Soft, FIMO Professional, Cernit, and Kato Polyclay.
If you are a beginner, a medium-soft clay is the easiest starting point. White clay mixed with a little translucent clay can create a delicate petal effect. Too much translucent clay, however, may make the flower look less opaque than a real plumeria. Start with a 4:1 ratio of white to translucent and adjust from there.
Always check the baking instructions on your clay package. Many Sculpey clays cure around 275°F, FIMO often cures around 230°F, and Kato can cure hotter. Brand matters. Guessing the temperature is how innocent flowers become crispy botanical crackers.
Color Recipes for Realistic Plumeria Petals
The classic plumeria is white with a yellow throat. It looks simple, but simple does not mean boring. The trick is subtle blending.
Classic White and Yellow Plumeria
Mix white clay with a tiny pinch of translucent clay. For the center, use yellow clay softened with a small amount of white. You want a buttery yellow, not highlighter neon. Unless your plumeria is going to a rave, keep it gentle.
Pink-Edged Plumeria
Use white clay for the base, then add pink pastel or a very thin layer of pink clay along the petal edges. Blend lightly with your fingertip or brush. This creates the look of petals blushing at their own beauty.
Sunset Plumeria
Blend yellow, peach, and coral tones near the center. Keep the outer edges lighter so the flower does not look too heavy. A soft gradient makes the bloom appear warm and tropical.
Step-by-Step: How to Make a Polymer Clay Plumeria Flower
Step 1: Condition the Clay
Conditioning means kneading and rolling the clay until it becomes smooth, flexible, and easy to shape. Warm it in your hands, fold it, roll it, and repeat until there are no crumbly edges or cracks. You can also run it through a clay conditioning machine if you have one.
Do not skip this step. Poorly conditioned clay can crack, crumble, or behave like it has personal issues. Proper conditioning gives your petals a clean finish and makes blending colors much easier.
Step 2: Make a Petal Template
Draw or cut a small teardrop shape from paper. A good beginner size is about 1 to 1.25 inches long. The petal should be narrow at the base and rounded at the top. Plumeria petals are not sharp, so avoid a pointy tip.
If you prefer symmetry, use the same template for all five petals. If you like a natural handmade look, vary the petals slightly. Real flowers are not factory-stamped, and that is part of their charm.
Step 3: Roll the Clay Thinly
Roll your petal clay to about 1/16 inch thick. For earrings or small charms, go a little thinner. For hair clips, magnets, or decor pieces, slightly thicker petals may be more durable.
Try to keep the clay even. Thick lumps near the edges can make the petals look clumsy, while paper-thin centers can tear when shaped. Aim for “delicate but not dramatic.”
Step 4: Cut Five Petals
Place your paper template on the clay and cut around it with a craft blade. You can also use a teardrop cutter if you have one. Cut five petals, then gently lift each one with a blade or flexible tissue blade.
If the clay sticks to your surface, dust the work area lightly with cornstarch or use a smooth ceramic tile. Avoid using flour because this is craft time, not biscuit time.
Step 5: Thin and Shape the Petal Edges
Place one petal on your palm, a foam pad, or a soft piece of folded paper towel. Use a ball stylus to gently press and roll around the outer edge. This thins the edge and gives it a natural curve.
Next, lightly cup the petal by pressing the center with the rounded tool. The base should curve inward, while the rounded tip can lift slightly. Plumeria petals look best when they have a relaxed twist, as if they are turning toward the sun.
Step 6: Add Color to the Center
For a classic plumeria, brush yellow pastel or apply a thin piece of yellow clay near the base of each petal. Blend the yellow upward, fading as it reaches the middle. The strongest color should stay near the center of the flower.
If you are using clay instead of pastel, press a very thin yellow teardrop onto the petal base and smooth the edges with a fingertip or silicone tool. Keep the layer thin so the petal does not become bulky.
Step 7: Add Optional Edge Shading
For pink or coral plumerias, brush a whisper of pastel along the outer edge. Use a dry brush and build color slowly. It is easier to add more color than to remove a giant pink smudge that looks like the petal got into a fight with a cupcake.
You can also use mica powder for a pearly glow. Use restraint. A little shimmer says “fresh tropical bloom.” Too much shimmer says “disco luau emergency.”
Step 8: Arrange the Five Petals
Now comes the magic. Place the first petal with its narrow end toward the center. Add the second petal slightly overlapping the first. Continue placing all five petals in a spiral pattern. Each petal should tuck under or over the next, creating that gentle pinwheel shape.
Use a small dot of liquid polymer clay at the base of each petal if needed. Press lightly with a needle tool or silicone shaper. Do not flatten the whole flower. The center should be connected, but the petal tips should remain lifted and lively.
Step 9: Build the Center
Roll a tiny ball of warm yellow clay and press it into the middle. Blend it gently into the petal bases. You do not need a large raised center; plumerias are more about the glowing throat than a chunky middle.
For extra depth, add a dot of orange pastel or clay at the deepest part of the center. This makes the flower look warmer and more dimensional.
Step 10: Refine the Shape
Look at the flower from above and from the side. Adjust the petal angles. Lift one tip, tuck another base, and smooth any fingerprints. A tiny amount of water or cornstarch on your fingertip can help polish the surface.
If a petal looks too flat, place a bit of crumpled parchment or polyester fiber under it during baking. This support helps the petal keep its curve. Do not use cotton balls if they leave lint everywhere. Lint is the glitter of the laundry world: once it appears, it wants to live there forever.
How to Bake the Polymer Clay Plumeria
Place your flower on parchment, cardstock, or a ceramic tile. Preheat the oven according to your clay brand’s instructions. Use an oven thermometer because many home ovens run hotter or cooler than the dial claims. Polymer clay needs accurate heat to cure properly.
For many common polymer clays, the curing temperature falls between 230°F and 300°F, depending on brand. Bake for the time recommended on the package, usually based on the thickest part of the piece. Thin flowers may look finished quickly, but underbaked clay can become brittle.
To prevent browning, tent the flower loosely with aluminum foil or cover it with an upside-down foil pan. Do not microwave polymer clay. Do not bake it at the same time as food. Ventilate the room, and if clay burns accidentally, turn off the oven, leave the area, and air it out before cleaning.
Cooling, Sanding, and Finishing
Let the flower cool completely before handling. Polymer clay is slightly flexible when warm, and thin petals may bend if touched too soon. Once cool, inspect the edges. If needed, lightly sand rough spots with fine-grit sandpaper.
You can leave the flower matte for a natural waxy look, or add a thin coat of compatible polymer clay varnish for shine. Avoid nail polish because it can react with polymer clay and become sticky over time. For the most realistic finish, use satin glaze only on the petals and a tiny bit of gloss in the center.
Project Ideas for Your Polymer Clay Plumeria
Plumeria Earrings
Make two matching flowers around 3/4 inch wide. Before baking, add holes with a needle tool or embed small eye pins. After baking, attach jump rings and earring findings. Lightweight clay makes comfortable tropical earrings that do not pull on your ears like tiny decorative anchors.
Hair Clips
Create a larger flower, bake it, then glue it to a metal hair clip with strong jewelry adhesive. This works beautifully for summer outfits, beach-themed parties, dance costumes, or anyone who wants to look like they casually wandered out of a vacation brochure.
Magnets and Home Decor
Glue a magnet to the back for refrigerator decor, or attach several flowers to a frame, mirror, or shadow box. Polymer clay plumerias are also lovely on handmade greeting cards, as long as the card will be hand-delivered rather than crushed by postal machinery.
Miniature Scenes
Use tiny plumerias for dollhouse gardens, fairy scenes, resin displays, or tropical-themed miniatures. A cluster of three flowers instantly makes a miniature setting feel more polished.
Common Mistakes and How to Fix Them
The Petals Crack
Cracking usually means the clay was not conditioned enough, the petals were too thin, or the piece was underbaked. Knead the clay longer, keep the petals slightly thicker at the base, and follow the recommended curing time.
The Flower Turns Brown
Browning often comes from oven temperature spikes. Use an oven thermometer, tent the flower with foil, and keep the piece away from heating elements. White clay is especially dramatic about heat, so treat it kindly.
The Petals Look Flat
Shape each petal before assembly and support the curves during baking. Even a small lift at the petal tip can make the finished flower look more natural.
The Center Looks Bulky
Use less clay in the center. Plumeria flowers have a smooth throat, not a giant button. Blend the center gently into the petal bases instead of adding a big round lump.
Extra Experience Notes: What I Learned Making Polymer Clay Plumerias
The first time you make a polymer clay plumeria flower, you may expect the hardest part to be cutting the petals. Surprisingly, the real challenge is patience. Five petals sound simple, but five petals that all agree to sit in a graceful spiral? That is where the flower begins negotiating like a tiny tropical committee.
One useful experience is to make more petals than you need. Instead of cutting exactly five, cut seven or eight. Some petals will be too thick, too thin, too wide, or somehow shaped like a spoon. Extra petals give you freedom to choose the best ones without trying to rescue every little clay blob out of guilt.
Another lesson is that color should be softer than you think. Bright yellow clay straight from the package can look harsh in the center of a white plumeria. Mixing yellow with white creates a creamier tone that feels more natural. Pastel shading also works beautifully because it gives the flower a gradual glow rather than a hard stripe.
Fingerprints are another reality. Polymer clay records touch like a detective. If your petals are covered in prints, pause before assembling. Smooth them with a clean fingertip, a silicone tool, or a little cornstarch. It is easier to clean each petal separately than to fix a fully assembled flower with five curved petals guarding the evidence.
Baking teaches its own lessons. A flower that looks perfect before baking can droop if unsupported. Small rolls of parchment tucked under the petal tips can save the shape. Also, do not rush the cooling stage. Warm petals are flexible and fragile. Let them cool on the tile until fully firm, even if you are excited and already holding the earring hooks like a proud jewelry goblin.
The best plumerias often come from slight imperfection. If one petal curls more than the others, it may look more realistic. If the pink edge is uneven, it can mimic natural color variation. Handmade flowers should not look like plastic buttons. They should look touched by sunlight, shaped by hand, and just polished enough to feel intentional.
Finally, make a small test flower before committing to a final piece. Test your clay thickness, baking temperature, and color blend. A practice flower is never wasted. It can become a charm, magnet, or “learning specimen,” which is the fancy craft term for “this one has personality.”
Conclusion
Learning how to make a polymer clay plumeria flower is a satisfying project because it combines simple shapes with beautiful results. You only need five petals, a warm center, careful shaping, and proper baking to create a flower that feels tropical, elegant, and handmade in the best possible way.
Start with the classic white-and-yellow design, then experiment with pink edges, coral centers, pearl finishes, and different sizes. Once you understand the basic petal shape and spiral assembly, you can turn polymer clay plumerias into earrings, hair clips, magnets, home decor, miniatures, and heartfelt gifts.
The secret is not perfection. The secret is observation: soft curves, gentle color, clean edges, and a relaxed flower shape. Give the petals room to breathe, bake them correctly, and let the final bloom bring a little vacation energy to your craft table. No plane ticket required.