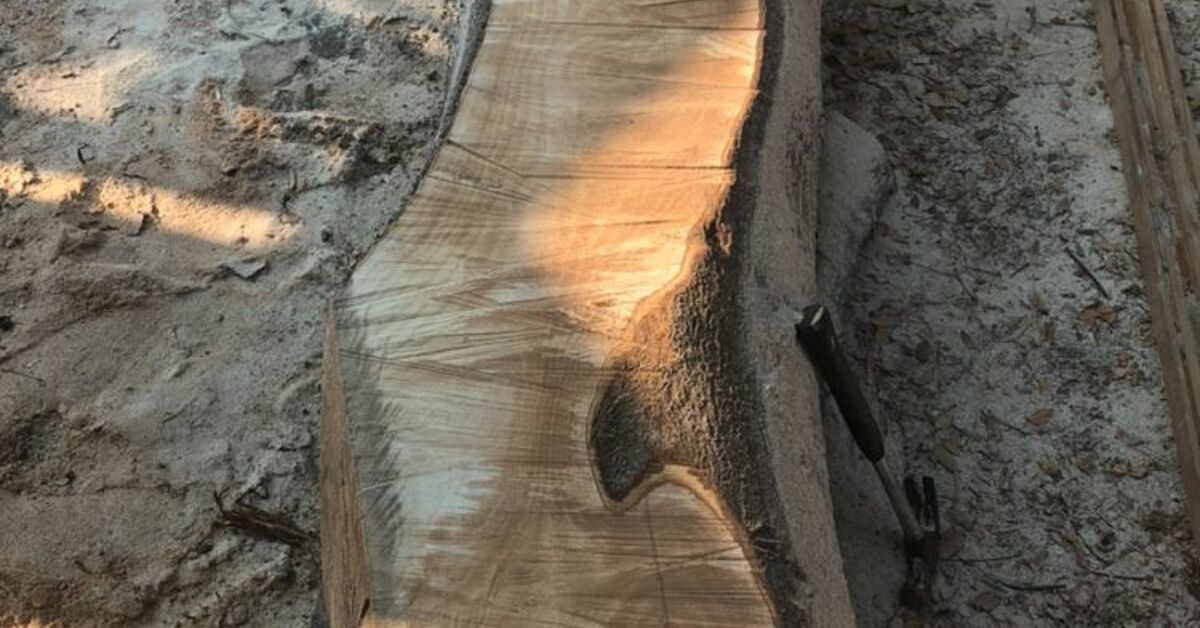
A live edge myrtle cutting board is the kind of kitchen project that makes people say, “Wait, you made that?” which is always more satisfying than hearing, “Where did you buy that?” Myrtlewood has swirling grain, warm color, and just enough personality to make a simple cutting board look like it has a backstory, a favorite coffee shop, and possibly a small fan club.
This DIY guide walks you through how to make a live edge myrtle cutting board from a small slab, including choosing the wood, flattening, shaping, sanding, finishing, and caring for it properly. The goal is not only to create something beautiful but also to make a board that is practical, food-safe, and sturdy enough for everyday kitchen work. Myrtle can be a show-off wood, but with the right approach, it behaves nicely.
Whether you are a beginner with a sander and a brave heart or a weekend woodworker looking for a gift-worthy project, this live edge cutting board DIY is approachable, rewarding, and just dangerous enough to make you clean your garage first.
Why Choose Myrtlewood for a Live Edge Cutting Board?
Myrtlewood, often called Oregon myrtle or California laurel, is prized for its unusual color variation and dramatic grain. Depending on the piece, it may show creamy sapwood, golden tan, olive-gray streaks, reddish-brown movement, or curly figure that looks like the tree was daydreaming while it grew.
For a cutting board, myrtle has several advantages. It is a hardwood with a fine, even texture, which helps create a smooth surface after sanding. It machines well when sharp tools are used, and its natural figure makes even a simple rectangle feel custom. A live edge adds even more character because the original contour of the tree remains visible along one or more sides.
That said, myrtle is not the same as maple, walnut, or cherry. It can have wavy grain, which may tear out if you rush planing or routing. It may also contain small cracks, knots, bark inclusions, or punky areas near the edge. In other words, myrtle is gorgeous, but it occasionally acts like it knows it.
Live Edge Cutting Board vs. Regular Cutting Board
A regular cutting board is usually squared up on all sides. It is clean, predictable, and tidy. A live edge cutting board keeps part of the tree’s natural outer shape. Instead of hiding the organic edge, you celebrate it.
The live edge design works especially well for serving boards, cheese boards, bread boards, and presentation pieces. It can also function as a true cutting board, but the natural edge needs careful preparation. Bark should usually be removed for a food-prep board because it can loosen, trap debris, or create hard-to-clean areas. The best live edge boards keep the natural contour while sanding the edge smooth and sealing it with a food-safe finish.
Tools and Materials You’ll Need
Materials
- One dry myrtlewood slab or board, ideally 3/4 inch to 1 1/4 inches thick
- Food-grade mineral oil
- Beeswax or premixed board butter
- Optional: food-safe wood glue if laminating pieces
- Optional: rubber feet and stainless screws
- Optional: blue painter’s tape for layout and edge protection
Tools
- Random orbital sander
- Sandpaper: 80, 120, 150, 180, 220, and optionally 320 grit
- Jigsaw, bandsaw, or handsaw
- Router with roundover bit, or sanding block for softening edges
- Chisel, card scraper, or small drawknife for removing bark
- Clamps
- Straightedge or winding sticks
- Dust mask, eye protection, and hearing protection
- Clean cotton rags or paper towels
You do not need a professional woodshop to make this board. A planer, drum sander, or router sled helps if your slab is rough, but many small boards can be flattened with patient sanding. Woodworking patience is basically the gym membership of DIY: nobody loves it at first, but the results are annoyingly real.
Step 1: Choose the Right Myrtle Slab
The best live edge myrtle cutting board starts with a dry, stable piece of wood. Look for a slab that is kiln-dried or properly air-dried. Moisture matters because a board that is still wet may warp, cup, split, or perform a dramatic kitchen-table tango after you finish it.
Choose a slab with attractive grain and a shape that suits its future use. A long narrow piece makes a beautiful bread board. A wider slab works well for general prep. A smaller, highly figured piece can become a cheese or charcuterie board.
Avoid slabs with deep cracks through the center, loose knots, soft punky sections, insect tunnels, or bark that is falling off in chunks. Tiny checks can sometimes be trimmed away or stabilized for decorative use, but deep cracks on a working cutting surface are bad news. They can trap moisture and food particles, and nobody wants yesterday’s onion hiding in a wood canyon.
Step 2: Decide the Shape and Size
Before cutting anything, study the slab. Turn it around. Look at the live edge. Notice the grain. Ask yourself where the best-looking section is. This is the part where woodworking becomes a little like sculpture, except the sculpture may later hold salami.
Common cutting board sizes include:
- Small serving board: 8 x 12 inches
- Medium everyday board: 10 x 16 inches
- Large prep board: 12 x 18 inches or bigger
Use painter’s tape or pencil lines to mark your rough shape. Keep at least one natural edge if you want the live edge look. If the live edge is very jagged, you can soften the outline slightly while still preserving the organic feel.
Step 3: Cut the Board to Rough Size
Cut the slab to rough length and width using a bandsaw, jigsaw, circular saw, or handsaw. If you are using a jigsaw, support the board well and move slowly to avoid a wandering cut. If the myrtle has curly or irregular grain, let the saw do the work. Forcing the cut is how you end up with smoke, blade marks, and a facial expression usually reserved for assembling cheap furniture.
Leave the board slightly oversized if you plan to square the ends later. Once cut, check the proportions. A live edge cutting board should feel balanced, not like a random tree scrap that escaped the firewood pile.
Step 4: Remove the Bark but Keep the Natural Edge
For a food-safe live edge cutting board, removing the bark is usually the smarter choice. Bark may look rustic, but it can separate over time and create tiny pockets that are difficult to clean. The good news is that you can remove bark while still keeping the wavy natural shape underneath.
Use a chisel, scraper, or small drawknife to gently lift the bark away. Work with the direction of the edge, not against it. Avoid digging too deeply into the wood. Once the bark is gone, use a sanding block or flap sander to smooth the edge. Your goal is a tactile, natural curve without sharp fibers, crumbly bits, or splinters waiting to attack someone reaching for cheese.
Step 5: Flatten the Faces
A cutting board needs two flat faces: one for cutting and one for sitting securely on the counter. If your slab is already surfaced, you may only need sanding. If it is rough, cupped, or uneven, flatten it before moving on.
There are several ways to flatten a myrtle cutting board:
- Use a planer if the board is narrow enough and free of risky knots or cracks.
- Use a router sled for thicker or more uneven slabs.
- Use a hand plane with a sharp blade for a traditional approach.
- Use a random orbital sander for minor unevenness, though this takes longer.
If you use a planer, take light passes. Myrtle’s figure can tear out, especially where the grain reverses. If using a sander, start with 80 grit only if necessary, then work through finer grits. Do not skip grits unless you enjoy chasing scratches like they owe you money.
Step 6: Square or Refine the Ends
Even if one side stays live edge, the ends usually look better when cleanly cut. Use a miter saw, table saw sled, circular saw guide, or careful hand cut to trim the ends square. For a more artistic board, you can cut one end at a slight angle, but keep function in mind. A cutting board that looks cool but rocks on the counter is basically kitchen performance art.
After trimming, lightly sand the end grain. End grain absorbs finish more quickly than face grain, so it deserves extra attention during oiling.
Step 7: Round Over the Edges
Sharp edges chip more easily and feel uncomfortable in the hand. A small roundover makes the board more durable and pleasant to use. Use a router with a 1/8-inch or 1/4-inch roundover bit, or simply ease the edges by hand with sandpaper.
On the live edge side, skip the router unless the shape is smooth and safe to follow. Hand sanding gives you more control. Keep the natural movement, but remove anything sharp, fragile, or fuzzy.
Step 8: Sand the Board Properly
Sanding is where a DIY cutting board goes from “garage experiment” to “boutique kitchen object.” Start with the lowest grit needed and move gradually upward. A common progression is 80, 120, 150, 180, and 220 grit. For a silky serving board, you may go to 320, but for a working cutting surface, stopping around 220 is often practical because it still allows oil to absorb well.
Sand both faces, all edges, and the end grain. After 180 or 220 grit, wipe the board with a slightly damp cloth to raise the grain. Let it dry completely, then sand lightly again with the final grit. This step helps prevent the board from feeling fuzzy after its first wash.
Do not forget the live edge. The live edge should feel smooth enough to run your hand along without catching splinters. If it feels like a tiny wooden cactus, keep sanding.
Step 9: Clean Off the Dust
Before finishing, remove every bit of sanding dust. Use a vacuum, compressed air, or a clean dry cloth. Avoid tack cloths that contain waxy or chemical residue unless you are sure they are compatible with food-contact projects.
Look closely at the surface under good light. Scratches that are invisible in a dusty garage may become very visible once oil hits the wood. Mineral oil has a magical ability to reveal both beautiful grain and the exact place where you got impatient.
Step 10: Apply Food-Safe Mineral Oil
For a classic DIY cutting board finish, food-grade mineral oil is simple, affordable, and easy to renew. Place the board on a protected surface. Pour a generous amount of oil onto one face and spread it with a clean cloth. Keep adding oil as the wood absorbs it.
Coat all surfaces: top, bottom, edges, live edge, and end grain. This matters because finishing only one side can encourage uneven moisture movement. Let the oil soak in for several hours or overnight. Then wipe off the excess. If the board still looks dry, repeat the process.
New boards often drink oil quickly. Do not be alarmed. Fresh myrtle can absorb finish like it just came back from a desert vacation.
Step 11: Add Beeswax or Board Butter
Mineral oil penetrates the wood, while beeswax helps create a more protective surface feel. You can use a premixed board butter or make your own by gently warming food-grade mineral oil with beeswax. A common homemade blend is roughly four parts mineral oil to one part beeswax by volume.
Rub the board butter into the entire board, including the live edge. Let it sit for 20 to 30 minutes, then buff with a clean cloth. The finished board should feel smooth, conditioned, and slightly richer in color, not greasy. If it feels slick or sticky, keep buffing.
Optional Add-Ons: Handles, Juice Grooves, and Rubber Feet
Should You Add a Handle Hole?
A handle hole can make a live edge myrtle cutting board easier to hang or carry. Drill the hole before final sanding, then round over the inside edge with sandpaper or a small router bit. Keep the hole away from cracks or weak grain.
Should You Add a Juice Groove?
A juice groove is useful if the board will be used for fruit, roast meats, or tomatoes that behave like tiny water balloons. However, routing a groove into a live edge board can be tricky because the shape may not be symmetrical. For beginners, a flat board without a groove is cleaner and easier.
Should You Add Feet?
Rubber feet help air circulate under the board and can reduce slipping. They also create a designated top side. The downside is that a board with feet cannot be flipped over for cutting on both sides. For a serving board, feet are great. For a hard-working prep board, you may prefer no feet.
How to Clean and Maintain a Live Edge Myrtle Cutting Board
Wash the board by hand with warm water and mild dish soap. Rinse it, wipe it dry, and let it air-dry upright. Never soak it in the sink. Never put it in the dishwasher. Dishwashers are wonderful for plates and deeply rude to wood.
For stronger cleaning after contact with raw meat, poultry, or seafood, use careful sanitation practices and consider keeping a separate plastic or dishwasher-safe board for raw proteins. Many home cooks reserve beautiful wooden boards for bread, vegetables, fruit, cheese, and serving. That keeps the board safer, prettier, and less likely to smell like garlic forever.
Reapply mineral oil when the board looks pale or feels dry. For many kitchens, monthly oiling works well, though heavy use may require more frequent care. Add board butter after oiling when the surface needs extra moisture resistance.
Replace or retire any cutting board that develops deep cracks, persistent odors, severe warping, or grooves that cannot be cleaned well. A handmade board can last for years, but it is still a kitchen tool, not an immortal relic.
Common Mistakes to Avoid
Using Wood That Is Not Dry
Moist wood may look fine now and betray you later. Always use properly dried lumber. If you are unsure, buy from a reliable hardwood supplier or use a moisture meter.
Leaving Loose Bark On
Bark can look charming, but on a cutting board it is usually a cleaning problem. Remove it and smooth the natural edge underneath.
Sanding Unevenly
Do not sand one area aggressively while ignoring another. Keep the sander moving and use pencil marks across the board to track your progress.
Using Vegetable Oil
Cooking oils such as olive oil, corn oil, or vegetable oil can go rancid. Use food-grade mineral oil, beeswax, or a cutting-board-specific finish.
Skipping End Grain
End grain drinks moisture quickly. Oil it thoroughly to help reduce cracking and uneven absorption.
Practical Uses for a Live Edge Myrtle Cutting Board
A live edge myrtle cutting board can serve many roles in the kitchen and dining room. Use it as a bread board, cheese board, fruit board, appetizer tray, or daily vegetable prep surface. The natural edge makes it especially attractive for entertaining because it looks styled even when all you did was arrange crackers and pretend it was effortless.
If the board has dramatic figure, consider using one side mostly for serving and the other for light cutting. This preserves the prettiest face while still keeping the board practical. Handmade does not have to mean fragile, but a little care helps keep the board beautiful.
Experience Notes: What Making a Live Edge Myrtle Cutting Board Teaches You
The first thing you learn while making a live edge myrtle cutting board is that the wood gets a vote. You may begin with a perfect plan: a neat rectangle, one elegant natural edge, maybe a handle hole placed exactly two inches from the corner. Then you notice a small crack, a patch of wild grain, or a curve in the live edge that is too good to cut off. Suddenly the design changes. That is not failure. That is the project becoming more interesting.
Working with myrtle is especially satisfying because the grain rewards each stage of the process. When the board is rough, it may look dusty and unimpressive. After the first sanding pass, color starts to appear. After 120 grit, the figure becomes clearer. Then the first coat of mineral oil hits, and the board changes completely. Golden tones deepen, darker streaks sharpen, and the live edge starts looking intentional instead of accidental. It is one of those DIY moments that makes all the sanding feel less like punishment and more like a dramatic reveal on a home improvement show.
Another lesson is that the live edge needs more handwork than expected. Flat faces are straightforward: sand, check, sand again. The natural edge is different. It has little valleys, fragile fibers, and awkward corners where power tools can be too aggressive. A sanding block, folded sandpaper, and patience work better than brute force. You want to keep the organic shape while making it comfortable to touch. The best test is simple: close your eyes and run your hand along the edge. If your fingers hesitate, catch, or threaten to file a complaint, keep refining.
You also learn that food-safe finishing is not a one-and-done miracle. Mineral oil and beeswax make the board look beautiful, but they are part of an ongoing relationship. The board will need cleaning, drying, and re-oiling. This is not a downside; it is part of owning real wood. A plastic board asks very little of you, but it also does not glow warmly on the table next to a loaf of sourdough. A myrtle board gives more, and it asks for a little care in return.
One practical experience tip is to make the bottom as nice as the top. Many beginners focus only on the show face, then rush the underside. But a cutting board lives in a wet, busy kitchen. Both sides should be sanded and finished evenly to help the board stay balanced. Even if you add rubber feet, finish the underside thoroughly.
Finally, expect small imperfections. A handmade live edge board should not look like it came from a factory mold. A tiny wave in the edge, a natural color shift, or a small knot can add charm. The trick is knowing the difference between character and a hygiene problem. Smooth natural grain is character. Deep cracks that trap food are trouble. Keep the romance, remove the risk, and you will end up with a board that feels both artistic and useful.
Conclusion
Making a live edge myrtle cutting board DIY is a satisfying project because it combines practical woodworking with natural beauty. You start with a slab that already has personality, then shape, flatten, sand, and finish it into something useful enough for daily cooking and attractive enough for the center of the table.
The keys are simple: choose dry myrtlewood, remove loose bark, keep the live edge smooth, sand carefully, finish every surface with food-safe oil and wax, and maintain the board with regular cleaning and conditioning. Do that, and your finished cutting board will not just be another kitchen accessory. It will be a handmade piece with grain, warmth, and a quiet little brag built right in.
Note: This guide is intended for DIY woodworking education. Use proper safety gear, choose food-safe materials, and follow safe kitchen cleaning practices before using any handmade board for food preparation.