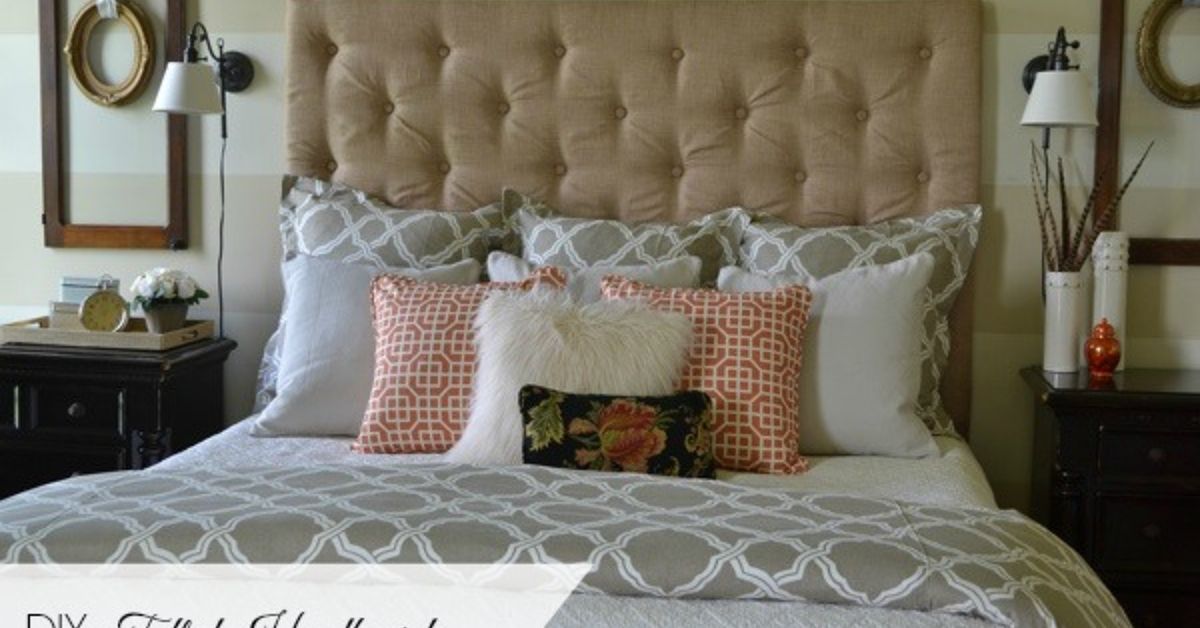
A tufted headboard has a magical way of making a bedroom look like it has its life together. Suddenly, the bed is not just a mattress with pillows; it is a “sleep sanctuary,” a “design moment,” and possibly the only part of the room not covered in laundry. The best part? You do not need a designer budget to get that soft, boutique-hotel look. With plywood, foam, batting, fabric, buttons, and a little patience, you can make a DIY tufted headboard for under $150.
This guide walks you through the full process: planning the size, choosing affordable materials, laying out the tufting pattern, wrapping the board, pulling the buttons tight, and mounting the finished headboard safely. The project is beginner-friendly, but it does reward careful measuring. Think of it as crafting meets light construction, with a tiny bit of wrestling against fabric in the middle.
Why Make a DIY Tufted Headboard?
A store-bought upholstered or button-tufted headboard can easily cost several hundred dollars, especially for queen and king beds. Making one yourself allows you to control the height, width, fabric color, padding thickness, and tufting style. You can create a modern channel-tufted look, a classic diamond tufted headboard, or a simple button-tufted design that feels timeless without looking fussy.
Another major benefit is comfort. A padded headboard is much better for reading, scrolling, or pretending you will read before immediately falling asleep. It also softens the look of the bedroom and can help reduce the echo that hard furniture and bare walls often create.
DIY Tufted Headboard Cost Breakdown
The exact cost depends on your bed size, fabric choice, and local material prices, but a budget-friendly queen-size tufted headboard can usually stay near or below $150 if you shop carefully.
Estimated Materials Budget
- Plywood or MDF: $25–$45
- Upholstery foam: $35–$55
- Batting: $10–$20
- Fabric: $25–$45
- Button cover kit or upholstery buttons: $8–$15
- Upholstery thread, twine, or wire: $5–$10
- Staples, spray adhesive, hanging hardware: $10–$20
The easiest place to save money is fabric. Look for clearance upholstery fabric, canvas drop cloth, velvet remnants, faux linen, or curtain panels. Avoid very thin fabric unless you add a backing layer, because foam and batting can show through. Medium-heavy fabric is the sweet spot: strong enough to pull tight, but not so thick that buttons refuse to cooperate like tiny upholstered divas.
Tools You Will Need
- Measuring tape
- Pencil or marker
- Drill and drill bits
- Staple gun and staples
- Utility knife or electric carving knife for foam
- Scissors
- Long upholstery needle
- Level
- Stud finder
- Optional: circular saw, clamps, sawhorses
If you do not own a saw, ask the home improvement store to cut the plywood to size. Many stores offer basic cuts, and it saves you from turning your driveway into a sawdust snow globe.
Step 1: Choose the Right Headboard Size
For a polished look, make the headboard slightly wider than your mattress. A twin headboard often looks good around 41 inches wide, a full around 56 inches, a queen around 62 inches, and a king around 80 inches. Height is more flexible. A standard DIY upholstered headboard may rise 28 to 36 inches above the top of the mattress, while a dramatic tall headboard can go higher.
For a queen bed, a practical beginner size is about 62 inches wide by 36 inches tall. This gives enough height for visible tufting and enough width to frame the mattress nicely.
Step 2: Pick Plywood or MDF
Plywood and MDF both work for a DIY tufted headboard. Plywood is lighter and holds screws well. MDF is smooth and flat, but it can be heavier. A 1/2-inch to 3/4-inch board is sturdy enough for most headboards. If you plan to mount the headboard directly to the wall with a French cleat, choose a board that can handle the hardware securely.
Once the board is cut, lightly sand rough edges. You do not need furniture-grade perfection because the board will be covered, but you do want to remove splinters. Fabric and splinters are not friends. Neither are fingers and splinters, obviously.
Step 3: Plan the Tufting Pattern
Before adding foam, mark your button locations on the plywood. For a classic diamond tufted headboard, stagger the rows. Start the first row a few inches below the top edge, then mark button spots every 8 to 10 inches across. The second row should sit lower and offset between the first-row buttons. This staggered layout creates the diamond effect once the buttons are pulled tight.
For a cleaner modern look, use a grid pattern with evenly spaced buttons. Grid tufting is easier for beginners because the measuring is straightforward. Diamond tufting looks more luxurious, but it requires a little more patience when shaping the folds.
After marking the pattern, drill holes through the plywood at each button spot. Use a drill bit large enough for your upholstery needle, thread, twine, or wire to pass through easily.
Step 4: Cut and Attach the Foam
Lay the upholstery foam over the plywood and cut it to match the board. One-inch foam creates a thinner, tailored headboard, while two-inch foam gives a plush look. If you want deep tufting, thicker foam is better. If you want to stay under $150, one-inch foam plus high-loft batting is usually the more budget-friendly choice.
Spray adhesive helps hold the foam in place while you work. Apply it according to the product instructions, then press the foam firmly onto the plywood. Let it set before moving to the next layer.
Step 5: Add Batting for Softness
Batting smooths the edges, softens the foam, and gives the finished headboard a fuller look. Cut the batting so it extends about 4 to 6 inches beyond the plywood on all sides. Lay the batting flat, place the foam-covered board face down on top, and pull the batting around to the back.
Staple the batting from the center outward. Pull it snug, not so tight that it compresses the foam unevenly. Fold the corners neatly like wrapping a gift. This is the only time your headboard will look like a giant present, unless you are giving it to yourself, which you absolutely are.
Step 6: Wrap the Headboard With Fabric
Iron or steam the fabric before attaching it. Wrinkles trapped under buttons will haunt you. Place the fabric face down on a clean surface, then place the batting-covered board face down on top. Make sure the fabric pattern is straight, especially if you are using stripes, plaid, or anything geometric.
Cut the fabric with a 5- to 6-inch overhang around all sides. Begin stapling at the center of the top edge, then the center of the bottom edge, then the sides. Continue working outward in small sections, alternating sides to keep the tension even. The fabric should be smooth across the front, but not stretched so aggressively that it distorts the weave.
Step 7: Make or Attach the Buttons
Fabric-covered buttons give a custom look. Button cover kits are inexpensive and usually easy to use with fabric scraps. If your fabric is very thick, test one button first. Some kits are not thrilled about heavy upholstery fabric. In that case, use ready-made upholstery buttons or choose a slightly thinner fabric for covering the buttons.
Thread a long upholstery needle with strong upholstery thread, waxed twine, or flexible wire. Push the needle from the back of the board through the drilled hole, foam, batting, and fabric. Thread the button, then send the needle back through to the rear of the board.
Step 8: Pull the Tufts Tight
Pull each button tight from the back until the front creates a soft depression. Secure the thread or wire with staples on the back of the board. For extra hold, zigzag the thread across a staple, pull tight again, and add another staple. Repeat for each button.
If you are making diamond tufts, shape the folds as you go. Encourage the fabric to fold diagonally between buttons. Do not wait until the end to fix every fold; by then, the fabric may have already chosen chaos. Work row by row, smoothing and guiding the folds with your fingers.
Step 9: Finish the Back
The back does not need to be beautiful, but it should be tidy. Trim extra fabric and batting so nothing hangs below the headboard. If desired, cover the back with inexpensive cambric fabric or a spare piece of cloth. This is optional, but it gives the project a cleaner finish and protects the wall from loose staples or fabric edges.
Step 10: Mount the Headboard Safely
There are three common ways to install a DIY tufted headboard. The first is to attach it directly to the bed frame with legs. The second is to hang it on the wall using D-rings or heavy-duty hangers. The third, and often the most stable, is a French cleat system.
A French cleat is excellent for wall mounting because it distributes weight and helps keep the headboard level. Always anchor into wall studs when possible. If studs do not line up with your hardware, use appropriate wall anchors rated for the weight of the headboard. A wobbly headboard is not charming; it is just furniture with trust issues.
Design Ideas for a High-End Look
Choose Velvet for Drama
Velvet makes a tufted headboard look expensive, even when the project is budget-friendly. Deep green, navy, charcoal, camel, and blush are popular choices that photograph beautifully.
Use Linen-Look Fabric for Casual Style
A linen-look fabric gives the headboard a relaxed, modern feel. It works especially well in farmhouse, coastal, Scandinavian, and neutral bedrooms.
Go Tall for Boutique-Hotel Energy
A taller headboard adds instant drama. If your room has high ceilings, a 48-inch-tall headboard can feel elegant and custom. Just remember: taller means more fabric, more foam, and possibly more cost.
Add Nailhead Trim
Nailhead trim around the edge can add a traditional or glam detail. Use a spacer or painter’s tape guideline to keep the spacing even.
Common Mistakes to Avoid
Using fabric that is too thin: Thin cotton can look limp and may reveal the color of the foam underneath. Choose upholstery fabric or add a backing layer.
Skipping the ironing step: Wrinkles do not magically disappear after stapling. They become permanent roommates.
Pulling fabric unevenly: Uneven tension causes ripples and crooked patterns. Staple from the center outward and keep checking the front.
Making button holes too small: The upholstery needle must pass through easily. Drill before adding foam and fabric.
Ignoring wall safety: A headboard should be securely attached, especially in homes with kids, pets, or enthusiastic pillow-fluffers.
How To Keep the Project Under $150
To keep your DIY tufted headboard affordable, buy a half sheet of plywood if your bed size allows it, use a foam mattress topper instead of specialty upholstery foam, shop fabric remnants, and borrow tools when possible. A staple gun, drill, and scissors are the essentials. Everything else is helpful, but not always mandatory.
Also, compare fabric widths. A wider fabric may cost more per yard but require less total yardage. For a queen headboard, 2.5 yards is often enough if the fabric is wide and the headboard is not extremely tall. For a king, plan closer to 3 yards or more.
Extra Experience: What It Feels Like To Build a DIY Tufted Headboard
The first thing you learn while making a DIY tufted headboard is that measuring feels boring until it saves the whole project. At the beginning, it is tempting to say, “That looks centered enough,” and start drilling. Do not listen to that voice. That voice also thinks one trip to the hardware store is realistic. Measure twice, mark clearly, and step back to check the pattern before committing to the drill.
The second experience is that foam has a personality. It shifts, bends, and occasionally refuses to cut in a perfectly straight line. A sharp utility knife works, but an electric carving knife can make the job easier. If the foam edge is not flawless, do not panic. Batting is forgiving, and fabric hides many tiny crimes.
Stapling the fabric is where the project starts to feel real. The flat pile of materials suddenly becomes something that looks like furniture. Work slowly here. Pull the fabric snug, check the front, staple a little, check again, and keep going. It is much easier to remove a few staples early than to discover a giant wrinkle after you have used half the box.
Tufting is the most satisfying and most dramatic part. The first button may feel awkward. The needle has to travel through fabric, batting, foam, and plywood, which can make you question every life decision that led to this moment. But once the first button pulls inward and creates that soft dimple, the whole project changes. Suddenly, you are not just making a headboard. You are upholstering. You may even briefly consider opening a furniture studio. Wait until button number seventeen before making business plans.
Having a helper makes tufting easier. One person can press the button from the front while the other pulls and staples the thread from the back. If you are working alone, prop the headboard securely and take your time. The goal is firm, even tufts, not a wrestling match with plywood.
The final mounting step is where you should slow down again. A beautiful headboard still needs to be safe. Use a level, find studs, and choose hardware rated for the weight. Once mounted, the room changes instantly. The bed looks more finished, the wall looks intentional, and the whole space feels warmer. Even basic bedding looks better against a soft upholstered backdrop.
The best part of the experience is the customization. You can match your curtains, contrast your wall color, reuse leftover fabric, or create a bold statement piece for less than the price of many store-bought options. And every time someone asks where you bought it, you get to casually say, “Oh, I made it,” while pretending that was not the exact moment you had been waiting for.
Conclusion
Making a DIY tufted headboard for under $150 is one of the most rewarding bedroom upgrades you can tackle. It combines comfort, style, and budget-friendly creativity in a project that looks far more expensive than it is. With a sturdy board, soft foam, smooth batting, attractive fabric, and carefully pulled buttons, you can create a custom upholstered headboard that fits your bed, your room, and your personality.
The secret is not perfection. It is preparation. Measure carefully, choose durable fabric, keep the tension even, and mount the finished piece securely. Whether you prefer a classic diamond tuft, a simple button grid, or a tall hotel-inspired design, this project proves that a beautiful bedroom does not require a luxury budget. Sometimes it just requires plywood, fabric, and the courage to use a staple gun.
Note: Material prices vary by store, location, bed size, and fabric choice. The under-$150 estimate works best when using budget-friendly fabric, standard plywood or MDF, basic hardware, and smart shopping strategies such as remnants, sales, or repurposed materials.