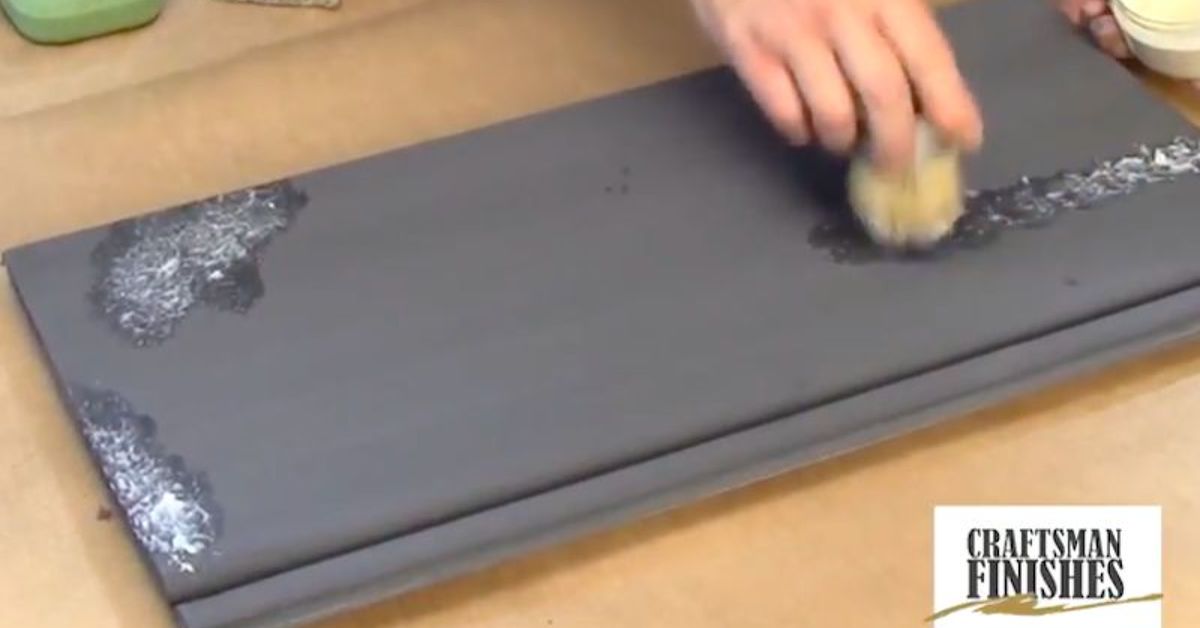
Farmhouse style has a magical way of making a plain piece of furniture look like it survived three generations, two kitchen remodels, one barn dance, and at least one dramatic Thanksgiving dinner. The secret is not always age. Sometimes, it is paint, patience, and a humble bit of wax hiding under the topcoat like a tiny craft-room magician.
Learning how to create a farmhouse distressed finish using wax under paint is one of the easiest ways to get that naturally worn, layered, time-loved look without attacking your furniture with a power sander like it owes you money. This method is often called a wax-resist technique. In simple terms, you apply wax to certain areas before painting over them. Because paint does not grip well where wax has been rubbed, those spots become easier to distress later, revealing the base color, stained wood, or original finish underneath.
The result is charming, casual, imperfect, and wonderfully forgiving. If your brush stroke is uneven, congratulations: it is “character.” If a corner gets extra worn, now it has “history.” Farmhouse distressing is one of the rare DIY finishes where small mistakes often improve the final look. That said, there is a difference between beautifully aged and accidentally mauled. This guide will walk you through the full process with practical tips, specific examples, safety notes, and finishing advice so your project looks intentionally rustic instead of suspiciously unfinished.
What Is a Wax-Resist Farmhouse Finish?
A wax-resist farmhouse finish is a painted furniture technique where wax is applied to selected areas before the final paint layer. The wax prevents the new paint from bonding tightly to those areas. Once the topcoat dries, you lightly rub, scrape, or sand the waxed spots to remove some of the paint and reveal the layer below.
This method works especially well for farmhouse furniture because real wear usually happens in predictable places: corners, edges, raised trim, drawer fronts, chair rungs, table legs, and areas around knobs or pulls. Wax lets you control that “old farmhouse kitchen” look instead of randomly sanding until your arm files a complaint.
Why Use Wax Under Paint Instead of Just Sanding?
You can absolutely distress furniture by sanding painted areas after the paint dries. However, wax under paint gives a softer, more natural chip-and-wear effect. Sanding alone can sometimes look too even, too scratchy, or too obviously manufactured. Wax resist allows the paint to release in a more organic way, especially when layered over stained wood or a darker base coat.
The technique is also beginner-friendly. You do not need expensive equipment, and you do not have to strip the entire piece. For many farmhouse, cottage, shabby chic, and vintage-inspired projects, a lint-free rag, a candle or furniture wax, chalk-style paint, and a sanding sponge are enough to create a finish with depth and personality.
Best Pieces for a Farmhouse Distressed Finish
Not every surface is the perfect candidate for wax-resist distressing, but many furniture pieces are excellent choices. Small projects are ideal if you are new to the technique. Try it on a picture frame, stool, shelf, tray, side table, nightstand, bench, or old cabinet door before moving on to a dining table or full dresser.
Pieces with details tend to look especially good. Raised panels, carved trim, turned legs, beadboard, planked tops, and beveled edges give the distressing places to shine. Flat modern furniture can still work, but you will need to be more strategic so the worn areas look natural rather than randomly scuffed.
Surfaces That Need Extra Caution
Be careful with glossy laminate, slick factory finishes, plastic-like veneers, and furniture with unknown old paint. Glossy surfaces may need light sanding or a bonding primer before painting. If the furniture is very old and may contain lead-based paint, do not sand or scrape it casually. Lead dust can be dangerous, especially for children and pregnant people. When in doubt, test first, follow lead-safe practices, or consult a certified professional.
Materials and Tools You Will Need
Gathering everything before you start will make the process smoother. Nobody wants to discover halfway through a project that the only clean rag in the house is actually a sock with emotional value.
- Chalk-style paint, milk paint, mineral paint, or matte furniture paint
- Clear furniture wax, white candle wax, beeswax, or a wax distressing block
- Degreasing cleaner or mild soap and water
- Lint-free cloths
- Paintbrush or small roller
- Fine-grit sanding sponge, usually 180 to 220 grit
- Drop cloth
- Painter’s tape, if needed
- Vacuum, tack cloth, or damp microfiber cloth for dust removal
- Protective gloves
- Dust mask or respirator when sanding
- Clear wax, furniture wax, or compatible protective topcoat for sealing
For the most authentic farmhouse distressed finish, choose colors that look like they could have aged together naturally. Popular combinations include stained wood under creamy white, charcoal under warm white, sage under ivory, navy under gray, black under antique white, or raw pine under soft farmhouse blue.
Step 1: Clean the Furniture Thoroughly
Good distressing starts with clean furniture. Paint does not appreciate grease, furniture polish, kitchen grime, or mystery residue from 1998. Use a mild degreasing cleaner or soap and water to remove dirt and oils. Pay close attention to drawer fronts, cabinet doors, tabletops, and areas around handles where hands have left years of invisible fingerprints.
After cleaning, let the piece dry completely. Painting over trapped moisture can cause poor adhesion, bubbling, or a finish that behaves like it has commitment issues.
Step 2: Lightly Sand or Scuff the Surface
Many chalk-style paints are known for sticking well with minimal prep, but light sanding is still helpful on glossy or slick surfaces. Use a fine-grit sanding sponge and gently scuff the surface. You are not trying to remove the entire old finish. The goal is to dull the shine and create a little tooth so the paint can grip.
Always sand in the direction of the grain when working with real wood. After sanding, remove dust with a vacuum, dry brush, tack cloth, or slightly damp microfiber cloth. Dust left behind can create bumps under paint and make the finish feel gritty instead of smooth and touchable.
Step 3: Choose Your Base Layer
The base layer is what will show through after distressing. If your furniture already has a beautiful stained wood finish, you may use that as the exposed layer. If the existing finish is unattractive, damaged, or the wrong color, paint a base coat first.
For example, if you want a classic farmhouse white dresser with dark worn edges, start with a dark brown, black, or charcoal base coat. If you want a coastal farmhouse look, try a soft blue or green base under warm white. If you prefer a primitive country style, use barn red, mustard, or deep olive beneath a creamy neutral topcoat.
Let the base layer dry fully before applying wax. Drying time depends on the paint brand, temperature, humidity, and thickness of application. Rushing this step is like frosting a cake while it is still in the oven. Technically possible, emotionally risky.
Step 4: Apply Wax Where Natural Wear Would Happen
Now comes the fun part. Rub wax onto the areas where you want the top paint color to distress easily. Use a white candle, a wax puck, beeswax, or clear furniture wax. Apply it to corners, edges, raised molding, around hardware, feet, legs, and any spot that would naturally get bumped or handled over time.
Think like time. Where would hands touch the piece? Where would a drawer scrape? Where would a chair leg get kicked? Where would a farmhouse table see plates, elbows, and the occasional ambitious toddler with a spoon? Those are your wax zones.
How Much Wax Should You Use?
Use a light to moderate amount. You do not need thick chunks of wax. A thin, uneven rub is usually enough. If you apply too much, the topcoat may resist too aggressively and peel in large patches. The best farmhouse distressed finish looks layered and believable, not like the paint lost a wrestling match.
For subtle distressing, apply wax only to a few edges. For a heavily aged look, wax more corners, high points, and random small areas across the surface. Keep the placement irregular. Perfect symmetry is the enemy of authentic aging.
Step 5: Paint the Topcoat
Once the wax is in place, paint over the entire piece with your chosen top color. Chalk-style paint is popular for farmhouse distressing because it dries matte and sands easily. Milk paint and mineral paint can also work beautifully, depending on the look you want.
Apply the paint in thin, even coats. A slightly imperfect brush texture can add charm, but heavy globs will make distressing harder to control. If you want fuller coverage, use two thin coats rather than one thick coat. Let the first coat dry before applying the second.
Do not panic if the paint looks uneven after the first pass. Many furniture paints settle into their final appearance after drying. Farmhouse style is also friendly to variation. A little tonal movement gives the piece depth.
Step 6: Distress the Waxed Areas
When the topcoat is dry to the touch, begin distressing. Use a lint-free cloth, plastic scraper, fine sanding sponge, or very fine steel wool, depending on the effect you want. Start gently. The paint over waxed areas should release more easily than paint applied directly to the surface.
Work slowly and step back often. This is the part where enthusiasm can become a tiny problem. One minute you are creating elegant vintage wear; the next minute your nightstand looks like it escaped a raccoon attack. Distress a little, evaluate, then continue.
Best Places to Distress
- Top corners and outside edges
- Raised decorative trim
- Drawer edges and cabinet door frames
- Around knobs, pulls, and handles
- Chair seats, rungs, and leg edges
- Table aprons and feet
- High points on carved details
If a distressed area looks too harsh, soften it with a light sanding motion around the edges. If you removed too much paint, touch it up with the topcoat, let it dry, and distress again more gently. This is another reason the wax-resist method is so forgiving.
Step 7: Add Depth With Glaze or Dark Wax
For extra farmhouse character, you can add antiquing glaze or dark wax after distressing. These products settle into grooves, corners, and texture, creating the illusion of age. Dark wax is especially effective on carved furniture, beadboard panels, and detailed trim.
Use restraint. A little dark wax goes a long way. Apply clear wax first if your paint brand recommends it, then work dark wax into details and wipe back the excess. The goal is gentle age, not “rescued from a chimney.” If the piece becomes too dark, clear wax can sometimes help lift or soften the dark wax before it cures.
Step 8: Seal the Finish
Painted furniture needs protection, especially if it will be touched often. Clear furniture wax is a traditional choice for chalk-style finishes and gives a soft, hand-rubbed sheen. Apply it with a wax brush or lint-free cloth, working it into the surface in thin layers. Wipe away excess and buff after it begins to set.
Wax usually feels dry before it is fully cured. Be gentle with the piece while the finish hardens. Avoid placing heavy objects, hot mugs, or wet items on it too soon. For high-use surfaces such as dining tables, bathroom vanities, or kitchen cabinets, consider a compatible water-based protective topcoat instead of wax, but always check product instructions. Some topcoats do not bond well over wax, so the order matters.
Common Mistakes to Avoid
Using Too Much Wax
Heavy wax application can cause the topcoat to slide, smear, or peel too much. Apply wax only where you want distressing and keep it thin.
Distressing Randomly
Natural wear has logic. Corners, handles, edges, and raised details should show more distress than protected flat areas. Random patches in the middle of a drawer can look fake unless there is a design reason for them.
Skipping Surface Cleaning
Paint may not stick properly over grease, silicone polish, wax residue, or dust. Clean first, then paint. It is not glamorous, but neither is repainting the whole thing next weekend.
Over-Sanding
Use a light hand. If you sand too aggressively, you can expose more surface than intended or create scratch marks. Fine-grit sanding sponges offer more control than rough sandpaper.
Ignoring Safety
If a piece has old paint and you do not know whether it contains lead, do not sand it carelessly. Test it or seek expert guidance. Work in a ventilated space, wear protection, and keep dust away from children, pets, and food-prep areas.
Color Combinations for a Farmhouse Distressed Finish
Color can completely change the mood of your project. White over stained wood creates a classic farmhouse look. Black under white adds bold contrast and works well on dressers and hutches. Gray under cream feels soft and weathered. Sage green under ivory gives a cottage garden effect. Navy under pale gray feels more modern farmhouse. Barn red under warm white creates a primitive country style that looks great on shelves, benches, and cabinets.
For a subtle finish, keep your base and topcoat close in tone. For a dramatic chipped-paint look, choose strong contrast. If you are refinishing a piece for resale or a neutral room, creamy whites, greige, taupe, soft gray, and muted green are safe bets.
Specific Example: Farmhouse White Side Table
Imagine a small wooden side table with a medium brown stain. First, clean it with a degreasing cleaner and lightly scuff the glossy finish. Leave the brown stain as the base layer. Rub candle wax along the table edges, corners, lower legs, and around the drawer pull. Paint the whole table with two thin coats of warm white chalk-style paint.
After the paint dries, gently rub the waxed areas with a cloth and fine sanding sponge. The white paint lifts from the edges, revealing the brown stain beneath. Add a whisper of dark wax around the drawer trim and legs, then seal with clear wax. The finished table looks like something found in a charming old farmhouse bedroom, minus the spiders and questionable attic smell.
How to Make the Finish Look Authentic
The best distressed finishes tell a believable story. Do not distress every inch equally. Real furniture wears unevenly. A drawer pull area may be more worn than the center of the drawer. The front feet may show more scuffing than the back. Edges may reveal more base color than flat panels.
Layering is also important. A farmhouse distressed finish looks richer when there is contrast between the exposed layer and the topcoat. If your piece feels flat, add a thin glaze, dry-brush a slightly lighter color across high points, or use dark wax sparingly in crevices.
Experience Notes: What I Learned From Using Wax Under Paint
The biggest lesson with wax-resist distressing is that the finish improves when you stop trying to control every square inch. The first time many DIYers try this technique, they apply wax too carefully, almost like drawing a map. The result can look planned instead of aged. A better approach is to move around the piece quickly and lightly, rubbing wax where wear would happen but allowing some randomness. Farmhouse furniture should not look like it was distressed by a ruler.
Another useful experience is to test your color combination before committing. A white topcoat over warm brown stain feels classic and safe, but white over orange-toned wood can look more rustic than expected. Gray over black can look elegant, while cream over sage green feels softer and more vintage. A small test board saves time and prevents the painful moment when you realize your “antique white” looks suspiciously like cold oatmeal under your room lighting.
Timing also matters. If the topcoat is too wet, distressing can smear. If it cures too hard, distressing takes more effort. Many painters like to distress once the paint is dry but not fully hardened. That window gives better control. However, every paint behaves differently, so the best habit is to test a hidden area first. The back of a leg, underside of a shelf, or inside edge of a drawer can tell you whether the paint is ready.
One practical trick is to distress in stages. Do the obvious edges first, then walk away for a few minutes. Come back with fresh eyes. In real life, it is easy to keep sanding because the process is satisfying. Unfortunately, satisfying and tasteful are not always the same thing. A short break helps you see whether the piece needs more wear or whether it is already finished.
Wax placement around hardware can make a huge difference. When furniture ages naturally, the area near knobs and pulls often wears from repeated touching. A little distressing there makes the whole piece look more convincing. The same applies to chair rungs and table legs. These spots get bumped, kicked, grabbed, and cleaned over years of use, so they deserve more attention than a protected flat side panel.
Another experience-based tip is to avoid using your best brush for waxy or gritty stages. Keep separate brushes for paint, wax, and dirty work. Wax can cling to bristles and affect future paint application. Labeling brushes may seem overly organized until you accidentally use a wax brush for paint and create a finish that behaves like a nonstick skillet.
Finally, sealing is where many good projects become great. Clear wax gives a beautiful low-sheen finish that feels right for farmhouse furniture, but it needs thin coats, buffing, and curing time. For decorative pieces, wax is often enough. For hard-working surfaces, durability should guide the final choice. A hallway bench, kitchen table, or bathroom cabinet may need a tougher protective finish, but make sure it is compatible with the products already on the piece.
The real charm of the wax-under-paint method is that it invites imperfection. You are not trying to make furniture look new. You are trying to make it look loved. With thoughtful prep, smart wax placement, gentle distressing, and a protective finish, even an ordinary thrift-store table can become the kind of piece people ask about when they walk into the room.
Conclusion
Creating a farmhouse distressed finish using wax under paint is simple, affordable, and surprisingly satisfying. The wax-resist technique gives you control over where paint wears away, helping you create a layered, naturally aged look without stripping the entire piece or relying on heavy sanding. By cleaning well, choosing the right base color, applying wax strategically, painting in thin coats, distressing gently, and sealing properly, you can transform plain furniture into a warm, rustic statement piece.
The beauty of this method is its flexibility. You can go subtle with lightly worn edges or dramatic with bold layered color. You can use it on small decor pieces or large furniture makeovers. Most importantly, you can make the finish feel personal. Farmhouse style is not about perfection. It is about warmth, texture, comfort, and pieces that look like they have a story to tell. With a little wax and paint, you get to write that story yourself.