Note: This copy-ready article is written in standard American English for web publishing. It contains only the body HTML, with SEO tags included as JSON at the end.
Activating a conduit in Minecraft is one of those magical moments where the game quietly says, “Congratulations, you are now rich enough to renovate the ocean.” A conduit works like an underwater beacon: it helps you breathe underwater, improves underwater visibility, increases mining speed, lights up the area, and can even damage nearby hostile mobs when fully powered. In other words, it turns a scary drowned-infested sea into your personal aquarium office.
If you want to build an underwater base, raid an ocean monument, mine prismarine, or simply swim around without watching your oxygen bubbles vanish like snacks at a LAN party, learning how to activate a conduit is absolutely worth it. The process is not difficult, but it does require the right materials, the right frame shape, and enough water around the block.
This guide explains how to activate a conduit in Minecraft in 10 steps, including what materials you need, how to build the conduit frame, how many prismarine blocks are required, and how to fix common setup mistakes.
What Is a Conduit in Minecraft?
A conduit is a special underwater utility block crafted from one Heart of the Sea and eight Nautilus Shells. Once activated inside a correct frame, it grants nearby players the Conduit Power effect while they are underwater or in rain. Conduit Power combines three extremely useful benefits: underwater breathing, improved underwater vision, and faster underwater mining.
Think of it as a tiny ocean guardian that decided to stop being dramatic and start paying rent. A conduit is especially useful for survival players who want to build underwater cities, clear ocean monuments, farm guardians, mine clay or gravel underwater, or explore deep ruins without carrying a backpack full of water breathing potions.
Materials Needed to Activate a Conduit
Before you start building, gather the correct materials. A conduit cannot be activated by simply placing it in water. It must sit in the center of a frame made from specific blocks.
You will need:
- 1 Heart of the Sea
- 8 Nautilus Shells
- At least 16 valid frame blocks
- Up to 42 valid frame blocks for maximum power
- A water-filled area large enough to build the frame
- A temporary block such as dirt, sand, or cobblestone
Valid conduit frame blocks include prismarine, prismarine bricks, dark prismarine, and sea lanterns. You may mix these blocks freely. The conduit is not picky about interior design, which is refreshing because some Minecraft builds look like a creeper assembled them during an earthquake.
How to Get a Heart of the Sea
The Heart of the Sea is the rare centerpiece of the conduit recipe. You cannot craft it from ordinary materials. The most common way to get one is by finding buried treasure. Search shipwrecks or ocean ruins for a buried treasure map, follow the red X, and dig until you find the treasure chest.
A good tip is to bring a shovel, food, and some patience. Buried treasure can be awkwardly tucked under sand, gravel, or stone near beaches and ocean edges. In survival mode, it is also smart to bring a door in Java Edition, a water breathing potion, a turtle shell helmet, or any breathing aid you already have. The ocean is beautiful, but it is also very committed to drowning careless players.
How to Get Nautilus Shells
You need eight Nautilus Shells to craft a conduit. There are several ways to collect them. You can fish them up as treasure items, buy them from wandering traders when the trade appears, or obtain them from drowned mobs that spawn holding a shell. Drowned farming can be effective, but it takes setup. Fishing is slower but peaceful. Wandering traders are convenient when they cooperate, which is not always, because they often seem more interested in selling suspiciously timed cactus than anything useful.
How to Craft a Conduit
Once you have the Heart of the Sea and eight Nautilus Shells, open a crafting table. Place the Heart of the Sea in the center slot. Then place the eight Nautilus Shells around it, filling every outer slot. The result is one conduit.
Crafting the conduit is only half the job. If you place it on the ground, it will emit light, but it will not give Conduit Power until it is correctly activated inside a water-filled prismarine-style frame.
How to Activate a Conduit in Minecraft: 10 Steps
Now for the main event. Follow these 10 steps carefully, and your conduit should activate without turning into an expensive underwater paperweight.
Step 1: Choose an Underwater Location
Pick a spot underwater where you want the conduit effect to reach. If you are building an underwater base, place the conduit near the center of the area. If you are raiding an ocean monument, place it close enough to help you mine and fight, but not so exposed that guardians make your life miserable.
The conduit can work in any biome and at almost any depth as long as the structure requirements are met. Still, a calm ocean or controlled build area makes construction easier.
Step 2: Clear Enough Space
You need room for a frame around the conduit. A full-power conduit frame fits inside a 5-by-5-by-5 area. Clear blocks that get in the way, especially sand, gravel, kelp, or random terrain pieces. The conduit itself must sit in the center of a 3-by-3-by-3 water-filled space.
If you are working in survival mode, bring tools with Efficiency and Aqua Affinity if possible. Without them, underwater mining can feel like trying to chop a tree with a wet noodle.
Step 3: Build the First 5-by-5 Ring
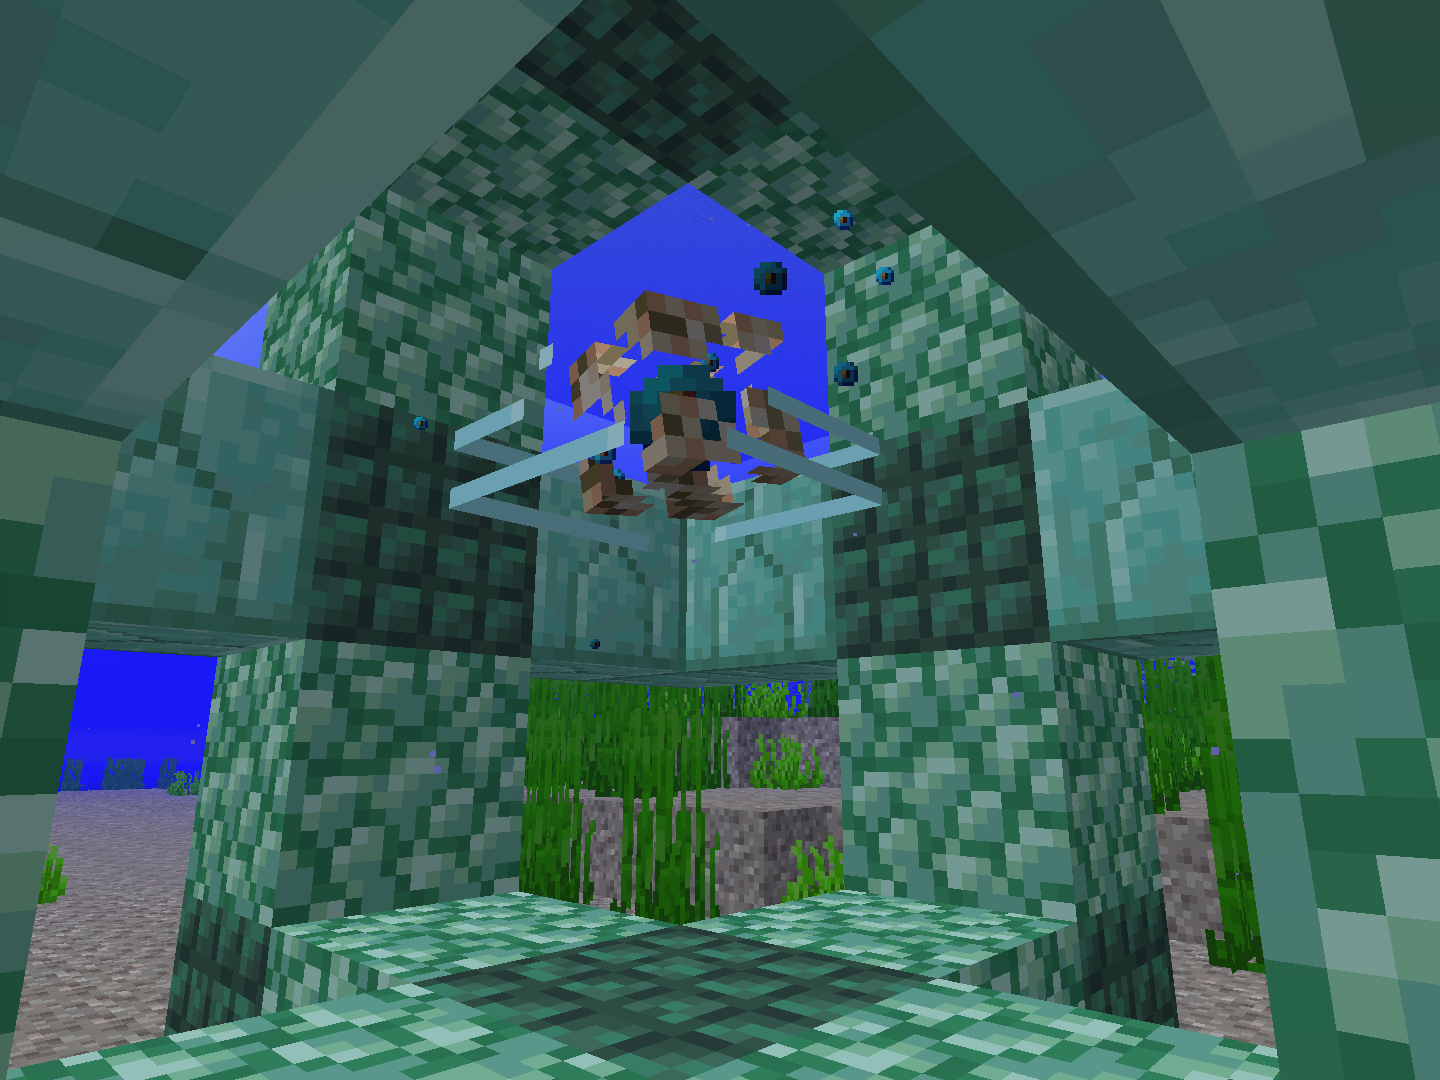
Start by building a vertical 5-by-5 square frame using prismarine, prismarine bricks, dark prismarine, or sea lanterns. Only the outer ring is needed, so leave the center empty. This first ring is the basic shape many players use to activate the conduit with the minimum number of blocks.
A minimal activation frame requires 16 valid blocks. That means a single 5-by-5 ring with the corners and edges placed correctly is enough to turn the conduit on. If you only have 16 blocks, this is the simplest working setup.
Step 4: Add More Rings for More Range
For stronger coverage, add additional rings around the conduit on the other axes. A full conduit frame uses 42 valid blocks. The more complete the frame, the farther the Conduit Power effect reaches.
The conduit activates at 16 blocks and reaches a 32-block radius. As you add more valid blocks, the radius increases. A complete 42-block frame gives the maximum effect radius of 96 blocks. For underwater bases, max range is usually worth it because nobody wants to lose breathing support halfway through installing a kelp-powered balcony.
Step 5: Keep the Center Open
Do not fill the center of the structure with frame blocks. The conduit must float in the middle, surrounded by water. The frame should be around it, not touching it. This is one of the most common mistakes players make when learning how to activate a conduit in Minecraft.
Imagine the conduit as a tiny royal sea cube. It wants personal space. Give it the center of the room.
Step 6: Place a Temporary Block in the Center
To position the conduit correctly, place a temporary block in the exact center of the frame. This block can be dirt, cobblestone, sand, or anything easy to break. The temporary block is only there to help you place the conduit in the correct spot.
Make sure the center is surrounded by water. If the conduit is not in water or the water volume around it is incomplete, it may not activate.
Step 7: Place the Conduit on the Temporary Block
Place the conduit on top of the temporary block so it sits in the exact center of the frame. The conduit should be aligned with the middle of the structure. If it is one block too high, low, left, or right, it will not activate properly.
Precision matters here. Minecraft may let you build floating castles, automatic farms, and chickens that live in questionable ethical conditions, but it will not forgive a badly centered conduit.
Step 8: Break the Temporary Block
Once the conduit is placed, break the temporary block underneath it. The conduit should remain floating in the water. If the frame is correct and enough valid blocks are present, the conduit will activate.
You will know it is working when the conduit opens, displays animated energy, emits particles, and grants Conduit Power when you are in range underwater or in rain.
Step 9: Test the Conduit Power Effect
Swim near the conduit and check your status effects. If everything is correct, you should receive Conduit Power. Your oxygen should stop dropping while underwater, your vision should improve, and underwater mining should become faster.
If you do not see the effect, check three things first: the conduit must be in water, the frame must contain at least 16 valid blocks, and the conduit must be centered inside the frame. Most conduit problems come from one of these three issues.
Step 10: Upgrade to a Full 42-Block Frame
A basic conduit is useful, but a full-power conduit is glorious. Upgrade the frame to 42 valid blocks if you want the maximum 96-block radius and hostile mob damage. A fully powered conduit can damage underwater hostile mobs within a short range, including drowned and guardians, making it excellent for ocean monument projects and underwater base defense.
Once upgraded, your underwater world becomes much easier to manage. You can build, mine, decorate, and explore without constantly swimming upward for air like a panicked squid in diamond boots.
Conduit Frame Sizes and Range
The number of valid frame blocks determines the conduit’s range. The minimum is 16 blocks, and the maximum is 42 blocks. Here is a simple breakdown:
| Frame Blocks | Effect Radius | Best Use |
|---|---|---|
| 16 blocks | 32 blocks | Small underwater builds or quick activation |
| 21 blocks | 48 blocks | Medium work areas |
| 28 blocks | 64 blocks | Large underwater rooms |
| 35 blocks | 80 blocks | Ocean monument support |
| 42 blocks | 96 blocks | Maximum range and best long-term setup |
Best Blocks to Use for a Conduit Frame
All valid conduit frame blocks work the same mechanically, so your choice can be practical or decorative. Prismarine is usually the easiest to collect from ocean monuments. Prismarine bricks look cleaner for structured builds. Dark prismarine gives a richer, high-contrast look. Sea lanterns add bright lighting and make the frame easier to see underwater.
For survival players, a mix is perfectly fine. Do not waste time worrying about whether the frame looks like a luxury resort on day one. First, make it work. Then make it pretty. That is also decent life advice, honestly.
Common Mistakes That Stop a Conduit From Activating
Using the Wrong Blocks
Only prismarine, prismarine bricks, dark prismarine, and sea lanterns count as valid frame blocks. Slabs, stairs, walls, glass, stone, copper, or random decorative blocks will not power the conduit.
Placing the Conduit Off-Center
The conduit must be in the middle of the frame. If it is not centered, the game will not recognize the structure correctly.
Not Using Enough Frame Blocks
You need at least 16 valid blocks. Anything less will not activate the conduit, even if the shape looks close.
Missing Water Around the Conduit
The conduit must be surrounded by water. If the center area is blocked by air pockets or solid blocks, activation can fail.
Expecting Maximum Power From a Minimum Frame
A 16-block frame activates the conduit, but it does not provide maximum range. Upgrade to 42 blocks if you want the full 96-block radius and stronger utility.
Why Activate a Conduit?
A conduit is one of the best tools for serious underwater gameplay. It is ideal for building ocean bases, draining monuments, collecting prismarine, exploring ruins, farming guardians, and creating dramatic underwater entrances that make your friends say, “Wait, you built all this in survival?”
Conduit Power also reduces the need for constant potions. Water breathing potions are useful, but they expire. A conduit stays active as long as the frame remains intact. For long projects, that stability is a huge advantage.
Survival Tips for Building a Conduit Safely
If you are building your first conduit in survival mode, prepare before diving in. Bring doors if you play Java Edition, water breathing potions, a Respiration helmet, or a turtle shell if you have one. Carry extra food, blocks, and a good pickaxe. If you are near an ocean monument, watch out for guardians and elder guardians. Their mining fatigue effect can turn a quick project into a full emotional journey.
It also helps to build a small temporary platform or air pocket nearby. Even with good gear, underwater construction can get chaotic. Kelp gets in the way, drowned wander over like unwanted neighbors, and your temporary block will somehow disappear exactly when you need it. Plan for messiness, and the project becomes much easier.
Best Places to Use a Conduit
The best place for a conduit depends on your goal. For an underwater base, place it near the center of the build so the effect covers the rooms, farms, tunnels, and entrances. For an ocean monument, place it near the monument’s center or slightly outside the structure before you begin clearing guardians. For resource gathering, place it near areas where you mine clay, gravel, sand, or prismarine.
Creative builders can also hide conduits inside decorative structures. A sea lantern and prismarine frame can look like a magical power core, temple centerpiece, underwater reactor, or fantasy shrine. The mechanics are useful, but the design potential is also excellent.
Personal Experience: What I Learned From Activating a Conduit in Minecraft
The first time you activate a conduit in Minecraft, it feels more complicated than it really is. The materials sound rare, the frame looks strange, and underwater building has a special talent for making calm players mutter things at their monitor. But once the conduit opens and the Conduit Power effect appears, the whole process suddenly makes sense.
In practice, the biggest lesson is to collect more materials than you think you need. If the plan is to build a minimum 16-block frame, bring extra prismarine anyway. It is very easy to misplace a block, lose track of the ring shape, or decide halfway through that you actually want the full 42-block frame. Having spare blocks saves you from swimming back to an ocean monument while a drowned follows you like it wants to talk about your extended boat warranty.
Another useful experience is to build the frame in a controlled area first. If you are new to conduits, test the design in a shallow ocean or creative world before doing it beside an ocean monument. A conduit frame is simple once you understand it, but it is less simple when guardians are firing lasers at you and your oxygen bar is giving you a countdown to poor decision-making.
For survival players, the full-power conduit is usually worth the extra effort. A basic conduit works, but the smaller range can feel limiting during large builds. When working on an underwater dome, tunnel system, or ocean monument conversion, the 96-block radius gives you much more freedom. You can swim farther, mine longer, and focus on building instead of constantly checking whether the effect is still active.
One of the best strategies is to place the conduit before starting the “pretty” part of your underwater base. Do not wait until the glass dome, coral garden, storage room, and dramatic kelp hallway are finished. Activate the conduit early, then build around it. This makes the entire project smoother because you are not fighting the ocean every five seconds.
Sea lanterns are also fantastic for conduit frames. They count as valid frame blocks and provide strong lighting, which helps visibility while building. If your base has a futuristic or magical theme, a frame made partly from sea lanterns can look amazing. Prismarine bricks and dark prismarine add contrast, while ordinary prismarine gives that classic ocean monument feel.
Finally, remember that a conduit is not just a tool; it changes how underwater Minecraft feels. Without one, the ocean can be stressful. With one, it becomes a buildable, explorable, resource-rich part of the world. Suddenly, underwater caves are less terrifying, monuments are less annoying, and ocean bases become genuinely practical. Activating a conduit is one of those upgrades that makes you wonder why you waited so long.
Conclusion
Learning how to activate a conduit in Minecraft is essential if you want to master underwater exploration and building. The recipe requires one Heart of the Sea and eight Nautilus Shells, while activation requires a water-filled frame made from prismarine, prismarine bricks, dark prismarine, or sea lanterns. A minimum 16-block frame will activate the conduit, but a full 42-block frame gives the best range and utility.
Once active, the conduit grants Conduit Power, helping you breathe underwater, see better, mine faster, and defend against nearby hostile underwater mobs when fully powered. Whether you are creating a survival ocean base, raiding an ocean monument, or simply tired of drowning every time you chase a fish, a conduit is one of the smartest investments you can make.