Drilling through a glass bottle sounds like the sort of project that ends with either a beautiful lamp or a dramatic trip to the broom closet. Fortunately, glass is not impossible to drill. It is simply unforgiving. With the correct bit, steady cooling, light pressure, and enough patience to resist “helping” the drill, you can create a clean hole without turning your favorite bottle into sparkly recycling.
A drilled bottle can become a table lamp, pendant light, planter, incense holder, wind chime, soap dispenser, or illuminated centerpiece. The basic technique is straightforward, but every step matters because glass does not bend or compress like wood. When stressed beyond its limit, it skips the negotiation and cracks.
Important note: This guide applies to ordinary annealed glass bottles. Do not attempt to drill tempered, safety, pressurized, cracked, or heat-damaged glass. Wear suitable eye protection and follow the instructions supplied with your drill and glass-cutting bit. The methods below synthesize guidance from major tool manufacturers, home-improvement publishers, glass specialists, and U.S. workplace-safety authorities.
Can You Really Drill a Hole Through a Glass Bottle?
Yes, provided the bottle is made from standard annealed glass and is in good condition. Most ordinary wine, beer, liquor, soda, and decorative bottles fall into this category. Annealed glass can be gradually ground away with a carbide or diamond abrasive bit.
The word drilling is slightly misleading. A normal twist bit cuts chips from wood or metal. A glass bit works more like a tiny grinder. Its hard cutting surface slowly wears away a circular path until it passes through the bottle wall. This is why speed, pressure, and cooling are so important.
Tempered glass is different. Its internal stress pattern makes it stronger during normal use, but penetrating its surface can cause the entire piece to break suddenly. Home-improvement guides consistently warn against drilling tempered or safety glass. If a bottle is specially marked as tempered, has an unknown industrial origin, or was designed for pressure or extreme heat, choose another bottle.
Tools and Materials You Will Need
You do not need an industrial glass shop, but you do need equipment designed for brittle materials. Attempting the job with a masonry bit, wood bit, or ordinary twist bit is an excellent way to create frustration in several sharp pieces.
- A clean, undamaged annealed glass bottle
- A variable-speed cordless drill or suitable rotary tool
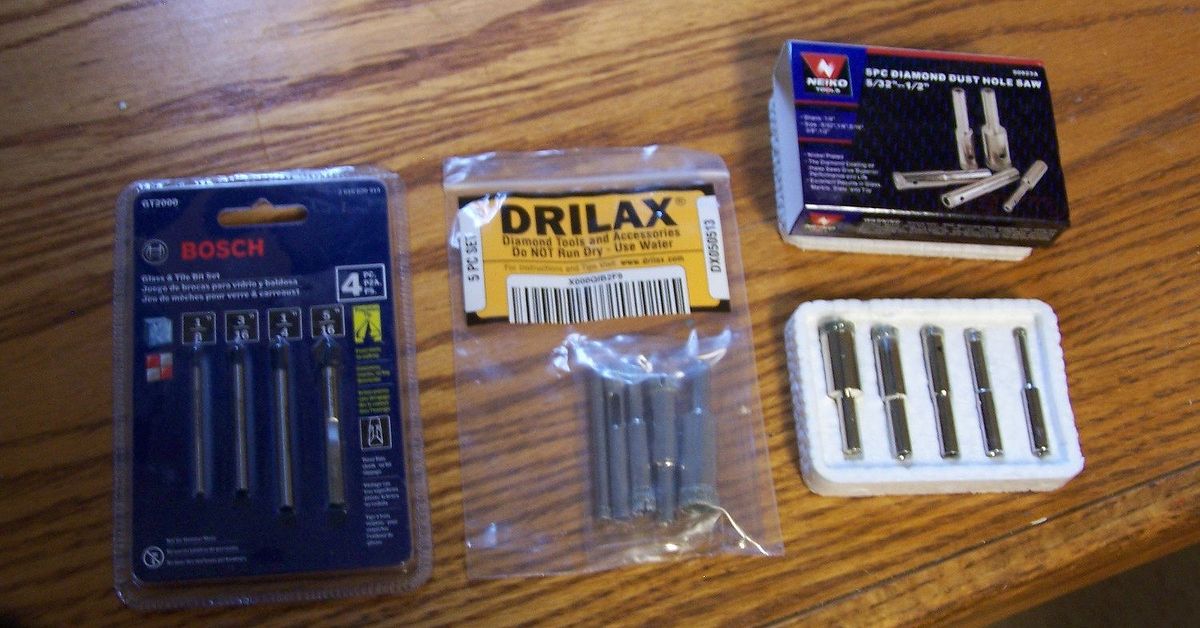
- A diamond-coated hole saw or carbide glass-and-tile bit
- Safety glasses with side protection
- Cut-resistant or sturdy work gloves
- A particulate mask or appropriate respirator
- Painter’s tape or masking tape
- A marker
- Plumber’s putty, modeling clay, or a drilling guide
- A spray bottle, sponge, pipette, or small container of clean water
- A padded bottle cradle, folded towel, rubber mat, or wooden V-block
- Silicon carbide wet/dry sandpaper or a diamond file
- A rubber grommet sized for the finished hole
Eye protection is essential because drilling can release tiny particles or, in a failed attempt, larger fragments. OSHA requires appropriate eye protection where flying particles are a hazard, with side protection when objects may approach from an angle. Water helps contain dust, but it does not replace protective equipment.
Choosing the Best Drill Bit for Glass Bottles
Carbide Spear-Point Bits
Carbide glass-and-tile bits usually have a pointed, arrowhead-shaped tip. They are useful for relatively small holes and can start accurately when used with tape. They are inexpensive and widely available, but they demand a light touch. Pushing too hard can concentrate stress at the pointed tip.
Diamond-Coated Hole Saws
For larger openings, a hollow diamond hole saw is usually the most practical choice. Diamond abrasive around the rim grinds a circular groove while the hollow center produces a round glass plug. Diamond bits are commonly recommended for thicker glass, curved bottles, lighting projects, and holes large enough for cords, tubing, or hardware.
Diamond Rotary-Tool Bits
Small diamond rotary-tool accessories work well for jewelry-sized openings, decorative ventilation holes, and minor adjustments. Certain Dremel glass-drilling bits are specifically designed for flat or contoured glass and use a tilted start before the tool is gradually brought upright. Always follow the speed and cooling recommendations for the exact accessory.
Choose the bit according to the hardware that will enter the finished opening. Measure the outside diameter of the cord grommet, pipe, fitting, or threaded insert rather than guessing. A hole that is slightly too small may be carefully enlarged with a diamond file. A hole that is too large will remain too large, no matter how sternly you stare at it.
Where to Place the Hole
Select the flattest, most uniform section of the bottle wall. On many wine bottles, that means the lower sidewall above the thick base. Avoid the shoulder, neck, deeply embossed decorations, molded seams, visible bubbles, scratches, chips, and abrupt curves. Uneven areas make it harder for the bit to contact the surface evenly.
Do not place the opening extremely close to the bottom edge. The heavy base may be substantially thicker than the sidewall, while the transition between the two can contain uneven stress. Leave enough surrounding glass for the bottle to remain structurally stable after drilling.
For a bottle lamp, test the planned cord route before making the hole. Confirm that the opening will not be hidden under a base, blocked by an internal object, or placed where the cord forces the bottle to sit unevenly.
How to Drill Through a Glass Bottle Step by Step
1. Clean and Inspect the Bottle
Remove the label, adhesive, dirt, and residue around the drilling area. Hold the bottle under bright light and inspect it carefully. Reject bottles with cracks, star-shaped impact marks, chipped rims, or suspicious scratches near the proposed hole.
Practice on an ordinary disposable bottle before drilling a rare, expensive, or sentimental one. Glass specialists and DIY guides regularly recommend practice because controlling the starting angle and pressure becomes much easier after one or two attempts.
2. Mark the Center
Place two short strips of painter’s tape over the drilling location to form an X. Mark the center with a permanent marker. The tape improves visibility and can reduce initial wandering when using a pointed bit.
A hollow diamond hole saw has no center pilot, so it may skate across the curved surface. A commercial suction guide is helpful, but a simple ring of plumber’s putty also works. Form the putty into a small circular dam around the mark. The ring helps hold water and gives the bit a boundary while you establish the groove.
3. Secure the Bottle Without Crushing It
Lay the bottle horizontally in a padded cradle. A wooden V-block lined with rubber is ideal, but a firmly rolled towel can work for a one-time project. The bottle should not roll when the drill touches it.
Never squeeze the bottle tightly in bare metal vise jaws. If clamps are necessary, use wide padded jaws and only enough pressure to prevent movement. You are securing the bottle, not trying to extract a confession from it.
4. Add Water
Wet the drilling point before starting. Water carries away heat, flushes abrasive slurry from the groove, reduces airborne debris, and helps preserve the diamond coating. Manufacturers of diamond bits commonly specify water cooling, although some specialized bits contain wax or are designed for dry use. Follow the instructions for your particular product rather than assuming every bit works the same way.
You can maintain cooling with a spray bottle, dripping sponge, putty dam, pipette, or gentle stream of water. Do not spray water into the drill’s vents, chuck, battery connection, or electrical components. A cordless drill is generally the simplest choice around water.
5. Start the Groove at an Angle
When using a hollow diamond hole saw, place one edge of the rim against the mark at roughly a 30- to 45-degree angle. Start the drill slowly and allow that edge to create a shallow crescent-shaped groove. Once the groove can keep the bit from sliding, gradually roll the drill upright until the entire circular rim contacts the glass.
Keep two hands on the drill when possible. Do not use hammer mode. A hammer drill repeatedly impacts the work surface, and glass has never been famous for enjoying repeated impacts.
6. Grind Slowly With Light Pressure
Hold the bit square to the bottle wall and allow the abrasive surface to do the work. Apply only modest pressure. The sound should be a controlled grinding noise rather than squealing, chattering, or banging.
There is no universal perfect speed because bit designs vary. A conventional hand drill is usually operated at a controlled low or moderate speed, while small rotary-tool accessories may have a manufacturer-specified range measured in thousands of revolutions per minute. The instructions supplied with the bit should take priority over a generic number from the internet.
Pause periodically to add water and flush cloudy slurry from the groove. For thicker material, lifting the tool briefly allows fresh water to reach the cutting surface and removes ground particles.
7. Reduce Pressure Near Breakthrough
The most delicate moment arrives when the remaining glass becomes paper-thin. Heavy pressure at this stage can push the circular plug inward and chip the inside edge. As soon as the cutting sound changes or water begins entering the bottle, reduce pressure and let the bit finish gradually.
Keep the drill aligned. Sudden sideways movement may cause the hole saw to catch the edge and spread a crack. Once the plug separates, release the trigger and withdraw the bit without twisting it against the opening.
8. Smooth and Protect the Opening
Rinse away all slurry and collect the glass plug carefully. Wet-sand the rim with fine silicon carbide paper or use a diamond file under running water. The goal is to remove sharp points, not aggressively reshape the hole.
Allow the bottle to dry and inspect the opening under bright light. If you see a crack radiating from the hole, retire the bottle. Do not attempt to hide the damage under hardware.
Install a rubber grommet whenever a cord, tube, wire, or hose will pass through the glass. The grommet protects the inserted material from the edge and reduces direct contact between the hardware and the bottle.
Common Reasons Glass Bottles Crack
Using the Wrong Bit
An ordinary twist bit tends to slide, concentrate pressure, and overheat. Use a bit explicitly rated for glass or glass tile.
Applying Too Much Pressure
Glass drilling is an abrasive process. Force does not make the bit dramatically faster; it mostly increases stress and the likelihood of a sudden fracture.
Allowing the Work Area to Overheat
Friction creates localized heat. Because the surrounding glass remains cooler, the uneven temperature can contribute to thermal stress. Continuous or frequent water cooling is one of the most consistent recommendations across tool manufacturers and practical guides.
Letting the Bottle Move
If the bottle rolls, the spinning bit may bind against the edge of the developing groove. A padded cradle is safer than trying to steady a round bottle with one hand.
Starting at Full Speed
A pilotless hole saw can skate across the surface before it establishes a groove. Start carefully at an angle or use a proper drill guide.
Pushing Through at the End
Breakthrough requires less pressure, not more. Many chips occur during the final seconds because the operator feels the hole is almost complete and decides to provide an enthusiastic finishing shove.
Trying to Enlarge the Hole Aggressively
Do not lever a spinning hole saw sideways to make the opening larger. Use the correct size from the beginning or make tiny adjustments with a suitable diamond file.
Safety Rules Worth Following
- Wear safety glasses or goggles with side protection throughout the project.
- Keep other people, children, and pets away from the work area.
- Use gloves while handling the bottle, plug, and finished opening, but keep loose material away from rotating tools.
- Use water to control heat and capture fine debris.
- Wear suitable respiratory protection when fine particles could become airborne.
- Never hold the bottle in your lap or against your body.
- Do not use hammer mode or an impact driver.
- Stop immediately if a crack appears.
- Clean the work area with damp disposable towels rather than blowing dust into the air.
- Do not use a drilled bottle for carbonated pressure, heat processing, boiling liquids, or structural applications.
Drilling permanently changes the bottle and can create microscopic damage around the opening. Treat the finished piece as a decorative craft component, not as a pressure vessel or durable drinking container. NIOSH also notes that drilling, grinding, and polishing silica-containing materials can generate airborne dust, which is another reason wet methods and careful cleanup are sensible.
Useful Glass Bottle Projects
Bottle Lamps
Drill a side hole near the lower portion of the bottle, protect it with a grommet, and route a properly rated lamp cord through it. Electrical components should be installed according to their manufacturer’s directions and applicable electrical requirements.
Fairy-Light Displays
A small opening can accommodate a thin string-light cable. Battery-powered lights simplify the design because no line-voltage wiring passes through the bottle.
Self-Watering Planters
A drilled bottle can support tubing or a controlled water outlet. Smooth the opening thoroughly so it does not damage the tube.
Wind Chimes and Hanging Art
Small diamond bits can create attachment points for wire or cord. Do not suspend heavy bottles from a hole unless the design includes an independent support system.
Decorative Dispensers
Some crafters drill bottles for pumps, hoses, or fittings. Choose hardware with flexible washers or gaskets so tightening does not place concentrated pressure directly on the glass.
Practical Experience Notes: What the Process Teaches You
The first lesson from repeated bottle-drilling projects is that preparation usually takes longer than the actual cutting. Cleaning the bottle, checking the glass, measuring the fitting, building a stable cradle, and arranging the water supply may feel overly cautious. Then the bit touches the glass and you realize those five minutes of preparation are the reason the bottle is not rolling toward the floor.
Beginners commonly expect the drill to bite into glass as it does into wood. Instead, the bit appears to polish one spot while producing a milky slurry. That slow progress is normal. The slurry is evidence that the abrasive is removing glass. Increasing pressure may briefly make the work feel faster, but it also makes the drill harder to control. The best results usually come when the operator becomes comfortable with boringly steady progress.
The angled start is another technique that sounds awkward until you try it. Setting the full rim of a diamond hole saw against a curved bottle gives the bit several directions in which to escape. Beginning with one edge creates a small track. As that track expands into a full circle, the tool becomes much easier to center. A guide still improves consistency, particularly when several bottles need identical holes.
Water management becomes a small project of its own. A spray bottle works, but it requires frequent pauses or a helper. A putty dam stores water directly around the cut, although it may need refilling as the slurry thickens. A soaked sponge positioned above the hole can provide a slow drip. Whichever method is used, the important detail is not flooding the entire workshop; it is keeping the bit and glass comfortably cool while containing fine debris.
Different bottles also behave differently. A basic wine bottle may drill smoothly, while a decorative liquor bottle with embossed lettering can challenge the same bit. Wall thickness may vary around the circumference, and molded seams can make the tool wobble. This is why a successful test on one bottle does not guarantee that every bottle in the recycling bin will cooperate.
The moment of breakthrough deserves special attention. During most of the cut, the drill rests against a reasonably thick wall. Near the end, only a fragile membrane remains. The operator may feel the tool begin to move more easily and instinctively lean forward. That instinct causes many chipped exits. Relaxing pressure and allowing the abrasive rim to complete the circle produces a cleaner opening.
Finishing is equally important. A hole can look smooth while still containing a sharp internal lip. Running a bare finger around an unfinished glass opening is not a sensible inspection method. A cotton swab can reveal snags safely, while wet sanding or a diamond file removes minor projections. Any cord should receive a correctly sized grommet even when the edge appears polished.
Finally, practical bottle drilling teaches respect for failure. Occasionally, a bottle cracks despite careful work because of an invisible flaw, inconsistent wall thickness, or prior impact. The correct response is not to glue the crack and continue. Discard the damaged piece safely, review the setup, and start again. Keeping spare bottles nearby makes that decision much easier and prevents sentimental attachment from turning into questionable engineering.
The overall experience becomes surprisingly calm once the operator stops trying to overpower the material. Secure the bottle, keep the cut wet, establish the groove gently, and let the bit grind at its intended pace. Glass may be fragile, but it is also predictable when treated with patience.
Conclusion
Drilling through a glass bottle is less about brute force and more about control. A glass-rated carbide bit can handle small openings, while a diamond hole saw is often the better choice for cords, fittings, and larger craft projects. Support the bottle securely, begin slowly, maintain water cooling, apply minimal pressure, and become especially gentle as the bit approaches the inside surface.
Most failures can be traced to rushing, overheating, movement, or using the wrong tool. Practice on an ordinary bottle, wear proper protection, and accept that every bottle has its own personality. Some are cooperative. Others apparently wake up determined to become mosaics.