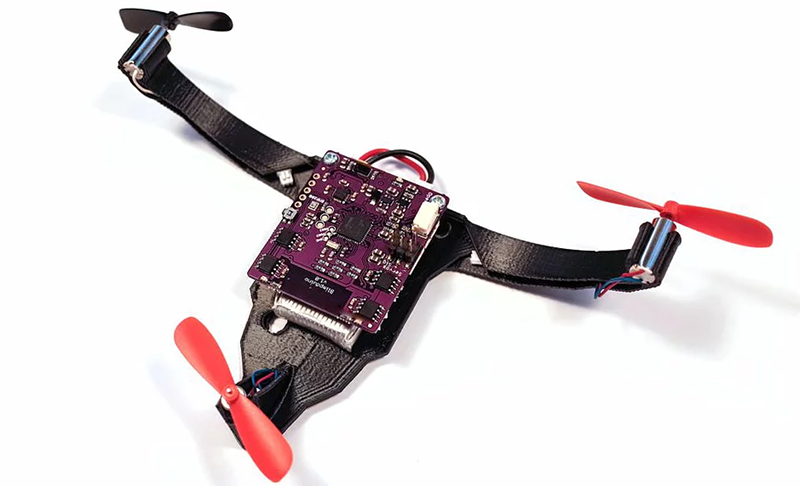
In a world where drones buzz like caffeinated hornets and quadcopters treat gravity as a personal insult, the Blimpduino 2 arrives with a calmer personality. It floats. It drifts. It turns a helium balloon into a programmable indoor aircraft. And somehow, that makes it feel more futuristic than half the noisy gadgets fighting for attention on a workbench.
Blimpduino Hits Version 2 is not just a fun headline for makers. It marks the return of a clever open-source autonomous blimp idea, updated with lighter electronics, better sensors, Wi-Fi control, Arduino-compatible code, and a design that invites experimentation. The original Blimpduino was already charming: an Arduino-based controller board, simple propulsion, and enough autonomy to make indoor flying feel approachable. Version 2 moves the idea closer to a serious educational robotics platform while keeping the playful spirit intact.
Think of it as a drone that went to finishing school. Instead of screaming across the room, it glides. Instead of chewing propellers into furniture, it politely bumps the air. Instead of demanding a racetrack, it asks for a hallway, a gym, a classroom, or a living room with furniture moved away from the “oops zone.”
What Is Blimpduino 2?
Blimpduino 2 is a low-cost, open-source autonomous blimp platform built around an Arduino-compatible controller. The project combines a helium-filled Mylar balloon, lightweight 3D-printed parts, brushless motors, sensors, Wi-Fi communication, and software that can be modified by makers, students, engineers, and curious people who enjoy turning floating party supplies into robots.
The platform uses a simple but effective flight layout: two vectoring differential thrusters for forward motion and steering, plus a lifting propeller for altitude control. That setup gives the blimp enough control authority to fly indoors, navigate basic spaces, and hold altitude more gracefully than a loose balloon escaping from a birthday party.
A Friendly Bridge Between Toys and Robotics
Blimpduino 2 sits in a sweet spot between a toy blimp and a research robot. It is accessible enough to assemble and fly without a graduate degree in aerospace engineering, yet it exposes real robotics concepts: sensor feedback, proportional control, wireless commands, motor mixing, altitude hold, and payload trade-offs.
That balance is why the project remains interesting. It does not hide everything behind a sealed plastic shell. The firmware, controller behavior, and physical design are meant to be inspected, modified, and improved. For STEM education, that is gold. For hobbyists, it is a weekend rabbit hole with propellers.
Why Version 2 Matters
The original Blimpduino came from an earlier era of hobby robotics, when cheap Wi-Fi modules, tiny sensors, lightweight motors, and home 3D printing were not as common as they are today. Blimpduino 2 benefits from the hardware revolution that made modern maker projects cheaper, smaller, and easier to customize.
Version 2 replaces the “clever but limited” feel of the early project with a more integrated control board. The heart of the system is a compact board with an ARM Cortex-M0-class processor, an ESP8266 Wi-Fi module, motor outputs, servo outputs, inertial sensing, altitude measurement, object detection support, and battery charging. In plain English: instead of taping together a pile of modules and praying to the soldering gods, you get a cleaner control platform designed specifically for a blimp.
The Big Upgrade: Integration
Integration matters because blimps are brutally honest about weight. Every screw, wire, bracket, connector, and “maybe I’ll add one more sensor” idea must be paid for with helium lift. A quadcopter can sometimes overpower bad design with larger motors. A blimp cannot. It has the energy of a polite cloud.
By concentrating electronics onto a lightweight board and pairing it with low-mass parts, Blimpduino 2 makes the build more practical. The design encourages low-infill 3D-printed components and careful battery selection. It also reminds builders that payload is not a suggestion. Payload is the boss.
Inside the Blimpduino 2 Hardware
Blimpduino 2’s controller board is where the project becomes more than a balloon with fans. The board is designed around a modern microcontroller architecture and includes the key systems needed for indoor flight.
ARM M0 Processing
The use of an ARM M0-class processor gives Blimpduino 2 more headroom than older 8-bit hobby boards. That extra processing capability is useful for reading sensors, filtering data, handling control loops, and communicating with an app or external controller. It also keeps the project familiar to Arduino users, because the board is Arduino-compatible and the firmware can be approached through a maker-friendly programming style.
ESP8266 Wi-Fi Control
The ESP8266 Wi-Fi module is another important piece. It allows the blimp to be controlled wirelessly, typically through a smartphone app or compatible controller setup. The ESP8266 is popular in maker projects because it can operate in station mode, access point mode, or both, which gives developers flexibility when building local control networks.
For Blimpduino 2, Wi-Fi control makes sense. Indoor flying does not require long-range radio hardware, and a phone-based interface makes the experience approachable. It also opens the door to custom control apps, experiments with UDP communication, and more advanced user interfaces.
Sensors for Smarter Floating
A blimp may look relaxed, but keeping it controlled is not trivial. Blimpduino 2 includes sensing hardware such as inertial measurement, altitude sensing, and forward object detection support. Its motion sensors help the controller understand orientation and movement, while laser-based time-of-flight sensing can help with altitude measurement and indoor positioning behavior.
Time-of-flight distance sensors are especially useful in compact robotics because they estimate distance by measuring how long light takes to return from a target. In practical indoor use, that means the blimp can collect useful distance information without relying only on guesswork. This is one reason Blimpduino 2 feels more like a robotics platform than a remote-control novelty.
How Blimpduino 2 Flies
The standard Blimpduino 2 setup uses three propellers: two for thrust and steering, and one for vertical control. The helium balloon provides most of the lift, so the motors do not need to fight gravity the same way quadcopter motors do. Instead, the goal is neutral buoyancy: the blimp should float without rapidly climbing or sinking.
Once the lift is balanced, the motors can focus on movement. The two side thrusters push the blimp forward and help turn it. The vertical propeller nudges altitude up or down. Software blends these inputs with sensor readings so the blimp behaves more intelligently than a raw motor mixer.
Slow Is a Feature, Not a Bug
Blimpduino 2 is not built for speed. That is part of the charm. A slower aircraft gives students and builders time to observe cause and effect. Push forward, and the blimp gradually responds. Turn too hard, and it rotates like a lazy weather vane. Add too much payload, and the lesson becomes very clear: physics is not accepting excuses today.
This slower pace makes the platform excellent for learning. Mistakes are visible, recoverable, and usually funny rather than expensive. A quadcopter crash can sound like a kitchen appliance losing a fight. A blimp mistake often looks like a balloon reconsidering its career.
Open Source Value: Why Makers Care
One of Blimpduino 2’s strongest advantages is its open-source nature. The project’s Arduino and Android app files are available publicly, allowing builders to study the code, modify behavior, and build new features. That matters because the best educational robotics platforms do not merely work; they explain themselves.
With Blimpduino 2, a beginner can start by flying the basic kit. A more advanced user can inspect how the app talks to the blimp, how the flight controller processes commands, and how sensor data influences motor output. A teacher can turn it into a lesson on feedback control. A robotics club can turn it into a competition platform. A determined tinkerer can try to add autonomous navigation, computer vision, or a tiny FPV camera, as long as the weight budget agrees.
Great for Teaching Control Loops
Control theory can feel abstract when it lives only on a whiteboard. Blimpduino 2 makes it visible. Altitude hold, for example, becomes a physical demonstration of feedback: measure height, compare it to a desired value, adjust motor output, repeat. When the tuning is poor, the blimp oscillates or drifts. When it improves, the motion becomes smoother.
That is a powerful learning experience. Students can see why proportional control matters, why sensor noise is annoying, why overcorrection causes wobble, and why good mechanical balance makes software look smarter than it really is.
Build Considerations: Weight, Lift, and Balance
The most important rule of Blimpduino 2 is simple: keep it light. The balloon provides lift, but not unlimited lift. Every part must justify its existence. Heavy wires, thick brackets, oversized batteries, extra glue, and ambitious camera modules can quickly turn a graceful blimp into a sad desk ornament.
Builders should approach the project like a tiny aerospace program. Use lightweight printed parts. Keep wiring short. Place the battery carefully. Balance the gondola below the balloon so the blimp stays stable. Choose a balloon large enough for the total weight, especially if flying at higher elevations where lift may be reduced.
Battery Choice Matters
A small LiPo battery keeps weight down while powering the motors and electronics. A larger battery may increase flight time, but it also adds weight. The trade-off is not always obvious. A heavier battery might provide more energy but require more lift and more motor effort. The best battery is not simply the biggest one; it is the one that works with the balloon, flight goal, and payload.
Indoor Use Is the Sensible Choice
Blimpduino 2 is best suited to indoor environments. Wind is the natural enemy of small blimps. Even a mild breeze can push a lightweight airship around like a shopping bag with ambition. Indoors, the blimp becomes manageable, repeatable, and safer for experiments.
Classrooms, gyms, maker spaces, and large rooms are ideal. Low ceilings may still work for basic testing, but larger open areas let pilots practice turns, altitude changes, and obstacle avoidance without constantly negotiating with lamps.
Specific Project Ideas for Blimpduino 2
Blimpduino 2 is more than a build-and-fly kit. It can become a platform for experiments. Here are several practical ideas that fit the spirit of the project.
1. Indoor Obstacle Course
Create hoops, gates, or lightweight markers and fly the blimp through a course. This teaches steering, momentum, drift, and control delay. It is also fun enough that people forget they are learning robotics.
2. Altitude Hold Tuning
Modify the altitude control behavior and test different tuning values. Track how quickly the blimp reaches a target height, how much it overshoots, and how stable it remains. This is a clean introduction to feedback systems.
3. Smartphone Co-Pilot Mode
Experiment with cooperative piloting. One user can control direction while another manages altitude or mission behavior. This turns the blimp into a collaborative robotics exercise and makes the room feel like a tiny airship command center.
4. Lightweight FPV Experiment
Advanced builders can explore adding a very lightweight camera system. The key word is lightweight. A camera that seems tiny on a desk may be enormous in blimp terms. Keep expectations realistic and test lift before attaching anything permanently.
5. Autonomous Waypoint Challenge
With additional sensing or external tracking, Blimpduino 2 can be used for simple waypoint navigation. The goal does not need to be perfect autonomy. Even partial success teaches valuable lessons about drift, sensor limits, latency, and path correction.
Blimpduino 2 vs. Quadcopters
Comparing Blimpduino 2 with a quadcopter is like comparing a sailboat with a speedboat. Both move, both require control, and both can make you question your life choices during troubleshooting. But they teach different lessons.
Quadcopters are fast, agile, and power-hungry. They rely on continuous thrust to stay airborne. Blimps are slow, efficient, and buoyant. They rely on lift from helium, which means their motors mainly control direction rather than preventing immediate gravitational embarrassment.
For education, that difference is valuable. Blimpduino 2 lets learners observe flight dynamics at a human-friendly pace. It is quieter, gentler, and generally less intimidating indoors. It also makes payload and balance painfully obvious, which is exactly what a good engineering project should do.
Who Should Build Blimpduino 2?
Blimpduino 2 is a strong fit for maker clubs, robotics educators, Arduino hobbyists, engineering students, and anyone who wants a flying project that is less frantic than a racing drone. It is especially useful for people interested in embedded systems, wireless control, sensor fusion, lightweight design, and indoor robotics.
It may not be the best choice for someone who wants instant outdoor flight, high-speed aerobatics, or heavy payload capacity. This is not a camera drone replacement. It is a floating laboratory. Treat it that way and it becomes wonderfully rewarding.
Common Challenges and Practical Fixes
Problem: The Blimp Will Not Rise
The most likely issue is excess weight or insufficient helium lift. Remove nonessential parts, check the balloon size, reduce wiring weight, and verify that the battery is not too heavy. If the blimp barely floats, it will struggle to climb.
Problem: It Spins or Drifts Too Much
Check motor alignment, gondola balance, and balloon symmetry. Small differences matter. A slightly crooked thruster can make the blimp rotate constantly, which is funny for thirty seconds and then becomes a debugging session.
Problem: Altitude Hold Feels Unstable
Revisit sensor placement, balance, and control tuning. The software can only do so much if the physical setup is fighting it. Stable mechanics make stable code easier.
Problem: App Control Is Inconsistent
Check Wi-Fi connection behavior, phone compatibility, and local network interference. Since the platform is open and hackable, advanced users can also experiment with custom control software or alternative interfaces.
Experience Notes: What Building and Flying Blimpduino 2 Feels Like
Working with a Blimpduino-style project teaches patience in the best possible way. The first lesson usually arrives before the motors spin: helium lift is precious. You start by thinking, “This tiny wire weighs nothing.” Then you add five tiny wires, a connector, a bracket, a battery strap, and a heroic blob of hot glue. Suddenly the blimp looks at the floor like it has accepted its destiny. That moment is not failure. It is engineering introducing itself.
The build process rewards careful hands. A clean gondola layout matters. Keeping the center of mass low helps stability. Placing the battery slightly forward or backward changes how the airship sits under the balloon. Even tape placement can matter. This is one of the joys of the project: the invisible forces become visible. Weight, drag, torque, buoyancy, and thrust are no longer textbook vocabulary. They are floating around the room, possibly heading toward a bookshelf.
The first successful flight feels different from launching a quadcopter. There is no dramatic takeoff. Instead, the blimp eases into motion, like it is thinking carefully about the invitation. Push forward and it gathers speed slowly. Stop thrust and it keeps drifting, because momentum has not checked your schedule. Turn too aggressively and it may rotate past the target with comic elegance. You quickly learn to pilot ahead of the aircraft, not at the aircraft.
That slow response is not a drawback; it is the classroom. It teaches anticipation. It teaches damping. It teaches that control systems are conversations, not commands shouted into the void. When altitude hold works, the blimp feels almost magical. When it does not, it bobs up and down like a confused elevator. Both outcomes are useful.
Another memorable experience is watching people react to it. A small indoor blimp attracts attention without intimidation. Kids want to chase it. Engineers want to tune it. Teachers see lesson plans forming in real time. Someone will inevitably suggest adding a camera, a claw, a banner, or a snack delivery system. Most of those ideas collide with payload limits, but that is part of the fun. Blimpduino 2 makes constraints friendly. It says, “Great idea. Now weigh it.”
The best flights usually happen in calm indoor spaces with enough room to drift. A gym, hallway, lab, or maker space gives the blimp breathing room. Ceiling fans should be off. Doors should be watched. Pets should be negotiated with diplomatically. The blimp is not fragile in the same way a racing drone is, but it is still a lightweight aircraft. Respect the balloon, the propellers, the battery, and the fact that helium has a habit of leaving slowly when nobody is looking.
After a few sessions, the project becomes less about simply flying and more about improving. Can the gondola be lighter? Can the control response be smoother? Can the app interface be better? Can the blimp fly through a hoop twice in a row without auditioning for a comedy reel? Each small improvement feels earned, and that is exactly why Blimpduino 2 remains such a compelling maker project.
Conclusion: A Quiet Little Airship With Big Teaching Power
Blimpduino Hits Version 2 because the project captures what makes open-source hardware exciting: it is understandable, modifiable, educational, and just odd enough to be memorable. It brings together Arduino-compatible programming, Wi-Fi control, lightweight design, sensor feedback, and indoor flight in a package that feels approachable without becoming boring.
Version 2 improves the original idea by embracing modern maker hardware. The ARM M0-class controller, ESP8266 wireless capability, laser distance sensing, inertial measurement, motor outputs, and open code create a platform that can serve beginners and advanced builders alike. Beginners get a fun indoor blimp. Experienced users get a floating testbed for control systems and robotics experiments.
It is not the fastest aircraft. It is not the strongest payload carrier. It will not replace a quadcopter. But it does something better: it makes robotics visible, gentle, and wonderfully strange. In a hobby often dominated by speed and noise, Blimpduino 2 reminds us that sometimes the smartest machine in the room is the one drifting quietly overhead.