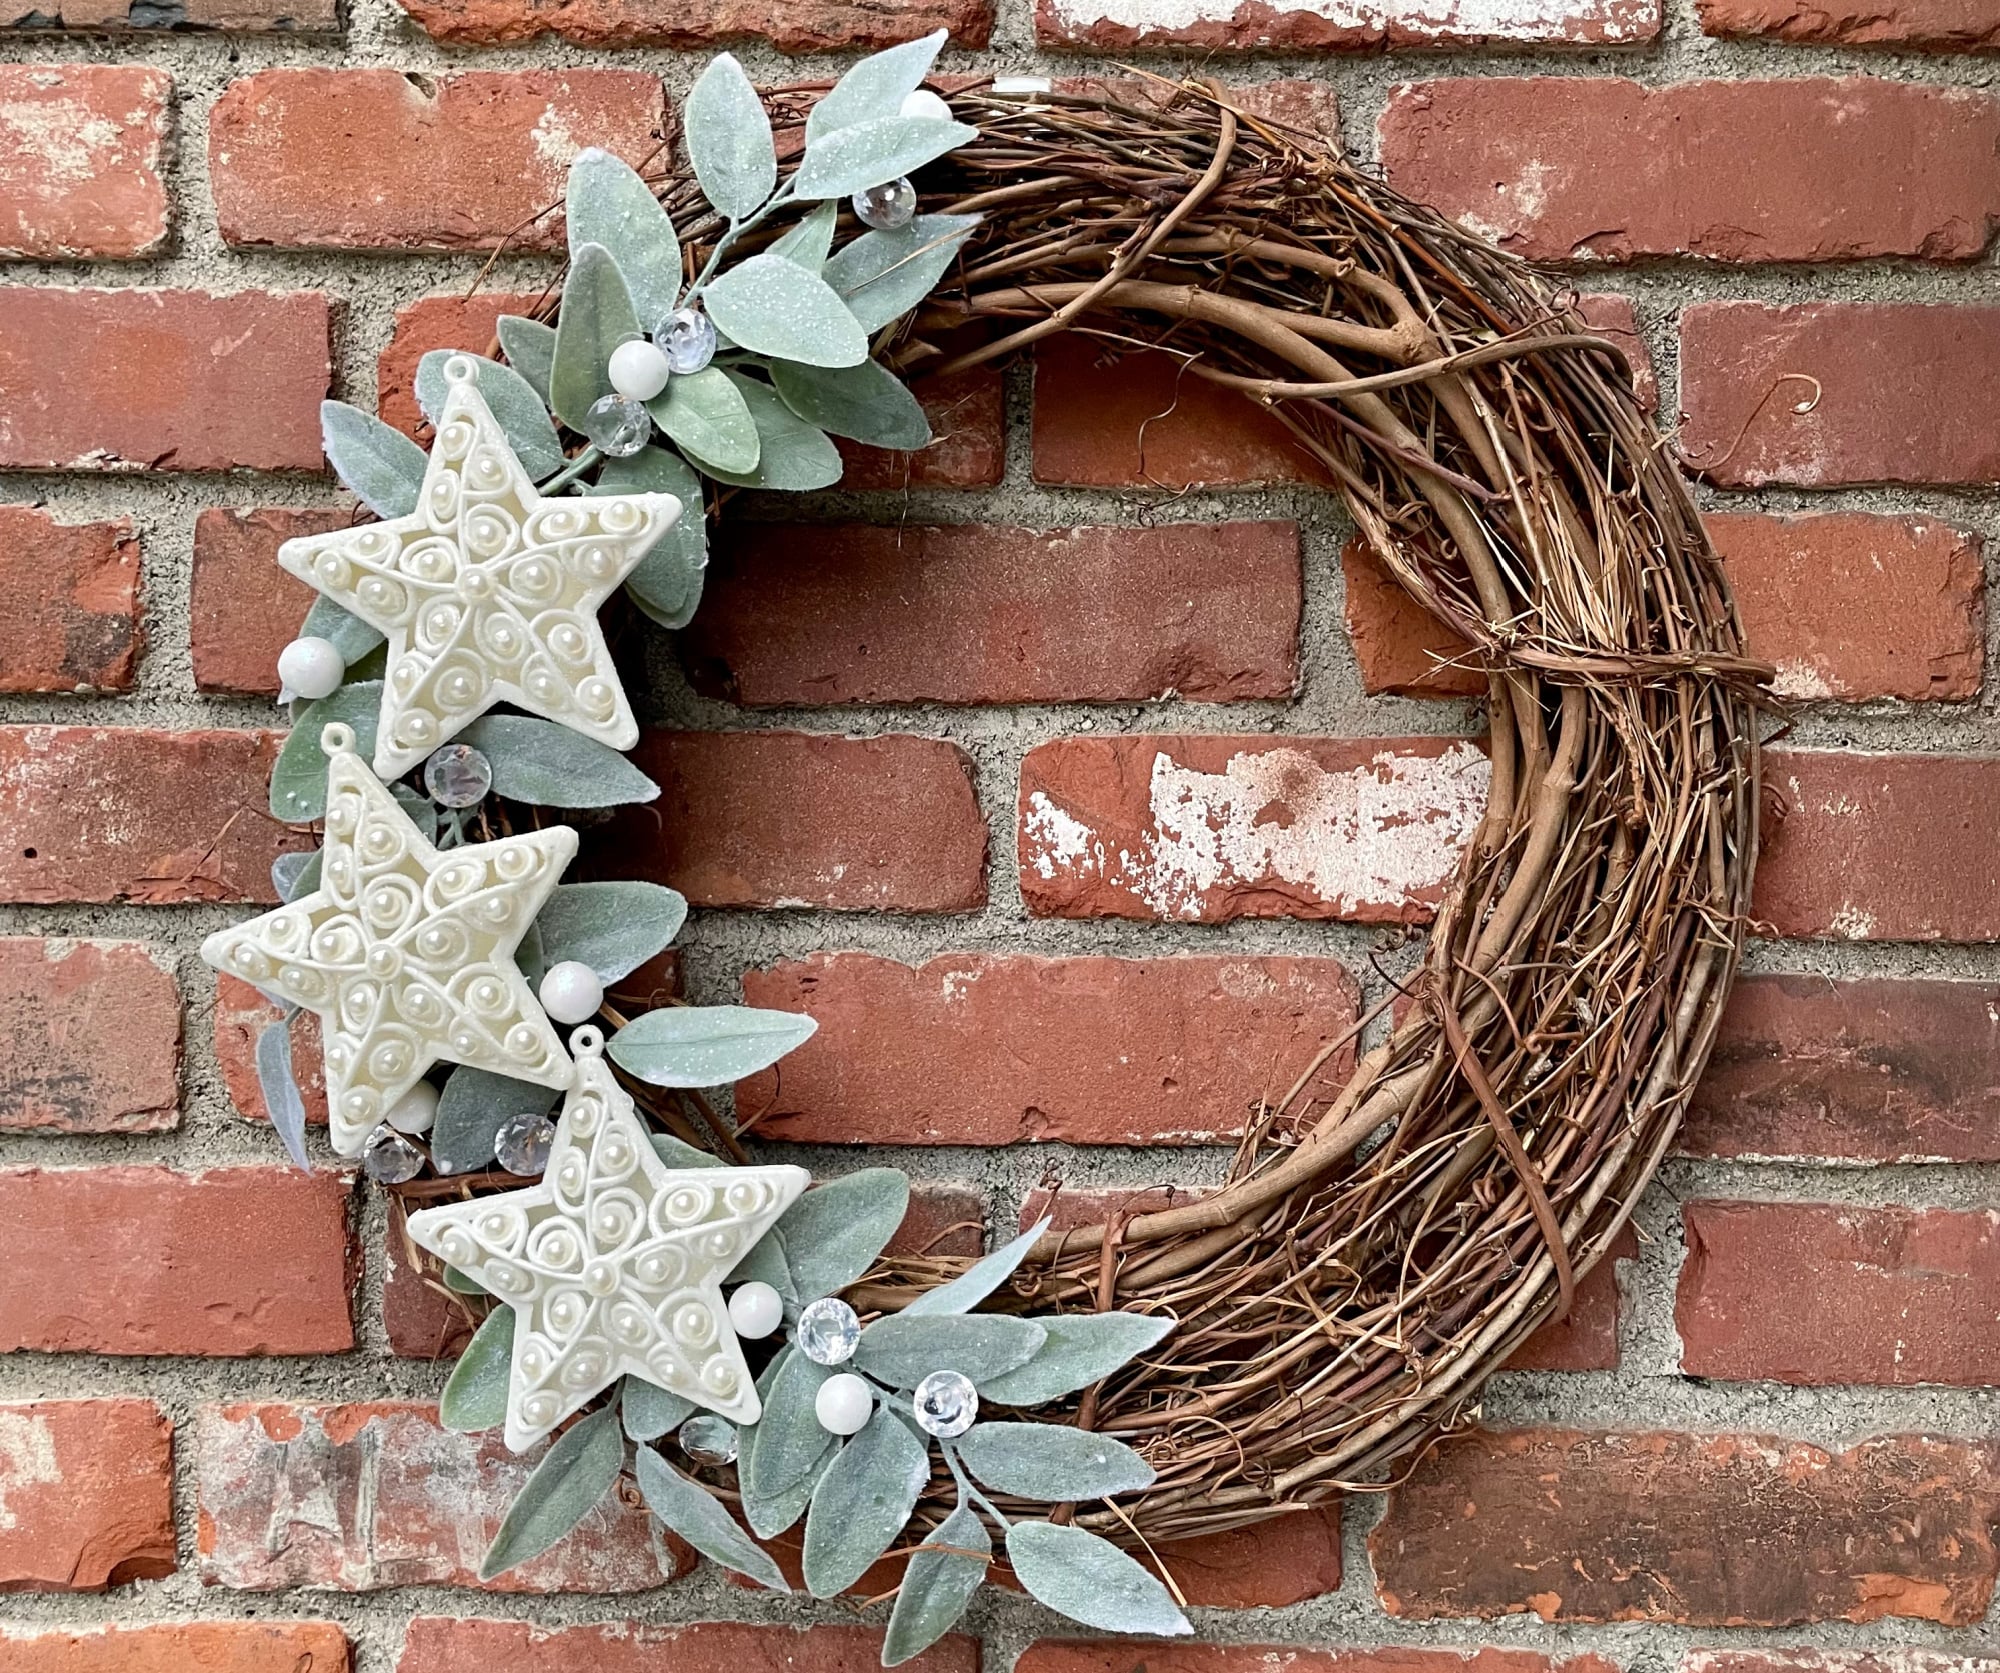
A winter wreath is one of those magical little home projects that makes your front door look like it has its life togethereven if the laundry inside is staging a rebellion. The best part? You do not need to be a professional florist, own a craft room the size of a barn, or understand why hot glue strings behave like tiny haunted spiderwebs. With a simple grapevine wreath, a few winter greenery stems, white or silver accents, and charming star ornaments, you can make a DIY winter wreath that looks elegant, rustic, and delightfully handmade.
This easy DIY winter grapevine wreath with stars is designed to work beyond Christmas. Instead of going heavy on red bows, candy canes, or Santa’s entire extended family, this wreath leans into a frosty woodland look: soft greenery, snowy berries, clear gems, silvery touches, and star shapes that feel cozy from December through February. It is budget-friendly, beginner-friendly, and forgiving enough that if one pine sprig points the wrong way, we simply call it “organic movement.” Very designer. Very chic.
Below, you will learn how to make a winter wreath step by step, how to choose the right materials, how to arrange greenery so it looks full instead of clumpy, and how to finish your wreath so it hangs beautifully on a door, wall, mantel, mirror, or interior window.
Why a Grapevine Wreath Is Perfect for Winter Decor
A grapevine wreath is one of the easiest bases for DIY wreath making because it already has texture, structure, and personality. Unlike a plain foam ring that needs to be completely covered, a grapevine wreath looks attractive even when some of the base shows through. The twisted vines create a rustic, natural background that pairs beautifully with winter greenery, pinecones, faux berries, lamb’s ear, eucalyptus, snow-dusted branches, and wooden stars.
Another advantage is flexibility. The gaps between the vines make it easy to tuck in floral stems without needing a complicated wiring technique. You can use hot glue for lightweight decorations, floral wire for heavier pieces, or both if you want the wreath to survive a windy porch and your neighbor’s enthusiastic door slamming.
For this project, an 18-inch grapevine wreath is a great size. It is large enough to make an impact on a standard front door but small enough to decorate without needing an entire craft store aisle. If you prefer a more dramatic look, use a 20- to 24-inch wreath. For interior doors, cabinets, or gallery walls, a 12- to 16-inch wreath works beautifully.
Supplies You Will Need
Before you begin, gather all your materials. Nothing interrupts creative genius quite like realizing your wire cutters are in the garage, your glue sticks are missing, and your dog is quietly investigating the faux berries.
Basic Materials
- 1 grapevine wreath form, preferably 18 inches
- 2 to 4 faux winter greenery stems, such as pine, cedar, eucalyptus, lamb’s ear, or flocked evergreen
- 3 white, silver, gold, or wooden star ornaments
- White berry stems, foam ball vase filler, pearl picks, or frosted berry clusters
- Small pinecones, clear gems, snowflake picks, or metallic accents
- Floral wire or paddle wire
- Hot glue gun and glue sticks
- Wire cutters
- Ribbon, twine, or a wreath hanger
Optional Decorative Add-Ons
- Battery-operated fairy lights
- Faux snow spray for a frosted finish
- Mini bells for a farmhouse look
- Velvet ribbon for a softer winter style
- Dried orange slices for a natural, cozy accent
- Silver ornaments or mercury-glass style picks for sparkle
If your wreath will hang outdoors, choose weather-resistant faux stems and secure everything with floral wire first, then reinforce with hot glue where needed. Hot glue can soften in heat and become brittle in freezing temperatures, so wire is your best friend for exterior wreaths. It is the dependable friend who brings snacks and remembers where you parked.
Choosing a Winter Color Palette
A successful winter grapevine wreath usually starts with a simple color palette. This keeps the wreath from looking like every leftover holiday decoration had a committee meeting on your front door.
For a classic winter look, use white, silver, soft green, and natural brown. This creates a snowy woodland style that feels fresh after Christmas. For farmhouse winter decor, combine creamy white berries, lamb’s ear, pinecones, burlap ribbon, and wooden stars. For a glam winter wreath, use silver stars, clear gems, pearl picks, icy blue ornaments, and flocked greenery. For a Scandinavian-inspired wreath, keep it minimal with eucalyptus, white stars, twine, and a few matte ornaments.
The star accents are what make this wreath special. Stars add shape, brightness, and a subtle holiday feel without making the wreath look overly Christmas-specific. White stars look clean and snowy. Wooden stars feel rustic. Silver stars add sparkle. Gold stars warm up the design and look lovely with cream berries and natural pinecones.
Step-by-Step: How to Make a DIY Winter Grapevine Wreath with Stars
Step 1: Fluff and Inspect the Grapevine Base
Place your grapevine wreath on a table and look at it from all sides. Grapevine wreaths are naturally uneven, which is part of their charm. Choose the best-looking side as the front. Trim any wildly rebellious twigs with wire cutters, but do not over-prune. A little rustic texture makes the finished wreath feel handmade rather than mass-produced.
Decide where the top of the wreath will be. If one side is fuller, you can use that as the bottom for visual balance. If the wreath has a gap or thin spot, do not panic. That is where a star, bow, or fluffy greenery cluster will go. Crafting is mostly problem-solving with prettier supplies.
Step 2: Plan the Layout Before Attaching Anything
Before you glue or wire anything down, lay your greenery and stars on top of the wreath. This dry run helps you see the overall shape. For a balanced winter wreath, arrange your largest greenery pieces first, then place the stars, then fill in with berries and smaller accents.
There are several layout styles that work well. A crescent design places greenery along one side of the wreath, usually from the lower left to the upper right. This is modern, elegant, and easy to style. A bottom-cluster design places most of the decorations along the lower third of the wreath, which looks beautiful with a ribbon hanger. A full wreath design covers most of the grapevine base with greenery and accents, creating a lush, traditional look.
For beginners, the crescent layout is the easiest. It looks intentional even when it is slightly asymmetrical. In fact, slight asymmetry often looks more expensive. That is not chaos; that is “designer tension.”
Step 3: Cut the Greenery Stems
Use wire cutters to separate your faux greenery into smaller pieces. Cut long stems into sections of about 4 to 8 inches. This gives you more control when layering. Large stems can look stiff if attached as one big piece, but smaller cuttings can be tucked into the grapevine at different angles for a fuller, more natural appearance.
Try mixing textures. Pine adds classic winter structure. Cedar gives a soft, draping look. Eucalyptus brings movement and a slightly modern feel. Lamb’s ear adds a frosted, velvety softness. Flocked greenery instantly creates a snowy effect. Combining two or three types of greenery makes the wreath look more dimensional.
Step 4: Attach the Greenery in Layers
Start by tucking the longest greenery pieces into the grapevine wreath. Angle them in the direction you want the design to flow. If you are creating a crescent shape, let the stems sweep around the curve of the wreath instead of sticking straight out like botanical antennas.
Once you like the placement, secure the stems with floral wire. Wrap the wire around the stem and through the grapevine base, twisting it tightly at the back. For extra hold, add a small dot of hot glue where the stem enters the wreath. Continue adding greenery in layers, placing some stems outward, some inward, and some slightly forward. This creates depth and prevents the wreath from looking flat.
A helpful rule is to use the “largest to smallest” method. Attach the biggest greenery first, then medium stems, then small filler pieces. Save delicate berries and decorative picks for the final layer.
Step 5: Add the Star Ornaments
Now it is time for the stars, also known as the part where the wreath starts acting fancy. Place three stars in a loose triangle rather than lining them up evenly. Odd numbers usually look more natural in floral design, and a triangular arrangement helps move the eye around the wreath.
For a crescent wreath, you might place one star near the bottom cluster, one near the center of the greenery, and one slightly higher on the opposite side. For a full wreath, space the stars around the wreath while keeping them visually connected with berries or greenery.
If the stars are ornaments with strings, remove or tuck the strings unless they add to the design. Attach lightweight stars with hot glue. For heavier wooden or metal stars, use floral wire by threading it through the ornament hanger or wrapping it discreetly around part of the star. Twist the wire onto the back of the grapevine wreath until secure.
Step 6: Fill Gaps with Berries, Gems, and Winter Accents
Once the greenery and stars are attached, step back and look for empty spots. Add white berries, pearl picks, silver foam balls, clear gems, or tiny pinecones to fill gaps and brighten the arrangement. These smaller accents are what make a DIY winter wreath feel polished.
White berries work especially well because they mimic snow and contrast beautifully against green stems and brown grapevine. Clear gems can add an icy sparkle, but use them sparingly. You want “winter morning frost,” not “craft aisle disco ball.”
Cluster small accents near the stars to make them feel integrated into the design. If a star looks like it is floating randomly on the wreath, tuck a few berry sprigs or greenery pieces around its edges. This makes the decoration look nestled rather than pasted on as an afterthought.
Step 7: Add Ribbon or a Hanging Loop
A wreath can be hung with a metal wreath hanger, command hook, ribbon loop, twine, or floral wire. If you want a clean modern look, attach a simple loop of wire to the back. For a farmhouse wreath, use burlap or ticking stripe ribbon. For an elegant winter wreath, choose velvet ribbon in ivory, champagne, navy, sage, or deep green.
If you add a bow, keep it proportional. A giant bow can overwhelm a delicate star wreath, while a tiny bow may look like it wandered in from a gift tag. For an 18-inch wreath, ribbon that is 1.5 to 2.5 inches wide usually works well.
Step 8: Check the Wreath from a Distance
Hang the wreath temporarily on a door or wall and step back. This is the moment of truth. Look for balance, shape, and any bare areas. Sometimes a wreath looks perfect on the table but slightly lopsided when vertical. Add a small sprig, adjust a star, or trim a stem if needed.
Do not aim for perfection. Handmade wreaths should have character. The goal is a winter wreath that looks welcoming, stylish, and thoughtfully arrangednot one that seems afraid of having a personality.
Design Variations for Your Winter Star Wreath
Rustic Farmhouse Winter Wreath
Use a natural grapevine base, wooden stars, pinecones, white berries, and burlap ribbon. Add a few lamb’s ear stems for softness. This style looks beautiful on a white, black, navy, or wood front door.
Snowy Woodland Wreath
Choose flocked pine, frosted cedar, white foam balls, and silver stars. Lightly spray pinecones with faux snow or white craft paint. This look feels wintry without being overly holiday-themed.
Minimal Scandinavian Wreath
Keep the grapevine base mostly exposed. Add eucalyptus, three simple white stars, and a narrow linen ribbon. The result is calm, clean, and perfect for modern homes.
Glam Silver and White Wreath
Use metallic silver stars, pearl picks, clear gems, flocked greenery, and a soft satin ribbon. This version works especially well indoors above a mantel or mirror.
Kid-Friendly Craft Version
Let kids paint wooden stars, choose berry picks, or help place pinecones. Adults should handle wire cutters and hot glue, unless you enjoy adding “minor glue-related drama” to your family traditions.
Where to Hang a Winter Grapevine Wreath
The front door is the obvious choice, but it is not the only one. A winter grapevine wreath also looks charming above a fireplace, on a pantry door, over a bed, in an entryway, on a kitchen range hood, or layered over a large mirror. Smaller versions can hang on cabinet doors, window frames, or the backs of dining chairs for a winter gathering.
If you hang the wreath outdoors, choose a covered porch when possible. Rain, snow, and direct sunlight can fade faux greenery, loosen glue, or damage delicate ornaments. For windy areas, use a sturdy wreath hanger and secure the bottom of the wreath with a removable adhesive hook or discreet ribbon tie.
How to Store Your Winter Wreath
When winter is over, store your wreath carefully so it looks good next year. Place it in a wreath storage box, large plastic bin, or breathable garment bag. Avoid stacking heavy items on top, unless you want your wreath to emerge next season looking like it lost an argument.
If the wreath has battery lights, remove the batteries before storage. If you used natural pinecones or dried accents, check for loose pieces and repair them before packing. Store the wreath in a cool, dry place away from moisture and pests.
Common Mistakes to Avoid
Using Too Many Decorations
It is tempting to add every pretty thing you bought, but restraint makes the wreath look more expensive. Pick a theme and stick with it. Stars, greenery, berries, and one extra texture are usually enough.
Skipping the Dry Layout
Always arrange the materials before attaching them. Once hot glue enters the chat, commitment gets real.
Ignoring Weight Distribution
Heavy ornaments can pull the wreath forward or make it hang crooked. Place heavier accents closer to the base and secure them with wire.
Forgetting the Back
Twisted wire ends can scratch doors or walls. Tuck sharp ends into the grapevine or cover them with felt pads if needed.
Making It Too Christmas-Specific
If you want the wreath to last all winter, avoid strong Christmas-only elements. Choose stars, snowberries, pinecones, evergreens, and neutral ribbon instead.
Personal Experience: What I Learned Making a Winter Grapevine Wreath with Stars
The first time I made a winter grapevine wreath with stars, I had a very confident plan. I placed the wreath on the table, lined up the supplies, plugged in the glue gun, and immediately discovered that confidence is not the same thing as having enough glue sticks. So, lesson one: check your supplies before you start. A half-melted glue stick will not carry an entire design, no matter how encouraging you are.
What surprised me most was how much better the wreath looked when I stopped trying to make it perfectly symmetrical. At first, I arranged the stars evenly around the wreath like numbers on a clock. It was tidy, but it looked stiffmore “craft store display sample” than “cozy handmade winter decor.” When I moved the stars into a loose triangle and let the greenery flow around one side, the whole wreath suddenly looked softer and more professional.
I also learned that greenery needs layers. One type of pine stem looked fine, but when I added lamb’s ear and a few frosted berry picks, the wreath gained depth. The lamb’s ear softened the harsh edges of the pine, while the berries brought in that snowy winter feeling. It reminded me of decorating a room: one texture is useful, two textures are interesting, and three textures make people ask where you bought it.
Another helpful trick was hanging the wreath while working. Laying it flat on the table was fine for the first few steps, but once I started adding stars and berries, I needed to see how gravity affected the design. A stem that looked graceful on the table suddenly drooped like it had received bad news. By hanging the wreath on an interior door and adjusting it vertically, I could see the real shape and fix awkward spots before the glue fully set.
The star ornaments were the real heroes. I used three white stars because they felt wintry without screaming “holiday clearance bin.” They made the wreath feel bright and cheerful, especially against the dark grapevine. If I were making another version, I would try unfinished wooden stars for a rustic cabin look or brushed gold stars for a warmer, more elegant style.
My biggest mistake was adding too many small accents at the end. I had white berries, clear gems, pinecones, tiny silver balls, and a ribbon. Naturally, I wanted to use all of them because they were sitting there looking useful. But the wreath started to feel crowded. I removed half the gems, tucked in only a few berries near the stars, and skipped the big bow. Instantly, the design looked calmer and more expensive. Sometimes the best crafting tool is the ability to stop.
I also recommend keeping a small repair kit after the wreath is finished. A few extra berries, floral wire, and glue sticks are helpful if something loosens after storage or outdoor hanging. Winter weather can be rude. Doors slam, wind shows off, and decorations occasionally need a little maintenance.
Overall, making a DIY winter grapevine wreath with stars is one of those projects that feels relaxing but still gives you a beautiful result. It is creative without being complicated, affordable without looking cheap, and flexible enough to match farmhouse, modern, rustic, or classic winter decor. Plus, every time you walk past it, you get the tiny satisfaction of thinking, “I made that.” That feeling is worth at least three hot glue strings stuck to your sleeve.
Conclusion
Learning how to make a winter wreath is easier than it looks, especially when you start with a grapevine base. The natural texture does half the decorating work for you, while greenery, berries, pinecones, and star ornaments add the winter magic. Whether you prefer a rustic farmhouse style, a snowy woodland look, or a simple Scandinavian design, this easy DIY winter grapevine wreath with stars can be customized to fit your home beautifully.
The key is to build in layers, use a focused color palette, secure heavier pieces with floral wire, and step back often to check the shape. With a few affordable supplies and a little creative patience, you can make a wreath that welcomes guests, brightens cold-weather days, and keeps your home looking cozy long after the holiday decorations come down.
Note: If you plan to hang this wreath outdoors, use weather-resistant faux greenery and floral wire for the strongest hold. For indoor display, hot glue works well for lightweight accents and makes the project quicker.