Trying to explain where you are over text can turn into a tiny geography exam nobody studied for. “I’m near the coffee shop.” Which coffee shop? “The one by the pharmacy.” Which pharmacy? “The one across from the big tree.” Wonderful. We have now invented a treasure hunt.
That is exactly why learning how to share your location on Viber is so useful. Whether you are meeting a friend downtown, helping a family member find your apartment, sending a pickup point to a driver, or letting someone know where the restaurant actually is, Viber location sharing can save time, confusion, and several dramatic “Where are you?” messages.
Viber, officially known as Rakuten Viber, is a popular messaging and calling app that supports chats, voice calls, video calls, media sharing, stickers, communities, and location attachments. On mobile, it can use your phone’s location permission to send a map point in a conversation. You can also share a location from a map app, such as Google Maps or Apple Maps, directly into a Viber chat.
This guide explains two simple ways to share your location on Viber, how to prepare your phone permissions, what to do when location sharing does not work, and how to protect your privacy while using the feature. No compass, hiking boots, or emotional support pigeon required.
What Does Sharing Your Location on Viber Mean?
When you share your location on Viber, you send a map-based message to another person or group. The receiver can tap that message to open the location in a map app and see where the pin is placed. In most everyday cases, this is used to share:
- Your current location
- A meeting point
- A nearby business or landmark
- A pickup or drop-off address
- A place you want someone to find easily
The most important thing to understand is this: a location message is more precise than saying “I’m around here somewhere.” It can reveal your exact or near-exact position, depending on your phone settings and the location you choose. That makes it convenient, but it also means you should share it thoughtfully.
Before You Start: Check These Quick Requirements
Before sending your location in Viber, make sure the basics are ready. If one of these pieces is missing, Viber may act like a waiter who forgot your order and politely stare into the distance.
1. Install or Update Viber
Use the latest version of Viber from the official app store for your device. App menus can change over time, and updating helps ensure you have the newest chat tools, security fixes, and location features.
2. Turn On Location Services
Your phone must allow location access. On iPhone, this is usually managed under Settings > Privacy & Security > Location Services. On Android, it is usually under Settings > Location, though the exact wording can vary by phone brand.
3. Give Viber Location Permission
Viber needs permission to access your phone’s location when you use the location-sharing feature. If Viber asks for permission, choose the option that fits your comfort level. For a one-time share, temporary access is often enough. For frequent use, “while using the app” may be more convenient.
4. Use a Stable Internet Connection
Location sharing works best when your phone has mobile data or Wi-Fi. If your connection is weak, the map may load slowly or show an inaccurate point.
Method 1: Share Your Current Location Directly in Viber
The easiest way to share your location on Viber is to send it directly inside a chat. This method is great when someone asks, “Where are you?” and you want to answer with something more useful than “next to a wall.”
Step-by-Step: How to Send Your Location in a Viber Chat
- Open the Viber app on your iPhone or Android phone.
- Go to the chat with the person or group you want to send your location to.
- Tap the More, plus, three-dot, or attachment-style icon near the message box. The exact icon may vary by app version and device.
- Choose Location, Send Location, or a similar option.
- If Viber asks for permission, allow location access.
- Wait for the map to detect your position.
- Check that the pin looks correct.
- Tap Send to share the location in the chat.
Once sent, your contact will receive a map-style message. They can tap it to view the location and use their preferred map app for directions.
When Should You Use This Method?
Use direct Viber location sharing when you want to send where you are right now. It is especially helpful for quick meetups, event entrances, parking lots, hotel lobbies, airport pickup areas, and unfamiliar neighborhoods.
For example, imagine you are meeting friends at a food festival. There are twelve taco stands, four stages, two suspiciously popular lemonade booths, and one friend who says, “I’m by the music.” Sending your current location in Viber is much easier than describing your exact position using nacho-based coordinates.
Accuracy Tip
Before tapping Send, give your phone a few seconds to improve the location fix. GPS, Wi-Fi, Bluetooth, and mobile networks can all help your device estimate where you are. If the pin looks slightly wrong, move to an open area or check that precise location is enabled for Viber.
Method 2: Share a Place or Map Link to Viber from Google Maps or Apple Maps
The second simple way is to share a location from a map app into Viber. This is perfect when you are not physically at the place yet, but you want to send a destination, meeting point, restaurant, store, hotel, office, or landmark.
In other words, Method 1 answers, “Where am I?” Method 2 answers, “Where should we go?” Very different energy. One is survival. The other is planning.
How to Share a Google Maps Location to Viber
- Open Google Maps on your phone.
- Search for the place you want to share, or drop a pin on the map.
- Tap the place name or pin details.
- Tap Share.
- Select Viber from the share options.
- Choose the Viber chat or contact.
- Send the map link.
How to Share an Apple Maps Location to Viber
- Open Apple Maps on your iPhone.
- Search for a place or tap and hold to drop a pin.
- Open the location card.
- Tap the Share button.
- Choose Viber.
- Select the conversation.
- Send the location link.
When Should You Use This Method?
Use this method when you want to share a destination rather than your live or current position. It is ideal for planning dinner, sending a hotel address, choosing a meeting spot, organizing a family trip, or directing someone to a business.
For example, if you are organizing a birthday dinner, you can search for the restaurant in Google Maps, share it to the Viber group chat, and save everyone from typing “Which branch?” five minutes before the reservation. That alone deserves applause.
Which Method Is Better?
Both methods are useful, but they serve different purposes. Direct Viber location sharing is best for showing where you are at the moment. Sharing from Google Maps or Apple Maps is better for sending a place, business, address, or planned destination.
| Situation | Best Method | Why It Works |
|---|---|---|
| You are waiting for a friend | Share current location in Viber | Shows where you are now |
| You want to send a restaurant address | Share from Google Maps or Apple Maps | Sends a searchable place or map link |
| You are lost and need help | Share current location in Viber | Helps someone find your position quickly |
| You are planning a meetup later | Share from a map app | Lets everyone preview the destination |
How to Allow Viber Location Permission on iPhone
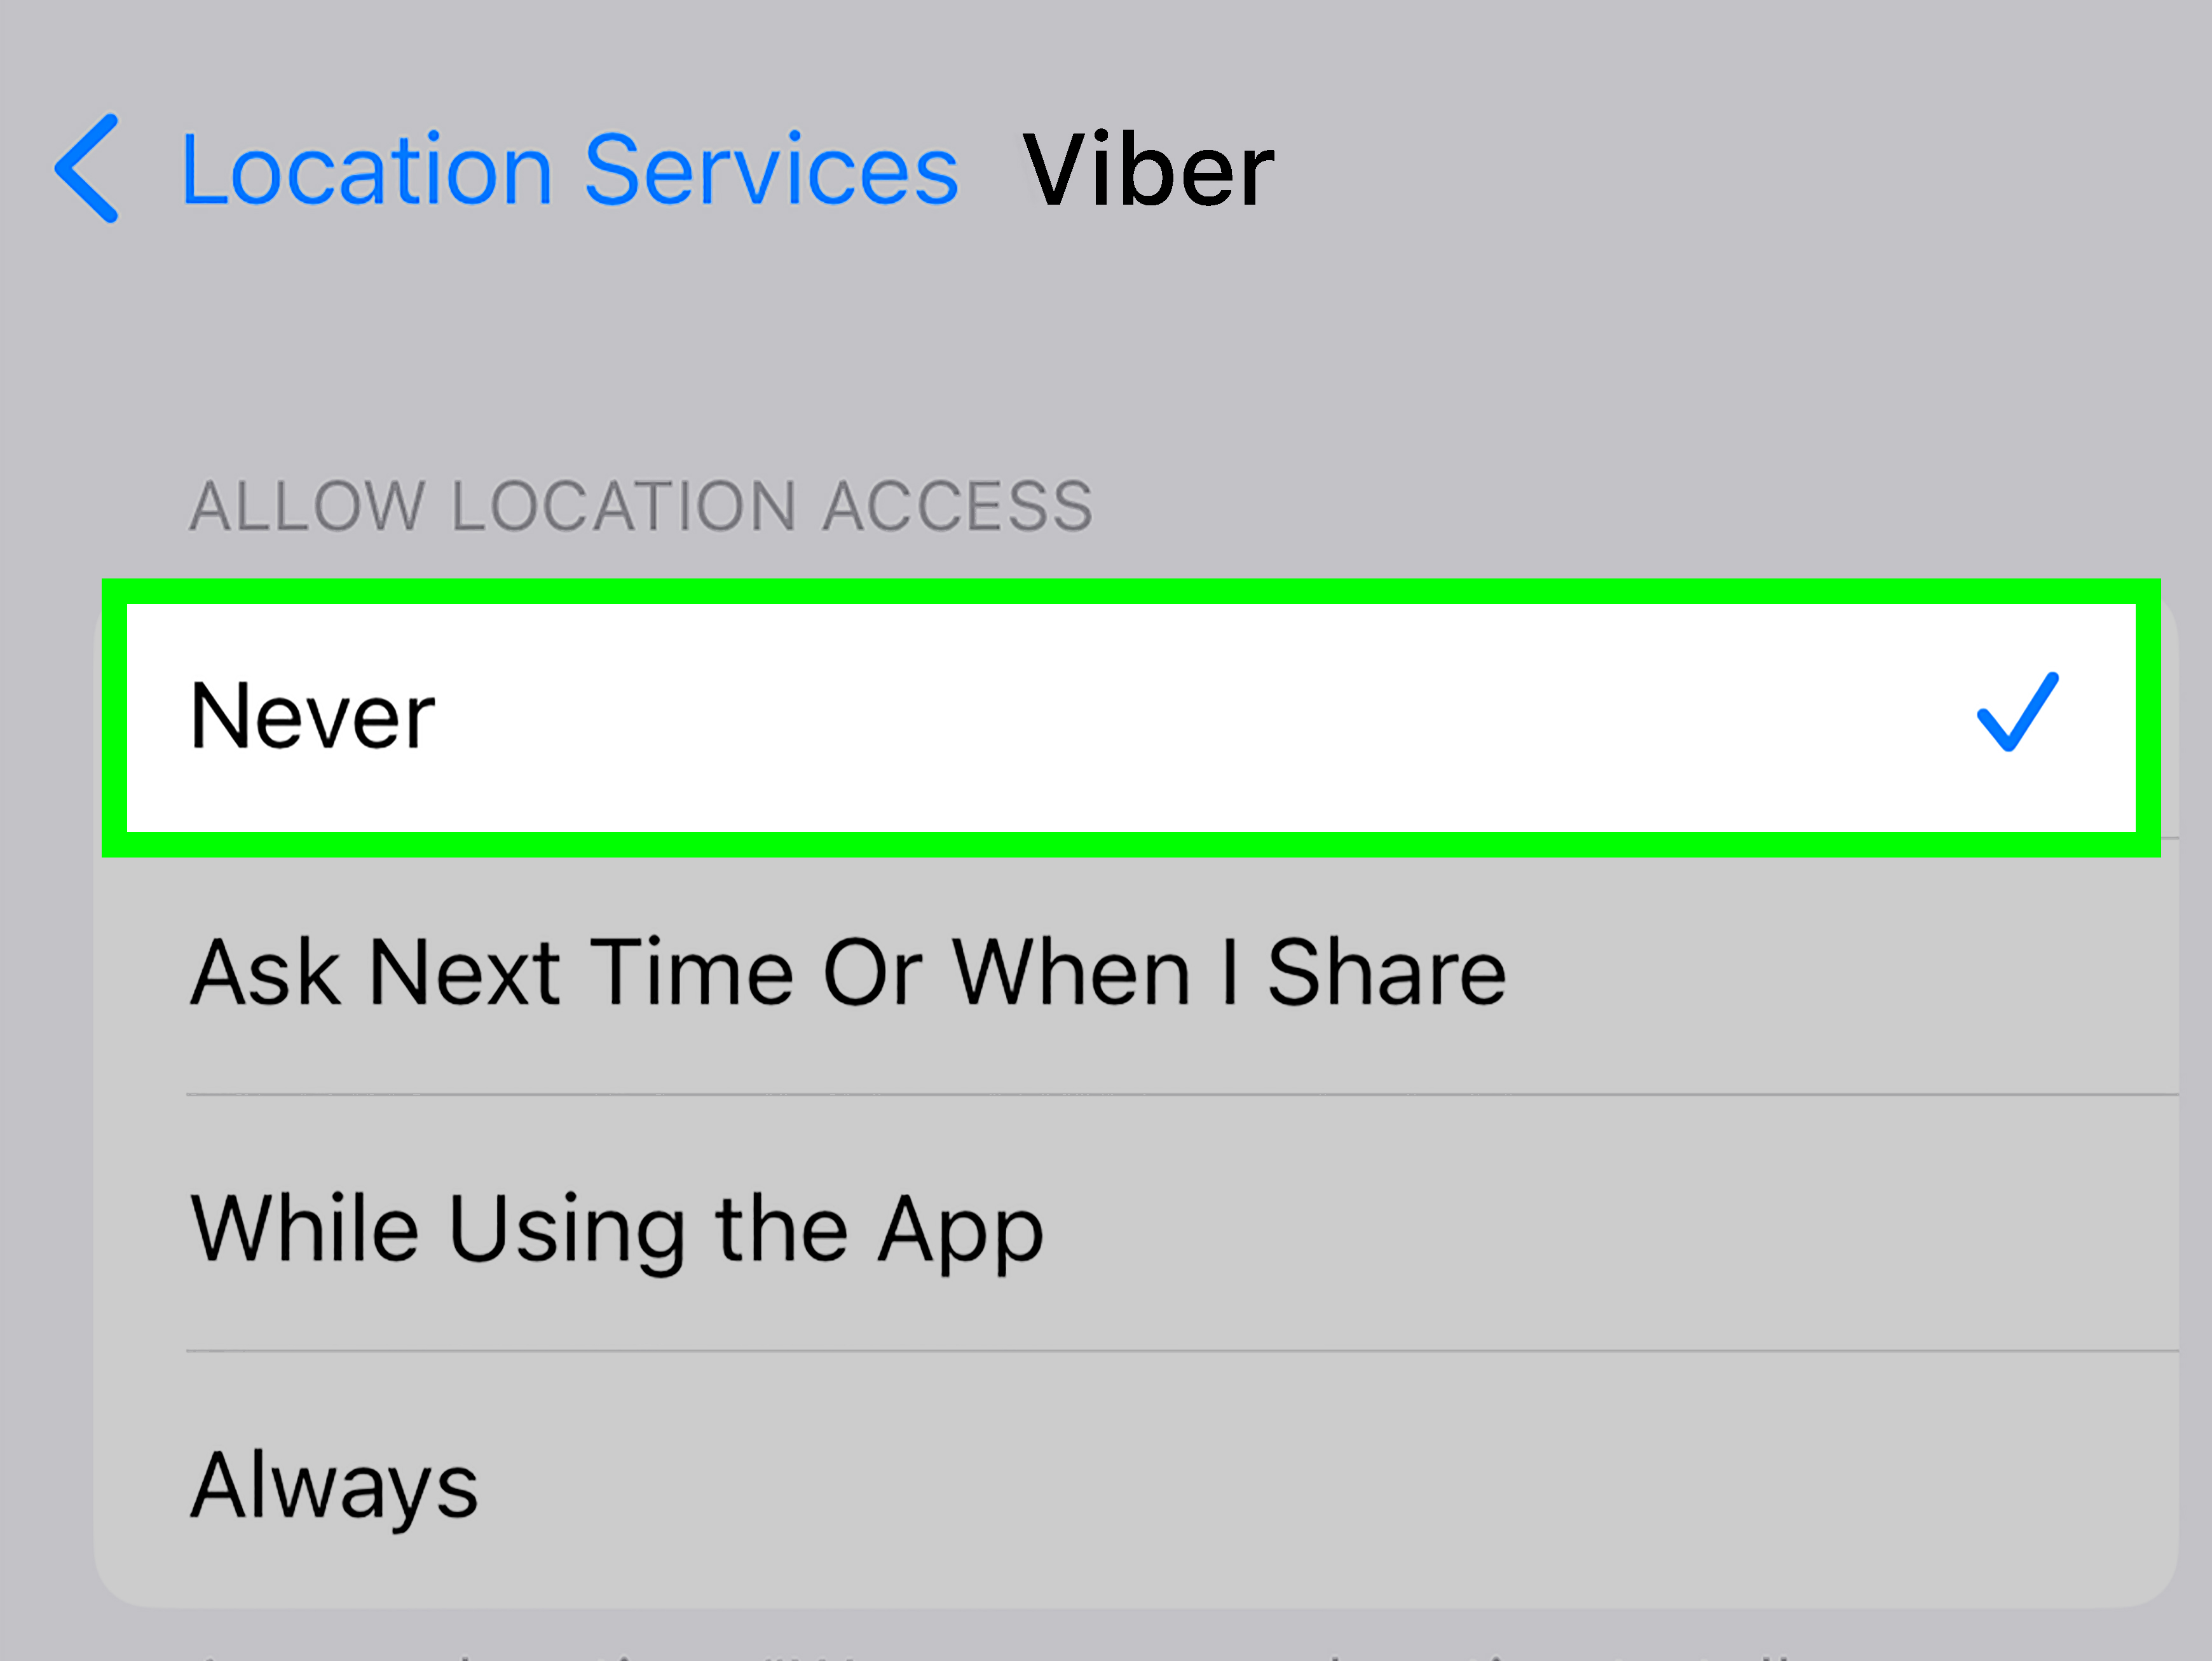
If Viber cannot find your location on iPhone, check the permission settings. Apple gives users detailed control over which apps can access location data and when.
- Open Settings.
- Tap Privacy & Security.
- Tap Location Services.
- Make sure Location Services is turned on.
- Scroll down and tap Viber.
- Select a permission such as While Using the App or Ask Next Time Or When I Share.
- If needed, turn on Precise Location for better accuracy.
If you only want to share location once, a temporary option is a smart privacy-friendly choice. If you use Viber location sharing regularly, allowing access while using the app can reduce permission popups.
How to Allow Viber Location Permission on Android
Android settings vary by manufacturer, but the general path is similar on most devices.
- Open Settings.
- Tap Location.
- Make sure location is turned on.
- Go to Apps or App permissions.
- Select Viber.
- Tap Permissions.
- Choose Location.
- Select Allow only while using the app or another option you prefer.
- Turn on Precise location if you want the shared pin to be more accurate.
On newer Android versions, you may be able to choose between approximate and precise location. Approximate location may be enough for general areas, but precise location is usually better when someone needs to find your exact pickup point.
Privacy Tips Before Sharing Your Location on Viber
Location sharing is useful, but it is also personal. A map pin can reveal where you live, work, study, shop, or spend time. Before sending it, pause for a second and ask: “Do I trust this person with this information?” That tiny pause is your privacy seat belt.
Share Only With People You Trust
Do not send your location to strangers, suspicious accounts, or people who make you uncomfortable. If someone pressures you to share your exact location, it is okay to say no.
Use a Nearby Public Place When Needed
If you are meeting someone but do not want to reveal your home address, share a nearby café, shop, lobby, or public landmark instead. This is especially useful for online marketplace pickups, first-time meetings, or group events.
Check the Chat Before Sending
Before tapping Send, confirm that you are in the correct Viber conversation. Accidentally sending your location to the wrong group chat is not the kind of plot twist anyone needs before lunch.
Review App Permissions Occasionally
Every so often, check which apps can access your location. Both iPhone and Android allow users to manage app permissions. If you do not use location sharing often, you can switch Viber back to a more limited permission setting after sending your location.
What to Do If Viber Location Sharing Is Not Working
If Viber refuses to share your location, do not panic. Most problems come from permissions, weak signal, outdated apps, or temporary phone glitches. In other words, your phone is probably not haunted. Probably.
1. Check Location Services
Make sure location services are turned on for your phone and that Viber has permission to use them.
2. Update Viber
An outdated app can cause missing buttons, broken map previews, or permission issues. Update Viber from the official app store.
3. Restart the App
Close Viber completely and open it again. This simple fix solves more tech problems than anyone likes to admit.
4. Check Your Internet Connection
Switch between Wi-Fi and mobile data to see whether the map loads better. A weak connection can prevent your location from appearing accurately.
5. Enable Precise Location
If the map pin is too broad or inaccurate, enable precise location for Viber in your device settings.
6. Try Sharing from a Map App Instead
If direct Viber sharing does not work, open Google Maps or Apple Maps and share the place to Viber using your phone’s share menu. This is a great backup method.
Can You Share Live Location on Viber?
Some guides and app versions may refer to live location or location messages, but availability can vary depending on device, region, and Viber version. The safest approach is to open a chat, tap the attachment or more-options button, and check what location options your app currently displays.
If your goal is simply to show someone where you are, sending your current location is usually enough. If you need continuous real-time tracking for a trip, pickup, or safety check-in, confirm whether your version of Viber supports that option. If it does not, you may need to use a dedicated map app that offers live location sharing.
Common Mistakes to Avoid
Sending the Wrong Pin
Always check the map before sending. GPS can occasionally place you across the street, behind a building, or in the middle of a dramatic-looking empty field. Give the map a moment to settle.
Sharing Your Home Address Too Casually
If you only need to guide someone nearby, share a public landmark instead of your exact home address. Convenience is nice; privacy is nicer.
Forgetting Group Chats Include Multiple People
When you share a location in a group, everyone in that group can see it. That is useful for meetups, but not ideal if the group includes people who do not need your exact location.
Assuming Everyone Uses the Same Map App
A Viber location message or map link may open differently depending on the receiver’s phone. If someone has trouble opening it, send the address in text as a backup.
Practical Examples of Sharing Location on Viber
Example 1: Meeting a Friend at a Mall
You are inside a large shopping mall, and your friend says, “I’m near the escalator.” Unfortunately, the mall has enough escalators to qualify as an indoor mountain range. Open Viber, share your current location, and add a short message like, “I’m near the north entrance, next to the bookstore.” The location pin plus a human-friendly clue makes finding you easier.
Example 2: Sending a Restaurant Location
You found a great restaurant for dinner. Instead of typing the name and hoping everyone chooses the correct branch, open Google Maps, search for the restaurant, tap Share, and send it to your Viber group. Now everyone has the same destination, and nobody ends up eating noodles alone across town.
Example 3: Helping a Family Member Find Your Building
If a relative is visiting, send your building location through Viber. If your exact entrance is hard to find, add a note such as, “Use the gate next to the pharmacy” or “Call me when you reach the blue sign.” A location pin is useful, but a small written clue can make it perfect.
Extra Experience: What I’ve Learned From Using Viber Location Sharing in Real Life
The biggest lesson about Viber location sharing is that it works best when you combine the map pin with a little context. A location pin is accurate, but real life is messy. Buildings have multiple entrances. Streets have confusing names. Parking lots look like they were designed by someone who enjoys puzzles. So when you send your location, add one simple sentence that explains what the person should look for.
For example, instead of sending only a pin, write, “I’m at the front entrance, near the ATM.” That tiny detail can save ten minutes of walking in circles. If you are at a café, mention whether you are inside, outside, upstairs, or near the window. If you are at an event, mention the nearest booth, stage, gate, or sign. The pin gets people close; the note gets them to you.
Another useful habit is checking the pin before sending it. In busy cities, GPS can occasionally bounce around because of tall buildings, underground areas, weak mobile signals, or crowded Wi-Fi zones. I have seen map pins land slightly across the road, which is not a disaster unless the road has six lanes and everyone involved has already lost patience. Waiting a few seconds before tapping Send often improves accuracy.
For planned meetups, sharing from Google Maps or Apple Maps is usually better than sharing your current location. If you are not already at the destination, do not send where you are now. Send where everyone needs to go. This sounds obvious, but it is one of those mistakes people make when they are multitasking, hungry, or trying to organize a group chat that has become 70% stickers and 30% confusion.
Privacy is another lesson worth taking seriously. Location sharing feels casual because it happens inside a chat, but the information can be sensitive. I prefer sharing public places when possible: a café, lobby, store, or building entrance. If someone is coming to my home, I only share the exact address with people I trust. If I am in a group chat, I double-check who is in the group before sending a pin. It takes two seconds and prevents awkward surprises.
It also helps to keep your app updated. Messaging apps change their icons and menus from time to time. One version might show a three-dot menu, another might show a plus button, and another might place location under attachments. If a guide says “tap the three dots” and your app shows a different icon, look for the general attachment or more-options area near the message box. The feature is usually hiding there, pretending to be mysterious.
Finally, location sharing should reduce stress, not create it. Use it when it helps: meeting friends, giving directions, coordinating pickups, sending business addresses, or helping family members find you. Skip it when a written address is enough or when you do not feel comfortable sharing your exact position. Technology is useful, but your judgment is still the smartest app on the phone.
Conclusion
Learning how to share your location on Viber is simple, practical, and surprisingly helpful in everyday life. You can send your current location directly inside a Viber chat, or you can share a destination from Google Maps or Apple Maps into Viber. The first method is best when someone needs to find you right now. The second method is better when you want to send a restaurant, hotel, office, landmark, or future meeting point.
For the best experience, keep Viber updated, allow location permission only when needed, check the map pin before sending, and add a short note for extra clarity. Most importantly, share your location only with people you trust. A good location message should make life easier, not turn your privacy into a group project.
Note: Viber menus and labels may vary slightly by device, operating system, region, and app version. If you do not see the exact button name described here, look for the attachment, plus, location, or more-options icon inside the chat.