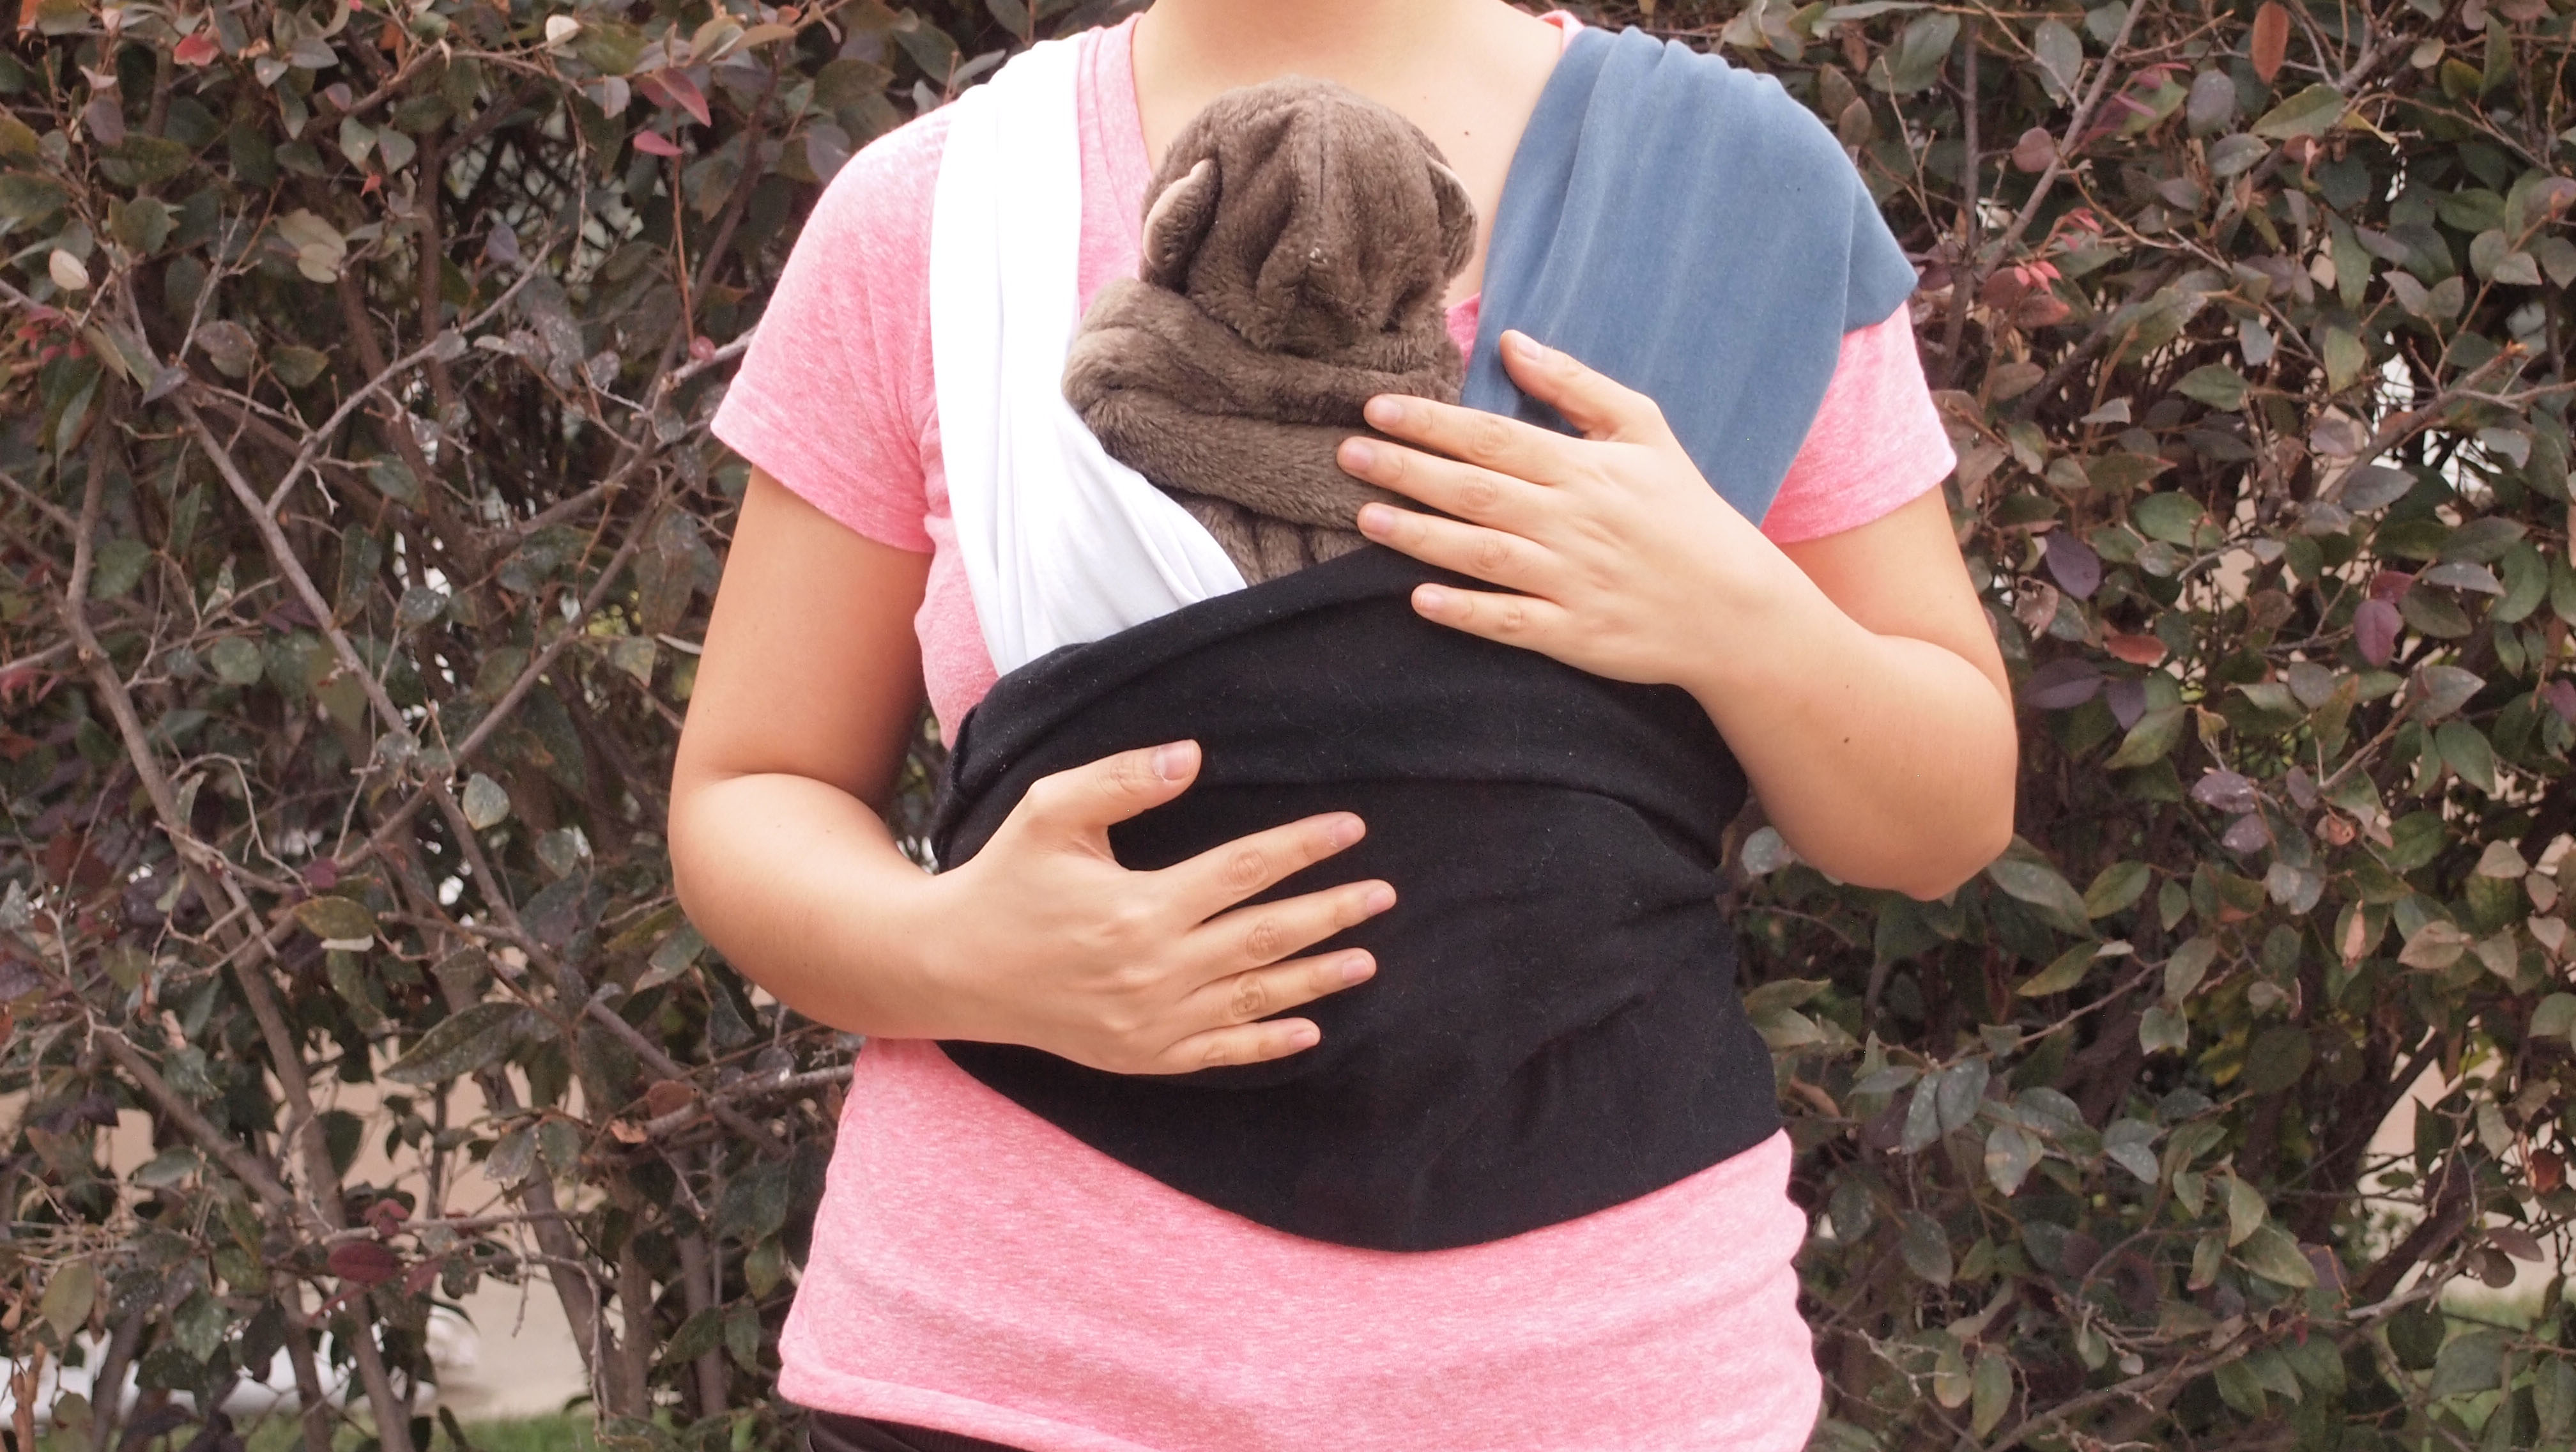
Important safety note: A homemade no sew baby wrap carrier from T shirts is a DIY project, not a safety-tested commercial carrier. Use it only for short, supervised, low-movement moments at home, and never use it for sleeping, driving, cooking, exercising, hands-free breastfeeding, or carrying a premature baby, a low-birth-weight baby, a baby with breathing issues, or a baby younger than 4 months without guidance from a pediatric professional. Your baby’s face must stay visible, the chin must stay off the chest, and you should be able to kiss the top of your baby’s head without doing yoga-level neck gymnastics.
Introduction: The T-Shirt Drawer Meets Babywearing
Every home has a mysterious T-shirt population. There is the old college shirt, the oversized gym shirt, the “I will wear this for painting” shirt, and the shirt nobody admits buying on vacation. With a little care, some of those soft cotton knits can become a temporary no sew baby wrap carrier from T shirts. It sounds like a parenting hack invented at 2:13 a.m. during a diaper crisis, and honestly, that is part of its charm.
Babywearing can be wonderfully practical. It keeps your baby close, helps you move around the house, and gives your arms a break from their unpaid internship as a full-time baby shelf. But babywearing also requires serious safety awareness. A wrap is not just fabric; it is a support system for a tiny human who cannot always reposition themselves. That means your DIY baby wrap carrier must be snug, high, breathable, and inspected before every use.
This guide explains how to make a no sew baby wrap carrier from T shirts in 11 steps, using simple materials and a safety-first mindset. You will learn how to choose the right shirts, cut them into usable fabric bands, arrange the wrap, test the hold, place your baby safely, and know when to stop using it. Think of this as a practical, budget-friendly craft with a strong parental side-eye toward anything flimsy, loose, or questionable.
What Is a No Sew Baby Wrap Carrier from T Shirts?
A no sew baby wrap carrier from T shirts is a homemade soft carrier made from stretchy cotton knit fabric, usually cut from large adult T-shirts. Instead of sewing seams, you use the existing stretch and shape of the fabric to create wide loops or bands that cross over your torso and help support your baby against your chest.
The most common DIY approach uses two large T-shirt fabric loops as crossed shoulder panels and a third fabric band as a support sash. The idea resembles a soft wrap or pre-tied carrier, but with one major difference: commercial wraps are designed, tested, labeled, and manufactured for infant carrying. Your homemade version is not. That does not mean it is automatically useless, but it does mean you must be more cautious than a cat inspecting a cucumber.
Before You Start: Safety Rules You Should Not Skip
Keep Baby Visible and Upright
Your baby’s face should be visible at all times. The nose and mouth must never be covered by fabric, your shirt, your body, or the baby’s own position. Your baby should be upright, not curled into a tight “C” shape. A curled position can restrict breathing, especially for very young infants.
Use the T.I.C.K.S. Idea
A simple way to remember safe babywearing is T.I.C.K.S.: tight, in view, close enough to kiss, keep chin off chest, and supported back. In plain English: keep the wrap snug, keep the baby high, keep the airway open, and do not let the fabric turn into a saggy hammock.
Support the Hips
A safe baby carrier should support the baby’s thighs from knee to knee when possible, with knees slightly higher than the bottom. This is often called the “M-position.” Avoid letting the baby dangle by the crotch or forcing the legs straight down.
Know When Not to Use It
Do not use a homemade T-shirt baby carrier if the fabric is thin, stretched out, ripped, slippery, too small, or if the carrier feels unstable. Do not use it while cooking, drinking hot liquids, cleaning with chemicals, running errands in crowded places, climbing stairs quickly, or doing anything where a stumble could turn into a disaster with sound effects.
Materials You Need
- Three large adult cotton or cotton-blend T-shirts
- Sharp fabric scissors
- Measuring tape
- A mirror
- A doll or rolled towel for practice
- A second adult spotter for the first real use
Choose shirts with a soft but sturdy knit. A little stretch is helpful; too much stretch is risky because the baby may sag lower as you move. Avoid shirts with holes, cracked prints, glitter, rough embroidery, loose seams, or fabric that becomes see-through when stretched. Your baby wrap carrier should feel like dependable fabric, not like a retired napkin.
How to Make a No Sew Baby Wrap Carrier from T Shirts: 11 Steps
Step 1: Choose Three Large, Strong T-Shirts
Pick three clean, adult-sized T-shirts, preferably large or extra-large. The bigger the shirts, the more fabric you have to work with. Cotton knit or cotton-spandex blends are usually the easiest to handle. Test each shirt by pulling the fabric gently in different directions. It should stretch and recover without staying warped.
Do not use delicate fashion tees, mesh fabric, heavily worn shirts, or shirts with side seams that look ready to retire. If a shirt has survived 400 laundry cycles and now resembles emotional tissue paper, thank it for its service and choose another.
Step 2: Wash and Dry the Shirts First
Wash and dry all shirts before cutting. This removes dust, detergent residue, pet hair, and the mysterious smell of “stored in a closet since 2017.” Washing also pre-shrinks the fabric, which helps you avoid surprise tightening later.
Use baby-safe detergent if your child has sensitive skin. Skip fabric softeners with strong fragrance, because babies spend a lot of time with their faces close to the fabric.
Step 3: Inspect the Fabric Like a Tiny Safety Inspector
Lay each shirt flat and check for holes, weak spots, worn seams, loose threads, and stretched-out areas. Hold the fabric up to light. If you can see thin patches or tiny breaks, reject that shirt. The goal is not to create a Pinterest miracle from fabric that has already emotionally moved on.
Also check the original side seams. Since this no sew method relies partly on existing seams, those seams need to be strong. If you tug gently and hear stitches popping, do not use that shirt.
Step 4: Cut Off the Top of Each Shirt
Place the first shirt flat on a clean surface. Cut straight across the body of the shirt just below the armpits, removing the sleeves and neckline. You should be left with a wide tube of fabric. Repeat this with the second and third shirts.
These fabric tubes will become your wrap bands. Try to cut smoothly and evenly. Ragged edges are not the end of the world, but smooth cuts reduce curling and make the carrier more comfortable.
Step 5: Stretch and Roll the Cut Edges
Gently tug the cut edges of each fabric tube. Knit T-shirt fabric often curls slightly when stretched, which can make the raw edge softer and less scratchy. Do not yank like you are starting a lawn mower. A gentle stretch is enough.
If the fabric rolls too much and becomes narrow, choose a sturdier shirt. A baby wrap carrier needs wide support, not spaghetti straps pretending to be responsible adults.
Step 6: Create Two Shoulder Loops
Take two of the fabric tubes. These will become your shoulder loops. Put one loop over one shoulder and across your torso like a sash. Put the second loop over the opposite shoulder, crossing it over the first loop at the center of your chest. The two loops should form an “X” across your front and another “X” across your back.
Stand in front of a mirror. The crossed fabric should sit high on your chest, not down at your waist. If the loops hang too low, the shirts are too large or too stretchy. If they are painfully tight, the shirts are too small.
Step 7: Add the Third Shirt as a Support Band
Use the third fabric tube as an outer support band. Slide it around your torso over the two crossed loops, placing it around your waist and lower ribs. This band helps keep the crossed panels close to your body and adds another layer of support once the baby is positioned.
The support band should feel snug but not restrictive. You should be able to breathe normally. Parenting already takes your breath away; fabric should not help.
Step 8: Practice with a Doll or Rolled Towel
Before placing your baby in the carrier, practice with a doll or a rolled towel that has a little weight. Slide the practice object into the crossed fabric panels, then pull the support band up over it. Watch how the fabric holds weight. Does it sag? Does it twist? Do the loops slide off your shoulders?
If anything feels unstable during practice, stop. Try different shirts or use a tested commercial wrap instead. Practicing first may feel silly, but it is much better than trying to solve a fabric puzzle while holding a real baby who has opinions.
Step 9: Place Baby High on Your Chest
With another adult nearby, place your baby high against your chest. The baby’s head should be close enough for you to kiss. Slide one crossed fabric panel under the baby’s bottom and across the back. Then slide the second crossed panel over the first, spreading both panels wide from shoulder to shoulder and from the baby’s bottom up the back.
Keep one hand on your baby at all times while adjusting. The fabric should support the baby’s back and bottom, but your hands are still the emergency backup system.
Step 10: Pull Up the Support Band
Bring the third T-shirt band up over the baby’s lower back and bottom. This outer band should add gentle support without covering the baby’s face. Keep the top of the band below the baby’s shoulders unless your baby has enough head control and you are actively supporting the head as needed.
Check the hips. The baby’s knees should sit higher than the bottom, with legs spread comfortably around your torso. Do not force the legs open, and do not let them hang straight down without thigh support.
Step 11: Do a Full Safety Check Every Time
Before moving around, check the following:
- Baby’s face is visible.
- Nose and mouth are clear.
- Chin is off the chest.
- Baby is high enough to kiss.
- Fabric is snug, not sagging.
- Back is supported in a natural position.
- Hips are supported in an M-position.
- You feel balanced and comfortable.
If the baby slips lower, the fabric stretches, or you feel unsure, take the baby out immediately. A DIY baby wrap carrier should never require hope as a structural component.
How Long Should You Use a T-Shirt Baby Wrap?
Use a homemade T-shirt wrap only for short sessions. Start with a few minutes while seated or standing still. If everything stays secure, you may use it briefly for calm, low-risk activities at home. This is not the carrier for long walks, shopping trips, housework marathons, or carrying a baby while chasing a toddler who has discovered markers.
Check your baby often for breathing, temperature, and position. Babies can overheat in layers of fabric, especially in warm rooms or summer weather. Dress your baby lightly and remember that your body counts as a heat source. You are basically a walking space heater with snacks.
Common Mistakes to Avoid
Using Fabric That Is Too Stretchy
Stretchy fabric can feel comfortable at first, but it may sag as the baby’s weight settles. If the baby slowly drops lower on your torso, the wrap is not supportive enough.
Letting the Baby Sit Too Low
A baby worn too low is harder to monitor and may curl forward. Keep your baby close enough to kiss. If you have to bend your neck dramatically, the baby is too low.
Covering the Baby’s Face
Never let fabric cover the nose or mouth. A covered face is not cozy; it is unsafe. Keep the baby’s face visible at all times.
Skipping the Practice Run
Practice with a doll, towel, or stuffed object before using the carrier with your baby. This gives you a chance to learn the feel of the fabric without the pressure of a wiggly passenger.
Assuming DIY Equals Certified
A homemade wrap is not safety-tested. It may be useful in a pinch, but a professionally designed carrier is the better choice for regular babywearing.
When a Commercial Baby Carrier Is the Better Option
A tested commercial baby wrap, ring sling, soft structured carrier, or hybrid carrier is usually safer and more reliable for daily use. These products typically include weight guidelines, instructions, warning labels, and design features created specifically for infant support. Many also provide better adjustability for different caregivers.
If you plan to babywear often, consider investing in a carrier that fits your baby’s age, weight, and developmental stage. Look for clear instructions, strong fabric, secure construction, and a design that supports healthy hip positioning. A DIY T-shirt wrap can be clever, but a properly made carrier is the dependable minivan of babywearing: less exciting, much safer, and less likely to make relatives nervous.
Cleaning and Care Tips
Wash your T-shirt wrap pieces after use, especially if your baby drools, spits up, or performs any of the other moist hobbies babies enjoy. Air drying can help preserve the fabric’s shape, but machine drying on low may be fine for sturdy cotton shirts.
After every wash, inspect the fabric again. Look for stretching, holes, thinning, seam damage, or changes in elasticity. Retire any piece that looks worn. A baby carrier is not the place for “one more use.” Save that energy for leftovers.
of Real-Life Experience: What Parents Learn Fast
The first thing most parents learn about making a no sew baby wrap carrier from T shirts is that the idea sounds easier than the first attempt feels. On paper, it is simple: cut shirts, cross loops, tuck baby, enjoy peaceful hands-free life. In reality, the mirror suddenly becomes your coach, the fabric twists like it has a personal agenda, and your baby may look at you with the calm judgment of a tiny project manager.
One practical experience is that shirt quality matters more than shirt size alone. A huge shirt made from thin, tired fabric is not better than a smaller shirt made from strong, springy cotton knit. Parents often discover this during the practice test. The rolled towel goes in, everything looks fine for thirty seconds, and then the “carrier” slowly slides south like it is trying to leave the building. That is the fabric telling you, very politely, “I am not the one.”
Another lesson is that babywearing confidence grows with practice. The first try should happen when everyone is calm, fed, and not already late for something. Trying a DIY wrap for the first time while the baby cries, the dog barks, and the delivery person rings the doorbell is a parenting sitcom waiting to happen. A quiet practice session with a spotter makes the process feel less like wrestling laundry and more like learning a useful skill.
Parents also learn that “snug” and “tight” are not the same as “squeezed.” A good wrap holds the baby close to your body without pressing the baby’s chin down or flattening their face into fabric. The baby should look supported, not packaged for shipping. If you feel the need to keep one hand under the baby at all times because the wrap seems unreliable, trust that feeling. Your instincts are often faster than your measuring tape.
Comfort for the adult matters too. If the loops dig into your neck, spread the fabric wider over your shoulders. If your lower back complains after three minutes, the baby may be sitting too low. If the wrap makes you feel off-balance, stop and readjust. Babywearing should feel secure and centered, not like carrying a warm sack of potatoes during a balance test.
Finally, many parents realize that a T-shirt baby wrap is best treated as a short-term experiment, not a permanent parenting system. It can be helpful for learning how wrap-style carriers feel, using up old shirts, or creating a quick backup for supervised moments at home. But for regular use, a tested carrier with proper instructions is worth it. Babies are adorable, wiggly, and surprisingly heavy for people who do not pay rent. Give them the safest support you can.
Conclusion
Learning how to make a no sew baby wrap carrier from T shirts can be a fun, budget-friendly project, especially if you enjoy turning everyday items into useful parenting tools. With three sturdy shirts, careful cutting, patient practice, and strict safety checks, you can create a temporary soft carrier for short supervised use at home.
The most important part is not the cutting technique; it is the safety mindset. Keep your baby visible, upright, close enough to kiss, and well supported. Watch the airway, support the hips, avoid overheating, and never use questionable fabric. When in doubt, choose a tested commercial carrier or ask a babywearing educator or pediatric professional for guidance.
A DIY baby wrap carrier from T shirts may be clever, but your baby’s safety is the real headline. The old T-shirts are just supporting characters.