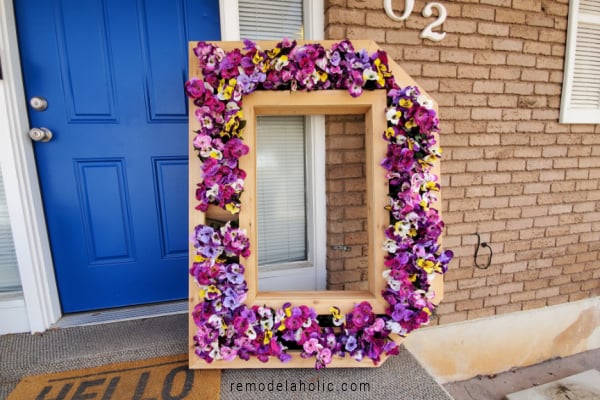
A large outdoor DIY monogram letter planter box is part garden, part woodworking project, and part oversized signature. It can brighten a porch, personalize a patio, marest begonias.
Unlike an ordinary rectangular planter, a monogram planter turns flowers, herbs, or succulents into a living letter. The project looks elaborate, but the basic construction is surprisingly approachable: cut a sturdy letter-shaped back, add shallow sidewalls, protect the wood from moisture, install drainage, secure the planting medium, and fill the face with plants.
This guide uses a 48-inch-tall letter as the working example. You can enlarge or reduce the plan, but keeping the letter bold, shallow, and well supported will make construction, planting, and maintenance much easier.
Why Build a Large Monogram Letter Planter?
A monogram planter adds personality without requiring permanent landscaping changes. It can stand beside a front door, lean against a garden wall, serve as a patio focal point, or become temporary event decor. Once the flowers fade, the same structure can be replanted for fall, winter, or the next growing season.
The project also makes efficient use of vertical space. Instead of occupying several square feet of patio, a freestanding letter creates a tall display with a relatively small footprint. The shape provides natural planting zones, while the surrounding wood becomes part of the design.
Best of all, the design is flexible. A rustic cedar letter filled with sedum suits a farmhouse porch, while a black-painted letter planted with white flowers feels modern. An herb-filled monogram near an outdoor kitchen can be decorative and useful, although guests may eventually wonder why the family initial smells strongly of thyme.
Plan the Letter Before Buying Lumber
Choose a Thick, Simple Typeface
Block-style letters work better than thin scripts because wide strokes provide room for roots, potting mix, and reinforcement. Fonts with complicated curls, narrow points, or tiny enclosed spaces may look attractive on paper but become frustrating when converted into a planter.
Letters such as E, H, L, M, N, T, and W are relatively easy to construct. Curved letters such as B, C, G, O, P, and S require more short sidewall segments or flexible trim. Letters with enclosed centers need inner walls around those openings.
Print the letter as a tiled poster, project it onto the plywood, or draw it with a grid. A practical finished size is approximately 48 inches tall, 30 to 36 inches wide, and 5 1/2 inches deep. Keep every main stroke at least 7 to 9 inches wide so the planter does not look spindly after the sides and trim are installed.
Decide How the Planter Will Be Displayed
Choose the final location before construction. A saturated vertical planter can become extremely heavy, especially after watering. A freestanding base is generally easier to manage than a wall-mounted design because it does not depend on siding, masonry, or decorative trim for support.
For a freestanding letter, plan on a wide wooden base, rear braces, and outdoor anchors in windy locations. If the planter will be mounted, its fasteners must connect to structural framing or suitable masonry anchors rather than decorative siding alone.
Materials and Tools
Recommended Materials
- One sheet of 1/2-inch or 3/4-inch exterior-rated plywood
- Cedar 1-by-6 boards for the outer and inner sidewalls
- Cedar 1-by-2 boards for front trim
- Exterior-rated wood glue
- Stainless-steel or corrosion-resistant exterior screws
- Galvanized 1/2-inch hardware cloth
- Heavy landscape fabric
- Heavy plastic sheeting, pond liner, or another waterproof membrane
- Exterior primer, paint, stain, or clear wood finish
- Lightweight container potting mix
- Small plants, plugs, or rooted cuttings
- Optional drip-irrigation tubing
- Pressure-treated 2-by-4 lumber or cedar for the support base
Cedar is a popular planter material because it is naturally resistant to outdoor decay and can be left unfinished to weather to a gray tone. Stainless-steel or exterior-rated fasteners are preferable because ordinary steel hardware may corrode or discolor cedar. ul Tools
- Tape measure and straightedge
- Pencil, marker, and carpenter’s square
- Jigsaw with an exterior-plywood blade
- Circular saw or miter saw
- Drill and driver bits
- Staple gun with exterior-rated staples
- Wire cutters or aviation snips
- Clamps
- Random-orbit sander or sanding block
- Safety glasses, hearing protection, gloves, and dust protection
How to Build the Monogram Planter Box
1. Transfer the Letter to the Plywood
Lay the plywood on a stable work surface and transfer the enlarged letter. Check the width of every stroke before cutting. Narrow spots are difficult to fill and may become weak points, so adjust the outline while changes still require only an eraser rather than an emergency lumber run.
Mark enclosed areas, such as the center of an A, B, D, O, P, or R. These openings will be cut out and surrounded by their own sidewalls.
2. Cut Out the Letter
Drill starter holes inside enclosed sections and use a jigsaw to follow the outline. Cut slightly outside the line, then sand back to the final shape. Support the plywood near the cut so the last few inches do not break away and splinter the finished face.
Test the letter in its intended location. This is the easiest moment to shorten an awkward arm, widen a narrow stroke, or admit that the first version of an S looked more like a surprised snake.
3. Sand and Seal the Back Panel
Sand both faces and all cut edges. Plywood edges absorb moisture quickly, so coat them carefully with exterior primer, paint, or a compatible outdoor sealer. Finish the back face before adding sidewalls because reaching it later will be inconvenient.
Follow the finish manufacturer’s instructions for drying and curing. When growing edible plants, use materials labeled for the intended application and keep the growing medium separated from finished wood with a liner.
4. Build the Sidewalls
Use cedar 1-by-6 boards to create a shallow tray around the entire letter. Remember that nominal 1-inch lumber is usually about 3/4 inch thick, while a nominal 1-by-6 is normally about 5 1/2 inches wide.
Cut straight sections first. For curves, make the wall from multiple short pieces with angled ends. Dry-fit every segment before applying glue. Predrill through the plywood into the cedar, then attach the walls with exterior glue and screws.
Add small cedar cleats behind long joints, sharp corners, and narrow transitions. The sidewalls will carry the outward pressure of wet potting mix, so reinforcement is more useful than decorative optimism.
5. Add Drainage at Every Low Point
Drill several 3/8-inch to 1/2-inch drainage holes through the lowest edge of each separate planting area. A letter with multiple low pockets may need drainage in several locations. Tilt the completed planter slightly forward or provide small spacers beneath it so water can escape instead of collecting against the base.
Do not rely on a layer of gravel to compensate for missing drainage holes. University extension guidance consistently recommends genuine drainage openings and a well-aerated potting mix; adding coarse material at the bottom does not fix a container that cannot drain. rotect the Interior Wood
Line the plywood back and cedar sidewalls with a waterproof membrane. Fold the liner neatly into corners and staple it near the front edge, where the fasteners will later be covered by trim. Cut openings in the membrane directly over the drainage holes.
The liner slows repeated wetting of the wood, but it must not turn the planter into a sealed bathtub. Confirm that every drain remains open before adding potting mix.
7. Install Optional Irrigation Tubing
A large vertical letter can dry unevenly, with upper and outer sections losing moisture first. Before closing the front, run drip tubing across the upper strokes and secure it with clips. Add emitters at several points rather than expecting one stream of water to travel evenly through the entire letter.
A removable hose connection makes seasonal storage and maintenance easier. Skip this feature if you prefer hand watering, but leave enough access at the top to water slowly without blasting potting mix through the front.
8. Fill the Letter with Potting Mix
Lay the letter flat with the open face upward. Fill it with lightly moistened, lightweight container potting mix. Do not use dense garden soil, which can compact, drain poorly, and add substantial weight. Quality container mixes commonly contain ingredients such as bark, peat or coir, perlite, and vermiculite to balance moisture retention with air space. the mix into corners and beneath narrow crosspieces. Press it gently enough to remove large voids, but do not pack it into a solid block.
9. Secure the Front
Lay landscape fabric over the filled letter. Place galvanized hardware cloth over the fabric and staple both layers securely around the perimeter and enclosed openings. Trim sharp wire ends and cover all exposed edges with cedar 1-by-2 trim.
The hardware cloth supports the soil when the planter is upright, while the fabric keeps fine particles from washing out. The front trim provides a finished border and protects hands from cut wire.
10. Build and Attach the Support
For a freestanding display, attach the planter to a broad base with rear braces. A base extending 18 to 24 inches behind the letter provides more stability than narrow feet. Use exterior screws, reinforce the connection with metal angles if needed, and anchor the assembly in exposed locations.
Lean the letter back slightly so it rests naturally against the braces. Do not position a heavy planter where children can climb on it or where a fall could block a walkway.
How to Plant a Living Monogram
Select Plants for the Actual Light Conditions
Choose plants according to the hours of sunlight at the display location, not according to the photograph on a social media post. Plants sharing one letter should have similar light and moisture needs. Mixing a drought-loving sedum with a thirsty impatiens forces one of them to live under deeply unfair management. options for a sunny monogram include:
- Sedum
- Sempervivum
- Portulaca
- Sweet alyssum
- Creeping thyme
- Small calibrachoa varieties
- Compact ornamental grasses
Good choices for partial shade include:
- Compact coleus
- Wax or tuberous begonias
- Impatiens
- Small ferns
- Alternanthera
- Silver dichondra
- Trailing lobelia
Use Focal, Filler, and Trailing Plants
The classic thriller-filler-spiller formula can be adapted to a vertical letter. Use a bold foliage plant or concentrated color as the focal element, compact plants to cover the middle, and trailing plants around lower corners and outer edges. Repeating a limited color palette usually looks more polished than squeezing in one of everything from the garden center. t While the Letter Is Flat
Cut small X-shaped openings through the landscape fabric between the hardware-cloth wires. Remove excess potting mix from each opening, insert a plant plug, and firm the mix around its roots. Space plants according to their mature size rather than packing them so tightly that they immediately compete.
Water the newly planted letter while it is horizontal. Keep it flat or only slightly elevated until the roots begin knitting into the planting medium. Hardware cloth provides immediate support, but a short establishment period reduces shifting when the planter is raised.
Watering and Ongoing Maintenance
Check the planter frequently during warm, dry, or windy weather. Container plants may require daily attention, and small or shallow planting pockets can dry faster than ordinary garden beds. Water slowly until moisture begins leaving the drainage holes. If the top section dries faster, apply water there first and return for a second pass. water automatically just because it is morning. Push a finger through an accessible opening and test the mix. Succulent plantings should dry more between waterings than begonias, coleus, or flowering annuals.
If the potting mix contains starter fertilizer, wait before beginning a feeding schedule. Repeated watering eventually removes nutrients from container media, so many actively growing annuals benefit from diluted, regular fertilizer after the initial supply begins running low.
Trim trailing plants before they hide the letter’s shape. Replace weak plants promptly, remove faded blooms, and inspect the drainage openings for roots or debris. Each season, check the support braces, screws, liner, hardware cloth, and finish.
In cold climates, remember that roots in above-ground containers are exposed to lower temperatures than roots protected in the ground. Move the planter to a protected location, empty it for winter, or use plants proven hardy for local container conditions.
Common Mistakes to Avoid
- Making the letter too thin: Narrow strokes leave little room for soil and weaken the structure.
- Skipping drainage: A decorative planter still needs functional holes at every low point.
- Using garden soil: It is generally too dense and heavy for a shallow vertical planter.
- Using indoor screws: Ordinary hardware can corrode after repeated exposure to moisture.
- Ignoring saturated weight: A planter that feels manageable when empty may become difficult to lift after planting and watering.
- Choosing plants by color alone: Plants sharing a letter must also share compatible light and watering requirements.
- Standing it upright immediately: Giving new roots time to settle helps reduce shifting and plant loss.
- Forgetting wind exposure: A four-foot letter behaves like a small sail during a storm.
Builder’s-Eye Experience: What the First Project Usually Teaches
A first attempt at a large outdoor DIY monogram letter planter box often begins with confidence, a fresh sheet of plywood, and a letter that looked perfectly reasonable on a laptop screen. The first surprise arrives when that elegant digital font becomes a four-foot outline. Thin strokes suddenly resemble chopsticks, curves require dozens of cuts, and the small opening in the middle of the letter appears designed specifically to trap a jigsaw.
The most useful early lesson is to simplify. A bold, slightly wider letter usually looks better outdoors than a delicate one. Once plants cover part of the front, fine details disappear anyway. Increasing the stroke width also creates more room for potting mix and allows the sidewalls to meet at stronger angles.
Dry-fitting the cedar walls is another step that seems optional until it saves the project. A gap of 1/8 inch may look harmless on the workbench, but wet mix will search for that opening with the determination of a toddler locating an unattended marker. Numbering every segment before gluing prevents the curved pieces from becoming a wooden puzzle.
The build also reveals how quickly small additions increase weight. Plywood feels manageable. Cedar feels manageable. Hardware cloth, liner, trim, soil, plants, water, and a support base each seem manageable. Together, they produce an object that should be positioned before final planting whenever possible. Carrying the completed letter across a yard is a memorable team-building exercise, although not always the kind the team requested.
Plant selection creates another learning curve. Tiny nursery plants may initially leave visible gaps, tempting the builder to crowd in extras. That empty space is useful. Fast-growing annuals can fill it within weeks, while tightly packed plants may develop poor airflow and compete for moisture. Repetition usually produces a stronger monogram than a random collection. Three or four plant varieties arranged rhythmically can make the letter appear intentional even before it fills out.
Watering is where the design becomes a real garden rather than outdoor artwork. The upper corners often dry first, while lower pockets remain moist. A slow watering pass works better than spraying the face with a strong hose stream. Drip tubing is helpful, but even a simple long-spout watering can gives better control than a nozzle set to “jet engine.”
The final lesson is that the planter improves as it ages. Fresh lumber and small plants can make the first-day result look slightly stiff. Within a few weeks, foliage softens the borders, trailing stems spill around the trim, and the letter becomes easier to recognize from a distance. Minor imperfections in the woodworking disappear behind leaves, which may be gardening’s kindest contribution to carpentry.
Seasonal changes also become part of the fun. Spring flowers can give way to heat-tolerant summer plants, followed by ornamental kale, pansies, evergreen cuttings, or decorative branches. The wooden letter remains the framework, while the planting becomes a renewable design surface. That flexibility is what makes the project more rewarding than a single-use lawn decoration.
Conclusion
A large outdoor DIY monogram letter planter box combines personalized decor with the changing color and texture of a container garden. The most successful version begins with a thick, uncomplicated letter and uses outdoor-rated materials, corrosion-resistant fasteners, lightweight potting mix, dependable drainage, and a stable support system.
Build the structure carefully, protect the wood from constant moisture, and select plants suited to the site’s real growing conditions. Once the foliage fills in, the result becomes more than a wooden initial. It becomes a living landmark for the porch, patio, garden, celebration, or front entryand possibly the only family monogram that needs fertilizer.