Every FDM 3D printing hobbyist knows the heartbreak: a model looks gorgeous in the slicer, prints without spaghetti, and then the top surface appears with ridges that look like a tiny bulldozer drove across it during rush hour. That is where ironing comes in. Traditional 3D print ironing smooths flat top layers by running the hot nozzle over the surface with a tiny amount of extrusion. Non-planar ironing takes that idea and gives it a third dimension.
Instead of treating the top layer like a perfectly flat table, non-planar ironing follows curved surfaces with controlled Z-axis movement. The goal is simple but powerful: reduce visible layer lines, soften the staircase effect, and create smoother FDM prints without sanding, filler primer, acetone vapor, or praying to the Benchy gods.
Non-planar ironing is still experimental, but it represents one of the most exciting directions in desktop additive manufacturing. It combines ideas from slicer ironing, non-planar 3D printing, G-code post-processing, curved toolpaths, and surface finish optimization. In plain English: your printer may eventually learn to polish its own work while printing it. That is not magic. It is smarter motion planning.
What Is Ironing in 3D Printing?
In conventional FDM or FFF printing, the nozzle lays down molten filament one line at a time. On a top surface, those lines cool into visible tracks. Even with good calibration, monotonic infill, proper extrusion flow, and a clean nozzle, the result can still look slightly ribbed. Ironing solves this by adding a slow, shallow finishing pass after the top layer is printed.
During ironing, the nozzle travels over the freshly printed top layer at a small spacing, often with very low flow. The heat softens the peaks, the nozzle flattens tiny ridges, and the small amount of extra plastic helps fill microscopic valleys. The result can be a smoother, glossier, more professional-looking top surface. It is especially useful for nameplates, badges, display bases, box lids, logos, signs, and flat cosmetic parts.
Traditional ironing works best on flat top surfaces. That is its superpower, and also its leash. If your part has a curved dome, angled slope, organic shell, aerodynamic contour, or sculptural top, standard ironing cannot fully follow that shape. It is like trying to iron a basketball with a hotel iron. Technically brave, visually questionable.
Why Planar Layers Create Rough Surfaces
Most desktop 3D printers build objects with planar layers. Each layer is sliced at a fixed height, stacked horizontally, and bonded to the layer below. This approach is reliable, simple, and compatible with common Cartesian, CoreXY, and bed-slinger machines. It is also the reason sloped surfaces show stair-stepping.
The staircase effect happens when a curved or angled surface is approximated by many flat layers. A steep wall may hide the layers well, but a shallow slope exposes them dramatically. Lowering the layer height helps, but it does not remove the problem entirely. You can print at 0.08 mm layers and still see texture on a wide, gently curved surface. The print may be accurate, but the surface finish says, “I was built one pancake at a time.”
Adaptive layer height can improve this by using thinner layers in areas where detail matters. However, adaptive slicing is still planar. It changes the thickness of flat slices; it does not make the nozzle follow the true curve of the model. Non-planar printing goes further by allowing the toolpath itself to move through X, Y, and Z at the same time.
What Makes Non-planar Ironing Different?
Non-planar ironing combines two concepts: ironing and non-planar toolpaths. Traditional ironing smooths a flat top surface. Non-planar printing follows curved surfaces by changing the Z height during extrusion or finishing moves. Put them together, and you get a smoothing pass that can travel along a curved surface instead of only across a flat plane.
The technique generally works by printing most of the object conventionally, then applying a special non-planar finishing path to the top or curved outer region. In experimental workflows, the model is sliced, the relevant G-code is processed, and a script creates a finishing path that moves the nozzle over the surface with dynamic Z changes. In some demonstrations, this has been done with modified Slic3r-based tools and Python scripts.
The important point is that non-planar ironing does not require the printer to become a five-axis robot. Many experiments target ordinary three-axis FDM printers. The print head still moves in X, Y, and Z, but instead of keeping Z fixed during a layer, it changes height along the path. This is clever because most printers already have the motors needed for the motion. What they lack is slicer support that makes the process easy, safe, and automatic.
How Non-planar Ironing Improves Surface Finish
Non-planar ironing improves surface finish by attacking the most visible flaw in many FDM prints: layer terracing on curved or shallow surfaces. Instead of leaving the top skin as a stack of tiny steps, the finishing pass traces a smoother contour. The heated nozzle acts almost like a controlled burnisher, softening and pressing the filament so the final surface looks less like a contour map and more like a manufactured part.
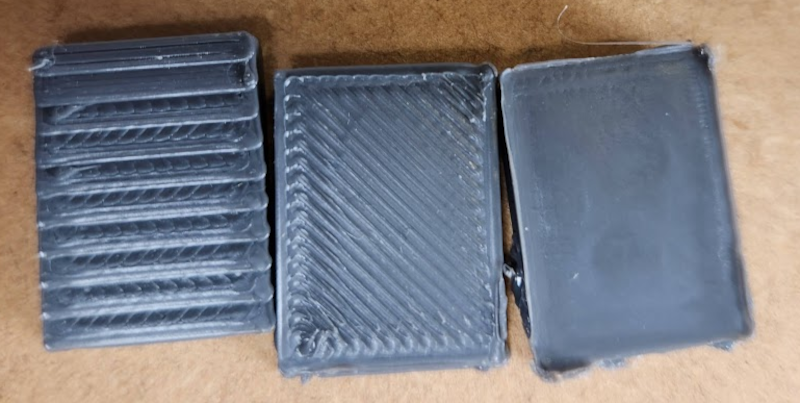
On a curved test object, the difference can be dramatic. A standard planar print shows ridges. A non-planar printed top layer may reduce those ridges. A non-planar ironing pass can make the surface even smoother because it is not just depositing material; it is also remelting and leveling the exposed surface. That matters for display models, ergonomic parts, product prototypes, cosplay props, drone bodies, decorative objects, and any print where the top surface is the first thing people notice.
This technique may also reduce post-processing time. Sanding FDM prints works, but it is messy, slow, and surprisingly good at making your desk look like it lost a fight with powdered plastic. Filler primer helps, but it adds cost, fumes, and waiting time. Chemical smoothing works only with certain materials and can soften details. Non-planar ironing aims to improve the surface directly on the printer.
Where Non-planar Ironing Works Best
Non-planar ironing is most promising for models with visible curved top surfaces. Think of domes, shallow slopes, organic shapes, rounded panels, embossed designs, topographic models, helmets, shells, airfoils, and presentation prototypes. These are the parts where standard flat ironing reaches its limit.
It is also useful when the part is printed for appearance rather than maximum speed. If you are printing a functional bracket that will live inside a machine, standard slicing may be enough. But if the print is a product mockup for a client, a display piece for a shop, or a custom enclosure that sits on a desk, surface quality matters. People judge objects with their eyes first and calipers second.
For flat signs, traditional ironing is still the easier choice. For highly detailed miniatures, non-planar ironing may be difficult because small features leave little room for safe nozzle movement. For tall, narrow, complex geometries, collision risk becomes a serious concern. The best use case is a broad, accessible top surface where the nozzle can move smoothly without crashing into walls, clips, towers, or decorative features.
The Role of Slicers and G-code
A slicer translates a 3D model into machine instructions. For ordinary printing, this means creating layers, perimeters, infill, travel moves, temperatures, speeds, retractions, and toolpaths. For non-planar ironing, the slicer or post-processing tool must do something more advanced: calculate a curved finishing path that follows the model surface while staying safe for the printer hardware.
That is not trivial. The software must understand nozzle geometry, part geometry, clearance, slope, line spacing, extrusion amount, and Z movement. It must avoid collisions between the nozzle, heater block, fan duct, probe, and already printed material. A normal nozzle tip may fit in an area where the wider hotend assembly does not. Anyone who has watched a fan shroud drag across a print knows that the printer does not forgive optimism.
Current experimental workflows often rely on custom scripts, modified slicers, or post-processed G-code. This makes non-planar ironing exciting for advanced users, but less friendly for beginners. Long term, the feature becomes truly powerful when mainstream slicers can generate these paths automatically with good previews, collision warnings, printer profiles, and safe defaults.
Printer Requirements and Practical Limits
The good news is that non-planar ironing can be explored on ordinary FDM machines in principle. The printer needs accurate motion, reliable extrusion, a stable hotend, and firmware that can process the generated G-code smoothly. The bad news is that “in principle” is where many weekend projects go to become twelve-hour troubleshooting sessions.
Z-axis motion must be smooth enough that the nozzle can follow tiny height changes without hesitation. Bed leveling must be accurate. Flow calibration matters because ironing uses very small extrusion amounts. Temperature control matters because the nozzle is being used as a smoothing tool. If the hotend is too cool, it may scrape instead of smooth. If it is too hot, it may smear, drag, or create shiny blobs at the edges.
Hardware geometry also matters. A long, narrow nozzle has more clearance than a bulky hotend with a low fan duct. Delta printers, CoreXY machines, and Cartesian bed-slingers may all behave differently depending on acceleration, Z mechanics, firmware settings, and part cooling. Before non-planar ironing becomes a normal checkbox, slicers will need strong machine-awareness.
Best Materials for Non-planar Ironing
PLA is often used in experiments because it is easy to print, widely available, and responds well to heat-based smoothing at the nozzle. PLA can produce crisp details and attractive surfaces, but it can also suffer from heat creep if ironing is slow and the hotend cooling is weak. That means long ironing passes over huge surfaces should be approached carefully.
PETG may benefit from smoothing, but it is more prone to sticking to the nozzle and forming little glossy zits, also known as “PETG confetti for people who enjoy pain.” Reducing temperature, drying filament, tuning flow, and using a clean nozzle become especially important. ABS and ASA may respond well to heat, but they bring warping, fumes, and enclosure considerations. TPU is possible in theory, but flexible filament and tiny ironing flow are not exactly a relaxing combination.
In general, dry filament, calibrated extrusion, and stable temperature are more important than the brand name on the spool. Non-planar ironing magnifies small errors. A printer that already leaves rough top layers, inconsistent extrusion, or random blobs will not become perfect just because the toolpath learned yoga.
Settings That Matter Most
Ironing Flow
Ironing flow controls how much filament is extruded during the smoothing pass. Too little flow leaves grooves and does not fill small gaps. Too much flow creates raised edges, blobs, and smearing. For non-planar ironing, flow needs to be especially conservative because the nozzle is following a surface rather than traveling across a flat plane.
Ironing Speed
Slower speeds usually give the nozzle more time to soften and level the surface. However, going too slow increases print time and may increase heat-related issues. A practical approach is to start slow, test small surfaces, and only scale up after confirming that the material behaves well.
Line Spacing
Smaller spacing produces more overlap between passes and can create a smoother finish. It also increases print time. With non-planar paths, spacing must be balanced against surface curvature. A path that works on a gentle curve may not work on a tight dome.
Nozzle Temperature
Temperature determines whether the nozzle glides, polishes, smears, or digs. Slight adjustments can change the finish dramatically. The best setting depends on material, speed, cooling, nozzle type, and surface shape.
Z Offset and Clearance
This is the scary setting. Too high, and the nozzle barely smooths anything. Too low, and the printer starts sculpting with the enthusiasm of a garden rake. Non-planar ironing requires precise surface tracking, so Z calibration is essential.
Benefits of Non-planar Ironing
The main benefit is smoother surface finish on curved and angled regions. That alone is a big deal. FDM printing has become fast, affordable, and surprisingly accurate, but surface finish remains one of its obvious weaknesses. Non-planar ironing targets that weakness directly.
Another benefit is reduced manual post-processing. For makers, that means less sanding. For small businesses, it means faster iteration and better-looking prototypes. For educators and makerspaces, it offers a strong demonstration of how software can improve physical manufacturing without changing the machine.
Non-planar ironing also points toward a larger future: smarter slicing. Instead of treating every part as a stack of flat layers, slicers can analyze geometry and choose the best strategy for each region. Flat areas can use normal layers. Curved visible surfaces can use non-planar finishing. Hidden structural sections can prioritize speed. Cosmetic areas can prioritize beauty. In other words, the slicer becomes less like a paper cutter and more like a manufacturing planner.
Challenges and Drawbacks
The biggest drawback is complexity. Standard ironing is already sensitive to flow, speed, spacing, and temperature. Non-planar ironing adds curved motion, collision avoidance, Z-axis precision, and surface mapping. That is a lot of variables. When it works, it looks futuristic. When it fails, it may look like your printer tried to autograph the model with a hot nail.
Print time is another issue. Ironing adds a second pass. Non-planar ironing may add even more computation and motion complexity. For a small cosmetic surface, that is acceptable. For a large object, the extra time may be painful.
There is also the problem of standardization. Mainstream slicers already support conventional ironing, but non-planar ironing is not yet a polished, universal feature. Users may need experimental repositories, modified slicers, scripts, and careful setup. That is fun for advanced makers. It is less fun for someone who just wants a smooth lid for a storage box before dinner.
How It Compares With Other Smoothing Methods
Compared with sanding, non-planar ironing is cleaner and more automated. Sanding is flexible, but it removes material and can soften edges. Compared with filler primer, non-planar ironing does not add coatings or require drying time. Compared with vapor smoothing, it works conceptually with more materials and does not involve chemical exposure. Compared with resin printing, it keeps the durability, size, and material options of FDM while improving the surface.
However, each method has its place. Resin printing still wins for tiny detail. Sanding still works on almost anything if you have patience and a podcast backlog. Vapor smoothing can create dramatic results on compatible plastics. Non-planar ironing is best seen as another tool in the surface-finish toolbox, not a universal replacement for every finishing method.
Tips for Getting Better Results
Start with a simple test model. A shallow curved tile or dome is better than a complex dragon skull with horns, teeth, and emotional baggage. Use dry filament. Clean the nozzle. Calibrate extrusion flow. Make sure the first layer and top layers are already consistent before experimenting with non-planar finishing.
Use small test patches before committing to large prints. Compare standard printing, traditional ironing, non-planar top layers, and non-planar ironing if your workflow allows it. Photograph surfaces under the same lighting angle because layer lines love dramatic shadows. A print that looks smooth from above may reveal ridges when lit from the side.
Keep expectations realistic. Non-planar ironing can make smooth prints, but it is not yet a beginner-friendly “make everything perfect” switch. It is more like overclocking a slicer: powerful, educational, and occasionally rude.
The Future of Smooth FDM Printing
The long-term future of non-planar ironing is likely integration. When slicers can automatically detect suitable surfaces, generate safe curved finishing paths, preview nozzle clearance, and tune parameters by material profile, this technique could become a common quality setting. Imagine selecting “Cosmetic Curved Top Finish” and letting the slicer handle the rest. That would be a major step forward for desktop 3D printing.
Non-planar ironing also fits into a broader movement toward adaptive manufacturing. Future slicers may combine variable layer heights, pressure advance, flow compensation, non-planar top skins, surface-aware ironing, and machine-specific collision modeling. The printer will still melt plastic through a tiny nozzle, but the intelligence behind that motion will be far more advanced.
For now, non-planar ironing is a promising experimental method. It is real, it is impressive, and it is not yet effortless. That is exactly where many important 3D printing features began.
Hands-On Experiences: What Non-planar Ironing Teaches Makers
The first experience most makers have with ironing is both delightful and suspicious. You enable the setting, print a flat badge, and suddenly the top surface looks smoother than expected. Then you print a larger part, and the edges get fuzzy, the finish turns uneven, or the nozzle drags a tiny shiny worm of plastic across the surface. This is the moment you learn that ironing is not a magic spell. It is a negotiation between heat, pressure, flow, and patience.
Non-planar ironing raises that lesson to the next level. The biggest practical discovery is that the model must be designed or selected with the technique in mind. A broad, gentle curve is friendly. A surface surrounded by tall walls is not. A dome with good nozzle access is a promising candidate. A complex part with overhangs, sharp decorations, and narrow valleys may turn into a collision-risk festival. Before trying the technique, it helps to inspect the part like a cautious machinist: Can the nozzle physically reach the surface? Will the heater block clear nearby features? Is the curve gradual enough for the Z-axis to follow smoothly?
Another experience is learning how much lighting affects judgment. A non-planar ironed surface may look excellent under soft overhead light, then reveal faint marks under a flashlight held low across the part. This does not mean the method failed. It means surface finish is visual, tactile, and directional. For prototypes, the improvement may be more than enough. For glossy consumer-facing parts, you may still want light sanding, primer, or a design texture that hides remaining artifacts.
Small calibration cubes are not enough. Makers experimenting with this technique should print surface-finish coupons: shallow ramps, domes, curved rectangles, and embossed panels. Keep the same filament, nozzle, temperature, and layer height while changing only one variable at a time. This sounds boring, but it prevents the classic 3D printing mistake of changing seven settings and then declaring victory over the wrong one.
The most useful mindset is to treat non-planar ironing as finishing during fabrication. You are not just printing a part; you are asking the machine to perform a tiny polishing operation while the plastic is still thermally cooperative. That makes cleanliness important. A dirty nozzle can scratch or smear. Wet filament can bubble. Over-extrusion can create ridges that no finishing pass can fully rescue. The better the base print, the better the ironing result.
In practice, the sweet spot is often a cosmetic part where the surface is visible, gently curved, and worth the extra print time. A custom enclosure lid, a topographic display, a curved logo plaque, or a prototype handle can show the benefit clearly. For hidden brackets, rough jigs, or emergency replacement parts, standard printing wins because speed matters more than beauty.
The best part of experimenting with non-planar ironing is that it changes how you think about FDM printing. Instead of accepting layer lines as an unavoidable tax, you start seeing them as a software problem, a geometry problem, and a toolpath problem. That is exciting. The printer hardware may be familiar, but the motion strategy is evolving. Smooth prints are no longer only about sanding after the fact. Increasingly, they are about smarter paths before the plastic ever cools.
Conclusion
Non-planar ironing makes smooth prints by combining the surface-leveling benefits of conventional ironing with curved, surface-following toolpaths. It is especially promising for FDM prints with visible curved top surfaces, where ordinary planar layers create stair-stepping that even fine layer heights cannot fully hide.
The technique is not yet as simple as checking a box in every slicer. It currently requires careful calibration, compatible geometry, reliable printer motion, and, in many cases, experimental tools or post-processing scripts. Still, its potential is enormous. It shows that better 3D print quality does not always require a new printer, a new material, or a weekend of sanding. Sometimes, the biggest upgrade is a smarter path for the nozzle.
For makers, engineers, educators, and small product designers, non-planar ironing is worth watching closely. It may become one of the features that helps FDM printing move from “good enough with visible layers” to “surprisingly smooth right off the build plate.” And if your printer can eventually iron its own curved surfaces, the least we can do is stop blaming it for looking like a stack of pancakes.