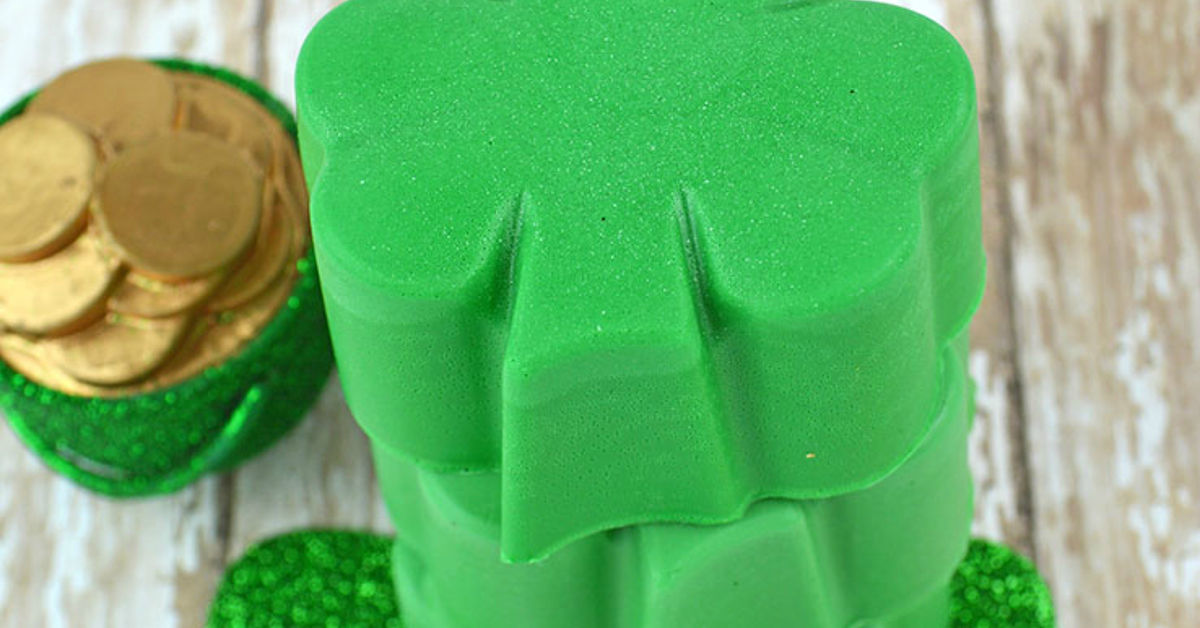
There are St. Patrick’s Day decorations, and then there are St. Patrick’s Day decorations that smell good, look adorable, and politely remind everyone in your bathroom to wash their hands. Homemade shamrock soap belongs firmly in the second category. It is festive, practical, giftable, and far less likely to leave glitter in your carpet than most holiday crafts.
The best part? You do not need to be a professional soap maker, own a lab coat, or understand complicated chemistry to make beautiful shamrock soap at home. This beginner-friendly project uses melt-and-pour soap base, which means the actual soap-making chemistry has already been done for you. Your job is to melt, color, scent, pour, and proudly act like a bathroom boutique owner for the rest of the week.
What Is Homemade Shamrock Soap?
Homemade shamrock soap is a decorative handmade soap shaped like a shamrock, clover, or four-leaf clover. It is most often made for St. Patrick’s Day, spring gifting, party favors, school-safe crafts, or cheerful bathroom decor. The classic version is green, lightly scented, and poured into a silicone shamrock mold.
For this guide, we are focusing on melt-and-pour shamrock soap because it is the easiest and safest method for beginners. Unlike cold-process soap, melt-and-pour soap does not require handling lye. You start with a pre-made soap base, gently melt it, add soap-safe color and fragrance, pour it into molds, and let it harden. It is basically the lasagna of soap making: the layers can look fancy, but the process is surprisingly manageable.
Why Melt-and-Pour Soap Is Best for This Project
Melt-and-pour soap is ideal for small decorative bars because it sets quickly, takes color well, and can be unmolded the same day. It is also forgiving. If your first pour looks slightly uneven, congratulationsyou have created “artisan texture.” If you add too much green and the soap looks like a leprechaun’s sports car, that is still technically festive.
Common melt-and-pour soap bases include clear glycerin, white glycerin, shea butter, goat milk, aloe, oatmeal, and coconut-based varieties. Clear soap gives a jewel-like look, while white soap creates a soft pastel green. For shamrock soap, both work beautifully. Clear base looks playful and bright; white base looks creamy and boutique-style.
Homemade Shamrock Soap Supplies
Before you start, gather everything you need. Melted soap cools faster than you expect, and nothing makes a craft table more dramatic than sprinting across the kitchen looking for a spoon while your soap sets in the measuring cup.
Basic Ingredients
- 1 pound melt-and-pour soap base, clear or white
- Soap-safe green colorant, mica, liquid dye, or cosmetic pigment
- Soap-safe fragrance oil or essential oil
- Silicone shamrock mold or clover mold
- Isopropyl alcohol in a spray bottle, preferably 91% or higher
Helpful Tools
- Microwave-safe glass measuring cup or heat-safe pouring pitcher
- Digital kitchen scale
- Knife or soap cutter
- Small spoon or silicone spatula
- Thermometer, optional but helpful
- Paper towels and a clean workspace
- Plastic wrap or shrink wrap for finished bars
A digital scale is strongly recommended because soap-making ingredients are more accurate by weight than by volume. This is especially important for fragrance. Too little fragrance may disappear; too much can irritate skin, soften the soap, or make the bar feel oily. The nose wants drama, but the skin prefers manners.
How to Make Homemade Shamrock Soap
This recipe makes about four to six small shamrock soap bars, depending on the size of your mold. You can double the recipe for party favors or divide it into smaller batches to test different shades and scents.
Step 1: Clean and Prepare Your Workspace
Start with a clean counter, clean tools, and dry molds. Soap is used for cleaning, but that does not mean it wants to begin life surrounded by toast crumbs and mystery coffee rings. Wash your equipment with warm soapy water, dry it well, and keep food-prep items separate from soap-making tools if you plan to make soap regularly.
Set your silicone shamrock mold on a flat tray or cutting board before pouring. This makes it easier to move the mold later without creating soap waves. A floppy silicone mold full of warm liquid soap has the personality of a water balloon, so give it support.
Step 2: Cut the Soap Base Into Cubes
Cut 1 pound of melt-and-pour soap base into small cubes, about 1 inch each. Smaller pieces melt more evenly and reduce the chance of overheating. Place the cubes into your microwave-safe measuring cup or pouring pitcher.
If you are using a white base, expect a creamy pastel result. If you are using clear glycerin soap, expect a brighter emerald or stained-glass effect. Both are excellent for homemade shamrock soap; the choice depends on whether your mood is “soft farmhouse sink” or “lucky charm gemstone.”
Step 3: Melt the Soap Slowly
Microwave the soap base in short bursts. Start with 20 to 30 seconds, stir, then continue in 10- to 15-second intervals until fully melted. Do not boil the soap. Overheating can create bubbles, rubbery texture, moisture loss, and a less polished finish.
If you prefer not to use a microwave, melt the soap gently in a double boiler over low heat. The goal is smooth liquid soap, not a bubbling cauldron. This is St. Patrick’s Day, not a wizard exam.
Step 4: Add Color
Add a small amount of soap-safe green colorant and stir gently. Begin with less than you think you need. You can always add more, but you cannot easily remove color once your soap has turned into neon swamp pudding.
For a natural-looking shamrock shade, combine a soft green with a tiny touch of yellow. For a deeper Irish green, use emerald mica or green liquid soap dye. If using mica powder, disperse it first in a small amount of melted soap or glycerin to prevent clumps.
Step 5: Add Fragrance
Once the soap is melted and slightly cooled, add soap-safe fragrance oil or essential oil according to the manufacturer’s recommended usage rate. A common starting range for melt-and-pour soap is around 2% to 3% fragrance by weight, but every fragrance behaves differently, so always check the product guidance.
Fresh scents work especially well for shamrock soap. Try peppermint, spearmint, cucumber melon, aloe, green tea, lime, rainwater, or a soft herbal blend. For a “Shamrock Shake” personality, use a skin-safe vanilla mint fragrance. Just remember that vanilla-based fragrances may discolor soap over time, often turning it tan or creamy brown. That can be charming in some projects, but less ideal if you are aiming for bright green clovers.
Step 6: Pour Into Shamrock Molds
Pour the melted soap slowly into the shamrock mold cavities. Slow pouring helps reduce bubbles and gives the details of the mold time to fill properly. If bubbles appear on top, spritz lightly with isopropyl alcohol. The alcohol helps pop surface bubbles and creates a smoother finish.
Do not move the mold immediately unless it is sitting on a tray. Warm soap can slosh into the wrong corners, and while abstract soap art is valid, it may not look like a shamrock anymore.
Step 7: Let the Soap Set
Allow the soap to cool completely at room temperature. Small shamrock bars may harden in one to three hours, but leaving them overnight gives the cleanest unmolding. Avoid placing hot soap directly in the freezer, as sudden temperature changes can encourage sweating or surface issues.
Step 8: Unmold and Wrap
Once firm, gently peel the silicone mold away from the soap rather than forcing the soap out. Wrap finished bars in plastic wrap, shrink wrap, or airtight packaging. Melt-and-pour soap contains glycerin, which attracts moisture from the air. This is one reason it can feel nice on skin, but it also means unwrapped bars may develop little beads of moisture called “glycerin dew.” The soap is not crying; it is just dramatic and hydrating.
Creative Variations for Shamrock Soap
Once you understand the basic process, homemade shamrock soap becomes easy to customize. You can keep the design simple and classic or turn your soap mold into a tiny St. Patrick’s Day parade.
Layered Shamrock Soap
Pour a thin layer of clear green soap into the mold, let it firm slightly, then pour a second layer of white or pale green soap on top. Spray each layer with alcohol before adding the next so the layers stick together. This creates a polished two-tone look that feels more expensive than it is, which is always a satisfying craft victory.
Gold-Dusted Shamrock Soap
Brush a tiny amount of cosmetic-grade gold mica into the mold before pouring the soap. When unmolded, the shamrocks will have a light golden shimmer on the surface. Use cosmetic-safe mica only. Craft glitter may look fun, but unless it is approved for skin use, it belongs on greeting cards, not on hands.
Peppermint Shamrock Soap
For a crisp, refreshing bar, scent the soap with peppermint or spearmint essential oil at a skin-safe rate. Mint pairs beautifully with green coloring and gives the soap a clean, cheerful personality. It is especially nice for guest bathrooms, where people will think you are very put together. Let them believe it.
Oatmeal Clover Soap
Use an oatmeal melt-and-pour base or add a very small amount of finely ground colloidal oatmeal. This creates a gentle, rustic-looking soap. Avoid adding large pieces of dried herbs, fresh botanicals, citrus slices, or food ingredients, because they can brown, spoil, or grow mold inside melt-and-pour soap.
Mini Party Favor Soaps
Use tiny shamrock molds to make individual guest soaps. Wrap each bar in clear packaging and tie it with green or gold ribbon. Add a small tag that says “Lucky You” or “Wash Your Hands, Leprechaun.” These are cute for classroom gifts, office favors, bridal showers, spring markets, and St. Patrick’s Day dinner parties.
Safety Tips for Homemade Soap Projects
Even beginner soap projects deserve careful handling. Melt-and-pour soap is simpler than cold-process soap, but it still gets hot enough to burn skin. Use heat-safe containers, stir gently, and supervise children closely. Kids can help choose colors, place labels, or package cooled bars, but adults should handle melting and pouring.
Use only ingredients labeled as safe for soap or bath-and-body products. Candle dye, craft paint, non-cosmetic glitter, and random kitchen extracts are not good substitutes. Skin is not a craft canvas, even if your inner artist strongly disagrees.
If you plan to sell or widely distribute homemade shamrock soap, be careful with product claims. A plain cleansing soap is different from a cosmetic or drug product depending on ingredients, marketing language, and intended use. Avoid claims such as “heals eczema,” “kills germs,” “treats acne,” or “antibacterial” unless you understand the legal requirements. For simple gifts, labels can include the soap base, fragrance, colorant, date made, and a note such as “for external use only.”
Troubleshooting Homemade Shamrock Soap
Why Is My Soap Sweating?
Melt-and-pour soap can attract moisture from the air because of its glycerin content. Wrap bars tightly once they are fully cooled. Store them in a cool, dry place away from humidity.
Why Did My Soap Have Bubbles?
Bubbles usually come from stirring too vigorously or pouring too quickly. Stir slowly, pour gently, and spray the surface with isopropyl alcohol right after pouring.
Why Did My Soap Turn Brown?
Some fragrance oils, especially those containing vanilla, can discolor soap. If you want a bright green shamrock, choose a non-discoloring fragrance or use a vanilla color stabilizer designed for melt-and-pour soap.
Why Did the Layers Separate?
Layer separation happens when one layer gets too cool or when you forget to spray alcohol between layers. Pour the next layer when the first layer is firm enough to support it but still slightly warm. Spray with alcohol before pouring.
Why Is My Soap Soft?
Too much fragrance, extra oil, or liquid additive can soften melt-and-pour soap. Keep additives minimal and follow recommended usage rates. More is not always better. In soap making, “just a splash” can become “why is this bar sweating like it owes money?”
Packaging and Gift Ideas
Homemade shamrock soap makes an easy seasonal gift because it is small, useful, and cheerful. Wrap each bar tightly in clear wrap, then add a paper band, sticker, or ribbon. Green baker’s twine, kraft paper, gold foil labels, and tiny clover tags all work well.
For a polished gift set, place three shamrock soaps in a small box with crinkle paper. Add a label with the scent name, such as “Mint Clover,” “Lucky Lime,” or “Fresh Green Tea.” You can also pair the soap with a hand towel, nail brush, bath sponge, or small jar of bath salts.
If making favors for an event, keep the scent light. Strong fragrance may smell lovely in your kitchen but become overwhelming when twenty bars are packed into one basket. A subtle scent is more guest-friendly and less likely to make the room smell like a mint factory wearing a green hat.
Experience Notes: What Making Homemade Shamrock Soap Teaches You
The first thing you learn when making homemade shamrock soap is that preparation matters more than confidence. Confidence says, “I can melt soap and pour it into a mold.” Preparation says, “Yes, but where is the alcohol spray, why is the mica clumpy, and why did I put the ribbon in another room?” Once the soap is melted, the project moves quickly. Having your mold ready, fragrance measured, colorant nearby, and workspace cleared makes the difference between a calm craft session and a tiny green emergency.
Another lesson is that color behaves differently in every soap base. A drop of green dye in clear glycerin soap can look bright and jewel-like, while the same amount in white soap becomes soft and creamy. Mica can add shimmer, but too much may settle or create streaks. The smartest approach is to start light, stir gently, and add more only if needed. Shamrock soap does not have to be one perfect shade of green. In fact, a tray of slightly different greens often looks more natural and charming.
Fragrance is where many beginners get ambitious. It is tempting to add extra scent because the melted soap smells lighter than expected. However, finished soap often smells stronger after it sets, and fragrance limits exist for a reason. A lightly scented mint or green tea soap feels fresh and pleasant. An over-scented bar can feel oily, overpowering, or irritating. The goal is “clean spring morning,” not “leprechaun cologne explosion.”
The most satisfying moment is unmolding. Silicone molds make this easy, but patience helps. If you unmold too soon, the edges may dent or the details may blur. Waiting overnight gives the soap a firmer, glossier finish. When the shamrock shape finally pops out cleanly, it feels like a small craft miracle. This is also when you discover which molds have the best detail, which color combination looks most professional, and whether you should have made a double batch. Usually, the answer is yes.
Packaging also changes the experience. A plain green soap bar is cute, but a wrapped shamrock soap with a ribbon and label looks like something from a boutique gift shop. Even simple packaging makes the project feel finished. It also protects the soap from moisture and fingerprints. If you are gifting the bars, label the scent and ingredients clearly, especially if recipients may have sensitivities.
Finally, homemade shamrock soap is a reminder that seasonal crafts do not need to be complicated to feel special. You are making something useful, festive, and personal. It can brighten a sink, become a thoughtful favor, or give kids a fun way to participate in holiday preparation. And unlike many holiday decorations, it does not need storage space after March 17. It simply gets used, enjoyed, and washed down the drain in a cheerful little cloud of bubbles. That is the beauty of homemade soap: it is practical magic with excellent hygiene.
Conclusion
Homemade shamrock soap is one of the easiest ways to bring St. Patrick’s Day charm into your home without committing to glitter, complicated tools, or a craft project that takes over the dining table for three business days. With melt-and-pour soap base, a shamrock mold, soap-safe color, and a fresh scent, you can create festive bars that look thoughtful and feel genuinely useful.
Whether you make classic green clovers, gold-dusted guest soaps, minty party favors, or layered artisan-style bars, the key is to keep the process simple and skin-safe. Choose proper soap ingredients, measure fragrance carefully, pour slowly, wrap finished bars well, and enjoy the fact that your bathroom now looks ready for a tiny Irish parade.