Creating an iCloud email address sounds like it should take three clicks, a sip of coffee, and maybe one tiny Apple logo animation. Sometimes it does. Sometimes it feels like you have wandered into a digital orchard where every tree asks for two-factor authentication. The good news is that setting up an iCloud email address is straightforward once you understand what Apple means by an Apple Account, iCloud Mail, and that shiny @icloud.com address everyone keeps talking about.
This guide explains how to create an iCloud email address on a Mac, what you can do from a Windows PC, how to access iCloud Mail afterward, and how to avoid the most common setup mistakes. Whether you want a cleaner personal email, a backup address, or a more Apple-friendly inbox for your devices, this walkthrough will help you get it done without yelling at your screen. Your screen appreciates that.
What Is an iCloud Email Address?
An iCloud email address is an email address that ends in @icloud.com. It is connected to Apple’s iCloud Mail service, which lets you send, receive, and manage email through iCloud.com, the Mail app on Mac, iPhone, and iPad, and supported email apps such as Outlook.
Here is the important distinction: an Apple Account and an iCloud email address are related, but they are not always the same thing. Your Apple Account is the login you use for Apple services like iCloud, the App Store, Apple Music, FaceTime, and Find My. It may be a Gmail, Yahoo, Outlook, or other email address. Your iCloud email address is the Apple-hosted email account you create for iCloud Mail.
For example, you might sign in to your Apple Account with [email protected], then create [email protected] for iCloud Mail. After that, you can use the iCloud address to send and receive email, while still using your original email to sign in to your Apple Account if you prefer.
Can You Create an iCloud Email Address on a PC?
Yes, with a small but important catch. On a Windows PC, you can create an Apple Account through Apple services such as Apple Music, Apple TV, or Apple’s account website. You can also access iCloud Mail at iCloud.com once your iCloud Mail address exists. However, the most direct way to create a primary @icloud.com email address is usually through an Apple device, especially a Mac, iPhone, or iPad.
That does not mean PC users are stranded in the wilderness holding a keyboard. If you already have an iCloud email address, you can use it on a PC through a browser, iCloud for Windows, Outlook, or another mail app with the correct iCloud Mail settings. If you do not yet have one, creating the Apple Account is still the first step. Then, depending on what options appear for your account, you may complete iCloud Mail setup through iCloud settings on an Apple device or through iCloud.com if prompted.
Before You Start: What You Need
Before creating an iCloud email address on a PC or Mac, gather the basics. You need an internet connection, a valid phone number for account verification, a strong password, and access to your Apple Account. If you are setting up mail on a third-party app, you may also need two-factor authentication and an app-specific password.
Choose Your iCloud Email Name Carefully
Your iCloud email address is not something you should create while half-asleep at 1:00 a.m. using the name [email protected]. Once you create the primary iCloud Mail address, it is meant to be long-term. Pick something professional, simple, and easy to spell.
Good examples include combinations of your first name, last name, initials, or a clean variation. If your preferred name is unavailable, try adding a middle initial, a short word, or a number that does not make the address look like a secret robot serial code.
How to Create an iCloud Email Address on a Mac
If you have a Mac, this is the smoothest route. Apple gives macOS direct access to iCloud Mail setup from System Settings.
Step 1: Open System Settings
Click the Apple menu in the top-left corner of your screen and choose System Settings. If your Mac is running an older version of macOS, you may see System Preferences instead. Different name, same general neighborhood.
Step 2: Sign In to Your Apple Account
If you are not already signed in, click Sign In and enter your Apple Account details. If you do not have an Apple Account yet, choose the option to create one and follow the on-screen instructions. You will need to provide basic information such as your birthday, country or region, password, and verification details.
Step 3: Go to iCloud Settings
After signing in, click your name in the sidebar, then select iCloud. This section controls iCloud features such as Photos, Drive, Keychain, Notes, and Mail.
Step 4: Turn On iCloud Mail
Look for Mail or iCloud Mail. Turn it on. If you do not already have an iCloud email address, your Mac should prompt you to create one. Enter the address you want, review it carefully, and confirm.
Once the address is created, your Mac can use it in the Mail app. You can also access it from iCloud.com and other devices signed in with the same Apple Account.
Step 5: Test Your New Address
Open the Mail app and send a test email to another address you own. Then reply to it. This tiny test can save you from discovering later that your new inbox was set up correctly but your outgoing mail was taking an unscheduled vacation.
How to Create an Apple Account on a Windows PC
If you are on Windows, start by creating an Apple Account. This gives you access to Apple services and prepares your account for iCloud features.
Step 1: Use Apple Music or Apple TV for Windows
Open the Apple Music app or Apple TV app on your Windows PC. Choose Sign In, then select the option to create a new Apple Account. Follow the prompts to enter your email address, create a strong password, set your region, and verify your account.
Step 2: Sign In at iCloud.com
After creating your Apple Account, go to iCloud.com and sign in. If iCloud Mail is available for setup on your account, follow any prompts that appear. If you do not see an option to create an iCloud Mail address on the web, use a Mac, iPhone, or iPad to turn on iCloud Mail and create the primary @icloud.com address.
Step 3: Access iCloud Mail on Your PC
Once your iCloud email address exists, you can use it from Windows in several ways. The simplest method is iCloud.com Mail in your browser. You can also install iCloud for Windows to sync iCloud features, or add your iCloud Mail account to Outlook if you prefer a desktop email experience.
How to Use iCloud Mail on a PC After Setup
After your iCloud email address is active, Windows becomes much more cooperative. You have three practical options: browser access, Outlook, or manual email client setup.
Option 1: Use iCloud Mail in a Browser
This is the easiest choice. Open your browser, go to iCloud.com, sign in with your Apple Account, and choose Mail. You can send, receive, delete, archive, and organize messages without installing anything. It is perfect for shared computers, workstations, or anyone who likes keeping things simple.
Option 2: Use iCloud for Windows
iCloud for Windows helps you access Apple services from a PC, including files, photos, passwords, and certain Outlook-related syncing features. Download it from the Microsoft Store, sign in with your Apple Account, and choose the features you want to enable.
If you plan to use iCloud Mail with Outlook, make sure your Windows version, Outlook version, and iCloud for Windows app are current. Updating software is not glamorous, but neither is spending an afternoon troubleshooting a problem that was fixed three versions ago.
Option 3: Add iCloud Mail to Outlook or Another Email App
You can add iCloud Mail to Outlook or another email app using Apple’s iCloud Mail settings. In many cases, you will need an app-specific password instead of your regular Apple Account password. This is a security feature that allows a third-party app to access mail without storing your main password.
For manual setup, iCloud Mail uses IMAP for incoming mail and SMTP for outgoing mail. The incoming server is typically imap.mail.me.com with SSL on port 993. The outgoing server is typically smtp.mail.me.com with authentication enabled. If your app asks for a username, try the part before @icloud.com; if that fails, use the full iCloud email address.
How to Create an App-Specific Password for iCloud Mail
If Outlook, Thunderbird, or another email client refuses your Apple Account password, do not panic. It is not judging you. It probably needs an app-specific password.
Step 1: Sign In to Your Apple Account
Go to Apple’s account management page and sign in. Make sure two-factor authentication is enabled, because app-specific passwords depend on Apple’s modern account security system.
Step 2: Open Sign-In and Security
Find the Sign-In and Security section, then choose App-Specific Passwords. Select the option to generate a new password.
Step 3: Label the Password
Give the password a clear label, such as “Outlook Windows” or “Thunderbird Mail.” This helps you identify it later if you need to revoke it.
Step 4: Use It in Your Email App
Copy the generated password and paste it into the password field in your email app. Do not use spaces unless the app specifically keeps them from the generated format. If the password is shown only once, save it in a secure password manager or be ready to generate a new one.
How to Create iCloud Email Aliases
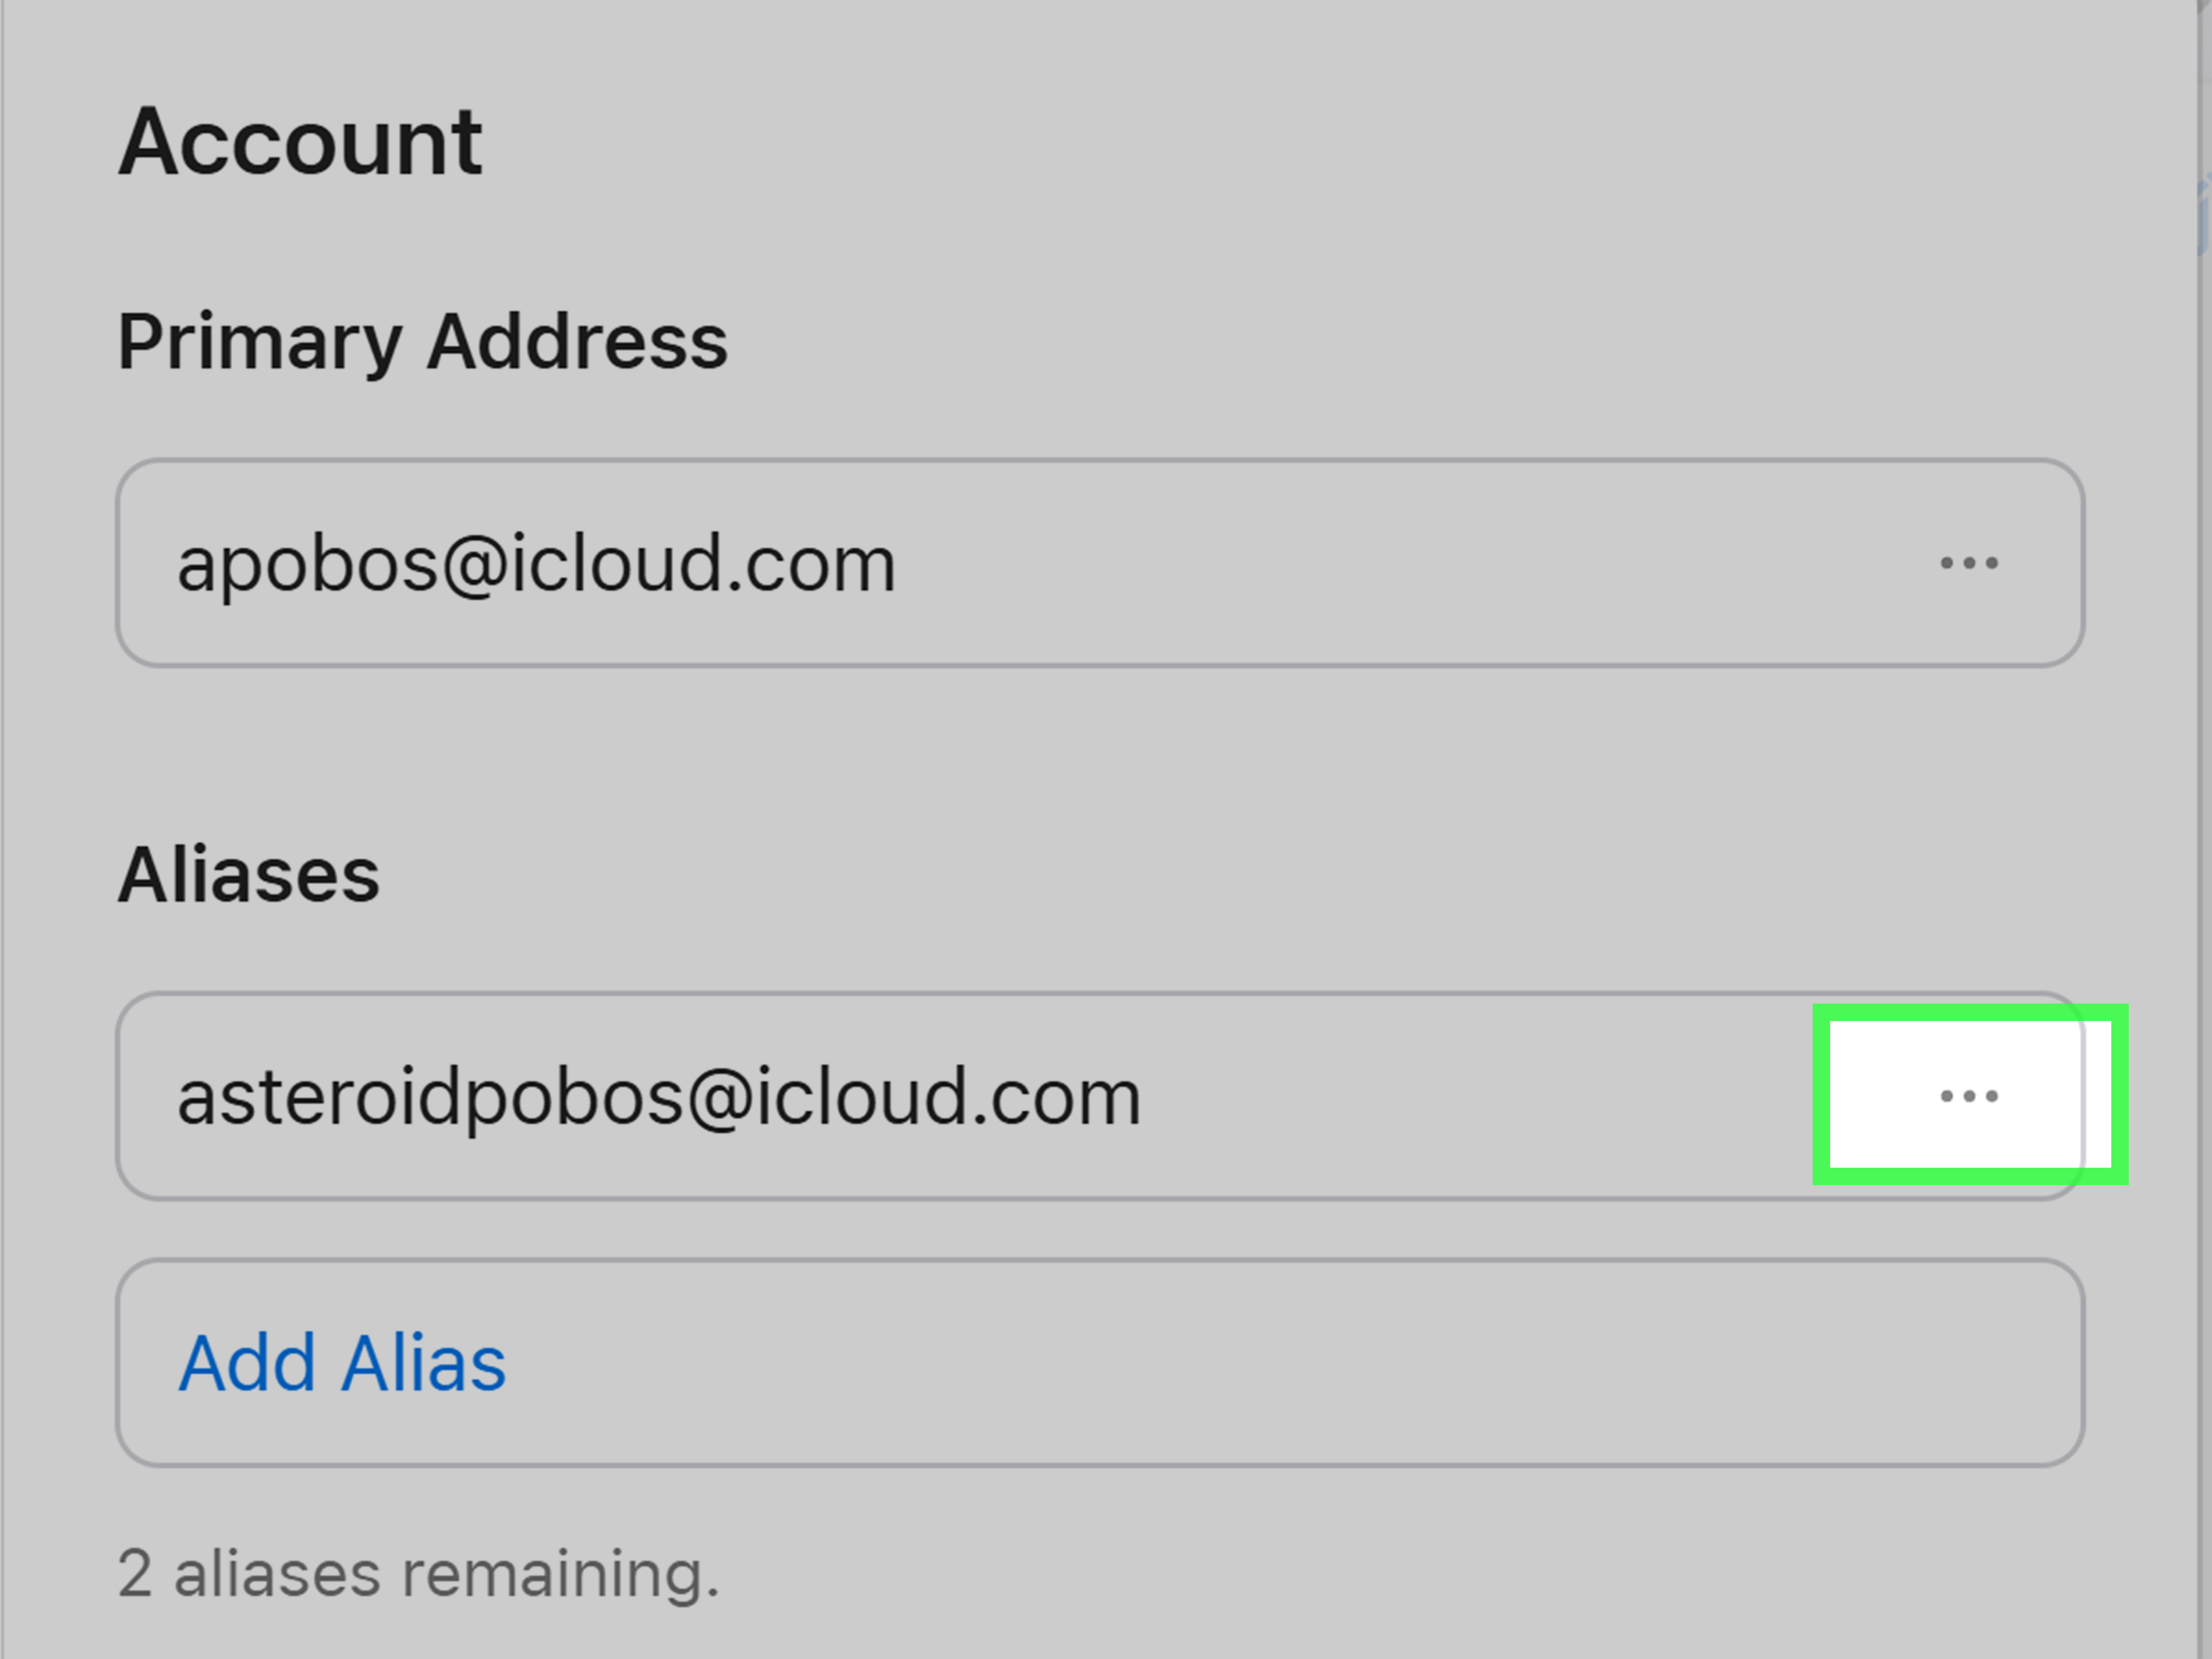
After creating your primary iCloud email address, you can create up to three @icloud.com email aliases. An alias is an extra address that sends mail to the same iCloud inbox. Think of it as your inbox wearing a different hat.
For example, you might use your primary iCloud email for personal messages, one alias for online shopping, and another for newsletters. If one alias starts attracting spam, you can disable or delete it without changing your main address.
Steps to Add an Alias
Sign in to iCloud.com, open Mail, go to Mail settings, and choose the option to add an alias. Enter the alias name, choose a label or color if available, and save it. Once created, you can send and receive email from that alias through iCloud Mail and supported devices.
Common Problems and Quick Fixes
You Do Not See the iCloud Mail Option
Make sure you are signed in with a personal Apple Account, not a managed account from a school or organization. Also check that your device software is up to date. On a Mac, return to System Settings, click your name, select iCloud, and look again for Mail or iCloud Mail.
Your Preferred Email Name Is Taken
iCloud email names are unique. If your first choice is unavailable, try a clean variation. Avoid long strings of random numbers unless you enjoy reading your email address out loud like a Wi-Fi password at a family reunion.
Outlook Keeps Asking for a Password
Generate a new app-specific password and use that instead of your main Apple Account password. Also confirm that the iCloud email address, server settings, and SSL settings are correct.
You Can Receive Mail but Cannot Send
This usually points to outgoing SMTP settings. Check that the outgoing server is correct, authentication is turned on, and the app-specific password is entered properly.
Security Tips for Your New iCloud Email Address
A new email address is useful, but a secure email address is better. Turn on two-factor authentication for your Apple Account, use a strong password, and avoid reusing that password anywhere else. If you add iCloud Mail to third-party apps, use app-specific passwords and revoke any you no longer need.
Be careful with phishing emails that pretend to be from Apple. Scammers often use urgent messages about storage, payments, account locks, or suspicious activity. Instead of clicking links in alarming emails, go directly to your Apple Account settings or iCloud.com. Your inbox may be new, but scammers are unfortunately very experienced.
PC vs. Mac: Which Setup Is Easier?
Creating an iCloud email address is easier on a Mac because iCloud Mail setup is built into macOS. You can sign in, turn on Mail, and create your address from System Settings. On a PC, you can create and manage your Apple Account, access iCloud.com, install iCloud for Windows, and use Outlook, but the first creation of a primary iCloud Mail address may still require an Apple device if the web setup option does not appear.
In simple terms: Mac is the front door. PC is a very useful side entrance after the address exists. Both can get you to your inbox; one just has fewer doorbells.
Experience-Based Tips for Creating and Using iCloud Email on a PC or Mac
From a practical user-experience point of view, the best way to create an iCloud email address is to slow down during the naming step. Many people rush through account creation and later realize the address feels too casual, too long, or too hard to explain. Since your primary iCloud Mail address may follow you for years, treat it like a digital business card. Even if you only use it for personal messages, a clean address is easier to remember and more comfortable to share.
Another useful experience is to test the address immediately after creating it. Send one email from iCloud Mail to another account, then reply back. This confirms both sending and receiving. It also helps you see how your sender name appears to other people. If your name displays oddly, adjust it before sending important messages. Nobody wants their first professional email to arrive from “MacBook Wizard” unless that is truly the brand strategy.
For Mac users, the Mail app usually gives the smoothest experience because it integrates naturally with iCloud. Messages, contacts, calendars, and account settings tend to feel more connected. Still, it is worth checking your iCloud settings after setup. Make sure Mail is enabled, your internet connection is stable, and your macOS version is current. Small updates can prevent big annoyances.
For PC users, the browser method is often the least stressful. iCloud.com Mail works well for everyday sending and receiving, and it avoids the extra setup required by Outlook or other apps. If you only check iCloud Mail occasionally, use the browser. If you live inside Outlook all day, then adding iCloud Mail to Outlook makes sense, but be prepared to use an app-specific password if prompted.
One common mistake is confusing the Apple Account login email with the iCloud Mail address. You may sign in with a Gmail address but send mail from an iCloud address. That is normal. Keep both addresses saved in a password manager with clear labels so you know which one is for signing in and which one is for email.
Email aliases are also worth using thoughtfully. Instead of giving your primary iCloud address to every website, create an alias for shopping, newsletters, or public sign-ups. This makes your inbox easier to organize and gives you more control if one address starts receiving junk mail. Just remember that aliases are not separate inboxes; they route into the same iCloud Mail account.
Finally, take security seriously from day one. Turn on two-factor authentication, watch for fake Apple emails, and avoid entering your password from links in messages. A well-created iCloud email address is convenient, polished, and reliable. A well-secured one lets you sleep at night without wondering whether a suspicious “your storage is full” email is plotting something dramatic.
Conclusion
Creating an iCloud email address on a PC or Mac is not difficult once you understand the setup path. On a Mac, you can create your primary iCloud Mail address directly through System Settings by turning on iCloud Mail. On a Windows PC, you can create an Apple Account, access iCloud.com, use iCloud for Windows, and connect iCloud Mail to Outlook or another email app after the address is active.
The key is knowing what each tool does. Your Apple Account gives you access to Apple services. Your iCloud email address gives you an @icloud.com inbox. iCloud.com lets you use mail from almost any browser. App-specific passwords help third-party apps connect securely. Put those pieces together, and your new iCloud email setup becomes much less mysterious.
Choose a professional address, test it, secure it, and consider aliases for better organization. With a little setup now, your iCloud Mail account can become a clean, dependable inbox that works across Mac, PC, and the webno orchard map required.