A Secret Wish Heart is exactly what it sounds like: a handmade heart that hides a tiny private wish, love note, prayer, promise, or “please let my coffee stay hot today” message inside. It is part keepsake, part ornament, part tiny emotional vault. Unlike a regular Valentine card that announces itself loudly with glitter and confidence, this little heart keeps its secret tucked away, making it feel personal, mysterious, and surprisingly meaningful.
This Secret Wish Heart Craft Tutorial walks you through how to make a hollow heart using air-dry clay or salt dough, place a rolled-up message inside, seal it, paint it, and turn it into a pendant, ornament, gift tag, keepsake charm, or Valentine’s Day decoration. The project is simple enough for beginners but polished enough to give as a handmade gift for Valentine’s Day, Mother’s Day, anniversaries, birthdays, friendship gifts, encouragement gifts, or “I made this because buying something felt too easy” gifts.
The best part? You do not need a studio, fancy tools, or the patience of a museum conservator. You need a heart mold, clay or dough, paint, glue, a tiny piece of paper, and a little willingness to get your hands messy. That last part is non-negotiable. Crafting without a little mess is just office work with prettier supplies.
What Is a Secret Wish Heart?
A Secret Wish Heart is a small handmade heart with a hidden message sealed inside. The message can be romantic, funny, spiritual, encouraging, nostalgic, or completely private. You might write “I love you,” “Be brave,” “Best mom ever,” “Our next adventure starts soon,” or a wish you want to keep for yourself. Once the heart is sealed, the note becomes part of the object’s meaning. The recipient may know there is a wish inside, or you may keep that part secret, which is deliciously dramatic in the best possible way.
This craft combines several popular DIY ideas: handmade Valentine gifts, secret message crafts, clay ornaments, heart-shaped keepsakes, and personalized paper notes. It also borrows a little magic from classic hidden-message projects, where the surprise is not just in how the craft looks, but in what it contains. The result is a small handmade piece that feels more thoughtful than a store-bought trinket and less stressful than attempting homemade macarons.
Why This Heart Craft Works So Well
The Secret Wish Heart works because it has three things every good handmade gift needs: symbolism, texture, and a story. The heart shape instantly says love, friendship, care, or encouragement. The handmade surface gives it character. The hidden message gives it emotional weight. Even if the heart is not perfectly smooth, that imperfection makes it feel human. A slightly lopsided heart says, “I tried,” which is often more charming than “I purchased this in aisle seven.”
It is also a flexible project. Adults can make a glossy, polished version with resin or clear sealer. Kids can make a safer version with air-dry clay, washable paint, and adult supervision. Teachers can adapt it for classroom Valentine crafts. Families can turn it into a wish-making tradition. Couples can make matching hearts. Friends can exchange them as tiny good-luck charms. Basically, if there is a feeling involved, this craft can hold it.
Supplies You Will Need
Main Materials
- Air-dry clay or homemade salt dough
- Small heart-shaped silicone mold
- Small strip of paper for the secret wish
- Pencil, fine-tip pen, or marker
- Acrylic paint in red, pink, white, gold, or your preferred colors
- Paintbrushes
- Craft glue or strong white glue
- Fine-grit sandpaper or nail buffer
- Eye screw, jump ring, ribbon, twine, or jewelry cord
- Clear acrylic sealer, Mod Podge, or resin for an adult-only glossy finish
Helpful Tools
- Toothpick or skewer
- Disposable cup or foam block for drying
- Wax paper or parchment paper
- Small drill or push pin for the hanging hole
- Baby wipe or damp cloth for smoothing clay
Safety Notes Before You Start
If children are helping, use safety scissors, washable materials, and adult supervision. Skip resin for young kids. Resin can create a beautiful glossy finish, but it should be handled by adults in a well-ventilated area while wearing gloves and following the product’s safety instructions. For a kid-friendly Secret Wish Heart, choose air-dry clay, acrylic paint, and a brush-on non-toxic sealer instead.
Also, remember that small parts such as eye screws, beads, jump rings, and tiny charms can be choking hazards for younger children. Keep them away from toddlers and preschoolers. If you are crafting with kids, treat the project like a tiny art workshop: fun, supervised, and not a free-for-all where someone discovers what glue tastes like.
Step-by-Step Secret Wish Heart Craft Tutorial
Step 1: Prepare the Clay or Dough
Start with a small amount of air-dry clay or salt dough. Knead it until it feels soft and workable. If it is too dry, lightly dampen your fingers. If it is too sticky, let it rest for a few minutes or dust your hands with a little cornstarch. The goal is a smooth texture that can press into the mold without cracking.
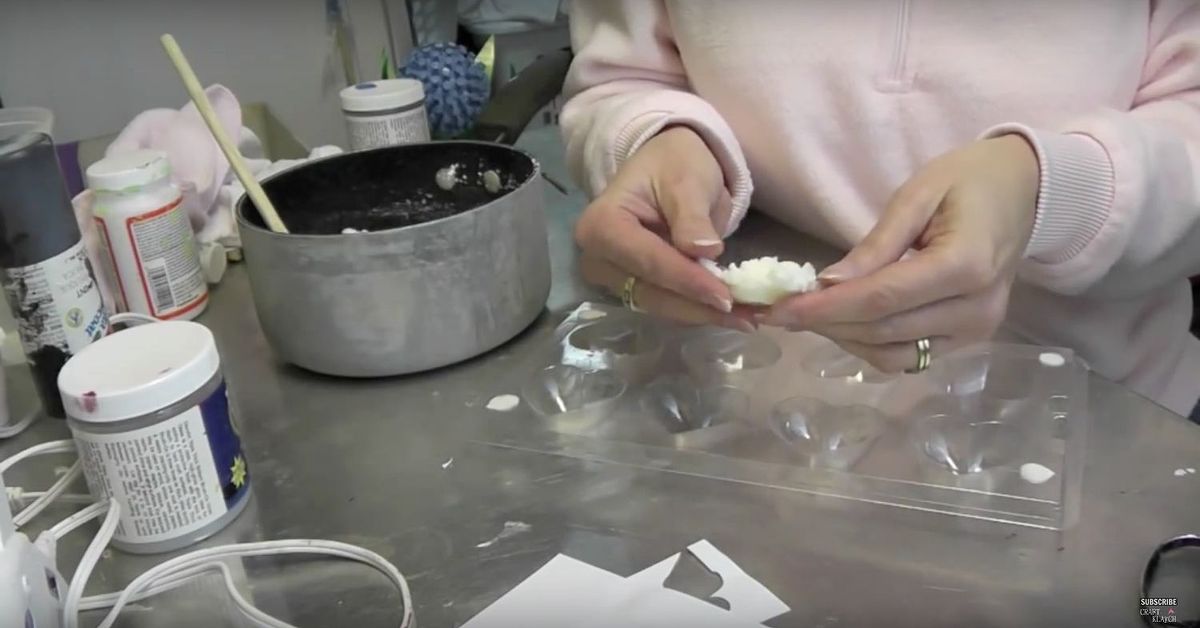
You will need two heart halves for each Secret Wish Heart. Do not fill the mold all the way to the top. Instead, press clay around the inside of the heart mold to create a shallow shell. Think of it like making a tiny heart-shaped bowl. The middle needs to stay hollow because that is where your secret wish will live.
Step 2: Shape Two Hollow Heart Halves
Press the clay gently into the mold, working it up the sides so the heart has an even thickness. Aim for about one-quarter inch thick. Too thin, and the heart may crack. Too thick, and it may look like a Valentine’s Day potato. Carefully make two matching halves. If your mold is deep, you can create a stronger rim by gently smoothing the edge with a damp finger.
Set the halves on parchment paper and allow them to dry according to the clay or dough instructions. Air-dry clay may need several hours or overnight. Salt dough may require air drying or low-temperature baking, depending on the recipe. Do not rush this step. A damp heart sealed too early can crack, soften, or trap moisture. Patience is cheaper than starting over.
Step 3: Smooth the Edges
Once both halves are dry, remove them carefully from the mold. Use fine-grit sandpaper or a nail buffer to smooth the flat edges. This helps the halves fit together neatly. Do not worry if the seam is still visible; you can hide it later with paint, glitter, ribbon, or the ancient crafting technique known as “strategic decoration.”
Test the two halves together before adding the message. If they wobble, gently sand the high spots. You want the edges to meet closely enough that glue can bond them securely. The better the fit, the more polished the finished heart will look.
Step 4: Write the Secret Wish
Cut a tiny strip of paper small enough to fit inside the heart. Write your message in small, clear handwriting. This is the emotional center of the project, so make it count. You can write a wish, a name, a date, a quote, a blessing, or a memory. For a romantic Secret Wish Heart, write something intimate but simple. For a friendship heart, write an inside joke. For a family keepsake, write a child’s name and the year. For yourself, write a goal or hope you want to carry into the future.
Roll the message tightly like a tiny scroll. If you want extra charm, tie it with a thin thread before placing it inside. Just make sure it still fits. The heart should close without bulging, unless your wish is apparently trying to escape.
Step 5: Paint the Inside
Before sealing the heart, paint the inside of both halves. Red, pink, gold, and pearl white are classic choices, but there are no craft police hiding behind the glitter aisle. Use deep burgundy for a vintage look, lavender for a soft romantic style, or metallic gold for a keepsake that feels more elegant.
Let the inside paint dry fully. This matters because the message will be sealed inside permanently. If the paint is wet, the paper may stick, smear, or absorb moisture. A dry interior keeps the secret wish safe and tidy.
Step 6: Seal the Message Inside
Place the rolled wish into one half of the heart. Apply a thin line of strong craft glue around the edge. Press the second half on top and hold it gently until it grips. Wipe away excess glue with a damp cloth or toothpick. Do not squeeze so hard that the heart collapses. This is a keepsake, not a stress ball.
Let the glued heart dry completely. Depending on your glue, this may take several hours. For the strongest result, leave it overnight. Once dry, gently sand the seam to make it smoother. If there are tiny gaps, fill them with a little clay, lightweight spackle, or extra glue, then let dry again.
Step 7: Paint the Outside
Paint the entire heart with acrylic paint. Two thin coats usually look better than one thick coat. Let the first coat dry before adding the second. Red is classic, but you can personalize the color based on the message. Try blush pink for a romantic gift, white and gold for a wedding favor, bright rainbow colors for a child’s wish heart, or black with metallic lettering for a dramatic modern look.
For texture, dab on paint with a sponge. For a ceramic-like look, sand lightly between coats. For sparkle, add a little fine glitter while the final paint layer is tacky. Use glitter carefully, though. Glitter has a way of moving into your home and raising a family.
Step 8: Add a Hanging Loop
If you want to hang the Secret Wish Heart as an ornament, pendant, gift tag, or charm, create a small hole at the top. Use a tiny drill bit, push pin, or skewer, depending on the hardness of your material. Add a dot of glue to an eye screw and twist it gently into the hole. Let it dry firmly before attaching ribbon, twine, or a jump ring.
If you prefer not to use hardware, glue a ribbon loop to the back instead. This works well for lightweight hearts. For a more decorative finish, cover the ribbon end with a small felt circle or painted paper patch.
Step 9: Seal and Finish
Brush on a clear acrylic sealer or Mod Podge to protect the paint. For adults who are comfortable using resin, a thin resin coat can create a glossy, glass-like finish. Always follow the resin manufacturer’s safety instructions, wear gloves, and work in a ventilated area. Let the finished heart cure fully before handling or gifting.
Once sealed, your Secret Wish Heart is ready. Tie it to a wrapped present, hang it from a branch centerpiece, attach it to a necklace cord, place it in a keepsake box, or give it as a pocket charm. The person receiving it may never read the hidden message, but that is part of the beauty. Some gifts are meant to be seen. Others are meant to be felt.
Creative Secret Wish Message Ideas
Not sure what to write inside? Keep it short. The message needs to fit inside the heart, and unless you have microscopic handwriting, this is not the moment for a five-paragraph emotional dissertation. Here are a few ideas:
- “I love you more than yesterday.”
- “You are my favorite person.”
- “Best friends, always.”
- “Good health, brave heart.”
- “May this year bring joy.”
- “Our adventure continues.”
- “Mom, you are magic.”
- “I believe in you.”
- “One day, this wish will come true.”
- “You are loved more than you know.”
For a playful version, write something funny: “You still owe me fries,” “Secretly the favorite child,” or “In case of emergency, add chocolate.” Humor makes the craft feel less formal and more personal. A handmade heart does not have to be serious to be meaningful.
Design Variations for Different Occasions
Valentine’s Day Secret Wish Heart
Use red or pink paint, tiny white dots, gold lettering, and a satin ribbon. Add initials or a date on the back. This makes a sweet alternative to a store-bought Valentine card.
Mother’s Day Wish Heart
Paint the heart in soft blush, cream, or lavender. Place a message inside such as “Best mom ever” or “Thank you for loving me through every weird phase.” Add a floral ribbon for a gentle keepsake look.
Friendship Heart
Use bright colors, doodles, mini stars, or stickers. Hide an inside joke inside. Friendship crafts should feel relaxed and joyful, not like they were inspected by a royal stationery committee.
Wedding or Anniversary Heart
Choose pearl white, champagne, gold, or soft gray. Add the couple’s initials and date. These can work as favors, bouquet charms, or small memory box pieces.
Personal Goal or New Year Wish Heart
Make one for yourself and tuck a goal inside. Hang it near your desk, mirror, or nightstand. It becomes a quiet reminder of what you are working toward without announcing your entire life plan to visitors.
Troubleshooting Common Problems
The Heart Cracked While Drying
Cracking usually happens when the clay is too thin, dries too quickly, or has uneven thickness. Next time, keep the shell slightly thicker and let it dry slowly. Small cracks can be filled with clay paste or glue before painting.
The Two Halves Do Not Fit
Sand the edges gently until they meet more evenly. If there is still a gap, fill the seam after gluing and hide it with paint, glitter, ribbon, or decorative trim.
The Paint Looks Streaky
Use thinner coats and let each layer dry. A white base coat can help bright colors look more even. Metallic paint may need extra coats to look rich.
The Hanging Screw Feels Loose
Remove it, add a drop of strong glue into the hole, and twist it back in. Let it dry completely before hanging. If the heart is heavy, use ribbon glued securely to the back instead.
How to Make This Craft More Kid-Friendly
For children, simplify the project. Use air-dry clay instead of resin-coated materials. Let kids press clay into a mold, choose paint colors, and write or dictate their wish. Adults can handle sanding, sealing, and adding hardware. Younger kids can decorate the outside with stickers, fingerprints, foam hearts, or washable paint.
You can also turn the project into a classroom activity by making paper Secret Wish Hearts instead of clay ones. Cut two paper hearts, let children write a wish, place it between the hearts, and glue around the edges. Add tissue paper, stickers, or crayon-resist messages for extra surprise. The paper version is lighter, faster, and much less likely to cause a teacher to whisper, “Why did I choose clay on a Friday?”
Experience Notes: What Making a Secret Wish Heart Teaches You
Making a Secret Wish Heart is one of those crafts that looks small on the table but becomes unexpectedly meaningful while you work on it. At first, you may think you are simply pressing clay into a mold. Then you start deciding what message to hide inside, and suddenly the project becomes personal. The heart asks a surprisingly big question for such a tiny object: what feeling is worth preserving?
One of the best experiences with this craft is watching how different people approach the secret message. Some write romantic notes. Some write wishes for health, courage, success, or peace. Some write names. Children often write wonderfully direct messages like “I hope Grandma gets cookies” or “I love my dog more than broccoli.” Adults tend to overthink it, because adults can turn even a tiny paper scroll into a philosophical event. That is part of the charm.
The crafting process itself is calming. Pressing the clay into the mold gives your hands something simple to do. Sanding the edges slows you down. Painting the surface adds anticipation because the heart begins to look less like a lump of craft material and more like a keepsake. When you finally seal the wish inside, there is a tiny ceremonial feeling to it. You are not just closing two halves of clay; you are choosing to protect a thought.
This tutorial is also a good reminder that handmade gifts do not need to be expensive or complicated. A Secret Wish Heart can be made with basic materials, but it carries emotional detail that mass-produced gifts often miss. The recipient may admire the color, the shine, or the shape, but the real gift is the idea that something was made specifically for them. Even if the message stays hidden forever, the knowledge that it exists makes the heart feel alive.
Another useful lesson is that imperfections can improve the final piece. A visible brushstroke, a slightly uneven seam, or a hand-painted dot that wandered off course can make the heart feel warmer. Handmade crafts have personality. They do not need to look like they were produced by a luxury ornament factory staffed by perfectionist elves. They need to feel sincere.
If you make several Secret Wish Hearts, you may find that each one develops its own mood. A glossy red heart feels romantic. A matte white heart feels peaceful. A gold heart feels celebratory. A child’s rainbow heart feels joyful and completely unconcerned with minimalist design trends, as it should. The same basic tutorial can become dozens of different keepsakes depending on color, message, finish, and occasion.
The most memorable experience is giving the heart away. You can tell the recipient there is a secret wish inside, or you can simply say it was made with a special thought. Either way, the gift invites curiosity. It feels intimate without being overly dramatic. It is small enough to keep on a shelf, hang on a tree, tie to a bag, or tuck into a memory box. Long after paper cards are recycled and candy has mysteriously disappeared, the heart remains.
That is the quiet power of the Secret Wish Heart Craft Tutorial. It turns ordinary supplies into a private little treasure. It gives love, hope, humor, and memory a physical shape. And it proves that sometimes the best part of a handmade gift is not what everyone can see, but what only the maker knows is hidden inside.
Conclusion
A Secret Wish Heart is more than a heart craft. It is a handmade keepsake with a secret tucked inside, which makes it perfect for Valentine’s Day, Mother’s Day, birthdays, anniversaries, friendship gifts, encouragement gifts, and personal wish-making traditions. With simple materials like clay, paint, glue, paper, and ribbon, you can create a meaningful ornament or pendant that feels thoughtful, personal, and charmingly mysterious.
Whether you make one glossy and elegant or colorful and kid-friendly, the heart becomes a tiny container for something bigger than itself. That hidden note is what transforms the project from cute decoration into a gift with a story. And honestly, any craft that can hold a secret, sparkle a little, and not require a professional art degree deserves a permanent spot on the DIY list.