A great home audio system should fill the room with music, movie dialogue, and the occasional dinosaur roar. It should not fill the room with loose cables that make your living room look like a small electronics store lost a fight.
Fortunately, hiding speaker wire does not always require opening walls or hiring a contractor. Depending on your home, budget, and tolerance for drywall dust, you can conceal speaker cables with paintable raceways, baseboards, flat wire, or an in-wall installation. Each method offers a different balance of appearance, effort, accessibility, and permanence.
This guide explains four practical tricks for hiding speaker wire, including where each approach works best, what materials you need, and which safety mistakes to avoid. Whether you are installing a pair of stereo speakers or a full surround sound system, the goal is the same: hear the speakers without constantly seeing how they are connected.
Plan the Speaker-Wire Route Before Hiding Anything
Before reaching for adhesive, a pry bar, or your bravest power drill, decide exactly where the wire needs to travel. A well-planned route is usually shorter, safer, and less visible than an improvised one.
Confirm the final speaker positions
Place the speakers where they sound best before concealing their cables. Moving a surround speaker six feet after installing an in-wall run is an excellent way to discover new and exciting vocabulary.
Use painter’s tape to mark the proposed cable path. Follow architectural lines such as baseboards, corners, door trim, crown molding, and furniture edges. Straight runs and clean right-angle turns generally blend into a room better than diagonal cables.
Measure generously
Measure the complete route rather than the straight-line distance between the receiver and speaker. Add enough cable for vertical sections, corners, connections, and future adjustments. Leaving a modest service loop near each endpoint makes equipment changes much easier.
Choose an appropriate wire gauge for the run and the speaker’s impedance. Ordinary 16-gauge copper speaker wire is suitable for many typical residential installations. Longer runs or low-impedance speakers may benefit from thicker 14- or 12-gauge wire. Check the recommendations supplied by the speaker and amplifier manufacturers instead of selecting cable by optimism alone.
Trick 1: Install Paintable Speaker-Wire Raceway
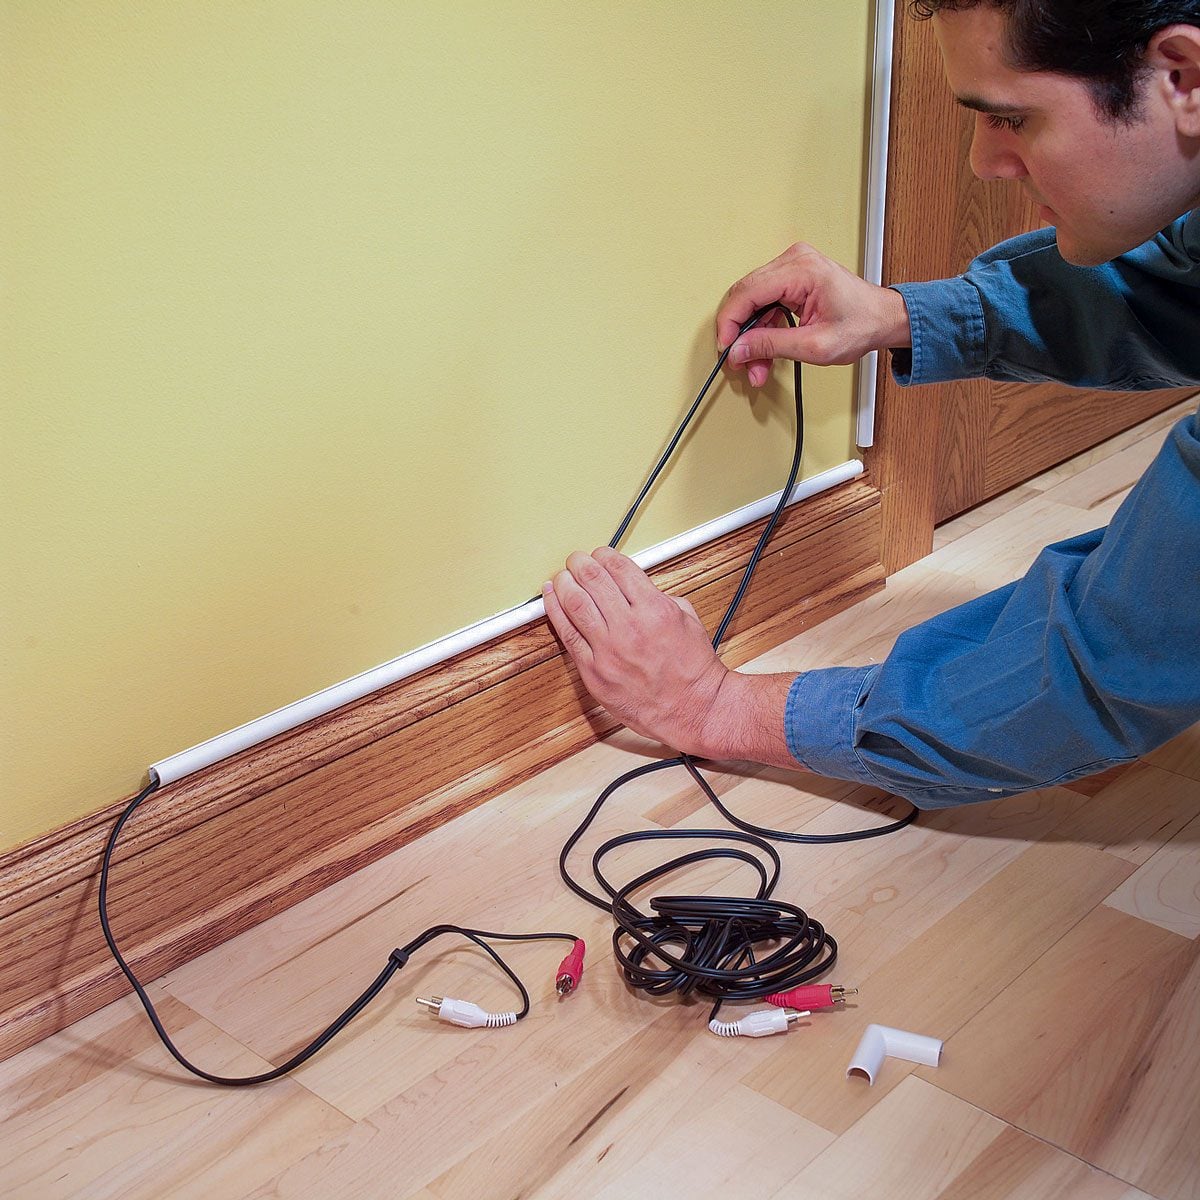
A surface-mounted raceway, also called a cord channel or cable cover, is usually the best all-around answer for hiding speaker wire without cutting into walls. It is a hollow plastic or metal track attached to a wall, baseboard, or ceiling. The wire sits inside, and a removable cover snaps over it.
Why raceway works so well
Raceway creates a tidy, protected path while keeping the cable accessible. If a wire fails or the audio system changes, you can open the channel instead of performing drywall archaeology.
Many residential raceways have adhesive backing, although screws provide a more dependable hold on textured, dusty, or uneven surfaces. Paintable models can be coated with the same wall or trim paint used in the room. Once installed along a baseboard or inside corner, a properly matched raceway often disappears from normal viewing distance.
How to install it neatly
- Measure the route and sketch every straight section, corner, and endpoint.
- Select a channel large enough for the speaker cable without tightly compressing it.
- Clean and dry the mounting surface so adhesive can bond properly.
- Cut the raceway with the tool recommended by its manufacturer.
- Attach the base in straight, level sections.
- Lay the cable inside without kinking it, then snap the cover into place.
- Paint the cover after confirming that the system works.
Use compatible inside corners, outside corners, couplings, and end caps for a finished appearance. Leaving jagged gaps at every turn rather defeats the purpose of making the installation look professional.
Best for: Renters, finished rooms, short-to-medium cable runs, and homeowners who want a reversible solution.
Main drawback: Raceway remains slightly visible, particularly when it crosses the center of a wall. Place it beside existing trim or in corners whenever possible.
Trick 2: Conceal Speaker Wire Along Baseboards and Trim
Baseboards provide a convenient pathway around the perimeter of a room. Depending on their design, speaker wire can be placed in the small gap beside carpet, tucked behind removable molding, or routed through a shallow channel behind the trim.
The simple carpet-edge method
In a carpeted room, a narrow gap sometimes exists between the tack strip and the wall. Flexible speaker wire may fit along this perimeter without creating a noticeable ridge. Use a blunt plastic tool to ease the cable into the gap; sharp tools can damage the insulation or turn a quick project into an unexpected carpet-repair tutorial.
Keep the cable near the room’s edge rather than running ordinary round wire across walking paths. A raised cable beneath carpet can wear prematurely and create a trip hazard. Never hide extension cords, power cables, or power strips beneath carpeting.
Behind removable baseboard
For a more permanent result, carefully remove the baseboard and route the wire in the space behind it. Some trim profiles naturally provide enough clearance. Others may require a shallow recess in the back of the molding or a properly planned channel in the wall surface.
Use a utility knife to score painted seams before removing trim. This reduces paint tearing. Work slowly with a trim puller or small pry bar, protect the wall with a thin wood block, and label each piece if several sections are removed.
Never drive nails or staples blindly through an area containing cable. Fasten the trim where you know the wire is not located. If a route passes around a doorway, the cable may be concealed behind the casing, but avoid creating tight bends or pinching it between hard surfaces.
Best for: Perimeter runs, carpeted rooms, traditional interiors, and installations where a visible raceway would look distracting.
Main drawback: Removing trim can crack old paint, plaster, or delicate molding. Historic homes frequently turn “just one quick cable” into a conversation with a carpenter.
Trick 3: Use Flat or Adhesive-Backed Speaker Wire
Flat speaker wire replaces the rounded profile of conventional cable with thin conductors arranged in a ribbon-like shape. Some versions include adhesive backing and can be placed directly on walls. Others are designed for routing beneath carpet or along flooring edges.
Hiding flat wire on a wall
Adhesive-backed flat cable can follow a wall from the receiver to a surround speaker with very little projection. After testing the connection, compatible flat wire may be covered according to the manufacturer’s instructions and blended with paint. Certain products accept a skim coat or finishing compound, creating an almost invisible result.
Start with a clean, smooth surface. Mark the route with a level, apply the cable gradually, and press out wrinkles as you proceed. Avoid stretching it around sharp corners. Manufacturers may provide special corner-folding instructions or connectors for changing direction.
Flat wire is less forgiving than raceway when the route changes later. Removing strong adhesive can lift paint, and repairing damaged cable may require replacing a long section. For that reason, verify speaker placement and polarity before completing the cosmetic finish.
Using flat wire near flooring
Only use products specifically approved by their manufacturer for the proposed under-carpet or floor application. Keep the run away from doorways, rolling furniture, and heavily traveled areas whenever possible. At an unavoidable exposed transition, use a suitable floor cable protector rather than relying on a strategically positioned houseplant.
Best for: Apartments, modern rooms with minimal trim, surround speakers mounted on open walls, and locations where a shallow cable profile matters.
Main drawback: Installation must be precise, and later repositioning may damage the wall finish or adhesive layer.
Trick 4: Run Speaker Wire Inside Walls or Ceilings
Running speaker wire inside a wall produces the cleanest and most permanent result. The visible portions can be limited to wall plates, binding posts, or short cable tails behind the speakers and receiver.
This method is ideal during construction or remodeling, when wall cavities are already accessible. It can also be completed in finished rooms by fishing wire through carefully positioned openings.
Use cable rated for concealed installation
Do not assume that any speaker wire can be placed inside a wall. In the United States, concealed low-voltage cable commonly carries markings such as CL2 or CL3. Riser and plenum spaces may require additional ratings. Requirements vary by jurisdiction and building type, so confirm the applicable code before purchasing cable.
The rating should be printed on the cable jacket and supported by the product packaging. Cable intended only for exposed equipment connections may not have the flame-resistance characteristics required for building cavities.
Inspect before cutting
Use a stud finder with electrical-detection capability and inspect both sides of the wall. Consider the likely locations of outlets, switches, plumbing fixtures, HVAC ducts, blocking, insulation, and fire stops. Turn off nearby circuits before cutting, but do not treat a switched-off breaker as permission to drill blindly.
Low-voltage wall brackets and purpose-made speaker wall plates create clean entry and exit points. Fish tape, fiberglass rods, or pull string can guide cable between openings. Vertical runs within one stud bay are generally easier than horizontal runs that must cross multiple studs.
If the cable passes through framing, protect vulnerable locations with appropriate nail plates. Seal penetrations through fire-rated assemblies with approved materials. Keep speaker wiring separated from line-voltage wiring as required by code; where routes must cross, a perpendicular crossing can reduce the length of close parallel exposure and may help limit induced noise.
A licensed low-voltage installer or electrician is worth considering when the route involves insulated exterior walls, multiple floors, masonry, fire-rated construction, crowded cavities, or uncertain wiring. Professional help costs less than repairing a drilled water pipe, which is a remarkably low bar but still an important one.
Best for: Permanent home theaters, new construction, renovations, wall-mounted speakers, and homeowners seeking the most polished appearance.
Main drawback: The work requires more planning, specialized tools, code awareness, and possible wall repair.
How the Four Speaker-Wire Hiding Methods Compare
| Method | Installation Effort | Visibility | Easy to Change? | Ideal Situation |
|---|---|---|---|---|
| Paintable raceway | Low | Low to moderate | Yes | Finished rooms and rentals |
| Baseboard or trim | Low to moderate | Very low | Usually | Perimeter cable routes |
| Flat speaker wire | Moderate | Very low | Not always | Open walls with minimal trim |
| Inside walls or ceilings | High | Minimal | Difficult | Permanent home theaters |
Common Mistakes When Hiding Speaker Cable
Pinching or puncturing the insulation
Do not crush speaker wire beneath trim, tightly bend it around corners, or fasten it with ordinary staples. Use insulated cable clips sized for the wire, and stop before the fastener compresses the jacket.
Forgetting speaker polarity
Maintain the same positive and negative orientation at the amplifier and speaker. Most cables identify one conductor with printing, a ridge, or a colored stripe. Reversed polarity may weaken imaging and bass response when speakers operate out of phase.
Finishing before testing
Connect every speaker and play familiar audio before painting raceway, replacing molding, patching drywall, or covering adhesive wire. Test each channel individually and listen for intermittent sound, buzzing, or distortion.
Creating an unserviceable installation
Leave enough wire at both ends to make comfortable connections. Label concealed runs at the receiver, especially in multichannel systems. Future you should not need forensic science to distinguish the left surround cable from the right surround cable.
Experience Notes From Real-World Speaker-Wire Projects
Real installations tend to reward planning more than expensive materials. One of the most common living-room scenarios involves rear surround speakers located behind a couch while the receiver sits across the room. The first impulse is often to run cable directly beneath a rug. That route is short, but it can produce a visible ridge exactly where people walk. Following the baseboard usually requires several extra feet of wire, yet the safer, cleaner result is worth the additional distance.
Paintable raceway is especially successful when homeowners treat it like architectural trim rather than a plastic tube. A channel placed halfway up a blank wall attracts attention. The same channel installed just above a baseboard, beside a door casing, or inside a corner becomes remarkably unobtrusive. Cutting every section before mounting it also helps. Installing one piece at a time without a complete layout often leaves the final corner with an awkward gapthe cable-management equivalent of discovering that the last puzzle piece belongs to a different puzzle.
Adhesive channels teach another useful lesson: surface preparation matters. Adhesive applied over dust, grease, or fragile paint may release after a few warm days. Cleaning the surface, allowing it to dry, and using mechanical fasteners where appropriate produces a far more dependable installation. Renters should test adhesive in an inconspicuous location because “removable” does not always mean “your security deposit will remain emotionally unaffected.”
Baseboard concealment works beautifully when the trim already has space behind it. Problems arise when installers assume that space exists and begin forcing cable into a tight seam. Pinched insulation, bowed molding, and cracked caulk are signals to choose another method. Removing one short section first provides a useful preview of the wall construction and prevents an exploratory project from spreading around the entire room.
Finished-wall installations reveal why cable rating and route inspection are not minor technical details. A seemingly empty stud bay may contain horizontal blocking, insulation, plumbing, or electrical cable. Starting with small, carefully positioned access openings makes obstacles easier to manage. In complex walls, a flexible inspection camera can answer questions before larger holes are cut.
The most satisfying projects also include labels and photographs. Before replacing trim or closing a wall, installers can photograph cable routes alongside a tape measure or recognizable framing feature. Those images become valuable when someone later mounts artwork, adds shelving, or wonders why a mysterious wall plate exists behind the sofa.
Finally, appearance should not come at the expense of speaker placement. It is better to use a slightly visible, tidy raceway that allows correct speaker positioning than to put every speaker in the wrong place merely because the nearest corner hides cable well. Audio equipment is supposed to sound good first. Looking good is the encore.
Conclusion
The best way to hide speaker wire depends on how permanent the audio system will be. Paintable raceway offers the easiest combination of neatness and accessibility. Baseboards and trim provide natural perimeter routes. Flat speaker wire creates a nearly invisible surface installation, while in-wall cable delivers the cleanest professional finish.
Whatever method you choose, plan the route, select suitable cable, protect it from damage, and test the entire system before closing or painting anything. With a careful installation, your speakers can command attention while their wiring quietly retires from public life.