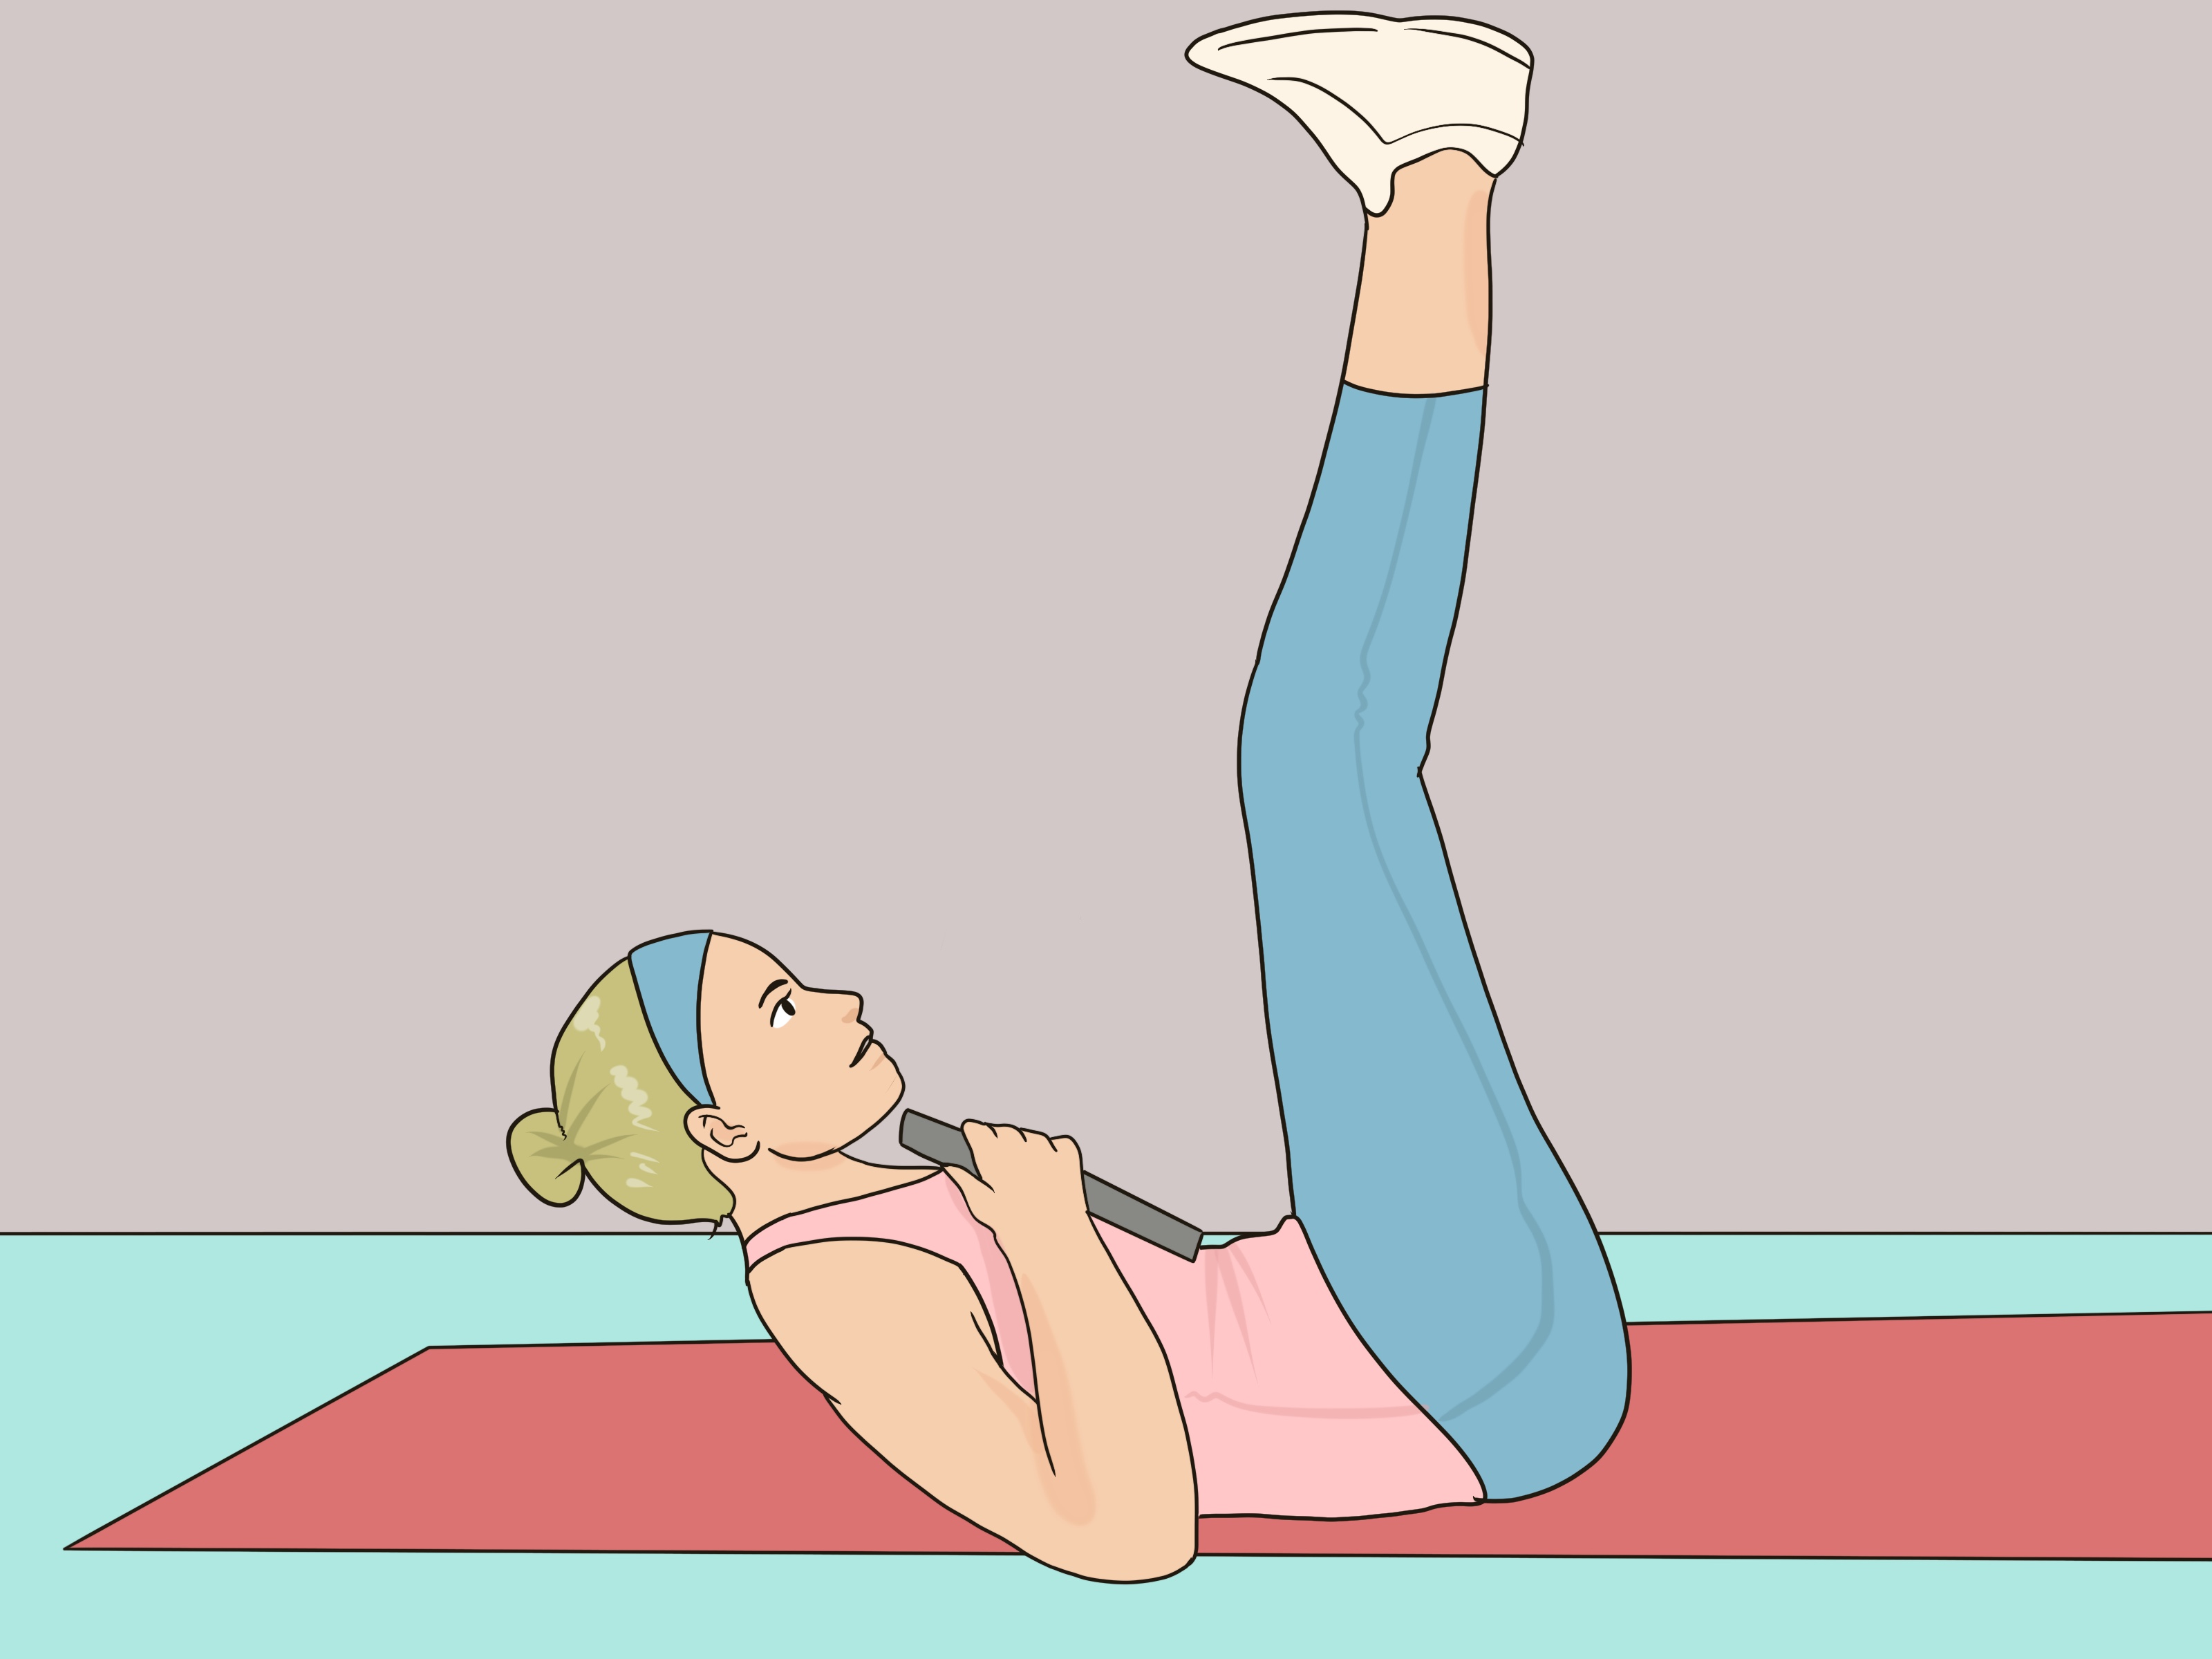
Vertical leg crunches look simple: lie down, point your legs toward the ceiling, crunch up, and try not to make the face people make when opening a stuck pickle jar. But like most “simple” exercises, the magic is in the details. Done well, the vertical leg crunch can help strengthen your rectus abdominis, challenge your obliques, improve core control, and add variety to an at-home ab workout without needing a single machine, membership card, or motivational poster yelling “NO PAIN NO GAIN.”
This guide breaks down 3 ways to do vertical leg crunches: the classic version, a beginner-friendly modified version, and a more challenging toe-reach variation. You will also learn proper form, common mistakes, breathing tips, workout programming, safety notes, and real-life experience tips that make the move feel less like random floor flailing and more like smart core training.
Before we begin, one important truth: vertical leg crunches are not a magic belly-fat eraser. No ab exercise can spot-reduce fat from your midsection. What this exercise can do is strengthen the muscles of your core, improve body awareness, and help you build a stronger foundation for sports, lifting, posture, and everyday movement. Translation: your abs may not instantly appear like a superhero suit, but your body will thank you for training with control.
What Are Vertical Leg Crunches?
A vertical leg crunch is a bodyweight core exercise performed while lying on your back with your legs lifted toward the ceiling. From that position, you contract your abdominal muscles to lift your head, neck, and shoulder blades off the floor. The move is similar to a traditional crunch, but the raised-leg position increases the demand on your core because your body must stabilize the pelvis while your upper body curls upward.
The primary muscle worked is the rectus abdominis, the long front abdominal muscle often associated with the “six-pack” look. The obliques, which run along the sides of your torso, also help with stabilization. Your deep core muscles, including the transverse abdominis, assist when you brace properly and keep your lower back from arching.
Because the legs stay lifted, this exercise asks for more control than a basic crunch. That does not mean you need to be an athlete to try it. It does mean you should focus on form before speed, quality before quantity, and breathing before turning purple like you are trying to lift a couch with your forehead.
Benefits of Vertical Leg Crunches
They strengthen the front of your core
Vertical leg crunches train spinal flexion, which is the action of curling your rib cage toward your pelvis. This movement targets the abdominal muscles in a direct, easy-to-understand way. When performed with control, the exercise can help build endurance in the muscles that support trunk movement.
They require no equipment
You only need a mat, a bit of floor space, and the willingness to meet your ceiling from a new angle. Vertical leg crunches are ideal for home workouts, travel routines, quick core finishers, and days when the gym feels farther away than another galaxy.
They add variety to ab training
If your core routine is just regular crunches and planks, vertical leg crunches can give your body a new challenge. Variety matters because the core works in many ways: bending, resisting movement, rotating, stabilizing, and supporting posture. A good routine should include several types of core exercises, not just one move repeated until boredom files a complaint.
They teach control
The raised-leg position makes it obvious when you are using momentum. If your legs swing, your lower back arches, or your neck does all the work, the exercise immediately starts feeling awkward. That feedback can help you slow down, brace better, and improve technique.
Before You Start: Set Up for Success
Choose a comfortable surface such as an exercise mat or carpeted floor. Avoid performing vertical leg crunches on a hard floor unless you enjoy feeling every vertebra question your life choices. Wear clothing that lets you move freely, and keep water nearby if you are doing the move as part of a longer workout.
Warm up for three to five minutes before core training. Good options include marching in place, cat-cow stretches, gentle trunk rotations, glute bridges, or dead bugs. The goal is not to exhaust yourself before the main event. The goal is to wake up your core and hips so they are not surprised when your legs suddenly point at the ceiling.
If you have back pain, neck problems, osteoporosis, recent abdominal surgery, pregnancy-related concerns, postpartum diastasis recti, or any medical condition that affects exercise, speak with a qualified healthcare professional before doing crunch-based movements.
Way 1: Classic Vertical Leg Crunch
The classic vertical leg crunch is the standard version and the best place to start if you already feel comfortable doing basic crunches without neck strain or lower-back discomfort.
How to do it
- Lie on your back on a mat with your legs extended upward toward the ceiling.
- Keep a slight bend in your knees. Your legs do not need to be perfectly locked straight.
- Cross your ankles if that feels comfortable, or keep your feet uncrossed and close together.
- Place your fingertips lightly behind your head, or cross your arms over your chest if you tend to pull on your neck.
- Brace your core by gently drawing your ribs down and tightening your abdominal muscles.
- Exhale as you lift your head, neck, and shoulder blades off the floor.
- Think about bringing your chest toward your thighs rather than yanking your head forward.
- Pause briefly at the top.
- Inhale as you lower slowly back to the starting position.
- Repeat for 8 to 15 controlled repetitions.
Form cues that actually help
Keep your chin slightly tucked, as if you are holding an orange between your chin and chest. Do not smash the imaginary orange. Nobody asked for juice. Your gaze should stay upward or slightly forward, not jammed into your knees.
Keep your lower back gently connected to the mat. If your lower back arches dramatically, reduce your range of motion, bend your knees slightly more, or try the modified version below. Your shoulders only need to lift a few inches. A crunch is not a full sit-up, and your abs do not receive bonus points for dramatic theater.
Recommended sets and reps
Start with 2 sets of 8 to 12 reps. Rest 30 to 60 seconds between sets. Once your form feels consistent, progress to 3 sets of 12 to 15 reps. If you can do 25 fast reps but your neck is doing most of the work, you are not advanced; you are just negotiating poorly with gravity.
Way 2: Modified Bent-Knee Vertical Leg Crunch
The modified version is perfect for beginners, people with tight hamstrings, or anyone who feels their lower back arch during the classic form. Instead of keeping your legs straight up, you bend your knees at about 90 degrees. This reduces tension from the hamstrings and hip flexors while still letting you train the crunching motion.
How to do it
- Lie on your back with your knees bent and lifted over your hips.
- Your shins should be roughly parallel to the floor, creating a tabletop position.
- Place your hands across your chest or lightly behind your head.
- Tighten your abdominal muscles and keep your lower back steady.
- Exhale as you curl your shoulders off the floor.
- Pause for one second at the top.
- Inhale as you lower with control.
- Repeat for 8 to 12 reps.
Why this version works
The bent-knee vertical leg crunch makes it easier to keep your pelvis stable. For many people, straight legs create too much pull through the hip flexors and lower back. Bending the knees gives you a better chance to feel the abs working instead of wondering why your back has joined the conversation.
Best beginner tip
Try placing your arms across your chest instead of behind your head. This prevents neck pulling and teaches your torso to lift through abdominal contraction. If the movement still feels too difficult, keep your feet on a wall with your hips and knees bent at 90 degrees. That setup gives your legs support while you practice the upper-body crunch.
Recommended sets and reps
Begin with 1 to 2 sets of 8 to 10 reps. Use a slow tempo: one second up, one second hold, two to three seconds down. When you can complete the reps without neck strain or back arching, move to the classic vertical leg crunch.
Way 3: Vertical Leg Toe-Reach Crunch
The vertical leg toe-reach crunch is a slightly more intense variation. Instead of placing your hands behind your head, you reach your arms toward your toes as you crunch upward. This can make the exercise feel more focused because your arms give you a clear direction: up, not forward.
How to do it
- Lie on your back and lift your legs toward the ceiling.
- Keep your knees slightly bent and your feet relaxed.
- Extend your arms upward, pointing your fingertips toward your toes.
- Brace your core and press your lower back gently toward the mat.
- Exhale as you lift your shoulder blades and reach your fingertips toward your toes.
- Pause briefly at the top without bouncing.
- Inhale as you lower your shoulders back to the mat.
- Repeat for 10 to 15 reps.
What to watch for
Do not swing your arms like you are trying to throw confetti at your feet. Your arms should guide the motion, not create it. Keep the movement small and controlled. If your legs start drifting toward your face or away from your body, reset your position.
How to make it harder
At the top of each rep, hold for two seconds and squeeze your abs. You can also add a small pulse, but only if you can do it without bouncing your neck or rocking your hips. Advanced exercisers may hold a very light medicine ball or dumbbell, but this is optional and should never come at the expense of form.
Common Mistakes to Avoid
Pulling on your neck
This is the classic crunch crime. Your hands are there for light support, not to tow your skull off the floor. If your neck hurts, cross your arms over your chest or reach toward your toes instead.
Using momentum
If you are bouncing up and down, your abs are not getting the best training effect. Slow down. A controlled crunch is more effective than a fast, floppy one. Think “curl and lower,” not “launch and collapse.”
Letting the lower back arch
An exaggerated arch can shift stress away from your abs and toward your lower back. Brace your core before each rep, keep your ribs from flaring, and use the bent-knee version if needed.
Holding your breath
Breathing matters. Exhale as you crunch up and inhale as you lower down. Holding your breath can create unnecessary tension and make the exercise feel harder than it needs to be.
Doing too many reps
More is not always better. Once your form falls apart, the set is over. Your abs respond well to tension, control, and consistencynot to 80 chaotic reps performed with the emotional intensity of a tax deadline.
How to Add Vertical Leg Crunches to Your Workout
Vertical leg crunches work best as part of a balanced core routine. Pair them with exercises that train stability and anti-rotation, such as planks, dead bugs, bird dogs, side planks, and glute bridges. This helps your core become strong in more than one direction.
Simple beginner core routine
- Modified bent-knee vertical leg crunch: 2 sets of 8 to 10 reps
- Glute bridge: 2 sets of 10 to 12 reps
- Dead bug: 2 sets of 6 to 8 reps per side
- Forearm plank: 2 rounds of 15 to 30 seconds
Intermediate ab workout
- Classic vertical leg crunch: 3 sets of 12 reps
- Toe-reach crunch: 2 sets of 12 reps
- Side plank: 2 rounds of 20 to 30 seconds per side
- Bird dog: 2 sets of 8 reps per side
How often should you do them?
For most healthy adults, core training two to three times per week is a practical starting point. Your abs need recovery like any other muscle group. Doing vertical leg crunches daily is not automatically better, especially if your form declines or your neck and back start complaining louder than your alarm clock.
Safety Tips for Better Results
Stop the exercise if you feel sharp pain, numbness, tingling, dizziness, or pressure in your lower back or neck. Muscle effort is normal. Pain is not a badge of honor; it is information. Listen to it.
Keep your movements smooth and controlled. Avoid jerking, twisting, or forcing your range of motion. If you are new to exercise, start with the modified version and gradually progress. If you are returning after injury, work with a physical therapist or certified fitness professional who can assess your form.
Remember that strong abs are only one part of a strong core. Your back muscles, hips, glutes, diaphragm, and pelvic muscles all play a role in trunk stability. A complete routine should train the whole system, not just the muscles you can see in bathroom lighting.
Experience Section: What It Actually Feels Like to Practice Vertical Leg Crunches
The first time many people try vertical leg crunches, they expect a simple ab exercise. Then they lift their legs, crunch up once, and immediately realize their body has questions. The most common surprise is how much stabilization the move requires. Keeping the legs vertical sounds easy until they begin drifting forward, wobbling sideways, or slowly lowering like they are trying to escape the workout.
One useful experience-based tip is to focus less on “getting high” and more on “getting tight.” Your shoulder blades only need to leave the mat. When beginners try to crunch too high, they often pull their head forward, flatten their breathing, and turn the movement into a neck workout wearing an ab-exercise costume. A smaller, cleaner crunch usually feels better and works better.
Another practical lesson is that hamstring flexibility matters. If your legs shake or your knees bend more than expected, that does not mean you are failing. It may simply mean your hamstrings are tight or your hip flexors are working hard to keep your legs up. In that case, the modified bent-knee version is not a downgrade. It is smart training. Fitness progress is not about choosing the hardest-looking option; it is about choosing the version you can control.
Breathing also changes the experience. Many people hold their breath when the exercise gets challenging. This makes the movement feel stiff and stressful. Try exhaling as you lift and imagining your ribs sliding down toward your hips. That cue often helps the abs engage more clearly. On the way down, inhale slowly and control the descent. The lowering phase is not a nap break. It is part of the rep.
In real workouts, vertical leg crunches work well near the end of a session. After full-body strength training, a few controlled sets can serve as a focused core finisher. They also pair nicely with dead bugs because the two moves teach different core skills. The crunch trains controlled spinal flexion, while the dead bug teaches you to keep your spine stable as your limbs move. Together, they create a more balanced routine than crunches alone.
People who sit for long hours may feel their hip flexors fatigue before their abs. If that happens, take shorter sets, bend the knees, or alternate vertical leg crunches with glute bridges. Activating the glutes can help balance out the front-of-hip tension that often comes from desk posture. Your body is not a collection of isolated parts; it is more like a group project where everyone must participate, including the muscles that usually hide in the back row.
A final experience tip: track quality, not just numbers. Instead of writing “50 crunches” in your workout notes, write “3 sets of 12 clean reps, no neck pulling.” That tells you much more about progress. Over time, the exercise should feel smoother, more controlled, and less like a wrestling match with your own torso. When that happens, you can progress by adding a pause, slowing the lowering phase, trying the toe-reach version, or combining the move with other core exercises.
Vertical leg crunches are not glamorous. They will not make the floor more comfortable, and they will not make your ceiling more interesting. But they can be effective, convenient, and surprisingly satisfying when performed with intention. The goal is not to punish your abs. The goal is to train them to work with control, support your movement, and help you feel stronger in everyday life.
Conclusion
Vertical leg crunches are a practical, equipment-free core exercise that can fit into beginner, intermediate, and advanced ab routines. The key is choosing the right version for your current ability. Start with the modified bent-knee vertical leg crunch if you need more support. Move to the classic version when you can control your lower back and neck. Try the toe-reach variation when you want a stronger challenge without adding equipment.
For best results, move slowly, breathe properly, avoid pulling on your neck, and stop when your form breaks down. Combine vertical leg crunches with planks, bridges, dead bugs, bird dogs, and other core exercises for a stronger, more balanced midsection. Your abs do not need chaos. They need consistency, control, and maybe a mat that does not feel like a medieval invention.
Note: This article is for general fitness education only. If you have pain, injury, pregnancy-related concerns, postpartum abdominal separation, or a medical condition, consult a qualified healthcare or fitness professional before performing crunch-based exercises.