Halloween decorating does not have to involve a fog machine, a life-size skeleton named Gary, and a budget that makes your wallet shriek louder than a haunted house actor. Sometimes, the simplest decorations do the most work. Enter the DIY Halloween garland: lightweight, affordable, easy to customize, and dramatic enough to make your mantel, staircase, doorway, bookshelf, or party table look like it has been personally styled by a very crafty ghost.
Garlands are one of the best Halloween decorations because they instantly add movement, color, and personality to a room. You can make them cute, creepy, vintage, elegant, kid-friendly, gothic, rustic, glam, or “I made this at midnight with construction paper and determination.” Better yet, most DIY Halloween garlands use simple materials: cardstock, felt, yarn, twine, ribbon, fabric scraps, pom-poms, paper plates, coffee filters, faux leaves, and a little glue.
Below, you will find more than 25 spooktacular DIY Halloween garland ideas, plus practical tips for materials, styling, durability, and party-ready display. Whether you are decorating for trick-or-treat night, a classroom party, a cozy movie marathon, or a full-blown monster mash, these ideas will help your home look festive without turning your dining table into a craft-supply crime scene.
Why DIY Halloween Garlands Are So Popular
DIY Halloween garlands are popular because they deliver maximum seasonal charm with minimal effort. Unlike large decorations that require storage space, garlands fold flat, roll up easily, and can be reused year after year if you choose sturdier materials like felt, fabric, foam, or laminated paper.
They are also flexible. A single paper bat garland can look playful in a kid’s bedroom, stylish over a black-and-white mantel, or eerie when layered with gauze and dim orange lights. That is the magic of garlands: they behave like Halloween accessories for your house. The same way a witch hat improves almost any costume, a garland improves almost any blank wall.
Essential Supplies for DIY Halloween Garlands
Before choosing a design, build a small Halloween garland kit. You do not need every item, but these basics will cover most projects:
- Cardstock or construction paper in black, white, orange, purple, gray, and metallic shades
- Felt sheets for reusable ghosts, bats, pumpkins, and candy corn
- Twine, yarn, ribbon, fishing line, or baker’s string
- Scissors, craft knife, ruler, and hole punch
- Glue stick, craft glue, tape, or a low-temperature glue gun
- Markers, paint pens, glitter glue, and stickers for details
- Mini clothespins, beads, pom-poms, tassels, faux leaves, or plastic spiders
- Battery-powered string lights for a glowing effect
If kids are helping, keep the materials simple and safe: pre-cut shapes, glue sticks, washable markers, and yarn. Save sharp tools and hot glue for older crafters or adults. Halloween should be spooky, not an accidental trip to the bandage drawer.
25+ Spooktacular DIY Halloween Garland Ideas
1. Classic Paper Bat Garland
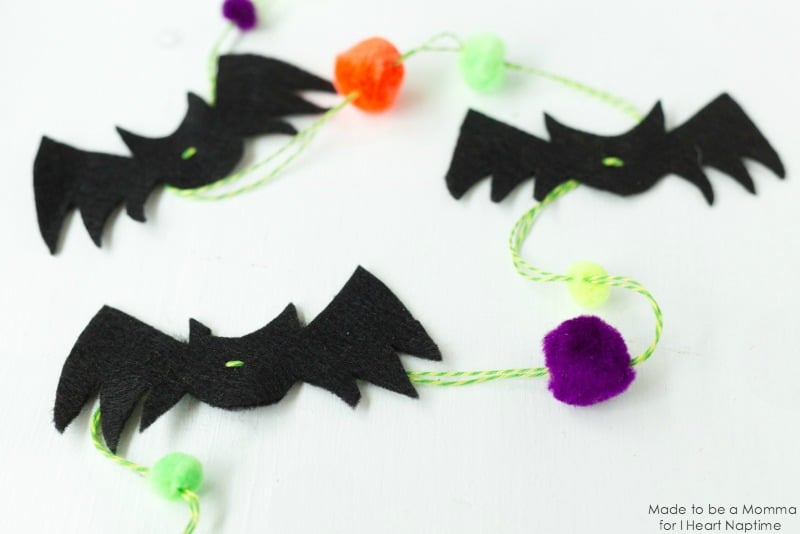
Cut bat shapes from black cardstock, punch holes near the wing tips, and string them across twine. For a flying effect, vary the size of each bat and slightly bend the wings forward. Hang the garland over a doorway, mirror, or mantel for instant haunted-house energy.
2. Friendly Ghost Garland
Use white cardstock, felt, or coffee filters to create simple ghost shapes. Draw tiny oval eyes with a black marker, then string them together. This is one of the easiest DIY Halloween garlands for kids because the shapes are forgiving. A lopsided ghost still looks like a ghost. Honestly, it may look even more emotionally relatable.
3. Candy Corn Cardstock Garland
Layer yellow, orange, and white paper triangles to mimic candy corn. Punch holes at the top corners and thread with orange ribbon or baker’s twine. This garland is cheerful, colorful, and perfect for kitchens, dessert tables, and classroom parties.
4. Felt Pumpkin Garland
Cut pumpkin silhouettes from orange felt and add green felt stems. You can keep them plain for a fall look or add jack-o’-lantern faces with black felt. Felt is a great choice because it does not tear easily and can be stored for next year.
5. Jack-o’-Lantern Face Garland
Instead of full pumpkins, cut orange circles and decorate each one with a different jack-o’-lantern face. Make some smiling, some surprised, and one that looks like it just checked the price of Halloween candy. This garland works well across windows because the orange pops in daylight.
6. Black Cat Garland
Cut cat heads or full cat silhouettes from black paper. Add yellow paper eyes or use a metallic gold marker for a chic finish. String the cats with purple ribbon for a playful Halloween color palette.
7. Witch Hat Garland
Make tiny witch hats from cardstock triangles and paper brims. Add ribbon bands, glitter stars, or tiny buckles. This DIY Halloween garland looks especially cute above a drink station labeled “Witch’s Brew.” Apple cider counts. So does hot chocolate. The cauldron is optional.
8. Spiderweb Garland
Use white paper, black paper, or thin craft foam to cut spiderweb shapes. Alternate webs with small plastic spiders or paper spiders. For a more elegant look, use black webs on white string and hang them against a light wall.
9. Pom-Pom Monster Garland
Make yarn pom-poms in Halloween colors, then glue on googly eyes and tiny felt teeth. This garland is more silly than scary, making it perfect for kids’ rooms or family-friendly parties. Use purple, lime green, orange, and black for a colorful monster parade.
10. Boo Letter Garland
Cut large letters spelling “BOO,” “EEK,” “TRICK OR TREAT,” or “HAPPY HALLOWEEN.” Use cardstock, felt, or chipboard. Decorate the letters with stripes, polka dots, glitter, or tiny bat cutouts. Letter garlands work beautifully as photo booth backdrops.
11. Vintage Halloween Pennant Banner
Create triangle pennants from kraft paper, orange cardstock, or printed scrapbook paper. Add vintage-inspired images like moons, cats, owls, pumpkins, and haunted houses. Distress the edges with brown ink for an antique look.
12. Skeleton Bone Garland
Cut simple bone shapes from white cardstock and string them together with black ribbon. For a fun twist, alternate bones with skull shapes. This garland looks great across a snack table, especially if you are serving “bone-chilling” treats.
13. Eyeball Garland
Use white paper circles, ping-pong balls, or foam balls to create eyeballs. Draw colorful irises and red squiggly veins with markers. String them carefully or attach them to a ribbon with glue. The result is delightfully creepy without being too intense.
14. Mummy Garland
Wrap strips of white crepe paper or gauze around cardstock rectangles, leaving space for googly eyes. String each mini mummy along twine. This garland is perfect for a Halloween party because it looks detailed but is secretly easy.
15. Haunted House Silhouette Garland
Cut small haunted houses from black cardstock and place yellow paper behind the windows to make them glow. Hang the garland in front of a window or layer it with battery-powered lights for a spooky skyline effect.
16. Moon and Star Garland
For a magical Halloween style, cut crescent moons and stars from metallic gold or silver cardstock. Mix in a few black bats or tiny witch silhouettes. This garland is ideal for anyone who prefers mystical decor over jump-scare decor.
17. Paper Chain Halloween Garland
Paper chains are classic for a reason. Cut strips of orange, black, white, and purple paper, then loop and glue them into a chain. Add stickers or draw mini ghosts and bats on the links. It is simple, nostalgic, and nearly impossible to mess up.
18. Tassel Garland in Halloween Colors
Make tassels from tissue paper, yarn, or embroidery floss. Use black, orange, white, purple, and metallic gold. Tassel garlands look festive without being too themed, so they can blend into modern Halloween party decor.
19. Felt Candy Corn Garland
Cut candy corn pieces from yellow, orange, and white felt, then glue the layers together. Felt candy corn has a soft, handmade look and lasts longer than paper. Hang it in the kitchen or near a candy bowl for maximum thematic commitment.
20. Mini Cauldron Garland
Cut black cauldron shapes from cardstock and add green tissue paper or glitter foam “bubbles” at the top. This playful garland is great for a witch-themed party, especially when paired with potion labels and green lighting.
21. Ghost Tassel Garland
Make white yarn tassels, tie them near the top to form a ghost head, and add black felt eyes. These little ghosts have charming movement when they hang, making them perfect for doorways and windows.
22. Pumpkin Spice Garland
Not every Halloween garland needs bats and bones. Create a cozy fall version with paper pumpkins, cinnamon-stick bundles, faux leaves, and orange ribbon. It transitions beautifully from September through Thanksgiving.
23. Black Lace Garland
Cut strips of black lace or use lace ribbon to create a gothic garland. Add small paper bats, faux pearls, or vintage keys for extra drama. This is a great option for elegant Halloween decor that whispers “haunted mansion” instead of shouting “plastic skeleton sale aisle.”
24. Mini Potion Bottle Garland
Use small paper bottle shapes and label them with names like “Moon Dust,” “Bat Wings,” “Spider Cider,” or “Goblin Tonic.” String the bottles across a bar cart, kitchen shelf, or party buffet. Keep the labels silly and family-friendly.
25. Glow-in-the-Dark Star and Ghost Garland
Use glow-in-the-dark paint or stickers on paper ghosts, moons, and stars. Charge the garland under light before guests arrive. When the room dims, your decorations get a second spooky life.
26. Clothespin Halloween Garland
Clip mini Halloween shapes, photos, postcards, or printed jokes to twine using small clothespins. This is one of the easiest garlands to update every year. You can swap in party photos, kids’ drawings, or new printable designs.
27. Bat and Moon Layered Garland
For a more designed look, layer two garlands together: one with black bats and one with gold moons. Hang them at slightly different heights. This creates depth and makes the display look fuller without adding much work.
28. Spooky Book Page Garland
Use pages from an old damaged book or printed faux book pages, then cut them into pennants. Add stamped bats, black ink edges, or tiny ghost illustrations. This garland works beautifully for a library, reading nook, or Halloween movie night.
How to Style Halloween Garlands Like a Pro
Layer Different Textures
The best Halloween garlands often combine more than one material. Try paper bats with cheesecloth, felt pumpkins with wood beads, or tassels with metallic stars. Texture makes the display feel intentional instead of flat.
Use Odd Numbers
When arranging shapes, odd numbers usually look more natural. A strand with seven ghosts, nine bats, or eleven pumpkins tends to feel balanced without becoming too perfect.
Match the Garland to the Room
A cute pom-pom monster garland may be perfect for a playroom, while black lace and gold moons may suit a dining room. Choose colors and materials that complement the space. Halloween decor can be spooky and stylish at the same time.
Add Lights Carefully
Battery-powered LED lights can make garlands glow beautifully. Avoid placing hot lights near paper, fabric, or dried materials. Use cool LED strands, secure them loosely, and never leave lit decorations unattended for long periods.
Best Places to Hang DIY Halloween Garlands
Garlands work almost anywhere, but some spots make them especially effective. A mantel is the classic choice because it creates a natural focal point. Doorways are great for party entrances. Stair rails allow long garlands to drape dramatically. Windows show off silhouettes, especially bats, ghosts, and haunted houses. Bookshelves, mirrors, headboards, and kitchen shelves can also use a small seasonal touch.
For parties, hang garlands behind food tables, dessert stations, photo booths, and drink carts. A strong backdrop makes photos look better and helps guests feel like the event has a theme, even if the theme is technically “we bought chips and made the wall cute.”
Tips for Making Your Halloween Garland Last Longer
- Use cardstock instead of thin printer paper for shapes that need structure.
- Choose felt, fabric, or foam for garlands you want to reuse.
- Store garlands flat in labeled envelopes or wrapped around cardboard.
- Keep paper garlands away from moisture, candles, and food splatters.
- Use removable hooks or painter’s tape to avoid damaging walls.
- Laminate paper pieces if you plan to hang them outdoors in a covered area.
Kid-Friendly Halloween Garland Ideas
If children are helping, pick projects with simple shapes and low-mess supplies. Paper chains, ghost cutouts, pumpkin faces, monster pom-poms, and clothespin garlands are all excellent choices. Pre-cut the main shapes for younger kids and let them decorate with markers, stickers, googly eyes, or foam pieces.
For a group activity, set up a “garland station” with bowls of shapes, yarn, and decorations. Each person can make one section, then you can connect the pieces into one long collaborative strand. The final result may not be perfectly symmetrical, but it will have personality. In Halloween crafting, personality beats perfection every time.
Budget-Friendly Ways to Make Halloween Garlands
You can make impressive garlands without spending much money. Use paper grocery bags for rustic pennants, leftover yarn for tassels, cardboard boxes for sturdy shapes, and old fabric scraps for bows. Coffee filters become ghosts, paper plates become pumpkins, and cotton balls become tiny spider eggs. Halloween crafting rewards imagination, not expensive supplies.
Printable templates can also save time, especially for bats, ghosts, candy corn, and jack-o’-lanterns. Trace the same template several times, cut in batches, and assemble while watching a Halloween movie. Just be warned: after the third garland, you may start referring to yourself as the Minister of Spooky String Decor.
Common Mistakes to Avoid
Making the Garland Too Short
Measure the space before cutting string. Add extra length on both ends for tying, taping, or draping. A garland that barely reaches the hooks can look tense, and Halloween decor should be dramatic, not stressed.
Using Weak Paper for Large Shapes
Large bats, pumpkins, and pennants may curl if the paper is too thin. Use cardstock or glue two layers together for strength.
Overloading the Strand
If your garland includes heavy pieces, use strong twine or ribbon. Space items evenly so the strand does not sag in one spot.
Ignoring the Background
Black bats disappear on a dark wall. White ghosts fade on a white mantel. Choose contrast so your hard work actually shows up.
My Experience Making DIY Halloween Garlands
The first thing I learned about making DIY Halloween garlands is that the “quick little project” always becomes a full seasonal personality shift. You start by cutting one bat, then suddenly you are surrounded by cardstock scraps, three glue sticks, and a strong belief that your hallway needs “more atmosphere.” This is normal. This is the garland effect.
In my experience, the easiest garlands are the ones with repeated simple shapes. Bats, ghosts, pumpkins, candy corn, and moons are the best beginner designs because they are recognizable even when they are not perfect. A slightly uneven pumpkin still looks handmade and charming. A slightly uneven bat looks like it has been through something, which frankly feels on-brand for Halloween.
Cardstock is my favorite material for fast projects. It cuts cleanly, holds its shape, and comes in every Halloween color you could want. For garlands I want to reuse, felt is worth the extra effort. Felt ghosts and pumpkins look softer and more polished, and they survive storage better than paper. I like placing felt garlands on mantels or bookshelves because they add texture without looking too busy.
The most useful trick is to make more pieces than you think you need. A six-foot garland can look sparse if the shapes are too far apart. When in doubt, cut extra bats, pumpkins, or tassels. You can always use leftovers as table scatter, gift tags, cupcake toppers, or mini decorations for a mirror. Halloween leftovers are not clutter; they are future spooky opportunities wearing tiny disguises.
Another lesson: color palette matters. Classic orange and black is always fun, but adding white, metallic gold, deep purple, smoky gray, or mossy green can make the garland feel more designed. For a modern look, black bats with gold moons are excellent. For a cozy farmhouse look, use kraft paper, twine, cream felt, and muted orange pumpkins. For a kid-friendly party, go bright with purple monsters, neon green eyes, and silly ghost faces.
Hanging is where many garlands succeed or flop. I prefer removable hooks for mantels and stair rails, painter’s tape for temporary wall displays, and mini clothespins when I want to adjust spacing. If the garland looks flat, layer it with a second strand. A paper bat garland plus a tassel garland instantly looks fuller. Add battery-powered lights behind the strand, and suddenly your craft looks like it has a decorating agent.
The best part of DIY Halloween garlands is that they do not need to be flawless. In fact, the handmade quality is the charm. Guests notice the creativity, kids notice the fun shapes, and your home gets that festive October feeling without requiring expensive decorations. A homemade garland says, “Yes, I celebrate Halloween,” but also, “Yes, I own scissors and I am not afraid to use them responsibly.” That is the kind of seasonal confidence every spooky home deserves.
Conclusion
DIY Halloween garlands are one of the easiest ways to transform your home for spooky season. They are affordable, customizable, fun to make, and versatile enough for every decorating style, from cute and colorful to gothic and dramatic. With simple materials like cardstock, felt, twine, yarn, ribbon, and a few playful details, you can create garlands that bring charm to mantels, staircases, windows, party tables, and entryways.
Whether you choose paper bats, friendly ghosts, candy corn, felt pumpkins, witch hats, black cats, tassels, moons, or monster pom-poms, the goal is the same: make your space feel festive, personal, and just spooky enough to delight everyone who walks in. Halloween decorating should be fun, not fussy. So grab your scissors, cue the Halloween playlist, and let your garland era begin.