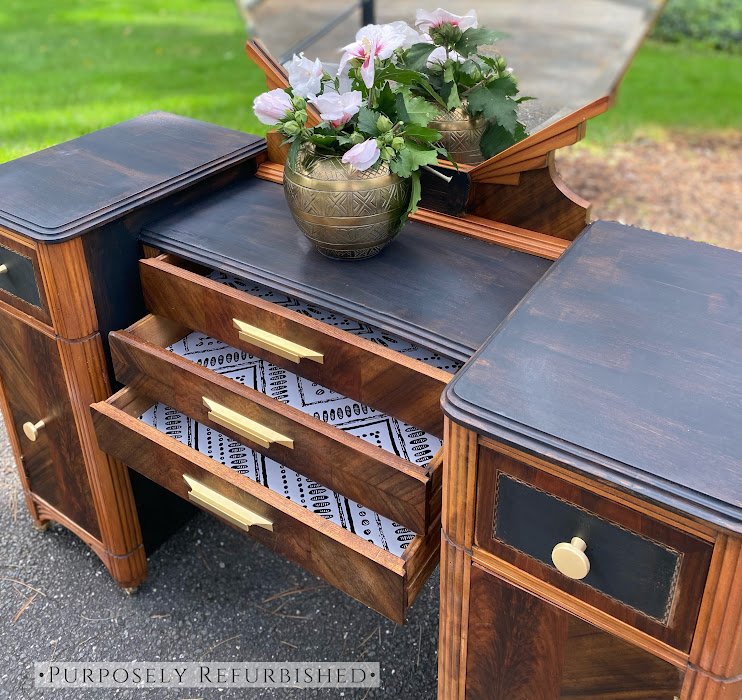
Old wood furniture has a funny way of looking both charming and deeply tired at the same time. That scratched dresser in the guest room? It may be one weekend away from looking boutique-worthy. The wobbly side table hiding in the garage? It might only need cleaning, tightening, and a better attitude. Renewing old wood furniture is one of the most satisfying DIY projects because the results can be dramatic without requiring a mansion-sized budget or a professional workshop.
Whether you found a thrift-store treasure, inherited a family table, or simply want to avoid sending solid wood to the landfill, there are many ways to refresh furniture. Some projects involve a full refinish with sanding, staining, and sealing. Others are simple upgrades, like new hardware, furniture wax, or peel-and-stick wallpaper. The secret is choosing the right method for the condition of the piece, the type of finish already on it, and the style you want in your home.
Below are 10 practical, creative, and beginner-friendly ways to renew old wood furniture, inspired by classic home improvement advice and real-world refinishing techniques.
Before You Start: Inspect, Clean, and Plan
Before grabbing paint like a DIY superhero with a brush, take a closer look at the furniture. Is it solid wood or veneer? Are there loose joints, missing knobs, peeling finish, water rings, deep scratches, or sticky mystery residue from 1998? A quick inspection helps you avoid turning a small weekend project into a dramatic restoration opera.
Start by cleaning the piece with a soft cloth and a mild cleaner suitable for wood. Avoid soaking the surface. Water and wood have a complicated relationship, and it is not always romantic. Remove drawers, unscrew hardware, check for wobble, and tighten screws. If the furniture may have old paint, especially from before 1978, consider lead-paint safety before sanding or scraping. Work in a well-ventilated area, wear eye protection, gloves, and a dust mask or respirator when needed.
1. Paint It for a Fresh, Modern Look
Painting is one of the fastest ways to renew old wood furniture. A dated brown dresser can become a soft white nursery piece, a navy entryway cabinet, or a bold green bar cart that looks like it has opinions. Paint is especially helpful when the wood grain is not attractive, the finish is badly damaged, or the piece has mismatched repairs.
For the best result, clean the surface thoroughly, lightly sand glossy areas, and use a primer if the furniture is slick, stained, or likely to bleed through. Chalk-style paint can create a matte, vintage finish, while enamel paint offers a harder, more durable surface for high-use furniture. Apply thin coats rather than one thick coat. Thick paint may look faster at first, but it often leaves brush marks, drips, and regret.
Best for:
Dressers, nightstands, chairs, bookcases, cabinets, and pieces with damaged or unattractive finishes.
2. Stain the Wood to Highlight Natural Grain
If the furniture has beautiful wood grain hiding under an old finish, staining may be the better choice. Stain enhances the natural character of wood instead of covering it. This is ideal for oak, walnut, mahogany, maple, and other woods with attractive grain patterns.
To stain old wood furniture, you usually need to remove the existing finish through sanding or a chemical stripper. Once the surface is clean and smooth, apply a pre-stain conditioner on woods that tend to absorb stain unevenly, such as pine, birch, or maple. Then apply stain with a cloth or brush, wipe away the excess, and let it dry before sealing.
Stain colors can completely change the mood of a piece. A honey stain gives a warm farmhouse feel. A dark espresso stain looks polished and formal. A weathered gray stain can make a table feel coastal without requiring you to own a beach house.
Best for:
Solid wood tables, dressers, desks, cabinets, and chairs with attractive grain.
3. Add a Clear Protective Finish
Sometimes old furniture does not need a new color. It simply needs protection. A clear finish can renew the surface, deepen the color of the wood, and guard against scratches, moisture, and daily wear. Common options include polyurethane, lacquer, varnish, shellac, and water-based topcoats.
Polyurethane is a popular choice for furniture that gets frequent use, such as dining tables and desks. Water-based polyurethane dries clearer and usually has lower odor, while oil-based polyurethane gives wood a warmer tone. Lacquer can create a smooth, professional-looking finish, but it requires careful ventilation and controlled application. Wax offers a soft sheen but is less durable than polyurethane for heavy-use surfaces.
Always match the finish to the furniture’s purpose. A decorative side table can live happily with wax. A kitchen table that faces coffee mugs, homework, hot plates, and the occasional spaghetti incident needs something tougher.
Best for:
Tables, desks, cabinets, dressers, and pieces that need long-term surface protection.
4. Replace the Hardware and Legs
New hardware can make old furniture look completely different with very little effort. Swapping dated brass pulls for matte black handles, ceramic knobs, antique bronze cup pulls, or sleek modern hardware can update a dresser in under an hour.
Furniture legs are another powerful upgrade. Tapered mid-century legs can make a boxy cabinet feel stylish. Bun feet can give a dresser a traditional look. Metal hairpin legs can turn an old tabletop into a modern desk. Before replacing legs, check the structure and weight of the furniture. The new legs should support the piece safely and evenly.
If the old hardware holes do not match the new pulls, fill them with wood filler, sand smooth, and drill new holes. Measure carefully. Crooked handles are tiny mistakes that shout from across the room.
Best for:
Dressers, cabinets, sideboards, desks, nightstands, and media consoles.
5. Use Decorative Overlays or Trim
Decorative overlays, molding, and wood trim can give plain furniture architectural detail. A flat-front dresser can become elegant with picture-frame molding. A simple cabinet door can look custom with raised trim. Even basic plywood furniture can gain character with the right decorative elements.
Apply overlays with wood glue or a suitable adhesive, clamp if needed, then prime and paint the piece for a seamless look. For a vintage style, choose curved or floral overlays. For a modern look, use thin geometric trim. This method is especially useful when you want a high-end appearance without buying high-end furniture.
Best for:
Flat-front dressers, cabinet doors, console tables, headboards, and storage pieces.
6. Try Furniture Transfers, Decals, or Stencils
Transfers, decals, and stencils are excellent for adding personality to old wood furniture. A floral transfer can turn a plain dresser into a romantic statement piece. A geometric stencil can make a cabinet look modern. Lettering can give a storage box or side table a vintage market feel.
The key is restraint. A little design detail can look intentional and artistic. Too much can make the furniture look like it lost a fight with a craft drawer. Place designs where they enhance the shape of the piece, such as drawer fronts, cabinet panels, or tabletop corners.
After applying transfers or stencils, seal the surface with a compatible topcoat to protect the design. This is especially important for pieces that will be touched often.
Best for:
Accent tables, dressers, cabinets, toy chests, benches, and decorative storage furniture.
7. Refresh the Surface with Furniture Wax
Furniture wax is a classic way to revive dull wood and add a soft, hand-rubbed glow. It works especially well on vintage pieces that do not need a full refinish. Wax can enrich color, reduce the appearance of minor scratches, and give wood a pleasant sheen.
Apply wax sparingly with a clean cloth or wax brush, let it haze according to the product directions, then buff it with a soft cloth. Avoid wax on surfaces that need maximum durability, such as kitchen tables or bathroom cabinets. Wax also does not play nicely under every future finish, so think ahead before using it.
Dark wax can add age and depth to painted furniture, while clear wax protects without changing the color much. Use dark wax carefully, unless you want your dresser to look like it spent the winter in a chimney.
Best for:
Vintage dressers, decorative cabinets, side tables, chairs, and lightly used accent furniture.
8. Cover Panels with Wallpaper or Fabric
Wallpaper and fabric can renew old furniture in a playful, stylish way. Peel-and-stick wallpaper works well on drawer fronts, cabinet backs, bookcase interiors, and tabletop panels under glass. Fabric can be applied to panels for texture, pattern, and softness.
This approach is perfect when the furniture is structurally sound but visually boring. A bookcase with wallpaper on the back panel suddenly looks designed. A nightstand with patterned drawer fronts feels boutique. A cabinet with grasscloth-style paper can add texture without major construction.
Choose durable materials and seal or protect them where needed. Avoid using delicate paper on surfaces that get heavy use or moisture. For renters, students, or indecisive decorators, peel-and-stick designs offer a low-commitment way to experiment.
Best for:
Bookcases, drawer fronts, cabinet backs, nightstands, desks, and decorative panels.
9. Repair Scratches, Dents, and Water Rings
Not every piece needs a dramatic makeover. Sometimes the best renewal is simply repairing damage. Small scratches can often be disguised with touch-up markers, stain pens, wax sticks, or scratch-cover products. Dents may respond to careful steaming if the wood fibers are compressed rather than missing. Deeper gouges can be filled with wood filler or epoxy putty, then sanded and finished.
White water rings are usually trapped moisture in the finish, not always permanent damage. Gentle methods such as controlled heat, a small amount of oil-based treatment, or a paste made for wood care may help. Dark water stains are more serious because they often indicate moisture has reached the wood itself. Those may require sanding, bleaching, staining, and resealing.
Always test repair methods in a hidden area first. Wood finishes can react differently, and nobody wants to turn one small ring into a modern art installation called “Table Panic.”
Best for:
Tables, desks, nightstands, dressers, and antique pieces with minor surface damage.
10. Repurpose the Piece for a New Use
Repurposing is the most creative way to renew old wood furniture. A dresser can become a bathroom vanity. A dining table can become a large desk. A cabinet can become a coffee bar. A wooden trunk can become a storage bench. An old door can become a headboard. When a piece no longer works in its original role, give it a new job description.
Before repurposing furniture, consider height, strength, storage needs, and safety. If you turn a dresser into a vanity, protect the wood from moisture and cut openings carefully for plumbing. If you make a bench, reinforce the structure so it can support weight. If you convert a tall dresser or bookcase, anchor it to the wall, especially in homes with children.
Repurposing is where old furniture gets to have a second career. It is basically retirement, but with better lighting and new hardware.
Best for:
Dressers, cabinets, trunks, tables, doors, bookcases, and solid wood pieces with good bones.
How to Choose the Right Renewal Method
The best method depends on the furniture’s condition and your goal. If the wood is beautiful, consider cleaning, staining, or sealing. If the surface is damaged beyond graceful aging, paint may be smarter. If the furniture looks dated but is otherwise fine, hardware and legs may be enough. If it feels too plain, overlays, stencils, wallpaper, or fabric can add character.
Also consider your skill level. Beginners may want to start with cleaning, waxing, hardware replacement, or painting a small side table. More advanced DIYers can tackle full stripping, staining, veneer repair, lacquer, or repurposing projects that require cutting and structural changes.
Common Mistakes to Avoid
One of the biggest mistakes is skipping prep work. Paint does not hide grease forever. Stain does not magically fix uneven sanding. A topcoat cannot rescue dust stuck in wet finish. Clean carefully, sand with the grain, remove dust, and follow drying times.
Another mistake is using the wrong product for the job. A delicate wax finish may not survive on a dining table used every day. A dark stain may look blotchy on soft wood without conditioner. Spray lacquer may look beautiful, but it requires ventilation and careful technique. Read labels, test first, and give each coat enough time to dry.
Finally, avoid over-restoring valuable antiques. Some antique furniture has historical value in its original patina. If a piece may be rare or valuable, consult a furniture restoration expert before sanding away its history.
Real-World Experiences: What Old Furniture Teaches You
Renewing old wood furniture teaches patience faster than almost any home project. At first, it looks simple: clean it, sand it, paint it, admire it. Then you discover a drawer that sticks, a mystery stain that refuses to leave, and one screw that appears to have been installed by a medieval blacksmith. That is part of the charm. Old furniture has a story, and sometimes that story includes making you work for it.
One common experience is realizing that cleaning alone can make a huge difference. Many old pieces are not actually ugly; they are just covered in dust, wax buildup, hand oils, and years of being ignored. A careful cleaning can reveal warmer color, clearer grain, and hardware that suddenly looks intentional instead of ancient. This is why experienced DIYers often start with the least aggressive method first. You can always sand later, but you cannot unsand a surface once you have gone too far.
Another lesson is that paint color looks different on furniture than it does on a tiny sample card. A soft sage green may look elegant in the store and slightly swampy on a large dresser in a dark hallway. Testing paint on a hidden area or sample board helps avoid disappointment. Lighting matters, too. Natural daylight, warm bulbs, and cool LEDs can make the same color appear surprisingly different.
Staining old wood can be even more unpredictable. Two drawers from the same dresser may absorb stain differently because of age, previous repairs, or different cuts of wood. This is where pre-stain conditioner, careful sanding, and test patches become valuable. Many DIYers learn that stain is less like makeup and more like a conversation with the wood. Sometimes the wood agrees. Sometimes it has other plans.
Hardware upgrades are often the most satisfying small change. Replacing old knobs can instantly shift a piece from outdated to stylish. However, measuring matters. If the new drawer pulls do not match the old holes, you may need to fill, sand, and drill. That extra step is not difficult, but it is easier when you expect it.
The most rewarding part is seeing a forgotten piece become useful again. A scratched table becomes a homework station. A tired dresser becomes nursery storage. A damaged cabinet becomes a coffee bar. These projects save money, reduce waste, and create furniture with personality. New furniture may arrive in a box, but renewed furniture arrives with a before-and-after storyand usually a little sawdust in your shoes.
Conclusion
Renewing old wood furniture is part design project, part problem-solving mission, and part treasure hunt. With the right approach, an outdated dresser, scratched table, or forgotten chair can become one of the most interesting pieces in your home. Paint can deliver a bold transformation. Stain can restore natural beauty. Wax, hardware, overlays, wallpaper, and repairs can refresh furniture without a full overhaul. Repurposing can give a piece an entirely new life.
The best results come from matching the method to the furniture. Start with cleaning and inspection, choose products carefully, protect yourself during sanding and finishing, and do not rush drying time. Old wood furniture has already survived years of use. Give it a thoughtful refresh, and it may be ready for many more.