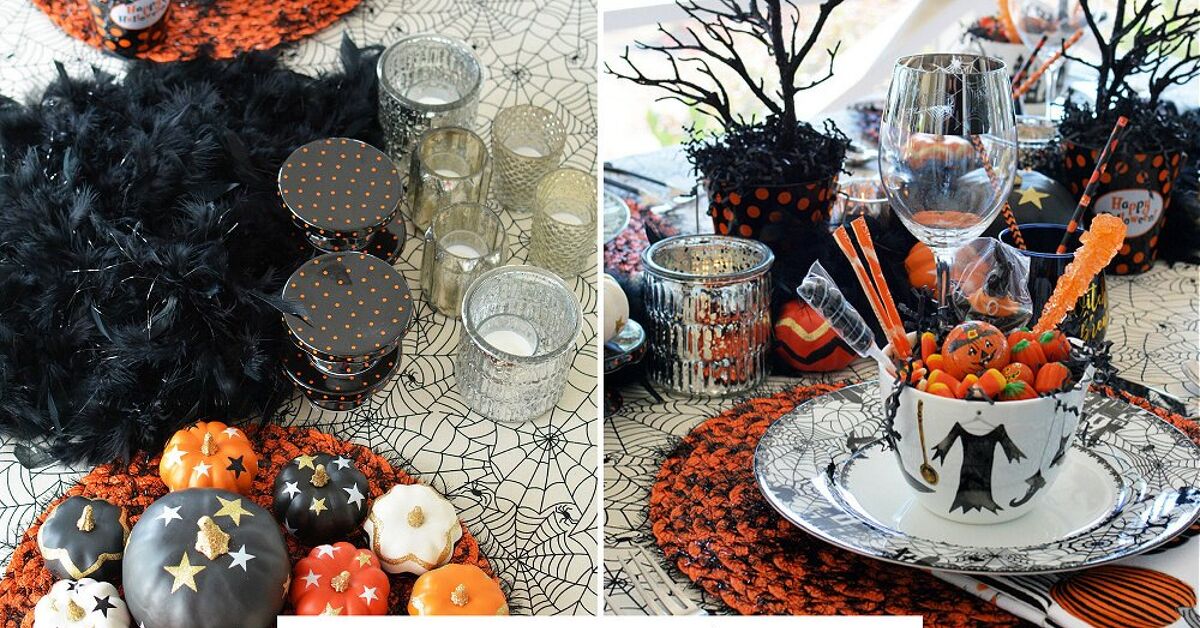
Halloween decorating does not have to involve a garage full of fog machines, a haunted-house budget, or a glue gun that somehow ends up stuck to your sleeve. Sometimes, the most memorable seasonal décor is sitting right in the middle of your table: a quick and easy Halloween table centerpiece that looks festive, polished, and just spooky enough to make dinner guests smile before they ask where the chips are.
The best Halloween centerpiece is not necessarily the biggest, darkest, or most dramatic. It is the one that fits your table, matches your hosting style, and does not block people from seeing each other across the mashed potatoes, cupcakes, or suspiciously orange punch. Whether you are decorating for a Halloween dinner party, a kids’ craft night, a cozy movie marathon, or a last-minute “people are coming over in one hour” situation, you can create a centerpiece that feels intentional without spending the entire afternoon wrestling fake spiderwebs.
This guide walks you through a simple, stylish method for building a Halloween table centerpiece using pumpkins, candles, branches, flowers, trays, fabric, candy, and a few eerie little details. You will also find theme ideas, budget tips, safety notes, and real-life decorating experience at the end so your table looks festive instead of frightening for the wrong reasons.
What Makes a Great Halloween Table Centerpiece?
A good centerpiece has three jobs: it anchors the table, supports the mood of the gathering, and leaves enough room for actual life to happen around it. Halloween gives you a playful design advantage because almost anything can become seasonal with the right color palette. A black tray becomes gothic. A white pumpkin becomes elegant. A glass jar becomes mysterious. A handful of candy corn becomes “decor,” which is convenient because it may also become “snack” within six minutes.
The easiest Halloween centerpiece ideas usually combine three elements: a base, a focal point, and accents. The base might be a tray, runner, cake stand, cutting board, or shallow bowl. The focal point could be a pumpkin, vase, lantern, skull, branch arrangement, or floral display. The accents are the little pieces that create texture and personality: mini pumpkins, flameless candles, faux spiders, ribbon, dried leaves, black feathers, wrapped candy, moss, or small bottles with spooky labels.
Start With a Clear Theme
Before you buy anything, choose the mood. Halloween décor can go in several directions, and mixing every possible style at once can make the table look like a seasonal aisle sneezed on it. Pick one main theme and let that guide your color choices and materials.
Classic Pumpkin Patch
This look uses orange pumpkins, mini gourds, fall leaves, burlap, wood, and warm lighting. It is friendly, family-style, and perfect for casual dinners. Add a few black bats or tiny spiders if you want a stronger Halloween feel without going full haunted mansion.
Elegant Gothic
Choose black taper candles, dark florals, deep red napkins, matte black pumpkins, antique-looking bottles, and a lace runner. This style works beautifully for adult dinner parties or moody buffet tables. Keep the arrangement low and symmetrical for a polished look.
Whimsical Witchy
Use striped ribbon, mini cauldrons, purple flowers, green accents, candy, paper bats, and playful signs. This theme is great for families, school parties, or anyone who prefers “cute spellbook” over “abandoned basement.”
Modern Minimal Halloween
Stick with white pumpkins, black candleholders, clear glass, eucalyptus, and one or two graphic accents. This approach feels fresh and clean, especially in smaller dining spaces where too much décor can make the table feel crowded.
The Quickest Formula: Tray + Pumpkin + Candles + Texture
If you want a Halloween table centerpiece that looks designed but takes about 15 minutes, use this reliable formula:
Step 1: Choose a Tray or Base
A tray instantly makes random objects look like a collection. Use a wood tray for rustic warmth, a black tray for drama, a silver tray for vintage elegance, or a cake stand for height. A long cutting board also works well for rectangular dining tables.
Step 2: Add One Main Pumpkin
Place a medium pumpkin in the center or slightly off-center. Real pumpkins look beautiful, but faux pumpkins are great if you want to reuse the centerpiece throughout the season. White, sage, black, and metallic pumpkins can look more refined than traditional orange, while classic orange always brings that unmistakable Halloween charm.
Step 3: Add Flameless Candles
Battery-operated candles give you the glow without the stress. Use different heights to create movement. If you prefer real candles, keep them away from paper, fabric, dried flowers, faux cobwebs, and anything that could tip or catch. For most Halloween table centerpieces, flameless candles are the easiest and safest choice.
Step 4: Fill Gaps With Texture
Add mini pumpkins, pinecones, dried leaves, moss, black feathers, faux berries, wrapped candy, or small ornaments. The goal is to cover empty spaces while keeping the arrangement breathable. If it looks like a decorative compost pile, remove a few items and let the centerpiece exhale.
Easy DIY Halloween Centerpiece Ideas
1. The Five-Minute Pumpkin Cluster
Gather three to seven mini pumpkins in different sizes and colors. Place them on a tray or table runner, then tuck in faux leaves, dried orange slices, or small sprigs of greenery. Add two flameless votives for a cozy glow. This is one of the simplest Halloween table centerpiece ideas because it requires no crafting skills, no cutting, and no emotional support from a hot glue gun.
2. The Spooky Branch Arrangement
Place bare branches in a tall vase or pitcher, then hang small paper bats, tiny ghosts, or orange-and-black ornaments from the branches. Anchor the bottom with black stones, candy corn, dried beans, or moss. This idea works especially well on buffet tables, entry tables, or sideboards because it adds height without crowding dinner plates.
3. The Pumpkin Vase
Cut the top from a small pumpkin, scoop it out, and place a glass jar or floral container inside. Fill it with mums, marigolds, eucalyptus, dried grasses, burgundy dahlias, or faux flowers. A pumpkin vase feels seasonal but still sophisticated, and it transitions easily from Halloween into Thanksgiving if you skip the bats and spiders.
4. The Candy Bowl Centerpiece
For a kid-friendly Halloween centerpiece, fill a clear glass bowl, apothecary jar, or tiered stand with wrapped candy. Surround it with mini pumpkins and battery tea lights. This idea is cheerful, colorful, and practical. The only downside is that your centerpiece may shrink throughout the evening. That is not a decorating failure; that is audience participation.
5. The Haunted Cloche
If you have a glass cloche or large jar, place a small skull, faux crow, mini pumpkin, moss, or flameless candle inside. Set it on a plate or cake stand and scatter a few dark leaves around the base. A cloche creates instant drama because it makes ordinary objects look like they were discovered in a mysterious attic.
6. The Black-and-White Table Runner Centerpiece
Lay down a black runner or cheesecloth, then arrange white pumpkins, black candlesticks, and small ceramic ghosts down the center. This is a strong choice for modern homes because it uses contrast instead of clutter. Add one metallic accent, such as gold flatware or brass candleholders, for warmth.
7. The Witch’s Garden
Use a shallow bowl, tray, or cauldron-style container. Fill it with moss, faux mushrooms, dried flowers, tiny potion bottles, and a few mini pumpkins. Add labels like “Moon Dust,” “Bat Wings,” or “Emergency Chocolate.” Keep it playful, not messy, and use a limited color palette so it still looks curated.
How to Build a Centerpiece in 20 Minutes
Here is a fast step-by-step plan for creating a Halloween table centerpiece when guests are coming soon and your dining table currently looks like it lost a paperwork battle.
Minute 1–3: Clear and Measure the Space
Remove mail, homework, chargers, random receipts, and anything else that does not say “festive.” Leave enough room for plates, glasses, serving dishes, and elbows. A centerpiece should enhance the table, not challenge guests to a maze.
Minute 4–6: Lay Down a Foundation
Add a table runner, folded scarf, strip of black fabric, kraft paper, cheesecloth, or a tray. This defines the centerpiece zone and makes the rest of the design feel deliberate.
Minute 7–10: Add the Main Object
Place your largest pumpkin, vase, lantern, bowl, or branch arrangement first. This gives the display a focal point. For rectangular tables, try placing the main object slightly off-center and balancing it with smaller pieces on the opposite side.
Minute 11–15: Add Supporting Pieces
Use mini pumpkins, candles, jars, flowers, candy bowls, or small figurines to build out the shape. Vary the height, but keep tall items narrow so they do not block conversation.
Minute 16–20: Add the Final Spooky Layer
Add one or two Halloween-specific accents: paper bats, faux spiders, a tiny skeleton hand, black ribbon, a ghost figurine, or a few themed place cards. Stop before the table starts looking like a clearance bin after a windstorm.
Budget-Friendly Materials You Probably Already Own
You do not need expensive seasonal décor to create a quick and easy Halloween table centerpiece. In fact, some of the best pieces are already in your kitchen, craft drawer, yard, or closet.
Look Around the Kitchen
Glass jars, cake stands, wooden boards, bowls, pitchers, mugs, and serving trays can all become centerpiece bases. Fill jars with candy, popcorn kernels, black beans, fairy lights, or mini ornaments. Turn a cake stand into a pumpkin pedestal. Use a soup bowl as a mini cauldron. Congratulations: your kitchen has been promoted to design studio.
Shop Your Yard
Branches, fallen leaves, pinecones, acorns, and dried grasses add organic texture. Clean and dry natural items before placing them on the table. If you want a moodier look, spray branches black or place them in a dark vase.
Reuse Fall Décor
Autumn decorations can become Halloween decorations with small changes. Add black ribbon to a fall wreath, tuck faux spiders into a pumpkin display, or place paper bats around a vase of orange flowers. This saves money and storage space.
Color Palettes That Always Work
Color is the secret shortcut to making a centerpiece look planned. Choose two or three main colors, then repeat them across the table.
Orange, Black, and Cream
This classic palette feels festive and balanced. Cream softens the bold contrast and keeps the centerpiece from looking too harsh.
Black, White, and Gold
This combination is elegant, modern, and party-ready. Use white pumpkins, black candles, and gold accents for a chic Halloween centerpiece.
Deep Red, Plum, and Charcoal
For a gothic dinner party, use dark florals, smoky glass, and matte black accessories. This palette feels dramatic without relying on plastic props.
Green, Purple, and Black
This is perfect for a witchy or whimsical theme. Keep the tones rich rather than neon if you want the table to feel stylish.
Safety Tips for Halloween Table Centerpieces
Halloween décor often includes paper, fabric, dried leaves, faux cobwebs, and candles, which means safety matters. Flameless candles are strongly recommended for centerpieces, especially if children, pets, costumes, or crowded buffet lines are involved. If you use real candles, place them in sturdy holders, keep them far from flammable decorations, and never leave them unattended.
Avoid placing decorations near hot serving dishes, electrical cords, or open flames. Keep tall pieces stable, and do not let fabric runners hang where someone can pull them. For jack-o’-lanterns, battery-operated lights or glow sticks are a safer choice than open-flame candles. A beautiful Halloween table should create atmosphere, not a surprise visit from the fire department.
How to Style the Rest of the Table
The centerpiece is the star, but the supporting cast matters. Keep place settings simple if your centerpiece is dramatic. Use solid plates, cloth napkins, and one small themed accent at each setting, such as a mini pumpkin, candy treat bag, or handwritten name card.
If your centerpiece is minimal, you can add more personality through napkins, chargers, glassware, and table linens. A spiderweb-patterned runner, black napkins, or orange goblets can make a simple pumpkin arrangement feel complete. The key is balance. If everything screams, nothing sounds spooky.
Common Mistakes to Avoid
Making It Too Tall
A centerpiece that blocks faces may look good in photos but feels awkward during dinner. Keep dining table arrangements low or use tall, thin pieces that do not interrupt conversation.
Using Too Many Tiny Items
Small accents are cute, but too many can look messy. Group items in clusters and leave some negative space.
Forgetting the Food
If you are serving family-style dishes, leave room. A centerpiece should not force the salad bowl to live on a chair.
Mixing Too Many Themes
Vampires, pumpkins, ghosts, witches, skeletons, candy, and gothic roses can work together only if you edit carefully. Choose a main direction and let everything else support it.
Experience Notes: What Actually Works in Real Homes
After decorating many seasonal tables, one lesson becomes clear very quickly: the easiest centerpiece is usually the one people enjoy the most. Guests rarely inspect whether every pumpkin is perfectly angled. They notice the glow, the mood, the color, and whether they can reach the bread basket without performing a haunted obstacle course.
One practical experience is that trays are lifesavers. When a centerpiece is built on a tray, you can move the whole arrangement in seconds if dinner gets crowded. This is especially useful for small apartments, family tables, or buffet setups. A tray also helps contain loose items like mini pumpkins, candy, leaves, and candles so the table feels organized rather than sprinkled with seasonal confetti.
Another real-world tip: flameless candles are worth it. They create the cozy flicker people love, but they do not make the host nervously glance at the table every thirty seconds. This matters even more when kids are reaching for candy, guests are wearing costumes with sleeves, or pets are wandering around with the confidence of tiny furry inspectors.
Fresh flowers can be beautiful, but they are not always necessary. Dried grasses, faux stems, branches, and leaves often last longer and fit the Halloween mood better. A vase of bare branches with paper bats can look more seasonal than an expensive bouquet. If you want flowers, choose sturdy fall varieties in orange, burgundy, cream, or deep purple. Mums, marigolds, dahlias, and eucalyptus are all strong options for a festive table.
Scale also matters more than price. A small round table needs one compact centerpiece, not a full haunted village. A long dining table looks better with a stretched arrangement: several small pumpkins, candles, and accents running down the center instead of one giant object in the middle. For a buffet table, taller elements work well because people are not trying to talk across them.
One of the best last-minute tricks is using candy as décor. Wrapped chocolates, lollipops, candy corn, caramel squares, and orange-wrapped sweets add instant color. Put them in glass jars or bowls, then surround them with pumpkins and candles. It looks cheerful, and guests love a centerpiece that doubles as dessert insurance.
Finally, do not underestimate humor. Halloween decorating gives you permission to be playful. A tiny skeleton sitting beside a pumpkin, a ghost peeking out of a napkin ring, or a label that says “Potion No. 31: Coffee” can make the table feel personal. The goal is not perfection. The goal is a table that makes people pause, smile, and feel like something fun is about to happen.
Conclusion
Creating a quick and easy Halloween table centerpiece is less about complicated crafting and more about smart layering. Start with a base, add a focal point, bring in candlelight, fill with texture, and finish with a few spooky details. Whether your style is rustic pumpkin patch, elegant gothic, whimsical witchy, or modern minimal, you can build a festive centerpiece in minutes using items you already own plus a few seasonal accents.
The best Halloween centerpiece feels welcoming, not overwhelming. It leaves room for food, conversation, laughter, and maybe one guest who insists they are “not really into Halloween” while eating their third ghost-shaped cookie. Keep it safe, keep it simple, and let your table set the scene for a memorable October gathering.