Note: This article is written for general RV battery education. Always follow your RV owner’s manual, battery label, charger manual, and local electrical safety rules before working on a battery system.
Introduction: Your RV Battery Is the Quiet Hero of the Campsite
Your RV battery is not glamorous. It does not have heated seats, panoramic windows, or a cup holder large enough for a suspiciously oversized road-trip coffee. But the moment it dies, suddenly it becomes the most important object in the universe. No lights. No water pump. No furnace fan. No fridge controls. No phone charging. Just you, the darkness, and the sound of your camping confidence quietly leaving the vehicle.
Learning how to charge your RV battery properly is one of the best skills any camper, weekend traveler, boondocker, or full-time RVer can develop. A healthy battery keeps your 12-volt systems alive, protects your appliances, extends battery life, and saves you from awkward campsite conversations that begin with, “Do you happen to have jumper cables and emotional support?”
This guide explains how to charge an RV battery in 12 practical steps. We will cover shore power, portable chargers, solar panels, generators, alternator charging, battery monitors, maintenance, safety, and common mistakes. Whether your RV uses flooded lead-acid, AGM, gel, or lithium iron phosphate batteries, the main idea is simple: use the right charger, choose the right settings, avoid overcharging or deep discharging, and treat electricity with the respect it deserves.
Understanding Your RV Battery Before You Charge It
Before plugging in cables and hoping for the best, it helps to know what kind of battery you are dealing with. Most RVs have two battery systems: the chassis battery and the house battery. The chassis battery starts the engine in a motorhome. The house battery, also called the coach battery, powers the living-area systems such as lights, fans, water pump, control boards, slides, and sometimes an inverter.
House batteries are usually deep-cycle batteries because they are designed to discharge and recharge repeatedly. Common RV battery types include flooded lead-acid, AGM, gel, and lithium iron phosphate, often called LiFePO4. Each chemistry has different charging needs. A flooded lead-acid battery may require water checks and ventilation. AGM batteries are sealed and maintenance-free but still need the correct voltage profile. Lithium batteries charge efficiently and tolerate deeper discharge, but they need lithium-compatible charging equipment and protection from freezing charge conditions unless they have built-in low-temperature charging protection.
How to Charge Your RV Battery: 12 Steps
Step 1: Identify the Battery Type
Start by reading the label on the battery case. Look for terms such as “flooded,” “wet cell,” “AGM,” “gel,” or “LiFePO4.” This matters because a charger set for the wrong chemistry can undercharge the battery, overcharge it, or shorten its life. A charger that works fine for a flooded lead-acid battery may not be ideal for lithium. A desulfation or equalization mode, for example, can be useful for some flooded batteries but harmful to AGM, gel, or lithium batteries unless the manufacturer specifically allows it.
If you cannot identify the battery type, do not guess. Check the RV paperwork, battery receipt, manufacturer website, or ask a qualified RV technician. Guessing battery chemistry is like guessing whether a pan is hot by grabbing it. You may be right, but the learning method is poor.
Step 2: Inspect the Battery and Cables
Before charging, inspect the battery compartment. Look for cracked cases, bulging sides, corrosion, loose terminals, damaged cables, melted insulation, leaking fluid, or a rotten-egg smell. If the battery appears damaged, do not charge it. Replace or professionally inspect it first.
For flooded lead-acid batteries, check electrolyte levels if the battery has removable caps. The plates should be covered. Use only distilled water when topping off, and never overfill. Clean corrosion from terminals with appropriate battery-cleaning methods, wear eye protection and gloves, and make sure the compartment has ventilation. Batteries can produce gases during charging, and sparks near a battery are not the kind of campsite fireworks anyone asked for.
Step 3: Turn Off Major 12-Volt Loads
Before charging, turn off unnecessary DC loads such as lights, fans, inverters, and entertainment equipment. Your RV converter or battery charger can often charge while powering small loads, but heavy loads slow down charging and make it harder to understand what the charger is doing.
If you are using a portable charger directly on the battery, shutting off the battery disconnect switch may help isolate the battery. However, some RVs wire important safety devices or memory circuits around the disconnect switch. When in doubt, follow the RV manual. The goal is to let the charger focus on charging instead of feeding every gadget in the rig, including the mystery switch nobody admits installing.
Step 4: Choose the Right Charging Method
There are several ways to charge an RV battery. The easiest is shore power, where you plug the RV into a campground pedestal or home outlet using the proper cord and adapter. Your RV converter changes AC power into DC power and charges the battery. Another option is a smart portable battery charger connected directly to the battery. Solar panels can charge through a solar charge controller. A generator can power the RV converter or a separate charger. In some RVs, the alternator charges the house battery while driving, especially when paired with a battery isolator or DC-to-DC charger.
Each method has advantages. Shore power is simple. Solar is quiet and excellent for boondocking. A generator is useful during cloudy weather or high energy use. Alternator charging is convenient on travel days. The best RV setup often uses more than one method because nature enjoys scheduling clouds exactly when your battery monitor says 22 percent.
Step 5: Use a Smart Charger or Proper RV Converter
A modern smart charger is strongly recommended. Smart chargers adjust charging voltage and current through stages, usually bulk, absorption, and float for lead-acid batteries. In bulk mode, the charger replaces most of the missing energy quickly. In absorption mode, voltage is controlled while current tapers down. In float mode, the charger maintains the battery without aggressively overcharging it.
Many newer RV converters also use multi-stage charging. Older single-stage converters may hold a constant voltage that is not ideal for long-term battery health. If your RV batteries always seem weak, boil off water, or never fully recharge, the converter may be part of the problem. Upgrading to a multi-stage converter or lithium-compatible charger can make a major difference.
Step 6: Set the Charger for the Correct Battery Chemistry
After connecting the charger, select the correct setting. Use flooded, AGM, gel, or lithium mode as appropriate. This one step prevents many battery problems. AGM batteries generally need different charging behavior than flooded batteries. Gel batteries are especially sensitive to overvoltage. Lithium batteries typically need a charging profile without equalization and with correct voltage limits.
If your charger has temperature compensation, use it for lead-acid batteries when available. Charging voltage requirements change with temperature. However, many lithium batteries do not use traditional lead-acid temperature compensation. Again, the manual wins every argument. It may not be exciting reading, but neither is replacing an expensive battery bank.
Step 7: Connect the Charger Safely
Make sure the charger is unplugged or turned off before connecting leads. Connect positive to positive first, usually red to the positive terminal. Then connect negative to negative or to the recommended ground point according to the charger manual. Keep clamps secure and away from moving parts, fuel sources, and metal tools.
Once the leads are connected properly, plug in or turn on the charger. Watch the display or indicator lights. Many chargers will show charging mode, voltage, battery percentage, or error codes. If you see reverse polarity, bad battery, overtemperature, or fault warnings, stop and investigate.
Step 8: Monitor Voltage and State of Charge
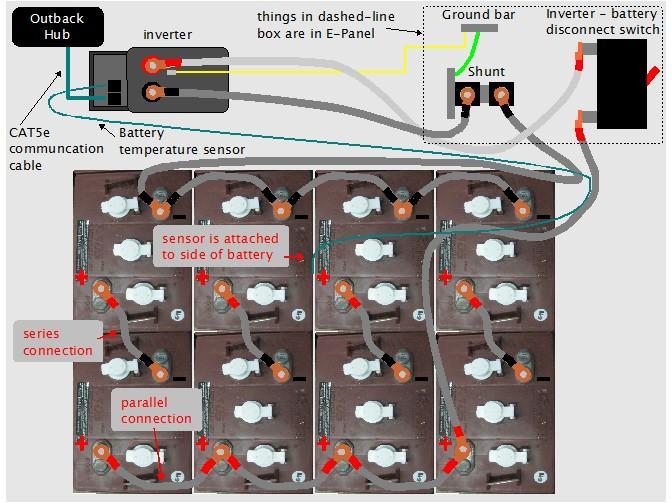
A battery monitor is one of the best upgrades for RV battery care. Basic voltage readings can help, but voltage alone can be misleading when the battery is under load or actively charging. A shunt-based battery monitor gives a clearer picture by tracking current in and out of the battery bank.
For lead-acid batteries, avoid regularly discharging below about 50 percent if you want longer life. Lithium batteries can usually discharge deeper, but you should still follow the manufacturer’s recommended limits. Checking state of charge helps you decide when to recharge, whether your solar is keeping up, and whether that “quick little movie night” actually consumed half the battery bank.
Step 9: Let the Battery Reach a Complete Charge
One common RV battery mistake is stopping too early. Lead-acid batteries need enough time in absorption mode to reach a true full charge. If you repeatedly charge only to 80 or 85 percent, sulfation can build up over time and reduce capacity. This is especially common when people run a generator for a short period and assume the battery is full because the voltage looks high.
Lithium batteries charge faster and do not need the same long absorption stage as lead-acid batteries, but they still need proper charging to balance cells depending on the battery management system. A charger reaching float or standby mode is a better sign of completion than glancing at surface voltage five minutes after plugging in.
Step 10: Charge With Solar the Right Way
Solar charging is excellent for RVs, but panels should not be connected directly to the battery without a charge controller. The solar charge controller regulates voltage and current so the battery receives the correct charging profile. Many controllers have settings for flooded, sealed, AGM, gel, and lithium batteries. Choose the correct one.
For best solar performance, keep panels clean, avoid shade, angle portable panels toward the sun, and check cable connections. Even a small shadow can reduce solar output. Solar is quiet, fuel-free, and perfect for maintaining batteries during storage, but it must be sized realistically. A tiny panel may maintain a battery, but it will not magically run a residential fridge, laptop, coffee maker, and hair dryer unless the sun has recently become a small private power plant.
Step 11: Charge While Driving With the Proper Equipment
Many motorhomes and towable RV setups can charge house batteries while driving. In simple systems, the alternator sends power through a charge line or isolator. However, modern battery banks, especially lithium systems, often benefit from a DC-to-DC charger. This device controls charging current and voltage, protects the alternator, and provides the correct charging profile for the house battery.
If your trailer battery does not gain much charge while towing, the factory charge line may be too small, too long, or limited by voltage drop. A DC-to-DC charger installed by a qualified professional can improve charging performance. This is especially useful for people who drive between campsites and want to arrive with a healthier battery bank.
Step 12: Store the Battery Properly After Charging
If your RV will sit unused, charge the battery fully before storage. Lead-acid batteries self-discharge and can sulfate when left partially discharged. They can also freeze more easily when discharged. Use a quality maintainer, solar maintainer, or periodic recharge schedule. For flooded batteries, check water levels during storage according to the manufacturer’s instructions.
Lithium batteries often prefer partial state-of-charge storage rather than sitting at 100 percent for months, but recommendations vary by brand. Some lithium batteries can be disconnected and stored with very little self-discharge. The safest answer is to follow the battery maker’s storage instructions. Also remember to turn off parasitic loads. Propane detectors, stereos, control boards, and other tiny loads can quietly drain a battery while your RV naps in the driveway.
Charging by Power Source: Which Method Should You Use?
Charging an RV Battery With Shore Power
Shore power is the most convenient method. Plug the RV into a proper 30-amp or 50-amp pedestal, or into a household outlet with the correct adapter for limited charging. The RV converter charges the battery and powers 12-volt systems. If using a household outlet, avoid running high-draw appliances such as air conditioners unless the circuit, adapter, and RV setup are rated for it.
Check that the converter is actually charging. A battery monitor or multimeter should show charging voltage at the battery when plugged in. If not, look for tripped breakers, blown reverse-polarity fuses, a battery disconnect switch left off, loose cables, or a failed converter.
Charging With a Generator
A generator does not usually charge the battery directly unless it has a dedicated DC charging output, and those outputs are often slow. The better method is to use the generator to power the RV converter or a high-quality portable smart charger. This lets the proper charging equipment handle the battery profile.
For lead-acid batteries, generator charging can be inefficient near the end of the charge because absorption takes time. Many RVers run the generator during the bulk stage, then let solar finish the slower top-off. That strategy saves fuel and reduces the number of hours your neighbors spend pretending not to hear your generator.
Charging With Solar Panels
Solar is ideal for maintaining batteries and supporting off-grid camping. A roof-mounted solar array can work all day without attention. Portable panels can be aimed for better performance and parked in the sun while the RV stays in the shade. Use a solar charge controller sized for your panel wattage and battery voltage.
For lithium batteries, confirm that the controller has a lithium profile or adjustable voltage settings. For lead-acid batteries, confirm whether equalization is appropriate. Do not equalize sealed AGM, gel, or lithium batteries unless the manufacturer specifically says it is safe.
Charging With a Portable Battery Charger
A portable smart charger is useful when the RV converter is weak, when the battery is removed from the RV, or when you want more control over charging. Choose a charger with enough amperage for your battery bank. A small one-amp maintainer is fine for storage, but it will be painfully slow for recharging a large depleted battery bank. For example, a 200 amp-hour bank charged with a tiny maintainer may finish sometime around your next birthday.
Use the charger in a ventilated area, keep it dry, select the correct battery mode, and inspect the battery during charging. If the battery becomes unusually hot, smells bad, leaks, or the charger shows a fault, stop charging.
How Long Does It Take to Charge an RV Battery?
Charging time depends on battery capacity, depth of discharge, charger output, battery chemistry, temperature, and whether loads are running. A simple estimate is to divide the amp-hours you need to replace by the charger’s amp output, then add extra time for charging inefficiency and absorption. For example, if you need to replace 50 amp-hours and your charger provides 10 amps, the basic math says five hours. In real life, a lead-acid battery may take longer because charging slows near full.
Lithium batteries usually accept charge more efficiently and maintain higher charging current until closer to full. Lead-acid batteries are slower during the final stage. Solar charging depends heavily on sunlight hours, panel angle, shade, weather, and controller efficiency. Alternator charging depends on wiring, voltage drop, and charge control equipment.
Common RV Battery Charging Mistakes
Using the Wrong Charger Setting
The wrong battery setting is one of the fastest ways to reduce battery life. Lithium, AGM, gel, and flooded batteries are not identical. Use the correct profile and disable modes that the battery manufacturer does not allow.
Letting Lead-Acid Batteries Sit Discharged
Lead-acid batteries dislike sitting in a low state of charge. Sulfation can harden on the plates and reduce capacity. Recharge promptly after use, especially after boondocking trips.
Relying Only on the Factory Monitor Panel
Many RV monitor panels show rough levels such as full, two-thirds, one-third, or empty. That is not precision; that is battery astrology. A real battery monitor or multimeter gives better information.
Ignoring Parasitic Loads
Small devices can drain a battery during storage. Propane detectors, stereos, antenna boosters, and control boards may continue drawing power even when everything looks off. Use the battery disconnect switch or physically disconnect the battery if recommended.
Charging a Frozen Battery
Never charge a frozen lead-acid battery. Freezing can damage the case and internal plates. Let the battery thaw safely and inspect it before charging. For lithium batteries, do not charge below the manufacturer’s minimum temperature unless the battery has internal heating or low-temperature charging protection.
Safety Tips for Charging RV Batteries
Wear eye protection and gloves when working near lead-acid batteries. Keep sparks, flames, and cigarettes away. Use insulated tools when possible. Remove metal jewelry before working around terminals. A wedding ring across battery terminals can turn a romantic symbol into a very bad toaster.
Make sure the charger is off before connecting or disconnecting clamps. Keep the area ventilated. Do not place a charger directly on top of the battery. Do not charge a battery that is cracked, leaking, swollen, or extremely hot. If you smell sulfur or see smoke, stop immediately and move away safely.
Maintenance Tips That Help Your RV Battery Charge Better
Clean terminals and tighten connections regularly. Corrosion increases resistance and reduces charging performance. For flooded batteries, check electrolyte levels and use distilled water as needed. Keep battery tops clean and dry. Dirt and moisture can create small current paths that contribute to discharge.
Test your charging system before big trips. Plug into shore power and confirm that voltage rises at the battery. Test solar output on a sunny day. Check the generator and converter together. If you rely on alternator charging, verify that the house battery gains charge while driving. The best time to discover a charging issue is in your driveway, not 40 miles from the nearest town while your fridge is developing trust issues.
Real-World Experiences: Lessons From Charging RV Batteries on the Road
One practical lesson many RV owners learn quickly is that battery charging is not only about plugging something in. It is about understanding your camping style. A weekend camper with hookups may only need a healthy converter and basic maintenance. A boondocker who runs lights, fans, a compressor fridge, laptops, and an inverter needs a more complete energy plan. The battery bank, charger, solar array, and monitoring system all need to work together.
For example, imagine a couple camping in a travel trailer for three nights without hookups. They arrive with one 100 amp-hour lead-acid battery, use lights, water pump, furnace fan, and phone chargers, then wake up on the second morning with weak voltage. The furnace fan ran heavily overnight, and the battery was drawn too low. Their solution might be adding a second battery, using LED lights, reducing furnace use, bringing portable solar, and recharging earlier instead of waiting for the battery to struggle.
Now consider a van owner with a 200 amp-hour lithium battery, 300 watts of solar, and a DC-to-DC charger. This setup may perform beautifully during sunny travel days. But if the van sits in shade for a week while the owner works remotely, solar output drops. The owner learns to park for morning sun, monitor daily amp-hour use, and drive occasionally to let the DC-to-DC charger replenish the bank. The battery is not the whole system; it is part of an energy budget.
Another common experience involves older RV converters. Some owners plug into shore power for days and assume the battery must be perfectly charged. Then they unplug and discover weak battery performance. In many cases, the converter is outdated, stuck at an imperfect voltage, or not properly connected through the battery disconnect circuit. A multimeter test at the battery while plugged in can reveal whether charging is actually happening. Trust, but verify. Your RV’s electrical system is not offended by a multimeter.
Solar charging also teaches patience. A portable solar suitcase can be wonderful, but only when placed well. Shade from one tree branch can reduce output dramatically. Dusty panels, low winter sun, and flat roof mounting all affect performance. Experienced RVers often check solar input at different times of day and move portable panels as the sun shifts. It feels a little like babysitting a very quiet sunflower, but the reward is free energy.
Generator charging brings its own lessons. Many beginners run a generator for an hour and expect a full battery. With lead-acid batteries, that hour may replace bulk energy but not complete the absorption stage. The battery voltage may look good temporarily, then drop under load. A better approach is to use a high-output smart charger during generator time, avoid unnecessary loads while charging, and let solar complete the slower final stage when possible.
Cold weather is another teacher. Batteries lose performance in low temperatures, and charging rules become more important. Lead-acid batteries should be kept charged to reduce freezing risk. Lithium batteries need special attention because many cannot be charged below freezing unless they include internal heaters or low-temperature cutoff protection. Winter campers should know exactly where their batteries are mounted, whether the compartment is heated, and what the battery manufacturer recommends.
The biggest experience-based tip is simple: create a pre-trip battery routine. Before leaving, fully charge the battery, check water levels if applicable, inspect terminals, test charging sources, and confirm the monitor reading. During the trip, check state of charge every day. After returning, recharge promptly and store correctly. This routine takes a few minutes, but it can add years of battery life and prevent the classic “why is everything beeping?” moment at midnight.
Conclusion: Charge Smart, Camp Happier
Charging your RV battery is not complicated once you understand the basics. Identify the battery type, inspect the system, use the correct charger, choose the right charging profile, monitor state of charge, and avoid deep discharge or overcharging. Shore power, solar, generators, portable chargers, and alternator charging can all work well when matched to the battery and used safely.
A well-charged RV battery gives you freedom. It lets you camp farther from hookups, run essential systems confidently, and enjoy the peaceful parts of RV life without obsessing over every flickering light. Treat your battery well, and it will quietly return the favor every time you flip a switch in the middle of nowhere and something actually turns on.