Note: This guide covers both Windows Media Player Legacy and the newer Media Player app in Windows 11, because Microsoft loves keeping names just similar enough to make everyone squint.
If you have ever opened a movie in Windows Media Player and heard the wrong language, the director’s commentary, or what sounds suspiciously like a descriptive audio track meant for accessibility, you are not alone. One minute you are ready to watch a video, and the next minute your computer is giving you the audio equivalent of a surprise plot twist. The good news is that switching audio tracks in Windows Media Player is usually simple once you know where Microsoft hid the option.
This guide explains exactly how to select an audio track in Windows Media Player, how to set a default audio language when possible, why the option may be missing, and what to do if the player refuses to cooperate. We will also clear up the difference between classic Windows Media Player Legacy and the newer Media Player app in Windows 11, because those are not the same thing even if their names sound like cousins at a family reunion.
What Selecting an Audio Track Actually Means
An audio track is one of the sound streams inside a video or DVD. Some files include only one track, which is the standard setup. Others include multiple tracks, such as:
- Different spoken languages
- Director or producer commentary
- Descriptive audio for accessibility
- Alternative mixes, like stereo and surround sound
So when people search for how to select an audio track in Windows Media Player, they are usually trying to switch from one embedded audio stream to another. That only works if the media file actually contains more than one audio track. If the file has only a single stream, Windows Media Player cannot magically invent a Spanish dub or a commentary track. It is a media player, not a wizard.
First, Know Which Player You Are Using
Before clicking random menus like you are trying to unlock a secret level, make sure you know which app is open.
Windows Media Player Legacy
This is the classic desktop app many people still think of when they hear “Windows Media Player.” On Windows 11, it may appear as Windows Media Player Legacy. This version is the one most commonly associated with the old-school menu path for switching audio and language tracks.
Media Player in Windows 11
This is the newer app Microsoft introduced for modern Windows 11 systems. It handles local audio and video playback and has a cleaner interface, but the classic menu structure is not the same. If you specifically need the traditional audio track workflow, Windows Media Player Legacy is often the easier place to start.
If you do not have Windows Media Player Legacy installed, you may need to add it as an optional feature in Windows 11.
How To Select an Audio Track in Windows Media Player Legacy
Here is the main method most users need.
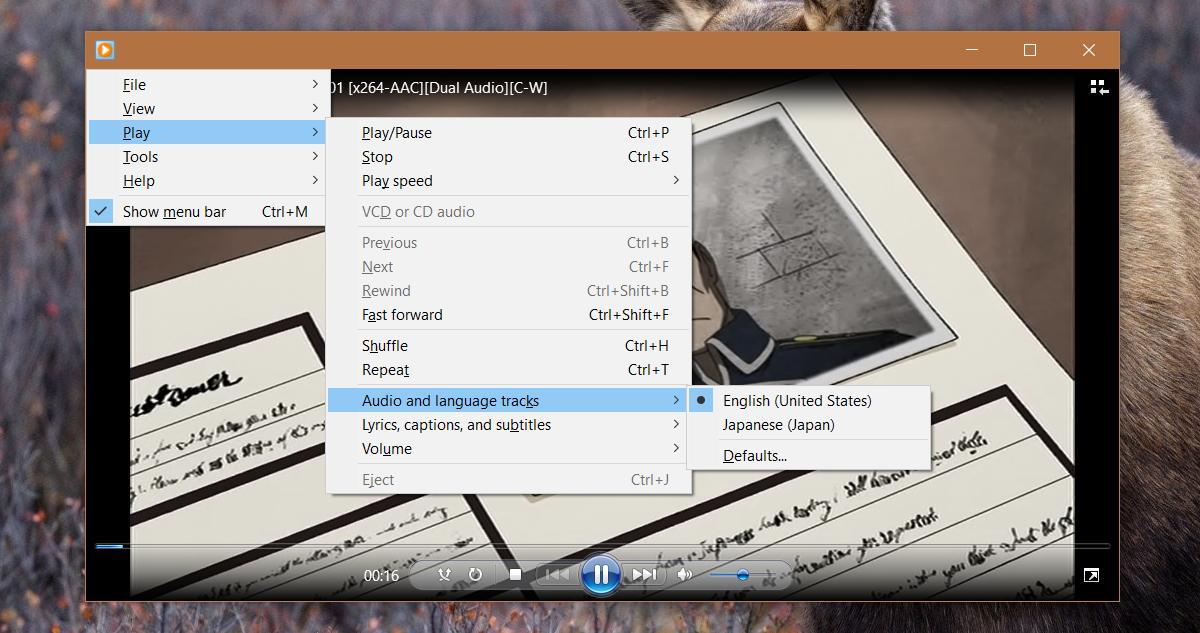
Method 1: Use the Hidden Menu Bar
- Open your video in Windows Media Player Legacy.
- Press the Alt key on your keyboard. In many cases, this reveals the classic menu bar.
- If that does not work, try Ctrl + M to show the menu bar.
- Click Play.
- Select Audio and Language Tracks.
- Choose the audio track or language you want.
- Resume playback and confirm the sound changed.
That is the core answer to the question. If your file includes multiple streams and Windows Media Player recognizes them properly, this menu should let you switch tracks in seconds.
One practical tip: pause the video before changing tracks. It is not always required, but it can make the change feel more reliable, especially with older files or older hardware.
Method 2: Set a Default Audio Language for DVD Playback
If you are dealing with DVD content or older multi-language media setups, you may also be able to choose a default language so you do not have to switch every single time.
- Open Windows Media Player Legacy.
- Click Organize.
- Select Options.
- Open the DVD tab.
- Click Defaults under Language Settings.
- Choose your preferred Audio language.
- Optionally set captions, subtitles, and DVD menu language too.
- Click OK to save the settings.
This is handy for people who watch discs with multiple languages. However, there is a modern catch: current Windows setups do not always include DVD playback support out of the box, so this feature matters more on older systems or older workflows than it does on a typical new Windows 11 laptop.
Why the Audio Track Option Might Be Missing
Sometimes you follow the steps perfectly and still do not see multiple audio choices. Annoying, yes. Unfixable, no. Here are the most common reasons.
1. The File Has Only One Audio Track
This is the most common explanation. Many MP4, AVI, WMV, and similar files contain just one sound stream. In that case, Windows Media Player can only show one option, often labeled as the default track.
2. The Format or Codec Is the Real Problem
Windows Media Player supports many common file types, including MP3, WAV, WMA, AVI, MOV, MP4, M4A, AAC, and FLAC. But support depends not only on the file extension, but also on the codecs used inside the file. Two MP4 files can behave very differently if they were encoded in different ways.
That means a video can open and play, yet still fail to expose all available audio streams correctly. If Windows Media Player cannot fully read the stream information, the alternate track may not appear in the menu.
3. You Are Using the Newer Media Player App Instead of Legacy
This is an easy mix-up. The newer Windows 11 Media Player app is not the same as Windows Media Player Legacy. If you were expecting the classic Play > Audio and Language Tracks path, you need the legacy version.
4. You Have a Windows N Edition
Windows N editions do not include all media technologies by default. If your system is missing the Media Feature Pack, audio playback features, codecs, or media app behavior may not work the way you expect.
5. The Wrong Audio Output Device Is Selected
Sometimes the track switched correctly, but you still think it did not because your sound is going to the wrong output device. Windows loves being helpful in the least helpful way possible.
How To Fix Audio Track Problems in Windows Media Player
Show the Menu Bar First
If you do not see the old menus, try Alt or Ctrl + M. A lot of Windows Media Player features hide behind that menu bar, including troubleshooting and advanced options.
Check the File Format
If your media file is in a standard format like MP4, WMV, or ASF, you have a better chance of smooth playback in Windows Media Player. If it is in a less friendly or more heavily customized format, track switching may be hit or miss.
A practical rule is this: if the file was created for broad compatibility, Windows Media Player usually behaves better. If it came from a niche workflow, a fan encode, or a strange rip with several embedded streams, the player may struggle.
Allow or Update Codecs Carefully
Windows Media Player can sometimes download or use additional codecs, and missing codecs are a known reason playback features fail. If a file will not expose its alternate audio streams, codec support may be the bottleneck.
Be careful here. Do not go on a wild internet safari installing every mystery codec pack you find. Use reputable sources, keep your system updated, and avoid cluttering your PC with unnecessary junk. That path ends with a slower computer and a mild identity crisis.
Install the Media Feature Pack on Windows N
If you use Windows 10 N or Windows 11 N, install the Media Feature Pack. Without it, key media components and codecs may be missing, which can affect playback and audio handling.
Confirm the Correct Audio Device
Go to Settings > System > Sound and make sure the correct speakers, headphones, or monitor output is selected. Also check that your device is enabled in advanced sound settings. A bad output selection can make audio switching look broken when the real problem is somewhere else.
Update Audio and Video Drivers
Outdated drivers can cause playback glitches, missing sound, or odd behavior with media files. If Windows Media Player is acting flaky, update your sound and display drivers through Device Manager or Windows Update.
Reinstall Windows Media Player
If the app is corrupted or misbehaving, turn the feature off and on again through Windows Features or Optional Features, then restart your PC. It is the classic “have you tried unplugging it and plugging it back in” move, but for media software.
How To Add Windows Media Player Legacy in Windows 11
If you are on Windows 11 and cannot find the classic player, here is the simple version:
- Open Settings.
- Go to System.
- Select Optional features.
- Choose View features.
- Search for Windows Media Player Legacy.
- Install it and restart if needed.
Once it is installed, open your media file there instead of the newer Media Player app. If your goal is to switch languages or commentary tracks through the old menu system, this usually makes life easier.
Example: Switching from Commentary to the Main Movie Audio
Let’s say you open a video file and immediately hear a voice explaining every dramatic pause, costume choice, and lighting decision. That is probably a commentary track, not a deeply thoughtful roommate hiding in your speakers.
Here is what to do:
- Pause the video.
- Press Alt to reveal the menu bar.
- Click Play > Audio and Language Tracks.
- Look for the main language track, often labeled by language or track number.
- Select it and continue playback.
If only one choice appears, the file may not contain multiple selectable tracks, or Windows Media Player may not be interpreting the stream layout correctly.
What About Subtitles and Accessibility?
Audio track selection often overlaps with captions and subtitles. If you are switching to a different spoken language, you may also want matching subtitles. On supported content and systems, Windows lets you customize caption appearance, and Windows 11 also includes Live Captions for broader accessibility.
This matters because some users are not actually looking for an alternate spoken track. They may be trying to better understand speech, deal with unclear audio, or follow content in another language. In those cases, captions can be just as useful as changing the audio stream itself.
Common Mistakes to Avoid
- Using the wrong app: Media Player in Windows 11 is not the same as Windows Media Player Legacy.
- Assuming every video has multiple tracks: Many files only include one audio stream.
- Ignoring codecs: File extensions do not tell the whole story.
- Forgetting Windows N limitations: Missing media components can break playback features.
- Blaming the track when the output device is wrong: Check speakers, headphones, and sound settings.
Common User Experiences With Audio Track Selection in Windows Media Player
One reason this topic stays popular is that the experience is rarely identical from one Windows PC to another. Some users open a bilingual video, press Alt, choose a new track, and everything works like a charm. Others open what looks like the same kind of file and find only one mysterious option labeled “Default,” which is about as informative as a sticky note that says “stuff.”
A very common experience is confusion caused by the app name. People search for instructions on Windows Media Player, then open the newer Windows 11 Media Player app and wonder why the steps do not match what they are seeing. They are not doing anything wrong. Microsoft simply kept the naming close enough to cause a little chaos. In practice, many users have better luck with audio track selection when they deliberately launch Windows Media Player Legacy.
Another common experience involves downloaded video files. A user may have a movie with English audio, Spanish audio, and subtitles bundled into one file. In one player, all those options appear neatly. In Windows Media Player, the video might play fine, but the alternate audio does not show up. This usually points to container or codec compatibility rather than user error. It feels personal, but it is really technical.
People also run into trouble when the audio does switch, but the result seems wrong. For example, they choose a new track and still hear no change. Later they discover the sound was routed to a TV over HDMI, a Bluetooth headset that had reconnected in another room, or a monitor with no speakers worth bragging about. Windows sound routing has a talent for turning a simple media task into a detective story.
Users with Windows N editions often describe an even more frustrating version of the problem. They expect built-in media playback to work normally, but certain features are incomplete until the Media Feature Pack is installed. Once that missing layer is restored, playback behavior often makes a lot more sense.
There is also the nostalgia factor. Plenty of people still prefer Windows Media Player Legacy because it feels familiar, fast, and direct. They know where the menus used to be, they remember organizing music libraries there, and they trust it for local files. So when an audio-track option is buried or missing, it can feel like a favorite old toolbox has been reorganized by someone who labels screws as “miscellaneous shiny bits.”
The most successful users tend to follow the same pattern: they confirm they are using the legacy app, test with a file they know has multiple audio tracks, reveal the menu bar, check codecs only when necessary, and verify sound output settings before assuming the file is broken. In other words, they troubleshoot calmly instead of angrily clicking every menu like they are trying to win a prize. That approach usually works.
Final Thoughts
If you want to know how to select an audio track in Windows Media Player, the essential answer is straightforward: use Windows Media Player Legacy, reveal the menu bar with Alt or Ctrl + M, then go to Play > Audio and Language Tracks and choose the stream you want. If that menu is missing or only shows one option, the issue is usually the file itself, the codec setup, the app version, or Windows media components.
Once you understand that, the whole process gets much less mysterious. Windows Media Player may still enjoy hiding useful controls behind old menus, but at least now you know exactly where to look. And honestly, that puts you ahead of about half the internet and several past versions of me.