Measuring an angle with a protractor can feel like trying to read a tiny plastic rainbow with two sets of numbers arguing with each other. One scale climbs left to right, the other climbs right to left, and somehow both are correct. Wonderful. Geometry brought snacks and confusion.
The good news? Once you understand what the protractor is asking you to do, measuring angles becomes surprisingly simple. A protractor is a tool used to measure angles in degrees, usually from 0° to 180° on a standard half-circle model. Whether you are doing homework, helping a fourth grader, sketching a woodworking cut, checking a craft pattern, or proving that a pizza slice is absolutely not “equal,” the process is the same: line up the center, match the baseline, read the correct scale, and don’t let the other set of numbers bully you.
In this guide, you will learn how to measure an angle using a protractor in 7 clear steps, plus common mistakes, examples, practice tips, and real-life experience from students, parents, teachers, and DIY folks who have all stared at a protractor and wondered why 40° and 140° are standing in the same spot.
What Is a Protractor?
A protractor is a measuring tool used to find the size of an angle. Most classroom protractors are semicircular and marked from 0° to 180°. Many have two number scales: one running clockwise and one running counterclockwise. This double-scale design is helpful because angles can open in different directions. It is also the reason beginners sometimes read the wrong number and accidentally turn a cute little acute angle into a dramatic obtuse angle.
The main parts of a protractor are:
- Center point: The small hole, cross, or mark near the middle of the flat edge. This goes on the angle’s vertex.
- Baseline: The straight bottom edge or 0° line. This lines up with one ray of the angle.
- Degree scale: The curved markings from 0° to 180° used to read the angle measure.
- Inner and outer scales: Two sets of numbers that help you measure angles opening in either direction.
What Is an Angle?
An angle is formed when two rays share a common endpoint. That endpoint is called the vertex. The rays are the two sides of the angle. The size of the angle tells you how much turn there is from one ray to the other, measured in degrees.
Here are the basic angle types you will see most often:
- Acute angle: Less than 90°
- Right angle: Exactly 90°
- Obtuse angle: Greater than 90° but less than 180°
- Straight angle: Exactly 180°
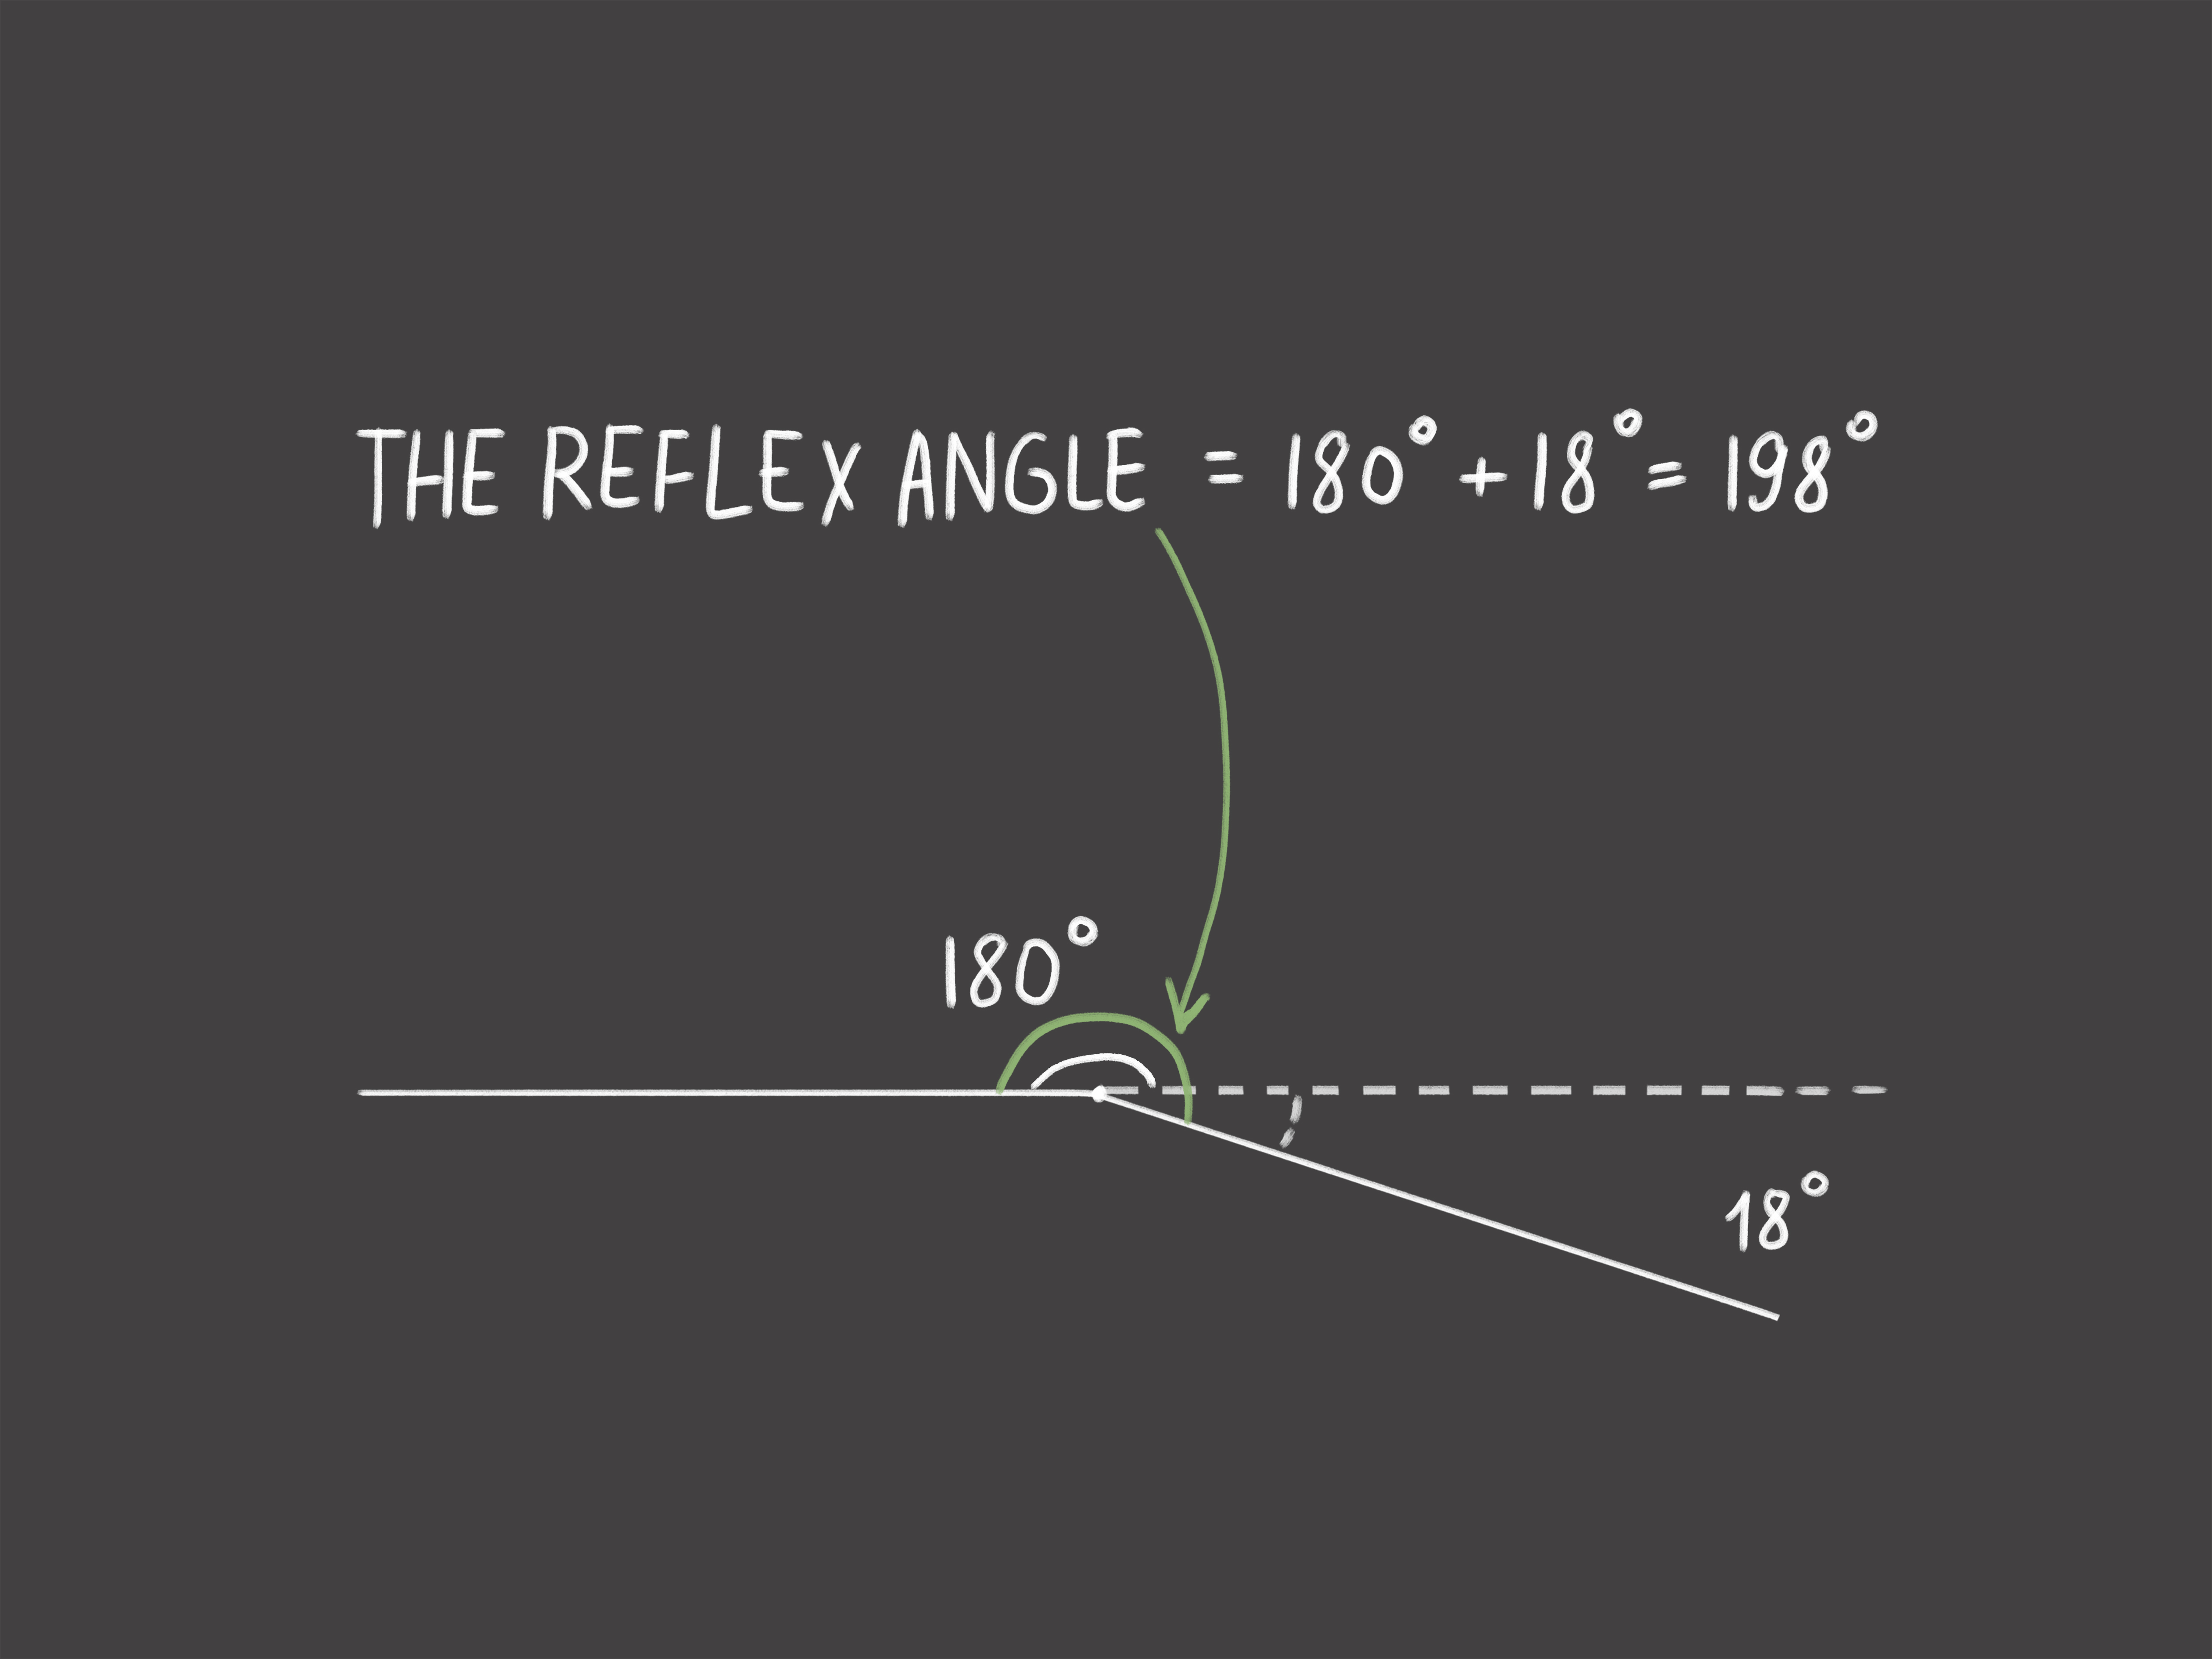
- Reflex angle: Greater than 180° but less than 360°
Most regular school protractors measure angles up to 180°. If you need to measure a reflex angle, you usually measure the smaller angle first, then subtract that measurement from 360°. For example, if the smaller angle is 110°, the reflex angle is 250° because 360° – 110° = 250°.
How to Measure an Angle Using a Protractor: 7 Steps
Ready to measure? Grab a protractor, a pencil, and an angle. If your angle is printed on a worksheet, excellent. If it is drawn by hand, make sure the lines are straight and long enough to reach the protractor’s scale. Tiny lines are cute, but they are not helpful.
Step 1: Identify the Vertex of the Angle
First, find the point where the two rays meet. That point is the vertex. Think of it as the hinge of the angle. If the angle were a door opening, the vertex would be the door hinge. If the angle were a slice of pie, the vertex would be the pointy end everyone pretends not to fight over.
This step matters because the protractor’s center point must sit exactly on the vertex. If the center is off, your measurement will be off too. Even a small shift can change the reading by several degrees, especially on a small printed angle.
Step 2: Place the Center Point of the Protractor on the Vertex
Now place the protractor so its center point is directly over the angle’s vertex. Most protractors have a tiny hole, circle, notch, or crosshair at the center. That mark is not decorative. It is the boss.
Line it up carefully. If you are teaching a child, this is the moment to slow down. Many wrong answers happen before anyone even reads the numbers. The protractor must be anchored at the exact point where the rays meet.
Step 3: Align One Ray with the 0° Line
Next, rotate the protractor until one ray of the angle lines up with the 0° line on the protractor. This is usually the straight baseline along the bottom edge. One side of the angle should run neatly along that baseline.
If the ray is too short to reach the scale, use a ruler to extend it lightly with a pencil. You are not changing the angle by extending the ray. A ray can keep going forever in geometry land, where apparently nobody pays for ink.
The important thing is that one side of the angle begins at 0°. That tells you which scale to read.
Step 4: Look at Where the Other Ray Crosses the Protractor
Now follow the second ray from the vertex outward until it crosses the curved degree markings on the protractor. That crossing point shows the angle’s measure.
If the ray does not reach the curved edge, extend it with a ruler. Keep the extension straight. A wobbly pencil line can turn a clean 60° angle into a geometry soap opera.
At this stage, do not rush to write the first number you see. Most protractors show two numbers at the same mark. One might say 50°; the other might say 130°. One is right. One is the little trickster hiding in plain sight.
Step 5: Choose the Correct Scale
This is the step where most mistakes happen. To choose the correct scale, ask one simple question: Which scale starts at 0° on the ray I lined up?
If your baseline ray starts at the 0° on the inner scale, read the inner scale. If it starts at the 0° on the outer scale, read the outer scale. Do not jump to the other scale halfway across the protractor. That is how innocent worksheets become crime scenes.
Here is a quick common-sense check:
- If the angle is clearly smaller than a right angle, your answer should be less than 90°.
- If the angle is wider than a right angle but not a straight line, your answer should be between 90° and 180°.
- If the angle forms a perfect corner, it should be 90°.
- If the angle forms a straight line, it should be 180°.
For example, suppose your second ray crosses a mark labeled both 40° and 140°. If the angle is visibly small and narrow, the answer is probably 40°. If it is wide and open, the answer is probably 140°.
Step 6: Read the Angle Measurement in Degrees
Once you have the correct scale, read the number where the second ray crosses the markings. Write the answer with the degree symbol: for example, 35°, 72°, 90°, or 125°.
Most school problems ask for whole-number degrees. If the ray lands between two marks, estimate to the nearest degree if the protractor has small tick marks. If the worksheet does not require high precision, choose the nearest whole number.
Remember: a protractor is a practical measuring tool, not a magical truth machine. Printed lines may be slightly thick, plastic tools may slide, and human eyeballs are not laser scanners. A measurement that is off by 1° is often just normal measuring error.
Step 7: Check Your Answer
Before you celebrate, check your measurement. Geometry rewards patience. It also punishes overconfidence with suspiciously wrong numbers.
Ask yourself:
- Is the protractor’s center still on the vertex?
- Is one ray lined up with 0°?
- Did I read the scale that starts at 0°?
- Does the answer match the angle type?
If your angle looks acute but your answer is 135°, check the scale. If your angle looks obtuse but your answer is 45°, check the scale again. The protractor may be technically innocent, but it certainly enables confusion.
Example: Measuring a Simple Angle
Imagine an angle with one ray pointing straight to the right and another ray slanting upward. You place the center point of the protractor on the vertex. You line the right-pointing ray with 0°. Then you look at where the upward ray crosses the curved scale.
At that point, the ray crosses both 60° and 120°. Which one is correct? Since the baseline starts at 0° on the scale that increases toward 60°, and the angle is clearly less than 90°, the correct measurement is 60°.
That small logic check is powerful. Always compare the number to the visual size of the angle. Your eyes can help catch a wrong-scale mistake before it escapes into your homework.
Common Mistakes When Using a Protractor
Mistake 1: Not Putting the Center on the Vertex
If the center point is not exactly on the vertex, the measurement will not be reliable. This is like trying to measure your height while standing on a chair and calling it “confidence.” The starting point matters.
Mistake 2: Lining Up the Wrong Edge
Some students line up the outside edge of the protractor instead of the 0° baseline. Use the straight 0° line, not just any flat-looking part of the tool.
Mistake 3: Reading the Wrong Scale
This is the classic protractor problem. Always start reading from the 0° that lies on your baseline ray. If you start from the opposite 0°, your answer will usually be the supplement of the correct angle. For example, you may read 130° instead of 50°.
Mistake 4: Forgetting to Extend the Ray
If the ray is too short, it may not reach the degree markings. Extend it with a ruler. Do not guess from halfway across the protractor unless you enjoy unnecessary drama.
Mistake 5: Measuring the Outside Angle by Accident
Sometimes a diagram shows both a smaller inside angle and a larger outside angle. Make sure you know which angle the problem asks you to measure. Look for the arc mark, label, or shaded region.
How to Measure Different Types of Angles
Measuring an Acute Angle
An acute angle is less than 90°. When measuring it, your answer should be small. If your protractor reading says 120°, but the angle looks like a narrow opening, you probably used the wrong scale.
Measuring a Right Angle
A right angle measures exactly 90°. It often appears as a square corner, like the corner of a notebook, window, tile, or well-behaved brownie. If the second ray crosses the 90° mark, the angle is right.
Measuring an Obtuse Angle
An obtuse angle is more than 90° and less than 180°. These angles look wide and open. If the angle is clearly wider than a right angle, choose the scale reading above 90°.
Measuring a Straight Angle
A straight angle measures 180°. It looks like a straight line. Both rays point in opposite directions from the same vertex.
Measuring a Reflex Angle
A reflex angle is greater than 180°. A standard half-circle protractor cannot directly measure it in one placement. Measure the smaller angle first, then subtract from 360°. For example, if the smaller angle is 75°, the reflex angle is 285°.
Tips for Measuring Angles More Accurately
For better results, use a transparent protractor so you can see the vertex and rays underneath. Keep the paper flat. Hold the tool still with one hand while reading the mark. Use a sharp pencil when extending rays because thick lines make measurements harder to read.
It also helps to estimate before measuring. Ask yourself whether the angle is about 30°, 60°, 90°, 120°, or 150°. Estimation gives your brain a target range. Then, when your reading is wildly different, you know something has gone sideways.
If you are measuring for a project such as carpentry, sewing, paper crafting, or model building, measure twice. Physical materials do not care that your first reading “felt right.” A 5° error may not matter on a worksheet, but it can matter when two pieces need to fit together neatly.
Why Learning to Use a Protractor Matters
Angle measurement is not just a school skill hiding in the geometry chapter. It shows up in real life constantly. Builders measure angles for cuts and corners. Designers use angles for layouts. Engineers use them in plans and models. Artists use angles for perspective. Athletes think about angles when shooting a basketball, kicking a soccer ball, or banking a pool shot. Even opening your laptop screen involves an angle, though thankfully no one asks you to submit the measurement for homework.
Learning how to measure an angle using a protractor also builds visual reasoning. You learn to connect a shape with a number. You learn to estimate, check, compare, and correct. Those are useful skills far beyond math class.
Practice Exercises
Try these simple practice tasks:
- Draw an acute angle and measure it with a protractor.
- Draw a right angle by tracing the corner of a piece of paper, then confirm it measures 90°.
- Draw an obtuse angle and estimate its measure before using the protractor.
- Measure the angle between the hands of a clock at 2:00, 3:00, and 5:00.
- Find three angles around your room and classify them as acute, right, obtuse, or straight.
Clock angles are especially useful. Each hour mark on a clock is 30° apart because 360° divided by 12 equals 30°. At 3:00, the hands form a 90° angle. At 6:00, they form a 180° angle. At 2:00, they form a 60° angle. Suddenly, the clock is not just judging your lateness; it is teaching geometry.
Experience Notes: What Actually Helps When Learning to Measure Angles
After working with students, parents, and everyday learners, one thing becomes clear: the hardest part of measuring an angle is rarely the math. It is the tool. A protractor looks simple, but beginners often treat it like a mysterious ancient compass that might open a secret door if rotated correctly. The best way to get comfortable is to practice slowly and deliberately.
One helpful experience is to start with obvious angles. Before measuring random worksheet angles, measure a right angle first. Use the corner of a book, index card, or sheet of paper. Place the center point on the corner, line one side with 0°, and confirm that the other side crosses 90°. This gives learners confidence because they already know what the answer should be. It is like training wheels, but for geometry instead of a bicycle.
Another useful approach is to cover one scale with a sticky note during early practice. Many beginners are overwhelmed by the two number scales. If the angle opens to the right, cover the scale that does not begin at the correct 0°. After a few tries, remove the sticky note and ask the learner to identify which scale should be used. This small trick can prevent the classic 40°-versus-140° mix-up.
Teachers often find that students improve when they estimate before measuring. Ask, “Is this angle less than 90° or greater than 90°?” before touching the protractor. That quick prediction builds number sense. If a student estimates “less than 90°” and then reads 130°, they know to pause. The estimate acts like a friendly alarm bell.
Parents helping with homework should resist the urge to grab the protractor and fix everything immediately. Instead, ask guiding questions: “Where is the vertex?” “Which ray is lined up with 0°?” “Which scale starts from that 0°?” These questions lead the learner through the process without turning the adult into a human answer key.
In DIY projects, the stakes feel different. Measuring a 45° angle on paper is one thing; cutting trim for a corner is another. For practical work, it helps to mark the angle lightly, measure twice, and compare the reading with the expected shape. If you are cutting material, test on scrap first. Geometry is cheaper when mistakes happen on leftover wood instead of the expensive piece.
Artists and crafters also use angle measurement more than they may realize. Origami folds, quilt patterns, paper stars, lettering layouts, and perspective drawings all depend on angles. A protractor can make designs cleaner and more consistent. Even if the final project looks creative and free-flowing, accurate angles often provide the invisible structure underneath.
The biggest lesson from real experience is this: accuracy improves with routine. Use the same sequence every time. Center on vertex. Baseline on ray. Read from zero. Check the scale. Confirm the angle type. When the steps become automatic, the protractor stops looking intimidating and starts feeling like what it really is: a small, clear tool that measures turns.
Conclusion
Learning how to measure an angle using a protractor is a basic geometry skill, but it is also a practical life skill. The process is simple when you follow the right order: identify the vertex, place the center point, align one ray with 0°, follow the other ray to the scale, choose the correct numbers, read the degree measure, and check your answer.
The most important rule is to read from the 0° line that matches the ray you aligned. Once you master that, the double scale stops being confusing. Acute angles, right angles, obtuse angles, straight angles, and even reflex angles become much easier to understand.
So the next time a protractor lands on your desk, do not panic. It is not a plastic semicircle of doom. It is just a geometry tool asking one polite question: “How wide is the turn?” Now you know how to answer.