Note: This article is written in clean, publish-ready HTML for web use. It contains original wording, practical cooking analysis, and no source-link clutter or content reference tags.
If kale has ever stared at you from the refrigerator with the energy of an unpaid gym coach, this recipe is your peace treaty. Cheesy kale nests turn leafy greens into crisp, savory, snackable bites that taste like an appetizer, look like something from a trendy brunch board, and quietly sneak vegetables into the conversation without making a speech about it.
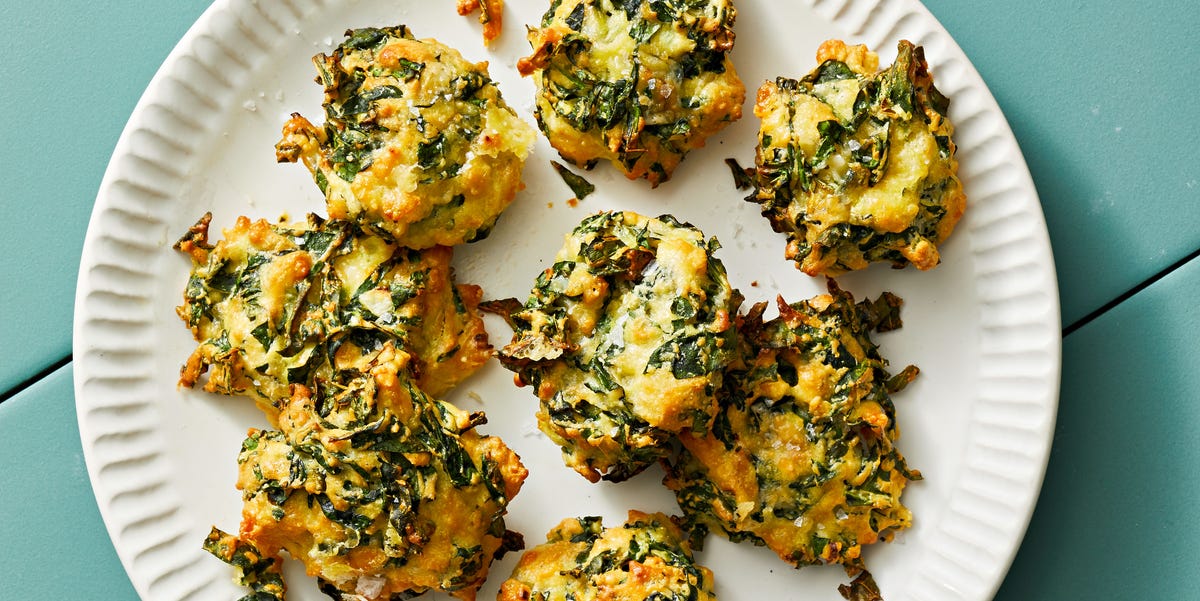
The idea is simple: thin ribbons of Tuscan kale are lightly wilted, mixed with eggs, garlic, scallion, almond flour, a small amount of all-purpose flour, baking powder, and extra-sharp white Cheddar, then air-fried into golden little nests. The result is tender in the center, crisp at the edges, cheesy throughout, and dangerously easy to eat straight from the basket. One minute you are “just tasting one,” and the next minute the serving plate looks like a raccoon hosted a dinner party.
This guide explains how to make the best cheesy kale nests at home, why the recipe works, how to keep them crisp, what to serve with them, and how to adjust the ingredients for different tastes. Whether you need a healthy party appetizer, a quick air fryer snack, a brunch side, or a clever way to make kale more lovable, this recipe deserves a spot in your regular rotation.
What Are Cheesy Kale Nests?
Cheesy kale nests are bite-sized vegetable fritters made with shredded or thinly sliced kale, cheese, eggs, and a light flour mixture. They are called “nests” because the kale ribbons twist together as they cook, creating little tangled rounds with crisp edges and a soft, cheesy center.
Unlike heavy fritters, these kale nests are light and delicate. The almond flour adds subtle nuttiness, the Cheddar brings sharp flavor, the eggs bind everything together, and the baking powder helps the mixture puff just enough so it does not become dense. Air frying gives the outside a golden finish without deep frying, which means less mess, less oil, and no need to stand guard over a pot of bubbling chaos.
Why This Cheesy Kale Nests Recipe Works
Thinly Sliced Tuscan Kale Cooks Quickly
Tuscan kale, also called lacinato kale or dinosaur kale, has flatter, darker leaves than curly kale. It is sturdy enough to hold its shape but tender enough to cook fast when sliced thinly. Removing the tough stems is important because the nests should be crisp and delicate, not chewy like a tiny green rope.
White Cheddar Adds Big Flavor
Extra-sharp white Cheddar is ideal because it has enough boldness to stand up to kale. Mild cheese can disappear into the batter, but sharp Cheddar makes every bite taste intentionally cheesy. Finely shredding the cheese helps it blend evenly, melt quickly, and cling to the kale ribbons.
Almond Flour Keeps the Texture Light
A mixture of almond flour and a little all-purpose flour creates a better texture than either one alone. Almond flour adds tenderness and a nutty background flavor, while all-purpose flour provides structure. The small amount of baking powder helps the nests cook up slightly airy rather than compact.
The Air Fryer Builds Crisp Edges Fast
The air fryer is perfect for cheesy kale nests because it uses hot circulating air to brown the outside quickly. The key is spacing. If the nests are crowded, they steam instead of crisp. Give them room, work in batches, and let the air do its tiny tornado magic.
Ingredients You Need
This recipe makes about 24 small cheesy kale nests, depending on how generous you are with each spoonful.
- 8 ounces Tuscan kale: Stems removed, leaves halved lengthwise, then thinly sliced crosswise.
- 1 teaspoon olive oil: Helps soften the kale and encourage browning.
- 1/2 teaspoon kosher salt: For massaging into the kale, plus more to taste.
- Freshly ground black pepper: Adds mild heat and balance.
- 2 large eggs: Bind the nests and help them hold their shape.
- 1 scallion, finely chopped: Adds fresh onion flavor without overpowering the cheese.
- 2 garlic cloves, grated: Gives the nests their savory backbone.
- 1/2 cup almond flour: Adds tenderness and light nutty flavor.
- 1 1/2 tablespoons all-purpose flour: Helps the mixture set.
- 1/2 teaspoon baking powder: Keeps the texture light.
- 4 ounces extra-sharp white Cheddar, finely shredded: The cheesy star of the show.
- Optional: Lemon zest, smoked paprika, red pepper flakes, or grated Parmesan for extra flavor.
How To Make Cheesy Kale Nests
Step 1: Prep the Kale
Wash the kale thoroughly and dry it well. Remove the thick stems by holding the base of each leaf and pulling the leafy part away from the rib. Slice the leaves lengthwise, then cut them crosswise into thin ribbons. The thinner the kale, the easier it is for the mixture to form nest-like shapes.
Step 2: Wilt the Kale
Heat the air fryer to 400°F. Place the sliced kale in a large bowl with olive oil, kosher salt, and a few grinds of black pepper. Massage the kale for about 30 seconds. Transfer it to the air fryer basket and cook for about 1 minute, just until wilted. Return the kale to the bowl and let it cool slightly.
This quick wilting step matters. Raw kale is bulky and stiff, but wilted kale folds easily into the egg and cheese mixture. It also releases some moisture before the nests cook, helping them crisp instead of turning soggy.
Step 3: Mix the Wet Ingredients
In a medium bowl, whisk together the eggs, chopped scallion, and grated garlic. If you like brightness, add 1/2 teaspoon lemon zest. If you want a little heat, add a pinch of red pepper flakes. This is where the flavor starts to wake up.
Step 4: Mix the Dry Ingredients
In a small bowl, whisk together almond flour, all-purpose flour, and baking powder. Breaking up any clumps now prevents floury pockets later. Nobody wants to bite into a cheesy kale nest and discover a surprise dust bunny of flour.
Step 5: Combine Everything
Add the egg mixture, dry mixture, and shredded white Cheddar to the cooled kale. Fold gently until the kale is evenly coated and the cheese is distributed throughout. The mixture should be moist and scoopable, not runny. If it looks too wet, add 1 teaspoon almond flour at a time. If it looks too dry, let it sit for 2 minutes; the salt and eggs usually loosen it slightly.
Step 6: Shape the Nests
Line the air fryer basket with perforated parchment paper or a parchment sheet trimmed to leave room around the edges for airflow. Drop 1-tablespoon portions into the basket, spacing them about 1 inch apart. Lightly press each spoonful into a small mound, but do not flatten it completely. A little height gives the nests a tender middle.
Step 7: Air Fry Until Golden
Cook at 400°F for about 4 minutes, or until the bottoms begin to set and the edges turn golden. Carefully flip each nest with a small spatula or fork, then cook for 1 more minute, or until crisp around the edges. Repeat with the remaining mixture.
Step 8: Serve Immediately
Cheesy kale nests are best hot, when the edges are crisp and the cheese is still melty. Sprinkle with a little flaky salt, lemon zest, or finely grated Parmesan before serving. Then stand back. People tend to approach these with “I’m just being polite” energy and leave with “Where is the second batch?” enthusiasm.
Oven Method for Cheesy Kale Nests
No air fryer? No crisis. Preheat the oven to 425°F and line a rimmed baking sheet with parchment paper. Scoop the kale mixture into 1-tablespoon mounds, leaving space between each one. Bake for 10 to 12 minutes, flip carefully, then bake for another 3 to 5 minutes until golden and set.
The oven version will be slightly less crisp than the air fryer version, but it is still delicious. For better browning, use the upper third of the oven and avoid crowding the pan. If your oven runs cool, add another minute or two. Kale nests are forgiving, but they do appreciate attention.
Best Tips for Crispy Cheesy Kale Nests
Dry the Kale Well
Water is the enemy of crispness. After washing kale, spin it in a salad spinner or pat it dry with a clean towel. If the leaves are wet, the nests will steam and soften.
Do Not Overcrowd the Basket
Air fryers need open space for hot air to circulate. If the nests touch, the sides will not brown properly. Cook in batches for the best texture. Yes, it takes a little longer. No, it is not optional if you want crispy edges.
Use Finely Shredded Cheese
Finely shredded Cheddar melts more evenly and binds the nests better than thick shreds. If possible, grate the cheese yourself. Pre-shredded cheese often contains anti-caking ingredients that can affect melting.
Let the Kale Cool Before Adding Eggs
If the wilted kale is too hot, it can start cooking the eggs before the nests are shaped. Let it cool until warm, not steaming. The eggs should bind the mixture, not become scrambled kale confetti.
Flip Gently
The nests are delicate during the first few minutes. Use a thin spatula or fork and turn them carefully. Once both sides are cooked, they firm up nicely.
Flavor Variations
Parmesan Garlic Kale Nests
Add 2 tablespoons finely grated Parmesan and an extra garlic clove. This version tastes like garlic bread took a yoga class and came back as a vegetable appetizer.
Spicy Cheddar Kale Nests
Add 1/4 teaspoon crushed red pepper flakes or a pinch of cayenne. Serve with ranch, chipotle mayo, or a cool Greek yogurt dip.
Lemon Herb Kale Nests
Add lemon zest, chopped parsley, and a little dill. This version is brighter and works beautifully with grilled fish, roasted chicken, or brunch eggs.
Italian-Style Kale Nests
Use mozzarella and Parmesan instead of Cheddar, then add Italian seasoning. Serve with warm marinara for dipping. It is basically a vegetable mozzarella stick with better manners.
Gluten-Free Cheesy Kale Nests
Replace the all-purpose flour with a gluten-free 1:1 flour blend or use an additional tablespoon of almond flour. Check that your baking powder is gluten-free if needed.
What To Serve With Cheesy Kale Nests
Cheesy kale nests are flexible. Serve them as an appetizer, side dish, snack, or brunch plate. They pair well with creamy, tangy, or spicy dips because the nests themselves are savory and cheesy.
- For dipping: Garlic aioli, ranch, spicy mayo, marinara, salsa, or Greek yogurt with lemon.
- For brunch: Serve with scrambled eggs, poached eggs, avocado toast, or smoked salmon.
- For dinner: Pair with roast chicken, turkey burgers, tomato soup, grilled shrimp, or a simple pasta.
- For parties: Arrange on a platter with toothpicks and two dipping sauces.
- For kids: Serve with ketchup or mild salsa. The cheese does excellent public relations for the kale.
How To Store and Reheat
Cheesy kale nests taste best right after cooking, but leftovers can still be excellent if stored properly. Let them cool completely, then place them in an airtight container lined with a paper towel. Refrigerate for up to 3 days.
To reheat, place them in the air fryer at 350°F for 2 to 3 minutes, or until warmed through and crisp again. You can also reheat them in a 375°F oven for 5 to 7 minutes. Avoid microwaving if you care about crisp edges. The microwave will warm them, but it will also make them soft, and these nests deserve better than a soggy retirement.
Common Mistakes To Avoid
Using Whole Kale Leaves
Large pieces do not bind well and can cook unevenly. Thin ribbons create the nest shape and help the mixture hold together.
Skipping the Wilting Step
Raw kale is too bulky. Wilting softens it, reduces volume, and makes it easier to combine with cheese and eggs.
Adding Too Much Flour
More flour may seem like a smart fix for a loose mixture, but too much can make the nests heavy. Add only a teaspoon at a time if needed.
Using Mild Cheese Only
Kale has personality. It needs a cheese with personality too. Extra-sharp Cheddar, Parmesan, Gruyere, or aged Gouda all work well.
Cooking Too Many at Once
If the air fryer basket is packed, the nests steam. Give them room and they will reward you with crisp edges.
Nutrition and Why Kale Nests Feel Like a Win
Kale is a leafy cruciferous vegetable related to cabbage, broccoli, collards, and Brussels sprouts. It brings fiber, color, and hearty texture to the plate. In this recipe, kale gets paired with protein-rich eggs, flavorful cheese, and almond flour, creating a snack that feels indulgent but still includes a generous amount of greens.
Of course, “healthy” does not have to mean joyless. These cheesy kale nests are proof that vegetables do not need to sit sadly beside dinner like an obligation. When cooked properly, seasoned well, and paired with cheese, kale becomes crisp, savory, and snackable. That is not a compromise. That is good cooking.
Best Cheesy Kale Nests Recipe
Recipe Summary
- Prep time: 25 minutes
- Cook time: 5 minutes per batch
- Total time: About 40 minutes
- Yield: About 24 nests
- Method: Air fryer
- Best served: Hot and crisp
Ingredients
- 8 ounces Tuscan kale, stems removed and leaves thinly sliced
- 1 teaspoon olive oil
- 1/2 teaspoon kosher salt, plus more to taste
- Freshly ground black pepper
- 2 large eggs
- 1 scallion, finely chopped
- 2 garlic cloves, grated
- 1/2 cup almond flour
- 1 1/2 tablespoons all-purpose flour
- 1/2 teaspoon baking powder
- 4 ounces extra-sharp white Cheddar, finely shredded
- Optional: lemon zest, smoked paprika, Parmesan, or red pepper flakes
Instructions
- Heat the air fryer to 400°F.
- Place kale in a large bowl. Add olive oil, salt, and pepper. Massage briefly until lightly coated.
- Transfer kale to the air fryer basket and cook for 1 minute, just until wilted. Return to the bowl and cool slightly.
- In a medium bowl, whisk eggs, scallion, and garlic.
- In a small bowl, whisk almond flour, all-purpose flour, and baking powder.
- Fold the egg mixture, flour mixture, and Cheddar into the kale until evenly combined.
- Line the air fryer basket with parchment, leaving space around the edges for airflow.
- Drop tablespoon-sized portions into the basket, spacing them about 1 inch apart.
- Air fry for 4 minutes, carefully flip, then cook 1 minute more until golden and crisp at the edges.
- Repeat with the remaining mixture. Serve immediately with your favorite dip.
Experience Notes: What Making Cheesy Kale Nests Teaches You
Making cheesy kale nests is one of those kitchen experiences that starts with mild skepticism and ends with you guarding the last three pieces like a dragon with a mortgage. At first, the bowl of sliced kale looks enormous. You may wonder if you accidentally bought enough greens to feed a small petting zoo. Then the kale wilts, shrinks, and suddenly the whole recipe makes sense. This is the first lesson: kale is dramatic before heat, but very cooperative after one minute in the air fryer.
The second lesson is that texture depends on small decisions. Dry kale matters. Thin slicing matters. Spacing the nests matters. These are not fussy chef rules designed to make dinner feel like homework. They are practical steps that separate crisp, golden bites from limp green pancakes. When the kale is too wet, the nests steam. When the basket is crowded, the edges stay soft. When the cheese is shredded finely, however, everything melts together beautifully and the nests hold their shape like they attended finishing school.
Another pleasant surprise is how versatile the flavor can be. The basic version with white Cheddar, garlic, and scallion tastes savory and familiar, almost like a cross between a fritter and a cheese crisp. Add lemon zest and the nests become brighter. Add smoked paprika and they lean snacky and bold. Add Parmesan and marinara and suddenly they are ready for an Italian appetizer spread. The recipe is structured enough to work, but flexible enough to let you play.
These nests are also a useful bridge recipe for people who claim they do not like kale. Often, kale rejection is not really about kale itself. It is about tough stems, under-seasoning, wet texture, or being served a mountain of raw leaves that require the jaw stamina of a golden retriever with a chew toy. Cheesy kale nests solve those problems. The kale is tender, the edges are crisp, the garlic is fragrant, and the cheese makes everything friendlier.
In real-life cooking, this recipe works especially well before dinner parties because the mixture can be prepared ahead and cooked close to serving time. You can slice and wilt the kale, mix the dry ingredients, shred the cheese, and keep everything ready in the refrigerator. When guests arrive, scoop and air fry. The smell of garlic and Cheddar will do more for your reputation than any scented candle ever could.
The only warning is that cheesy kale nests disappear quickly. If you are serving more than four people, consider doubling the recipe. If you are serving hungry people standing near the kitchen counter, triple it and hide a few for yourself. A cook deserves insurance.
Conclusion
The best cheesy kale nests recipe is simple, crisp, flavorful, and surprisingly fun. With Tuscan kale, sharp white Cheddar, eggs, garlic, scallion, almond flour, and a quick blast of air fryer heat, humble greens become a snack-worthy appetizer that works for parties, brunch, lunch boxes, and weeknight sides.
The secret is not complicated: slice the kale thinly, wilt it briefly, keep the mixture light, avoid overcrowding, and serve the nests hot. Do that, and you will get golden edges, cheesy centers, and a plate of vegetables that nobody has to be bribed to eat. Kale may still be kale, but in this recipe, it wears a crispy Cheddar jacket. That is a glow-up worth celebrating.