Audacity is the digital audio editor many people meet right after they realize their recording contains a fan, a fridge, a barking dog, three mouth clicks, and one mysterious hum that sounds like a tiny spaceship trying to land. The good news: Audacity gives you several free tools to remove unwanted audio, reduce background noise, silence awkward sections, trim dead space, clean up clicks, and even reduce vocals from a song when the recording allows it.
The important trick is knowing which kind of “remove audio” you actually need. Deleting a bad section is different from silencing it. Reducing background noise is different from removing a cough. Cutting vocals from music is different from cleaning a podcast voice. This guide walks through the most practical ways to remove audio in Audacity, using beginner-friendly steps, real editing examples, and a few “please do not destroy your waveform” warnings along the way.
What Can You Remove in Audacity?
Audacity can help remove or reduce several types of unwanted sound, including background hiss, fan noise, electrical hum, clicks, pops, long silences, awkward pauses, selected sections of audio, and some center-panned vocals. However, it is not magic in a hoodie. If a loud motorcycle passes directly over your sentence, Audacity may reduce the damage, but it probably cannot rebuild a clean voice from underneath the chaos.
For best results, identify the problem before choosing the tool. Use Delete or Cut when you want a section gone. Use Silence Audio when you want the timing to remain unchanged. Use Noise Reduction for steady background sounds like hiss or fan noise. Use Noise Gate for quiet room noise between words. Use Click Removal or Repair for small clicks and pops. Use Vocal Reduction and Isolation only when the vocal is mixed in a way Audacity can target.
Before You Start: Make a Safety Copy
Before editing, duplicate your file or save a new Audacity project. Audio cleanup often requires trial and error, and nothing ruins a creative afternoon faster than realizing you permanently processed your only copy until it sounds like it was recorded inside a soup can.
Recommended setup
Open Audacity, import your audio file, and immediately save the project with a clear name such as interview-cleanup-version-1. Then listen once from start to finish and note the biggest problems. Do not start throwing effects at the track randomly. That is how good audio becomes “crispy,” and not in a charming potato-chip way.
How to Remove a Section of Audio in Audacity
If your goal is to remove a cough, long pause, false start, chair squeak, or accidental “wait, is this recording?” moment, the simplest option is to select and delete the unwanted section.
Steps to delete unwanted audio
- Open your audio in Audacity.
- Choose the Selection Tool.
- Click and drag over the section you want to remove.
- Press Delete or Backspace.
- Play the edit point and make sure the transition sounds natural.
This method shortens the track because the selected audio disappears and the remaining audio moves together. That is useful for tightening podcasts, voiceovers, narration, online lessons, and interviews. If the edit sounds abrupt, zoom in and adjust the cut slightly. You can also add a tiny fade-out before the cut and fade-in after it to smooth the transition.
How to Silence Audio Without Changing Timing
Sometimes you do not want to shorten the track. For example, you may be editing audio that must stay synced with video, slides, music, or another speaker. In that case, use Silence Audio instead of Delete.
Steps to silence a selected area
- Select the noisy or unwanted section.
- Go to Generate or use the appropriate Audacity silence command available in your version.
- Choose Silence Audio or press the shortcut if configured.
- Play the surrounding area to confirm the timing still works.
Silencing keeps the same duration but replaces the selected sound with silence. This is helpful for removing a cough during a presentation recording, muting background chatter during a pause, or cleaning a video voiceover without knocking the whole timeline out of sync.
How to Remove Background Noise in Audacity
The most popular Audacity cleanup tool is Noise Reduction. It works best on steady background noise such as fan hum, air conditioner noise, tape hiss, computer whine, or a low buzz. It works by learning a short sample of the unwanted noise and then reducing similar noise across the selected audio.
Step 1: Find a noise-only sample
Look for a few seconds where nobody is speaking and only the background noise is present. This is often at the beginning or end of a recording. If you are planning future recordings, intentionally capture five seconds of room tone before speaking. Your future editing self will send you a thank-you basket.
Step 2: Get the noise profile
- Select the noise-only area.
- Go to Effect > Noise Removal and Repair > Noise Reduction.
- Click Get Noise Profile.
Step 3: Apply noise reduction
- Select the full section you want to clean, or press Ctrl + A on Windows or Command + A on Mac to select all.
- Open Noise Reduction again.
- Adjust the settings carefully.
- Use Preview before applying.
- Click OK when the result sounds natural.
A good starting point is moderate noise reduction rather than extreme processing. Heavy settings can create watery, robotic artifacts, especially on spoken voice. If your voice begins to sound like it is broadcasting from a submarine, undo the effect and try lighter settings. Two gentle passes are often better than one aggressive pass.
Best Audacity Noise Reduction Settings for Voice
There is no single perfect setting because every room, microphone, and recording level is different. Still, for podcasts, tutorials, interviews, and voiceovers, start conservatively. Try a noise reduction amount around 6 to 12 dB, moderate sensitivity, and a small amount of frequency smoothing. Preview the result while wearing headphones.
The goal is not to create absolute silence. The goal is to make the voice easier to hear without making it sound processed. A little natural room tone is often better than a lifeless digital vacuum. Silence that feels too perfect can be oddly distracting, like a hotel hallway at 3 a.m.
How to Remove Hum in Audacity
Electrical hum often appears as a steady low-frequency tone, commonly related to power systems, bad cables, grounding issues, or nearby electronics. Noise Reduction can help, but a Notch Filter may work better if the hum sits at a specific frequency.
Steps to reduce hum
- Select the affected audio.
- Go to Effect > EQ and Filters > Notch Filter.
- Try targeting 60 Hz in the United States or 50 Hz in many other regions.
- Preview the result.
- Apply only enough filtering to reduce the hum without thinning the voice.
If the hum remains, it may have harmonic frequencies above the main tone. In that case, you may need additional gentle filtering. Be careful: removing too much low end can make a warm voice sound thin and papery.
How to Use Noise Gate in Audacity
A noise gate reduces sound below a chosen volume threshold. In plain English, it can lower room noise between words while allowing louder speech to pass through. This is useful when the background noise is most noticeable during pauses.
When noise gate works well
Use Noise Gate for quiet room tone, low-level microphone hiss, or background sound that becomes obvious only when nobody is speaking. It is less useful when noise overlaps with the voice. If the fan is loud under every word, Noise Reduction or better recording conditions may be more effective.
Basic noise gate workflow
- Select the audio you want to process.
- Open Effect > Noise Removal and Repair > Noise Gate.
- Set the threshold so the gate catches quiet background noise but does not chop off soft words.
- Preview carefully.
- Apply the effect once the pauses sound cleaner but still natural.
If the gate is too strong, it can cut off breaths, sentence endings, or quiet consonants. The result feels jumpy and unnatural. Think of Noise Gate as a polite bouncer, not a medieval drawbridge.
How to Remove Clicks and Pops
Clicks and pops are common in vinyl transfers, mouth noises, microphone bumps, and digital glitches. Audacity includes tools such as Click Removal, Repair, and spectral editing options for specific problems.
Use Click Removal for repeated clicks
- Select the area with clicks.
- Go to Effect > Noise Removal and Repair > Click Removal.
- Start with the default settings.
- Preview the result.
- Apply the effect if the clicks are reduced without damaging the main audio.
Use Repair for tiny individual problems
For a single small click, zoom in until you can see the waveform clearly. Select a tiny area around the click and use the Repair effect. This works best on very short defects. If you select too much audio, the repair may not work well.
How to Remove Silence and Dead Space
Long gaps can make a recording feel slow, especially in podcasts, lectures, and voiceovers. You can manually delete pauses, but Audacity also offers Truncate Silence, which automatically shortens quiet sections based on a threshold.
Manual method
Select the silent section and press Delete. This gives you full control and is best when timing, emotion, or conversation rhythm matters. For interviews, manual editing usually sounds more human because not every pause is bad. Some pauses are dramatic. Some are thoughtful. Some are just your guest trying to remember the name of that one actor from that one movie.
Automatic method
- Select the audio.
- Open Effect > Special > Truncate Silence or the relevant Truncate Silence location in your version.
- Set the silence threshold and minimum duration.
- Preview if available.
- Apply the effect and listen for unnatural pacing.
Truncate Silence can save time, but do not overdo it. Removing every breath and pause can make speech sound rushed and oddly stressful. A clean edit should feel polished, not like the narrator drank three espressos and challenged the script to a footrace.
How to Remove Vocals from a Song in Audacity
Audacity can sometimes reduce or isolate vocals, especially when vocals are centered in a stereo mix and instruments are spread left and right. The classic method uses phase cancellation, while newer workflows may involve separation plugins on supported systems. Results vary widely depending on how the song was mixed.
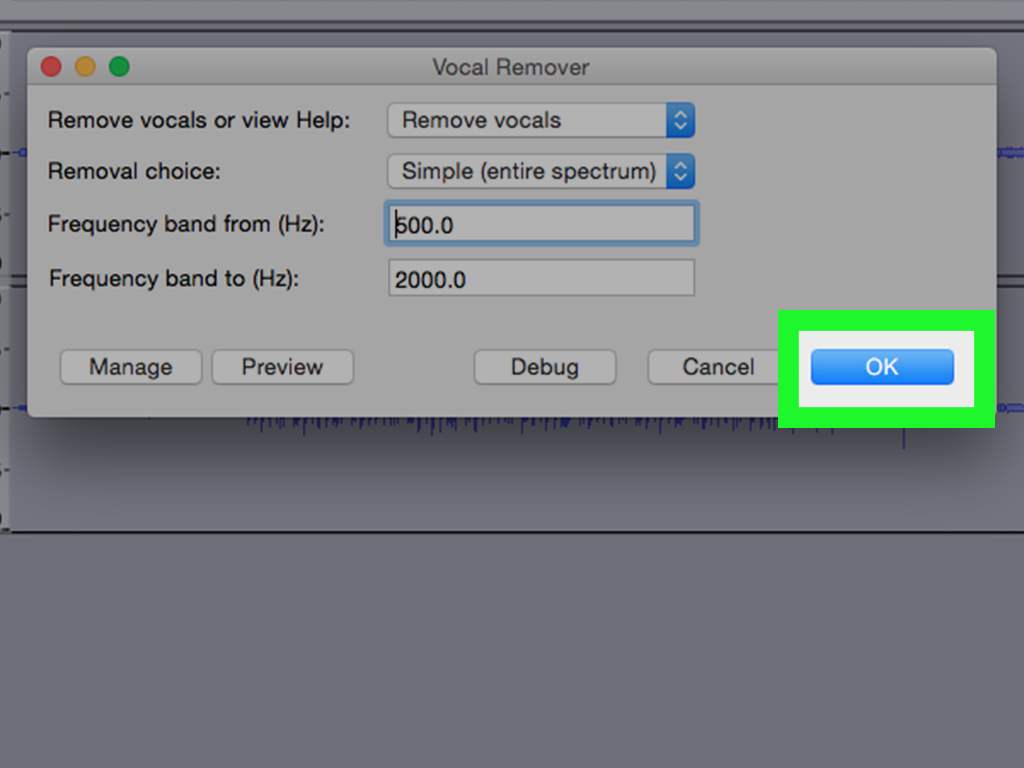
Steps using Vocal Reduction and Isolation
- Import the song into Audacity.
- Select the track.
- Go to Effect > Vocal Reduction and Isolation.
- Choose a remove-vocals option.
- Preview the output.
- Adjust frequency range settings if the bass or instruments disappear too much.
This method may leave ghostly vocal leftovers, reduce drums, weaken bass, or create phasey artifacts. That does not mean you did anything wrong. It means the original mix was not built like a neat layer cake. Most commercial songs are more like musical lasagna.
How to Remove Audio from One Track While Keeping Others
If your Audacity project has multiple tracks, you can mute, solo, delete, or split tracks without affecting the entire project. This is useful for podcasts with separate speaker tracks, music beds, sound effects, or layered narration.
Useful track controls
- Mute: Temporarily disables a track during playback and export.
- Solo: Plays only the selected track or tracks.
- Delete track: Removes the whole track from the project.
- Split clips: Divides audio into movable sections without deleting the original sound immediately.
Before exporting, make sure the correct tracks are muted or unmuted. Many “my export is missing audio” problems happen because a track was accidentally muted. The mute button is tiny, but it has the power of a dramatic plot twist.
How to Export Clean Audio After Editing
After removing unwanted audio, export a new file rather than overwriting your original. For podcasts and voiceovers, WAV is excellent for high-quality masters, while MP3 is convenient for web publishing. If you are editing audio for video, confirm the sample rate and format required by your video editor.
Export checklist
- Listen to the beginning, middle, and end before exporting.
- Check that no track is accidentally muted.
- Use headphones to catch clicks and rough edits.
- Leave enough natural breath and room tone for comfort.
- Export a clean master file and keep your Audacity project for future changes.
Common Mistakes to Avoid
Using too much noise reduction
Heavy noise reduction is the most common beginner mistake. It can make voices sound metallic, hollow, or underwater. Reduce noise only as much as needed for clarity.
Deleting instead of silencing
If your audio must stay synced with video, deleting a section can throw everything off. Use Silence Audio when timing matters.
Processing the entire track without testing
Always preview effects on a small section first. A setting that helps one part may damage another part.
Expecting perfect vocal removal
Vocal removal depends on the mix. Sometimes Audacity works surprisingly well; sometimes the remaining track sounds like karaoke night in a haunted aquarium.
Practical Example: Cleaning a Podcast Voice Track
Imagine you recorded a 30-minute podcast episode at home. The voice is clear, but there is a soft fan noise, a few mouth clicks, and some long pauses. A smart Audacity workflow would look like this: first, duplicate the project. Next, select a few seconds of room tone and use Noise Reduction gently. Then use Click Removal only on the sections with noticeable clicks. After that, manually delete long pauses that slow the conversation. Finally, listen through headphones and export a WAV master plus an MP3 publishing copy.
This approach works because it solves each problem with the right tool. It does not attack the whole file with one giant effect and hope for the best. Audio editing is a little like cleaning a kitchen: use a sponge for the counter, a broom for the floor, and absolutely do not use a pressure washer on the toaster.
Experience Notes: What Actually Works When Removing Audio in Audacity
In real editing work, the best results usually come from patience rather than dramatic settings. The first lesson is that cleaner recording beats heroic cleanup. If you record near a humming air conditioner, a loud laptop fan, or a reflective empty room, Audacity can help, but it will not turn a bad recording into a studio masterpiece with one click. The smartest “noise removal” often happens before pressing Record: move closer to the microphone, turn off fans, close windows, place soft materials in the room, and record a few seconds of room tone.
Another practical lesson is that silence is not always your friend. Beginners often try to remove every breath, pause, and tiny background sound. The result can feel unnatural, especially in voice recordings. Human speech has rhythm. A short breath before an important sentence may make the delivery feel more real. A tiny pause can help listeners understand the point. When editing a podcast or narration, remove distractions, not humanity.
Noise Reduction works best when used gently. A common workflow is to apply a light pass, listen, and then decide whether a second pass is necessary. If you push the effect too hard, the background noise may disappear, but the voice can lose warmth and detail. This tradeoff matters. Most listeners will forgive a little room tone if the voice sounds natural. They are less forgiving when the speaker sounds like a robot trapped in a rain barrel.
For interviews, manual editing often beats automatic cleanup. Truncate Silence can be helpful for solo narration, but conversations need breathing room. If you shorten every gap equally, the interview may feel rushed or emotionally flat. A better approach is to remove obvious dead air, false starts, and interruptions while keeping pauses that support meaning. Editing should guide the listener, not erase the personality of the conversation.
For music, expectations should stay realistic. Vocal removal can be fun and useful for practice tracks, karaoke demos, remixes, or quick experiments, but it is rarely perfect. If the vocal, snare, bass, and other instruments share the same center space, removing one can affect the others. Sometimes the best result is not a clean instrumental but a usable backing track with reduced vocals. That is still valuable, as long as you know what the tool is actually doing.
The final experience-based tip is to listen on more than one device. Headphones reveal clicks and tiny artifacts. Laptop speakers reveal whether speech is clear. Car speakers or phone speakers can expose harshness, low volume, or muddy sound. A track that sounds perfect on one device may surprise you elsewhere. Before publishing, export a test file and listen like a normal audience member, not like an editor staring intensely at waveforms as if they owe you money.
Conclusion
Removing audio in Audacity is less about one magic button and more about choosing the correct tool for the problem. Delete unwanted sections when timing does not matter. Silence sections when sync must stay intact. Use Noise Reduction for steady background noise, Noise Gate for quiet pauses, Notch Filter for hum, Click Removal for pops, and Vocal Reduction for certain music mixes. Work on a copy, preview before applying effects, and keep the voice or music sounding natural.
Audacity is powerful because it gives you control. Used carefully, it can turn a messy recording into clean, publishable audio. Used wildly, it can turn a normal voice into a haunted toaster. Choose the first path. Your listeners, your headphones, and your future self will appreciate it.
Note: Menu names may vary slightly depending on your Audacity version and operating system. Always test effects on a copy of your project before exporting the final file.